2XL-AA20023TS-en-US Rev A · 2019-04-04 · Amendments and Errors Reserved · © SAF-HOLLAND, Inc., SAF-HOLLAND, HOLLAND, SAF,
and logos are trademarks of SAF-HOLLAND S.A., SAF-HOLLAND GmbH, and SAF-HOLLAND, Inc.
Troubleshooting Guide
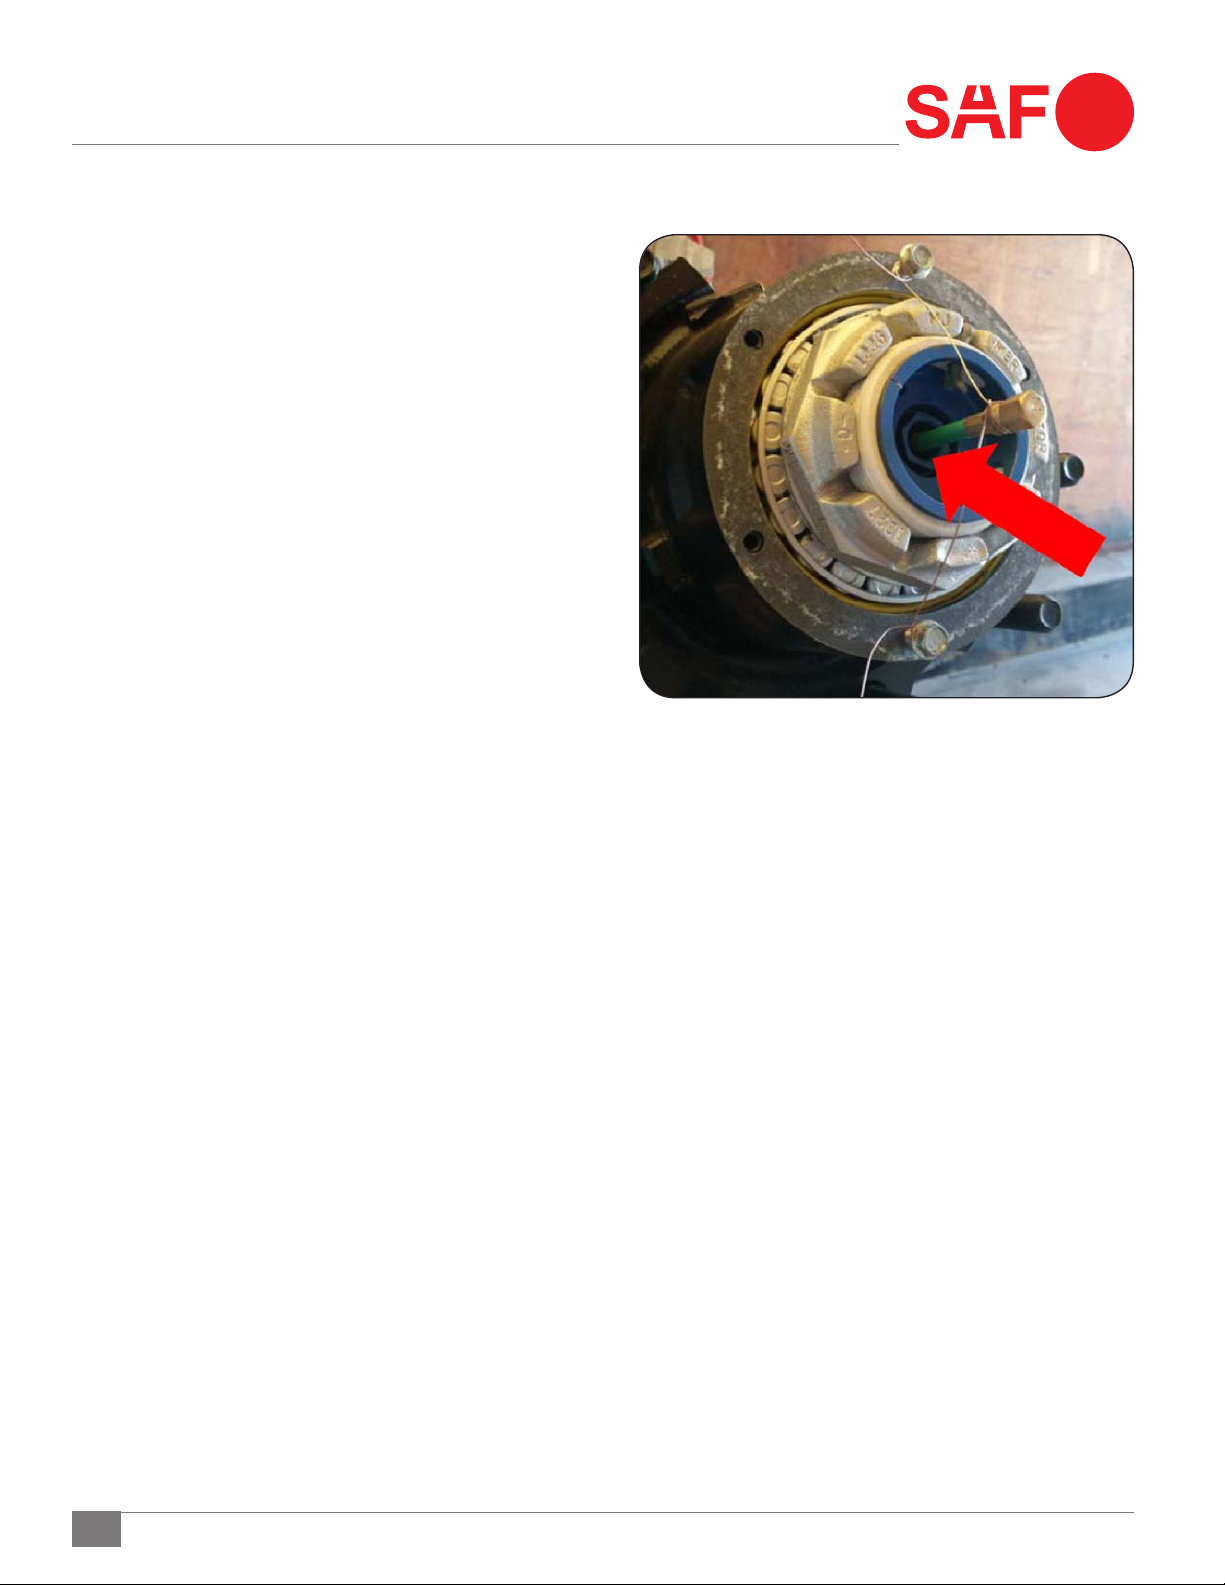
Figure 3
Symptom:
Air leaking from axle vent
Problem:
Air leak inside the axle or air leak inside the hubcap.
Solution:
Try to listen for the air leak on each side of the axle, and start
with the side that is the loudest. Relieve system pressure by
shutting off the air system valve. Relieve the system pressure at
the tire hose or hubcap. Remove the hubcap and the rotating
shaft from the hub cap and wire it to the hub using two hubcap
bolts as illustrated in Figure 3. Cap the rotating shaft end with
a 1/8" NPT cap as illustrated in Figure 3. Turn air system valve
on and allow pressure to build. Spray soapy water on the spindle
plug to rotating shaft seal. Replace spindle plug and rotating
shaft if leak is present around seal. If bubbles are present around
the two holes in the spindle plug for the vent, then the leak is
internal to the axle. Proceed with removing the spindle plug. The
spindle plug can be removed by using an appropriate size pipe
inside the hex of the spindle plug and applying force up and
down until free. Check connections and check airline. Repair or
replace as per procedures below.
Symptom:
Air leaks at spindle plug fittings.
Problem:
Fitting nut not tight, tubing cut by the fitting nut, or tubing
not pushed into the fitting far enough.
Solution:
If compression type fitting, tighten nut to 6-10 in-lbs or hand
tight plus two wrench flats if loose. For damaged tubing,
remove tubing from fitting and cut off just above leaking cut.
If damage is not present, re-insert tubing into fitting. For a
loose connection, loosen fitting nut and push tubing further
into fitting then retighten nut to 6-10 in-lbs or two wrench
flats. If push-to-connect type fitting, remove by pushing
outer ring toward fitting and pull air line free. Inspect air line
end. Recut square and push firmly into fitting until air line
bottoms out.
Symptom:
Brake air tank de-pressurized or low pressure.
Problem:
No pressure protection valve installed, defective pressure
protection valve, or leaking connection between air tank and
pressure protection valve.
Solution:
Replace pressure protection valve or dis-assemble connection,
apply pipe sealant and re-assemble with the direction of flow
arrow in the correct orientation.
Symptom:
Tire/System Pressure reading low/high
Problem:
The regulator setting could be set low or high. The system could
have an air leak. Another potential problem is insufficient air
tank pressure.
Solution:
Check the regulator setting by using a good quality digital
tire gauge to check the pressure at the valve located at the
regulator as illustrated in Figure 1. Reset regulator setting
to required pressure. Using a good quality digital tire gauge
check pressure at tank valve located adjacent to the regulator.
Pull up on the regulator knob and turn counter-clockwise until
system pressure is at least 20 psi less than desired system
pressure. While pulling up on regulator knob, slowly turn
knob clockwise until desired system pressure is achieved.
If pressure reading is greater than desired system pressure
repeat adjustment procedure above.
If the regulator setting is at the desired tire pressure, proceed
to check the system for leaks per the procedure for the
warning light on.
Verify the trailer system air tank pressure is higher than
the regulator setting. Follow procedure for Brake air tank
de-pressurized or low pressure above.
If no system leaks are found and regulator cannot be reset.
Replace regulator assembly.