manuals.online logo
Brands
  1. Home
  2. •
  3. Brands
  4. •
  5. Safety Track
  6. •
  7. Dashcam
  8. •
  9. Safety Track UCIT LIVE 4 Camera DVR User manual

Safety Track UCIT LIVE 4 Camera DVR User manual

UCIT LIVE 4 Camera DVR
Vehicle Video Recorder
Live View Player User Guide
2015 SEP V 1.1
1
Introduction
This user guide will walk you through how to use and operate the Live View
Player Software for your UCIT Camera System
Note: This is a Windows Application.
Table of Contents
A. Launching the Live View Player…………………………………………3
B. Live View Interface Layout………………………………………………4
C. Device List………………………………………………………………..5
D. Figure 1 & 2 on Interface Layout…………………………………………6
E. Figure 3 on Interface Layout……………………………………………..7
F. Figure 4 on Interface Layout……………………………………………..8-16
!

2
A. Launching the Live View Player
After opening the application, you will be confronted with the 3G Platform Client
Login. Shown Here:
Here you will want to input your chosen username and password. The Network Configuration
should already be pre-filled to access your data being run through our server. DO NOT change
these settings as you will not be able to login if you do. If you delete them by accident close the
login window and open the application again.
You will notice below where you have entered your user name and password there are options to
“Remember password” and “Auto Login”. By checking the box by remember password this will
of course remember your password for you every time you double click and open the application
to this screen. If you check both “Remember Password” and “Auto Login” when you double
click the application to open it you will bypass this login screen and go straight to your Live
View Interface.
Otherwise after you type in your username and password click Login and you will see your Live
View Interface if your Username and Password were entered correctly.
3
B. Live View Interface Layout
4
Number of Online Devices
Live View Channels
1
3
4
2
Time and Date
Fig. 4
Software/Window Options
Fig. 3
Fig. 2
Fig. 1
Device List
The above Live View Interface Layout will be explained in detail in the following pages.
Certain Features of this software may not be applicable to you if you have the UCIT 2 Camera
(Dash Cam) System.
For Example: Video Playback or “Remote Playback” is not available for the UCIT 2 Camera.
These Features may become available at a later time for your system but your sales rep should
have made this clear that this particular feature is not available for the UCIT 2 Camera System.
Device List:
5
Device List
Indicates Device Offline
Indicates Device is Online with No GPS Position
Indicates Device is Online with GPS Lock
To the left shows a fully functioning device that
all available channels/cameras are selected and
streaming live.
Purple = Alarm Trigger
Yellow = Idle Trigger
Red = Over-speed Trigger
Any of the changes in device behavior will be
recorded. Whether it be going online, offline or
triggering an event, they will be listed in the event
tab (Figure 3)
To the left demonstrates when you right click a
vehicle you will see additional options.
Play- Play all available channels
Audio- Play audio (Must be viewing live to
activate)
(Single Broadcast, talk and broadcast aren’t used.
Record and Snapshot are done using buttons
below the live view windows.)
Stop All Play- Stop play on all channels
Config- Used to change the vehicle name
Reboot- Reboot the device if needed
FullScreen- Full screen the live view windows
Figure 1: Split Screen Display Functions
Single Display
Quad Display
9 Division Display
Figure 2: Live View Functions
6
16 Division Display
Multi-Division Display
(25/36/49/64)
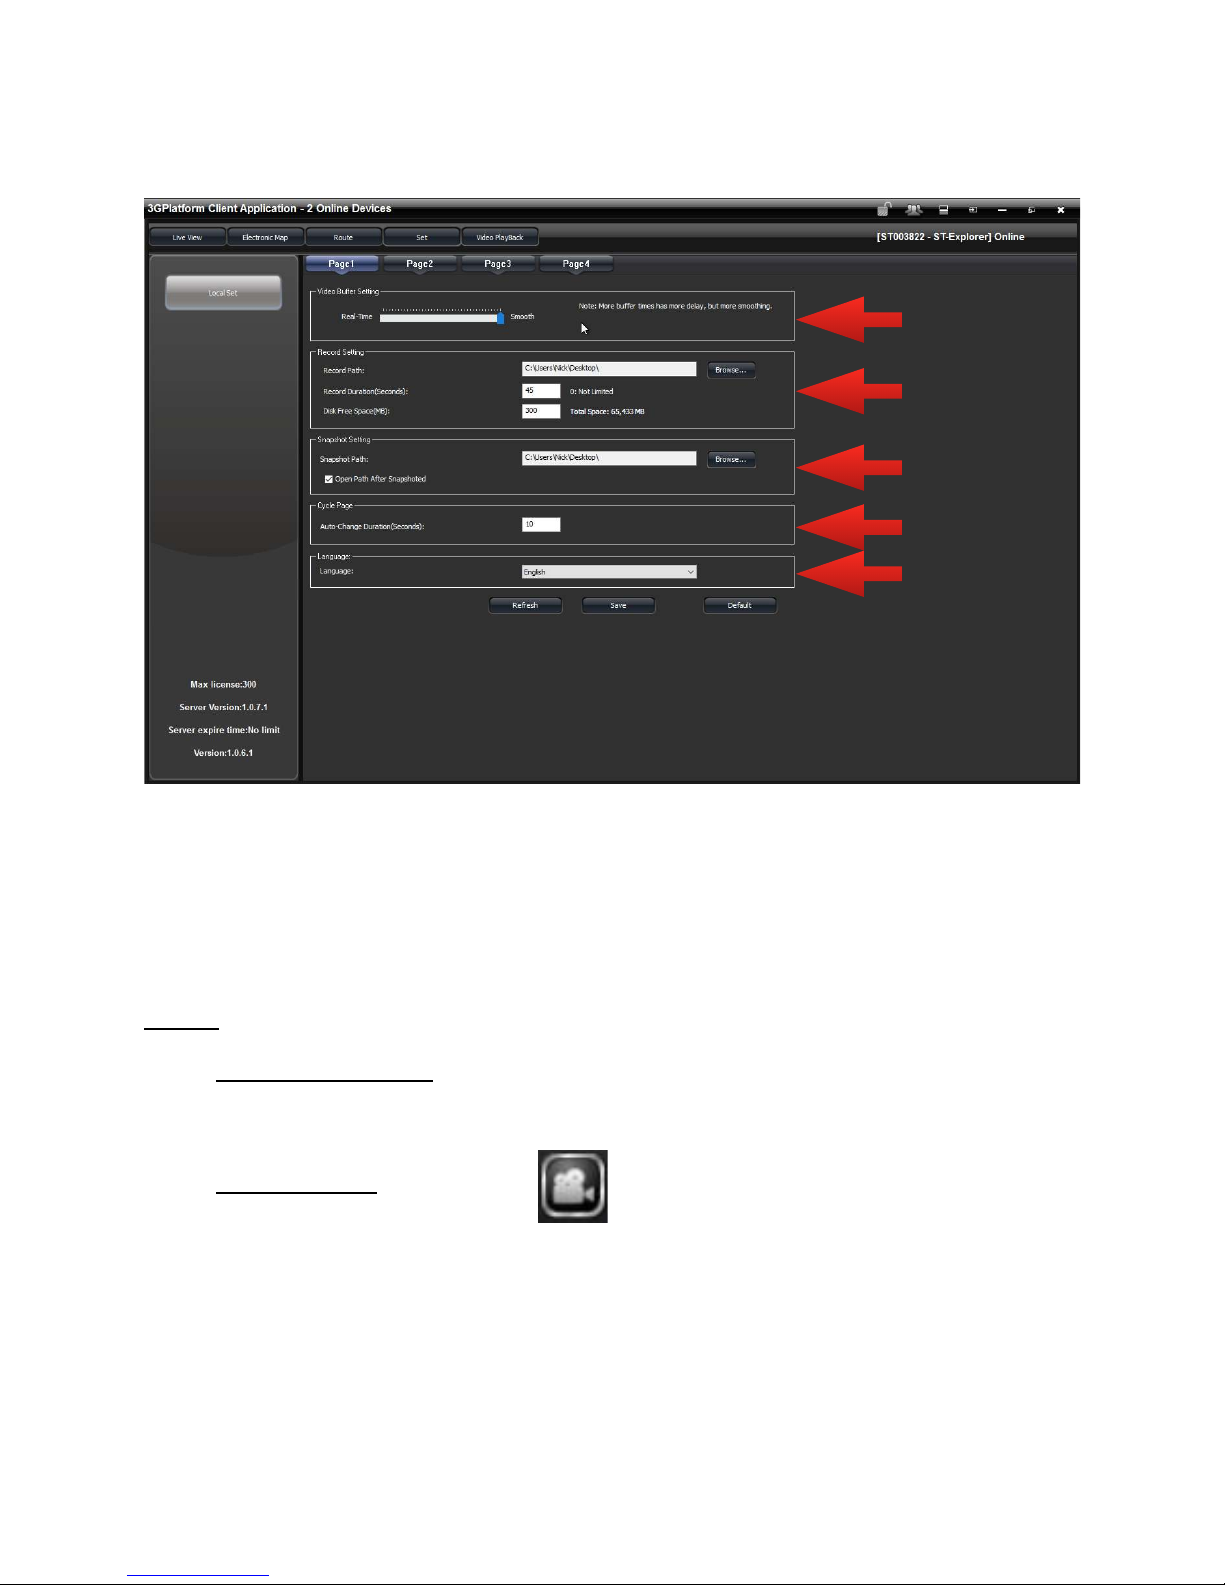
Record Single snapshot as AVI file.
-During Playback select a channel you want to record. Once the Record icon is pressed
you will notice a red recording signal at the bottom of the screen.
Snapshot
-This will take a snapshot of the selected channel during playback. It will save to the
path you have chosen in settings.
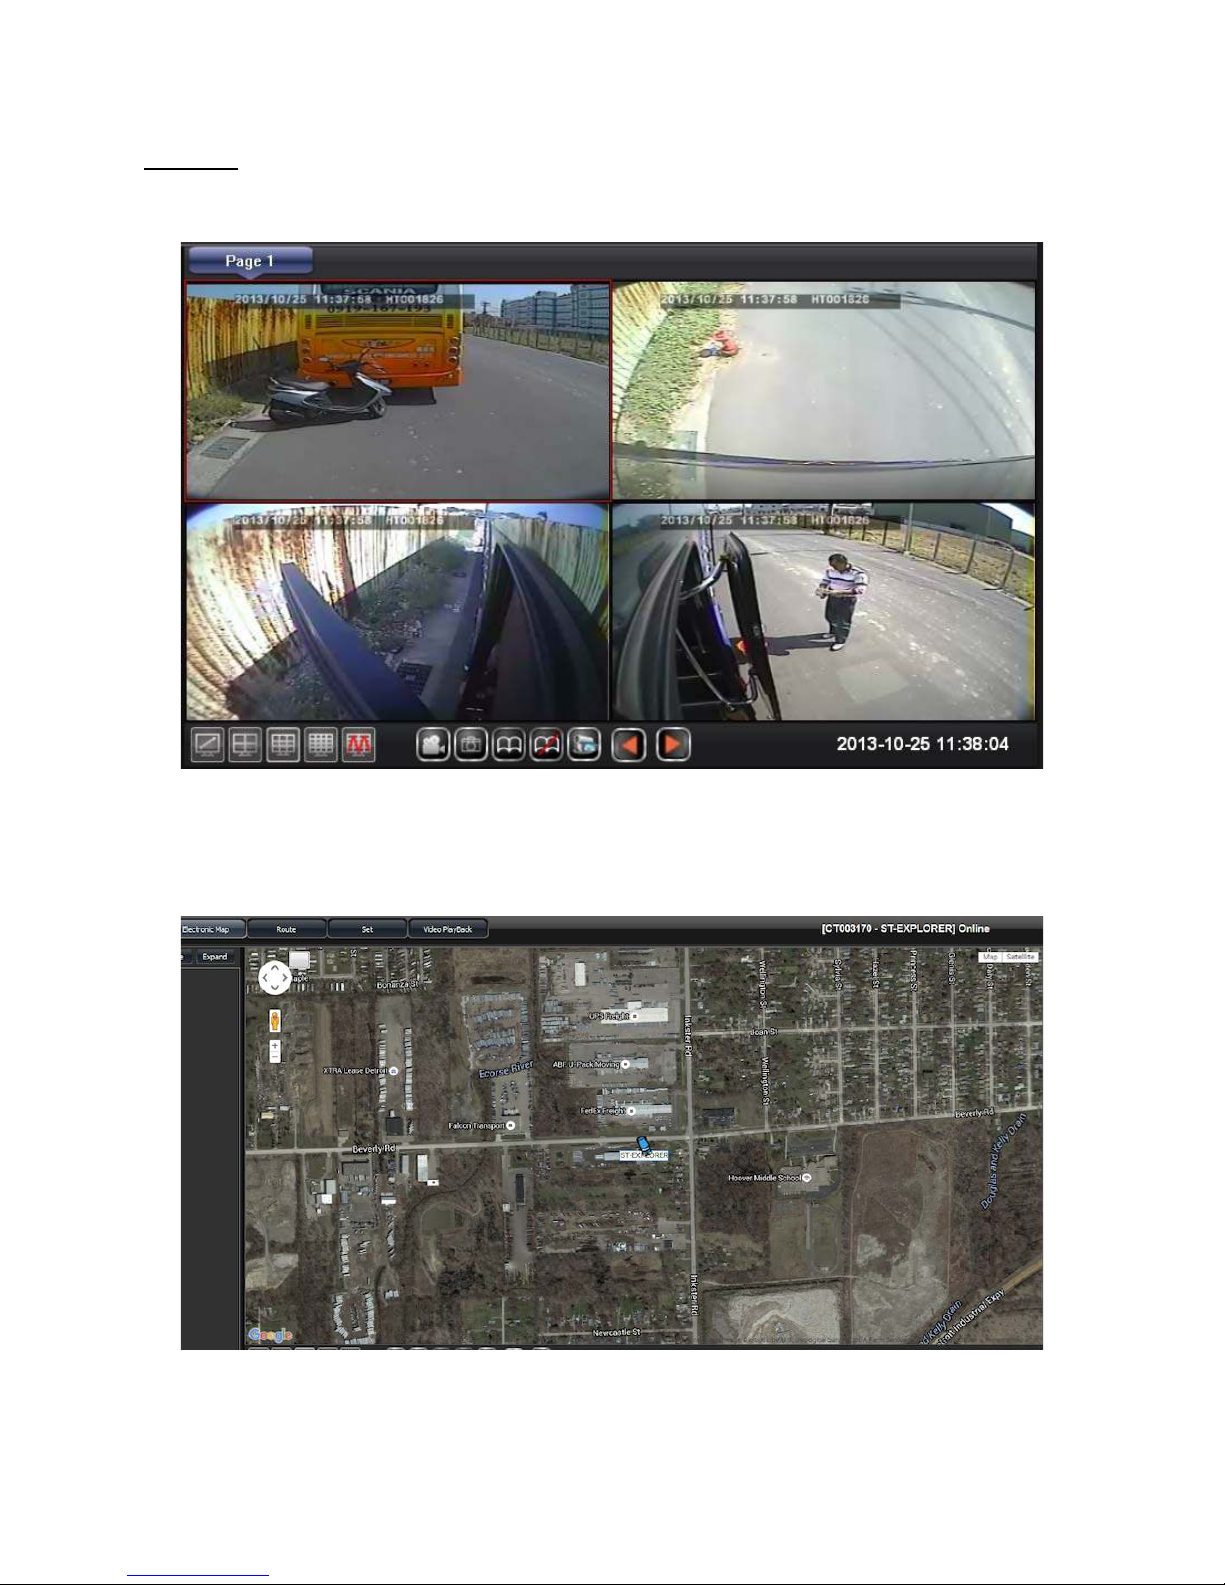
Auto flip to next page
-When playing back multiple devices at once, this will automatically flip pages from
one to the next for you. The period of time between each flip can be changed in settings.
Stop auto-flip to next page
-Stop the auto flip feature if enabled.
Save the current live viewing channels to be able to retrieve it next time
-This feature allows you to save the current live channels that are playing back. It will
be saved in a list so that you can access it more quickly than searching in the device list.
Manually go to the next or previous page
-Select to toggle between pages.
Figure 3: Interface Info
1. Event: This tab will show any event that occurs in your fleet. Events are time and date
stamped and a description is to the right. The description shows which vehicle, and what
event type. Event types could be online, offline, Overspeed, Idle, Disk Error, Alarms etc.
2. Dev List: This tab will show a list of your devices along with other relevant information.
3. Map: This tab will show you a google maps integrated map view of the GPS location of your
vehicles. This will update location every 5 seconds as long as the device is online with a GPS
lock.
7
Figure 4:
Live View:
Above shows a live play back through 4 available channels.
Electronic Map:
The large size map view is similar to the mini map view below in the interface info tabs. It is just
on a larger scale so that you can see your entire fleet’s location easier.
8
Route:
The Route feature Allows you to draw GPS route history of a vehicle on a day as far back as 15
Days. It just gives you the overall route for that day. It doesn’t display specific information such
as stops or idle times just the route at a glance.
9
After Selecting “Route” at the top (Fig.4) you will be presented
with a larger scale map. At the bottom left corner you will see a
window like the one to the left. Here is where you choose the
particular day (as far back as 15 days) and the vehicle you want to
draw a route for. The device can either be online or offline. Select
Search to start the search for all routes for that day.
The window to the left is what you will see in the bottom left
corner of your map after clicking search. This will display all
available routes for that day. Time and date stamped with Start and
End of the route.
End of Route
Map Points
Start of Route Example
Set:
This is the settings tab, here you can manipulate your viewer settings. This tab consists of 4
pages.
!WARNING! There are settings that you will want to be mindful if changed, that will cause
Data Overages that you will be responsible for. You will be notified of what these settings are
below so you are aware.
Page 1:
1. Video Buffer Setting: This slider bar determines the buffer time. It is set to a
Standard of Smooth. This way you get smooth reliable video. The more time the video
has to buffer, the more smooth it is. (delay or buffer time is usually a few seconds if that).
2. Record Setting: When you click the button on the main screen while playing
back live video, this determines the path (Location of recorded video) and duration.
!Warning! Disk Free Space(MB) is Not Applicable. Do not change this setting. It is set
to a standard.
10
1
2
3
4
5
3. Snapshot Setting: When you click the button on the main screen while playing
back live video, a snapshot (Still image) will be taken. This determines the path (Location
of image).
4. Cycle Page: This is where you can change the Auto-Change Duration of the flip when
using the auto-flip feature.
5. Language: Here the language can be adjusted. It is set to a standard of English.
Page 2:
11
1
2
1. Event Record Setting:!Warning! Data Overages can apply if not used correctly.
Here you have the option to automatically record events as they occur. The recording
starts the second the chosen channel for the particular event occurs.
The player automatically records what ever is being streamed back on the player. You
must be streaming the vehicle you want video recorded events on. You are in control of
the duration of that recorded event.
!Warning! The above record duration time DIRECTLY correlates to the “AUTO
DISCONNECT TIME” on the page 3 tab in settings.
Example: Lets say I want to record video of any Braking event that may occur, on a
particular vehicle for training purposes, on the driver’s shift. On page 2, I have
Brake selected under CH.1 and CH.2 which I know is the forward facing
camera and driver facing camera. This way I can tell if the driver was texting,
which could have been the cause of the hard brake. Next I have the record
duration set to 15 seconds. Which should be more than enough time to see
what I need. Next I want to make sure, on page 3, that my auto disconnect time
is also 15 seconds.
2. Email/Setting: You have the option to receive emails notifying you when the camera
system detects an event. If you have your events setup to be recorded they you even have
the option to automatically attach that video file in the email notification.
If you want to receive email notifications check the email notify box.
SMTP Server, SMTP Port, Email Account and Email Password are left alone. They next
think you will want to do is input emails of those you want to receive these notifications.
!Warning! If the SMTP Server, SMTP Port, Email Account and Email Password are
N/A if manipulated then this feature will not work for you. You are only concerned with
“Email Address” and the check box options.
Email Options:
Door: N/A
Left = Hard Left Turn
Right = Hard Right Turn
Brake = Hard Brake
G-Sensor = Accident
Over Speed = Exceeded Speeding Perimeters
Idle = Exceeded Idling Perimeters
Disk Error = SD Card Has Been Removed or Damaged
Video Loss = Loss Of Video from Loss of Coverage or Power Disconnect
Offline = Vehicle is Offline.
*Note: You must keep the software up and running to receive these emails.
12
Page 3:
1. 3G Settings: Here you can manipulate settings to adjust how your viewer operates.
-Unit of Speed: Choose your desired unit of speed (Km/h, Mile/h or Knot)
-Auto Disconnect Time: !Warning! Data Overages can apply if not used correctly.
This feature works as a fail safe, turning the auto disconnect time on will give you a time
limit as to how long you can live stream a device for. Notice the field for inputing a time
is in SECONDS. Example: Putting 600 in the field is 600 Seconds = 10 Minutes.
-Read Device: Here you have an option of “Only Read Online Device” or “Read All
Device”. This has to do with the your device list or vehicle list. If you choose “Only
Read Online Device” you will of course see devices/vehicles that are online, but when
those devices go offline they will disappear from the device/vehicle list. If “Read All
Device” is chosen then when a device goes offline it will still be present on the device
list it will just be grey in color. (Refer to Device list on Page 2 of this guide for
difference between online and offline devices).
-Grouping of Device: Grouping your devices will put them all into subcategory with your
company name instead of listing all devices individually.
2. Other Settings: Other viewer settings that may or may not be applicable to you.
13
1
2
-Auto Stop/Talk broadcast duration: Not Applicable at this time.
-Over Speed Value: Here is where you set the parameter of your desired speeding
threshold. If you input 80 into the field, when that vehicle hits or exceeds 80mph (if your
unit of speed is MPH) you will be notified if you have any alerts setup as this is an
Event. Otherwise you will see a Red light appear on that particular unit. (Indicated in
Device list on page 2).
-Show Route of All Day: Not Applicable at this time
-Web Port: Not Applicable
-Idle Duration: Here is where you set the parameter of your desired Idling threshold. You
will notice that the duration is in seconds. If you input 600 then you will either receive a
notification if setup or be indicated from your device list that a vehicle has been sitting
idle for more than 10 minutes.
-Display in Proportion: When live streaming a camera the view will be in proportion to
the camera, not fit the live view window. (The window will be shrunk down to fit the
center of the live view window).
-Full Screen Type: When you select select full screen or max window from the software/
window options (Refer to Section B on page 4.) you will have a choice of full screen.
Full screen from main window, the computer you are using or a second monitor if you
have one installed.
-Min percent of data need downloaded when playback: This directly relates to the remote
playback/video playback feature. This is not applicable to you if you have the UCIT 2
Camera System. At a standard this is set to 80 and this works best. Basically what this
means is that when you start the download on a snip of video from a vehicle in Video
playback, it will have to be 80 percent downloaded before you will see video. By setting
this to 80% we are allowing the video to get the majority of the way downloaded so we
can view without any “buffering” interruption.
Page 4: NOT APPLICABLE
-This page shows the Storage Server Settings. There is no need to manipulate these
settings as it could cause your software to not work properly.
14
Video Playback:
The Video Playback feature allows you to remotely access a device/vehicle only when a vehicle
is online and has a good cellular connection. When you want to remotely access a device for
playback just check to see if the vehicle is available for stream in the “Live View” tab.
NOTE: This feature is only available on the UCIT 4 Channel DVR System and the UCIT PRO
Series.
When accessing the DVR remotely, you will see the video data exactly as you would see it if you
were to pull the memory card from the DVR and play back from the Desktop Player. Minus the
playback tools and ability to export data. However you do have the ability to record what you are
playing back remotely, which will be saved to your computer as an .AVI. You are then able to
share it as you please.
The next page will walk you through step by step how to remotely access your DVR.
15
*NOTE: Once you have finished reviewing video in “Video Playback” Be sure to click STOP
to stop the video playback and EXIT PLAYBACK to end the connection to the device. You will
have to wait for about 10 seconds for the software to end the connection to the device. Once
that time has elapsed you will see the lower area (where the video snips would appear) will
turn white.
16
Step 1: Make sure Remote Playback is selected.
Step 2: Based on the capacity of your SD Card, you should
know how many days of history you should have. Select Day.
Step 3: Select the vehicle you want to playback from the
dropdown menu. Next, select enter playback. Below choose
the channel you want to view or all channels. Then choose
the area of time you are looking for. After that you click
search. Snips of video will appear in the grey box below
where you can double click to start your download for
playback. Or you narrow down the “Play Start time” and
“Play End Time” within a chosen video below and click play.
Before you select a snip of video or play you can also record
what you are about to view by clicking in the check box next
to record.
The section to the left shown here will show you the start
time and end time of each video snip. This will allow you
to determine the duration of each video as well.
If you want to play the entire snip from start to finish,
simply double click the video snip.
Safety Track - 249 Main St. Belleville MI 48198 - 734-699-7633

Other Safety Track Dashcam manuals

Safety Track UCIT BASIC/LIVE 4 User manual

Safety Track

Safety Track UCIT BASIC/LIVE 4 User manual

Safety Track UCIT BASIC/LIVE 4 User manual

Safety Track

Safety Track UCIT BASIC/LIVE 4 User manual

Safety Track UCIT User manual

Safety Track

Safety Track UCIT User manual

Safety Track UCIT BASIC 2 User manual

Safety Track

Safety Track UCIT BASIC 2 User manual

Safety Track UCIT User manual

Safety Track

Safety Track UCIT User manual

Safety Track UCIT 2 User manual

Safety Track

Safety Track UCIT 2 User manual

Popular Dashcam manuals by other brands

Drive Proof DAS-3000HD Introduction manual

Drive Proof

Drive Proof DAS-3000HD Introduction manual

ring RSDCR1000 manual

ring

ring RSDCR1000 manual

CRASH CAM NAVCAM-818SHD user manual

CRASH CAM

CRASH CAM NAVCAM-818SHD user manual

VSYSTO M6L user manual

VSYSTO

VSYSTO M6L user manual

Teltonica MVC300 quick start guide

Teltonica

Teltonica MVC300 quick start guide

4Sight 4SK606 manual

4Sight

4Sight 4SK606 manual

Prestigio RoadRunner MIRROR quick start guide

Prestigio

Prestigio RoadRunner MIRROR quick start guide

BlackVue DR750S-2CH IR quick start guide

BlackVue

BlackVue DR750S-2CH IR quick start guide

Lexi PI00499 user guide

Lexi

Lexi PI00499 user guide

Philips CVR700 user manual

Philips

Philips CVR700 user manual

Crossbeats ROAD EYE DC01 user manual

Crossbeats

Crossbeats ROAD EYE DC01 user manual

Papago GoSafe 110 quick start guide

Papago

Papago GoSafe 110 quick start guide

Magnadyne C-LP1 Owners and installation manual

Magnadyne

Magnadyne C-LP1 Owners and installation manual

ring RBGDC50 instructions

ring

ring RBGDC50 instructions

Provision ISR PR-DVR-C10 Quick installation guide

Provision ISR

Provision ISR PR-DVR-C10 Quick installation guide

Quintezz Full HD Dashcam+ user manual

Quintezz

Quintezz Full HD Dashcam+ user manual

Top Dawg TDGPSCAM01 quick start guide

Top Dawg

Top Dawg TDGPSCAM01 quick start guide

ZENEC ZE-RCE3702 Mounting instructions

ZENEC

ZENEC ZE-RCE3702 Mounting instructions

manuals.online logo
manuals.online logoBrands
  • About & Mission
  • Contact us
  • Privacy Policy
  • Terms and Conditions

Copyright 2025 Manuals.Online. All Rights Reserved.