Safex Tintschl Engineering FlowMarker User manual

SPEZIALEFFEKTE FÜR BÜHNE, FILM + FERNSEHEN
GÜNTHER SCHAIDT - SAFEX-CHEMIE · D-22869 SCHENEFELD · BLANKENESER CHAUSSEE 26/32 · TEL: 040/83 92 11-0 · FAX: 040/830 1452
®
Instruction Manual
Gebrauchsanleitung V 3.2
FlowMarker
FLOW CONTROL AND COMPUTING SYSTEMS

2/ 22 • GA FM 1 05.01
COPYRIGHT 2001 by SAFEX®CHEMIE - GÜNTHER SCHAIDT
Jeder Nachdruck und jede -fototechnische- Vervielfältigung, auch über elektronische
Verfahren, ist nur mit Zustimmung des Copyright-Inhabers zulässig.
Dear SAFEX Customer
Sehr geehrter SAFEX®-Kunde!
This instruction manual is bilingual, you will find the german version in
the 2nd part. Questions regarding use and maintenance we are pleased
to answer by phone or eMail.
Please read the safety instructions befor use.
Diese Gebrauchsanleitung ist zweisprachig, die deutsche Version finden
Sie im 2. Teil. Fragen zu der Anwendung beantworten wir gerne auch per
Telefon oder E-Mail.
Die Sicherheitshinweise sollten vor Gebrauch unbedingt gelesen wer-
MANUFACTURER / HERSTELLER:
DISTRIBUTOR / VERTRIEB:
Tintschl Engineering AG
Flow Control and Computing Systems
Erlangerstr. 9 ·D-91083 Baiersdorf/Germany
Tel.: +49 9133 76 71-0 ·Fax.: +49 9133 76 71-11
e-mail: [email protected]
GÜNTHER SCHAIDT SAFEX®CHEMIE
D-22869 Schenefeld ·Blankeneser Chaussee 26/32
Tel.: +49 (0) 40-83 92 11-0 ·Fax: +49 (0) 40-830 14 52

GA FM 1 03.05 • 22 / 3
table of contents
ILLUSTRATIONS AND DESCRIPTION OF COMPONENTS ..........S. 4 + 5
Instruction Manual
A System description ....................................................... 6
B Preparing device for operation ....................................... 6
C Using FlowMarker.......................................................... 8
D Maintenance and care .................................................. 9
E Storage and transportation............................................ 11
F Safety instructions......................................................... 12
G Technical data ............................................................... 14

4/ 22 • GA FM 1 05.01
FOG GENERATOR FLOWMARKER
Battery
Batterie
Heating
Heizung
Ready
Bereit
Multi function button: fog + „on“
Multifunktionstaster: Nebel + Aktivierung
Tank control window
Tanksichtfenster
Battery
Einschub-Batterie
Control LED
Kontrollampen
Fill opening/lter cartridge
Befüllöffnung/Filterkartusche
Battery compartment
Batteriefach
Battery compartement safety screw
Batteriefachsicherung
Power input socket 12 V DC
Ladebuchse 12 V DC
Figure 2 / Abb. 2
Use with application tube AR1
Verwendung mit Applikatorrohr AR 1
Thread for application tube
Gewindeaufnahme für Applikator
Adjustment ring for air intake
Verstellring (Luftzufuhr)
Figure 1
Abb. 1
Nozzle / Düse
AR1

GA FM 1 03.05 • 22 / 5
FOG GENERATOR FLOWMARKER
Fill opening
Befüllöffnung
Pressurized can
Druckgasdose
Figure 4 / Abb. 4
Filling FLOW MARKER with
FOG FLUID
FLOWMARKER mit FOGFLUID befüllen
Battery charger
Batterie-Ladegerät
Fill stem
Füllstift
Figure 3 / Abb. 3
charging battery
Batterie laden

6/ 22 • GA FM 1 05.01
safeX®-floWMaRKeR
For best use in all fields of application of the SAFEX®-FLOWMARKER, it is recommended
to read this instruction carefully.
The safety instructions and all sections marked with an exclamation mark are
especially important and should be given particular consideration.
SYSTEM
COMPONENTS
a sYsteM DescRiption
b pRepaRinG DeVice foR opeRation
GENEral
The FlowMarker fog generator was especially developed for the visualization of slow
and weak airflows in the fields of science and technology.
The generation of low-impulse, thermal neutral fog helps to solve even very difficult
problems of airflow visualization.
In areas with a steady airflow, even small cavities can be filled with fog. This fog, as if
flowing like water, forms a “fog lake”, on the surface of which even very weak airflows
can be recognized.
The FlowMarker basic equipment consists of:
●the FlowMarker device
●one insert battery (12V, 2.0Ah/20HR, type LC-TA122PU)
●an unscrewable application tube, type AR1
●one pressurized can FlowMarker Fog Fluid
●4 condensation absorbing rings, each type KR1 and KR2
●one plastic tube for removing condensation absorbing ring KR1
●a low voltage power supply, 12V = (1A, 12VA) for charging the battery inside the
device, together with 4 international wall outlet adapters
●a user manual
Before first use, check the device with regard to intactness and completeness of the
standard parts. Immediately report any damages or missing parts to the supplier
or the supplier’s service office.
The FlowMarker is delivered de-aerated and with the tank approximately half full for
initial testing.
FIllING OPEraTION a. Place the fog fluid can upright on a solid base. Remove the valve protection cap.
Hold the can with one hand.
b. Hold the FlowMarker by its handle, with the fog outlet pointing up. Fit the fill
opening at the back of the device onto the valve stem of the can. Make sure to
hold the device upright, with the tank control window being visible.
c. Press the can slightly against the device to press the fog fluid from the can into
the device.
Important: No dust or dirt particles must get into the fill opening.

GA FM 1 03.05 • 22 / 7
INSErTING
BaTTErY
DE-aEraTING
FluIDwaYS
(d) The filling procedure is visible in the tank control window. The tank piston with
the yellow mark moves towards the back of the device.
The filling procedure has to be stoped when the red mark has moved along
80% of the window. Do not over fill the tank under any circumstances!
(e) Pull the valve stem out of the fill opening. Put the valve protecting cap onto the
can. Prevent fill parts from getting dirty!
(f) Remove possible fluid remainders from the fill opening with a paper towel.
(SAFEX fog fluid is non-toxic and harmless.)
The insert battery is delivered with a partial charge for the initial test of the device. We
recommend to entirely charge the battery before continuous use (see also chapter „D“
MAINTENANCE AND CARE).
For optimum performance, de-aerate the fluid ways in the device after every refill.
a. Activate and heat up the FlowMarker by pushing the white fog button for two
seconds.
b. The heat-up takes about 30 seconds when the device is cold. After complete
heat-up
(green LED “Ready” lights up and yellow LED “Heating” goes out),
hold the device vertically, with its nozzle or application tube pointing up. Press
the fog button for about 45 seconds, until the fog comes out evenly.
De-aerating can only be carried out in upward direction!
a. To place the battery in the device, first loosen the battery
compartment safety screw (see illustration) with a
screwdriver counter-clockwise just one or two turns until
the screw head corresponds with the outer surface of the
device’s housing. Stop if there is noticeable resistance,
do not use force, this may damage the battery compart-
ment.
b. Push the battery into the battery compartment (see illustra-
tion) with contacts first and inscription pointing up, until the
battery audibly and noticeably clicks into place.
c. Fasten now the battery securing screw by turning it clock-
wise, again, stop if there is noticeable resistance.
This operation is necessary to prevent the battery from falling
out. By no means let the lead-acid battery fall out of the
device as it might break and corrosive acid might escape.
d. The FlowMarker is now ready for operation and can be
activated by pressing the white multi function button (ON +
FOG) for at least 2 seconds. The yellow LED “Heating” must
light up.
If the red LED “Battery” lightens up, the battery is empty and has to be charged
with the battery charger for at least 10 minutes. (See section „D“ MAINTENACE
AND CARE „Charging the battery”.)

8/ 22 • GA FM 1 05.01
c UsinG floWMaRKeR
aPPlICaTION TuBE
aCTIVaTING DEVICE
GENEraTING FOG
ExTENSION TuBE
●Switch on the FlowMarker by pressing the white button for 2 seconds.
●Let the device heat up for about 20 to 30 seconds.
●When the yellow LED “Heating” goes out and only the green LED “READY” lights
up, fog can be generated by pressing the white „FOG“ button.
The FlowMarker has been constructed for use in any position of operation. By means
of the application tube, the fog can be applied at the desired place or into the airflow to
be investigated, in any position of the device.
When the tank is full and the battery completely charged, fog can be generated conti-
nuously for about 20 minutes.
Usually, the fog flow is only needed for some seconds, i.e. the device will be used only
impulsively.
For saving battery power, which means longer battery performance time, the FlowMarker
has an energy saving mode.
If no fog is generated (i.e. the white button is not pressed) within two minutes,
the device automatically switches off.
The FlowMarker can be reactivated immediately by pressing the button for 2 seconds.
It is ready for operation within few seconds, depending on the time it has not been used
(max. 30 seconds when heat exchanger has completely cooled down).
To use the special advantages of the patented FlowMarker, the fog application tube is
necessary for low-impulse and thermal neutral fog generation.
Standard delivery is version AR1 with a black 30 cm tube. Due to its special design and
material, the emerging fog has assumed room temperature and is fluidically “calmed
down”.
In addition, a black plastic ring on the application tube base serves as controllable air
inlet. By turning the ring, the six air inlets in the application tube can be reduced or
completely closed. This has a considerable influence on the fog and its flow.
The fog can therefore be generated according to the user’s requirements.
To collect the fog fluid that unavoidable condenses in the tube, the delivered
condesation absorbing rings should be inserted according to section „D“ MAIN-
TENANCE AND CARE on page 11.
For special applications, extension tubes are available or can be developed.
Presently, the following variation is available.
APPLICATION TUBE AR2 - 75 cm length
furnished with a tube fitting system for an application length of up to 1.8 m.
This system is suitable for the investigation of airflows at ceilings and smoke
detectors.
air-admission control ring

GA FM 1 03.05 • 22 / 9
CharGING ThE
BaTTErY
Maintenance anD caRe D
rEMOVING
BaTTErY
CharGING
BaTTErY
ExTErNal
FluID FIllING aND
TaNk
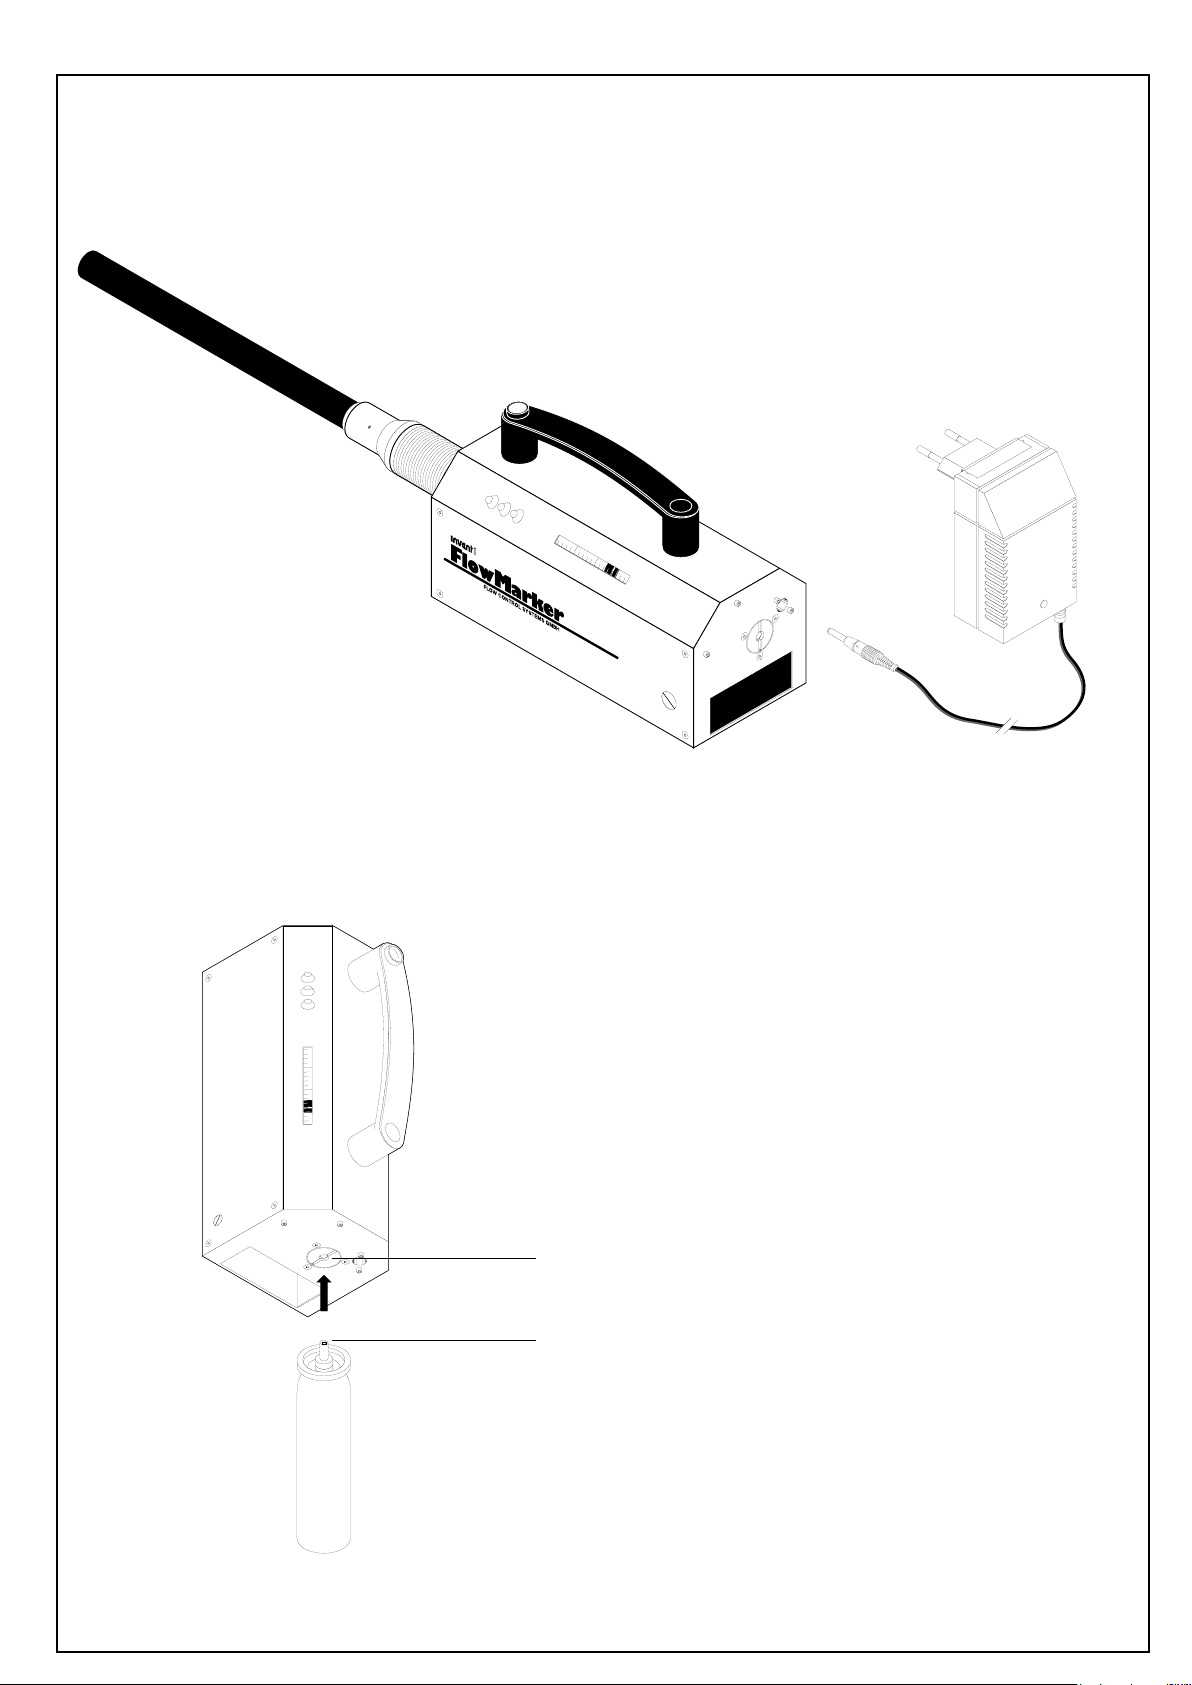
The battery is charged inside the device. The included power supply transfomer with
plug generates the necessary DC voltage. It is connected to the device with the inserted
battery via the power input socket (see figure 3). The power supply must be plugged
into a regular 100 - 240 V AC/50-60 Hz socket.
The battery is automatically charged, with the FlowMarker switched on or off.After
two hours, 80% of the loading is done; after 3 hours, the battery is 100% loaded.
For frequent use, the device should regularly be connected to the power supply and, if
possible, remain connected over night.
For the maintenance of the battery which, unlike NiCd batteries, has no memory effect,
it is of advantage to leave the device connected with the power supply over a longer
period of time, possibly for several years.
However, this “round-the-clock” loading mode only makes sense if the used
mains supply has no automatic “night cut-off”, as otherwise the battery would
be discharged.
IMPORTANT: Please make sure that during storage or transport the fog button cannot
be inadvertently pressed, for instance by objects lying on the device.
If more than one battery is available, the device can be equipped with a fresh battery
in a short time.
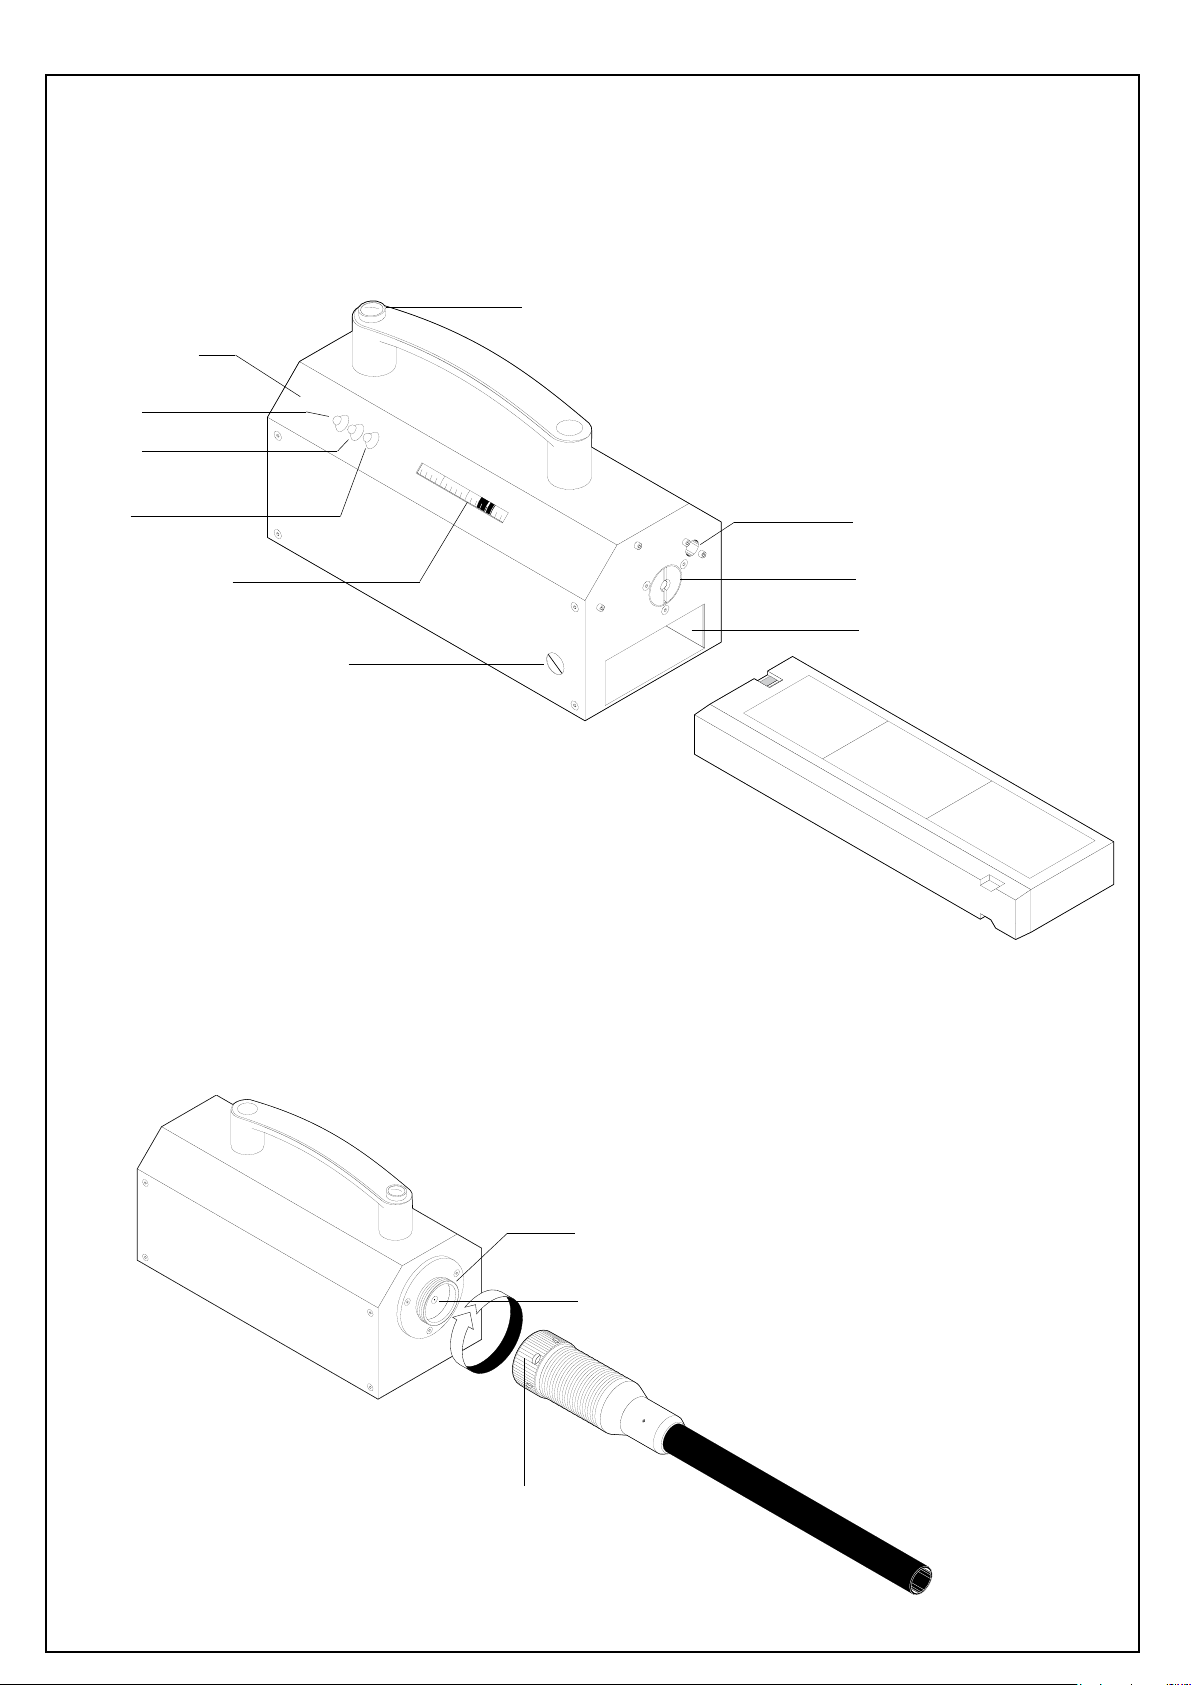
Loosen the battery compartment safety screw, hold the device upright with the nozzle
showing up, and slightly beat the edge of the battery compartment on the ball of the
thumb of your open hand until the battery loosens and slides into your palm.
The FlowMarker is designed for operation only with original batteries.
In addition to the possibility to charge the battery inside the device, a charging adapter
with power supply is available as an extra accessory. With it, you can charge spare
batteries independent of the device.
Put the clip of the charging adapter on the contacts of the spare battery, plug the power
supply into a regular (100- 240 V) outlet and charge the battery for at least 2, or better
3 hours.
Remainders of the fog fluid in the tank can be kept there for up to 2 years without suf-
fering any harm. The pressurized can is also storable for at least 2 years. It should be
stored not below minus 15°C and at a maximum temperature of 30°C.
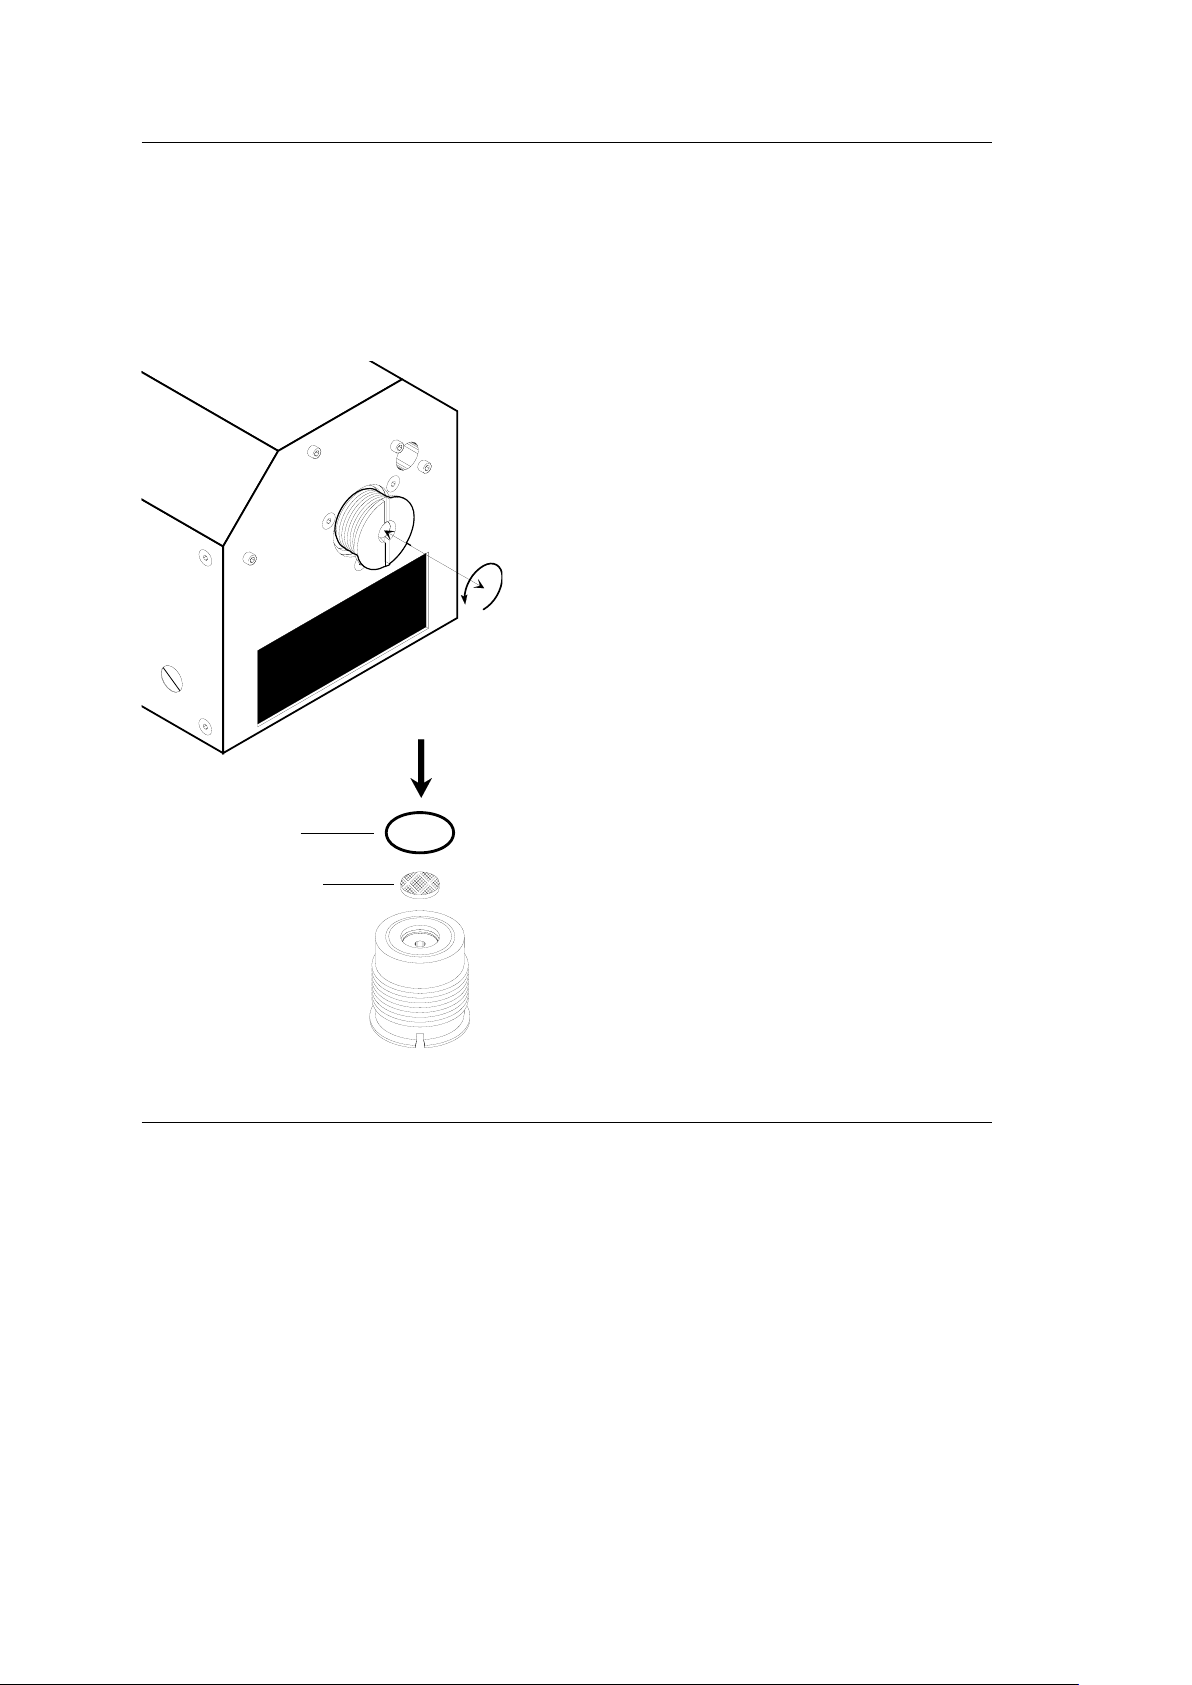
Due to its very fine construction details, the FlowMarker is very sensitive to dirt in the
fluid channels and in the fog fluid itself. Therefore, the fill opening and the valve of
the fluid can must be protected from fibres, fluff and any sticky liquids.
The fill stem of the fluid can must be covered with its cap. It can be cleaned with warm
water.
After every filling, clean the fill opening of remaining fluid with absorbent paper. Before
the next filling, clean the opening of dust and fluff with a soft brush or warm water. (All
case components are made of stainless steel).
Do not let any water get into the device.

10 / 22 • GA FM 1 05.01
FOG FluID CaN aND
FluID PrESSurE
ChaNGING ThE
FIlTEr
As a matter of course, the filling system of the FlowMarker has a highly efficient filter
which can be easily changed when required.
If the fog fluid from a new can fills the tank only very slowly or not at all, the cause
may be
- unless the can is empty or depressurized -
a blocked filter in the fill opening.
In this case, change the filter as follows:
1. Unscrew the filter cartridge (see illustration) from the device
by turning it counter-clockwise with a coin.
2. Take the white micro filter (30 my) out of the filter cartridge,
preferably with tweezers, and dispose of it. At the same time,
remove also the black o-ring seal.
3. Gently push the new micro filter into the recess and put a new
o-ring into the groove. The o-ring must lie in the groove crease-
free and evenly. Pay attention to absolute cleanness.
4. Gently screw filter cartridge hand tight into the device with a
coin.
Do not clean or re-use the removed filter, and do not clean the
fill opening with any sharp object.
Never use the FlowMarker without a filter. Even very small
particles can lead to serious damage of the device.
Blockage of the fluid channels or the heat exchanger must not be
removed with acid, de-scaling agent or other detergents; this
would seriously damage the device. Appropriate repairs can only
be carried out at the manufacturer’s works or at approved service
centers.
Heaters for exchange are available as spare parts.
The fog fluid itself is harmless and no hazardous material. The can, however, is under
gas pressure and therefore classified as hazardous material according to international
transport regulations, UN No. 1950 AEROSOLS. The pressure gas is non-flammable,
non-toxic and ecologically harmless.
According to European regulations, the SAFEX fluid cans with up to 10 kilograms per
packaged unit are subject to less strict conditions for transport on road or rail; they
must merely be well packaged (GGAV, exception No. 9).
The pressure of the can is independent of the temperature. It gets less with every filling.
Hence, every filling of the tank takes several seconds longer.
In order not to “deaerate” the can incorrectly, always fill the device with the fill
stem of the can pointing up. Filling in a horizontal or other position of the can is not
possible.
For particular applications it may be necessary to generate only very small amounts of
fog. As the amount of fog discharge depends on the amount of the tank filling, it may
be advantageous to fill the tank only at one third or halfway.

GA FM 1 03.05 • 22 / 11
stoRaGe anD tRanspoRtation e
TraNSPOrT
If the FlowMarker will not be needed for more than 3 months and will not be connected
to the power supply during this time, charge the battery completely and take it out of
the device.
Such preparation makes the battery storable for up to 2 years without suffering any
damage.
During storage and transportation strictly prevent the battery contacts from being
short-circuited by conductive materials such as metal, carbon fiber, graphite, foils etc.
Otherwise danger of fire.
For transport a special case is available.
Especially when wrapping or packingthe FlowMarker (e.g. as flight baggage), take the
battery out of the device at any rate to prevent the device from starting.
The two contacts of the battery must also be covered (e. g. insulating tape etc.).
It is unavoidable that some condensation will occur in the fog application tube during
intensive use of the FlowMarker.
In well ventilated warm areas a possible fluid condensation, for example on a could
surface, will dry up without leaving a residue. In the application tube however it is likely
that under intensive use the condensed fluid film will increase and fluid may drop out
the tube.
To avoid a slide risk condensation absorbing rings are available as an accessory,
which are inserted at both ends of the application tube.
The smaller ring KR 1 is to be inserted from the muzzle side of
the black tube.
The larger ring KR 2 has to be inserted from the „threaded“ side
of the application tube until it fits in behind the air inlet holes at
the recess.
The rings will absorb possible fluid condensation and may dry out
if the FlowMaker is not used. However they have to be replaced
periodically depending on th intensity of use, at the latest when they
are completely soaked.
To remove the “front” ring KR1, use the attached plastic tube
and push it out from the rear end.
To remove the KR2 ring, flush the tube inside with warm water
and let the ring get soft before pulling it out.
If necessary put the applicator tube end in warm water for some 15
min., remove the ring, clean it from fluid residues and other impuri-
ties and wipe the tube completely dry before mounting it back to
the FlowMarker.
CONDENSaTION aB-
SOrBING rINGS

12 / 22 • GA FM 1 05.01
f safetY instRUctions
GENEral
aCTIVE uSE
(Fog generation):
The nozzle of the device (see figure 2) heats up to 250°C. Do not touch during operation.
Danger of burning!
The discharging fog jet is hot at first (about 10 cm). Never direct it to persons, parti-
cularly not to the face, without application tube. Danger of small but hot splashes!
Allow fog to be blown towards open space. Never blow it directly on persons (minimum
safety distance: 0.5 m).
Do not blow fog on hot surfaces, into open flames or into glowing heating ele-
ments etc.!
The normally non-flammable and non-toxic fog can decompose on hot, red glowing
surfaces (> 380°C) or in open flames.
Heat sources like lamps, central heatings ore other closed heating systems or electric ma-
chines without red-glowing parts are no danger and need not be given attention.
Use the FlowMarker only in dry condition; do not pour water over the device or immerse
it in water. Any dirtying with aggressive media, dust, solvent, etc. may cause serious
damage.
The FlowMarker is not suitable for use in explosive environment. It has no EX
protection. Never use it in close proximity to open containers with inflammable
liquids or in saturated areas with fumes of inflammable liquids or gases.
All SAFEX®-FOG GENERATORS comply with CE and therefore meet to the legal
regulations of the European Community. The FlowMarker fulfils international
standards for low voltage operated electric devices.
The FlowMarker contains no hazardous materials and only one heating element with
circa 40 W power input. The entire power supply takes place exclusively with protective
low voltage, provided an appropiate power transformer is used which fulfils local safety
requirements.
Please notice:
1. The machines are equipped with a safety device. If the heating does not work
properly, the machine will turn in a safe condition.
2. Replace fuses only while machine is switched off and the failure has been cleared
by an expert. Use only proper spare part (fuse 5 x 20 mm, type see chapter “G”
TECHNICAL DATA on page 14).
3. Do not put electric machines in operation which may have been damaged
by dropping or rough transport, since the safety devices may be affected even
if there is no damage visible from the outside. In cases of doubt immediately
disconnect the machine from power and send it in for repair.
4. Unauthorized repair or tampering with the regulation devices can lead
to serious hazards and damage to the machine. Repairs should only be
made by authorized service centers.
5. In any places with public admittance the machine must be out of reach for
unauthorized persons. Electric installation must fulfil national safety require-
ments. Keep the device, fluid can and spare parts out of children’s reach.

GA FM 1 03.05 • 22 / 13
BaTTErY
„STraNGE“
FluIDS +
OThEr
POSSIBlE
MISSuSE
FluID CaN
Due to physical processes, longer or improper use will inevitably result in some fog fluid
condensing inside the application tube.
The condensed fluid can easily be wiped off with a paper towel or washed off with
water. Remove fluid drops or spilled fluid on the ground, as viscous fluids create a risk
of skidding.
Fluid absorbent rings are available as accessory. They are inserted on both ends of
the application tube.
The larger ring KR 1 has to be inserted from the „threaded“ side of the application
tube until it fits behind the air inlet holes at the recess.
The smaller ring KR 2 has to be inserted from the muzzle side of the black tube
until it has completely sliped in.
The rings will absorb possible fluid condensation. They have to be replaced periodically
dependent on how intensive the device is used.
The fog fluid can is under pressure. The propellant N2is non-inflammable, non-toxic
and enviromentally safe
The pressurized fog fluid can, like any aerosol can, must never be heated above
50°C, opened by force, or burned.
When entirely empty, dispose of it with domestic refuse.
The battery of the FLOWMARKER is a sealed lead-acid battery. When it is no longer
usable, dispose of it according to the local regulations.
●By no means open or burn the battery, or short-circuit the battery
poles.
●Should, in case of damage, any acid gel escape from the battery, imme-
diately rinse the affected parts of the body with ample water. If eyes are
affected, rinse first, then immediately consult a physician.
Before use, check the battery safety screw to prevent the battery from falling out
(See chapter B „Inserting Battery).
For unattended transport, take the battery out of the device. Prevent the battery
contacts from being short-circuited by conductive materials. Serious fire hazard! During
transport cover battery contacts with non conductiv material (e. g. friction tape)
The FlowMarker will get seriously damaged if filled with other substances than SAFEX
FlowMarker Fog Fluid. Other fog fluids from SAFEX or other manufacturers are also
unsuitable.
CAUTION: Operation with unsuitable fluids or opening the device lead to the immediate
loss of any guarantee or liability on the manufacturer’s or supplier’s side.
Therefore do not open the device and do not unscrew any of its screws. Repairs
must be carried out only by authorized service centers.
Damaged or improper battery chargers may cause damaging of the battery and
lethal electric shock. Therefore, use only checked and suitable charging devices
which comply with national regulations.
Under no circumstances use device any longer if battery control LED lights up.
Do not put fog or application tube into orifices of the body.
rISk OF SkIDDING

14 / 22 • GA FM 1 05.01
G tecHnical Data floWMaRKeR
OPERATION VOLTAGE 12 Volt DC from internal battery
POWER INPUT 3,4 A (in heating operation), Heating power 40 W - fuse intern: 5 x 20 mm
- 6,3 A - medium time lag
POWER SUPPLY “INTERNATIONAL” for all international voltages, with adapters for EU, GB, USA + Australia
wall outlets, CE + UL listed! 100 - 240 V AC / 50-60 Hz / 250 mA /18 VA
- Output: 12 V DC / 1 A / 12 VA
DIMENSIONS length 210 mm without application tube, - with standard application tube
500 mm - width 90 mm, height inclusive handle 135 mm
WEIGHT 2,66 kg inclusive battery and appllication tube AR1
BATTERY 12 V – 2 Ah, lead-acid battery type LC-TA122PU
BATTERY CHARGING TIME min. 2 hours 80% - 3 hours 100%
OPERATING TIME / BATTERY for constantly switched-on device circa 2 to 5 hours, dependent on duration
and frequency of fog generation
“SLEEP MODE” OF DEVICE circa 2 minutes after last pressing fog button
HEAT-UP TIME max. 30 seconds for cold device
FOGGING MATERIAL exclusively SAFEX FLOWMARKER FOG FLUID (pressurized can)
TANK VOLUME circa 16 ml
FLUID CONSUMPTION circa 0.7 ml/min for continuous fog generation
FOG PERFORMANCE tank volume lasts for circa 20 minutes continuous fog or for about 420 fog
cycles of circa 3 seconds each
FLUID CAN pressurized can according to UN No.1950 “AEROSOLS”, volume 73 ml =
75 g, sufficient for about 2000 fog cycles of circa 3 seconds each
OPTIONAL ACCESSORY, MATERIALS, SPARE PARTS:
FOGGING MATERIAL SAFEX FLOWMASTER FOG FLUID, pressurized can with 72 ml
CONDENSATION ABSORBING RINGS pack. containing 10 pieces, type KR 1
pack. containing 10 pieces, type KR 2
SPARE FILTERS pack. containing 2 filters and 2 seal rings
BATTERY CHARGER “INTERNATIONAL” power supply with battery clip for external battery charging, for all inter-
national voltages, with adapters for EU, GB, USA + Australia wall outlets,
CE + UL listed
100-240 V AC / 50-60 Hz / 250 mA /18 VA - Output: 12 V DC / 1 A / 12
VA
power supply with battery clip for external battery charging
SPARE BATTERY PANASONIC type LC- TA 122PU, 12 V /2 Ah
APPLICATION EXTENSION TUBE type AR 2, impact resistant plastic tube with fitting,
standard length 75 cm, optional up to max. 1.5 m
TRANSPORTATION CASE plastic case with rigid foam compartments for safe transport of the basic
equipment

GA FM 1 03.05 • 22 / 15
inHaltsVeRZeicHnis
Ansicht und Beschreibung der Bedienungselemente...........S. 4 + 5
GEBRAUCHSANWEISUNG
A Systembeschreibung ..................................................... S. 16
B Gerätevorbereitung ........................................................S. 16
C Inbetriebnahme.............................................................. S. 18
D Wartung und Pflege ...................................................... S. 19
E Lagerung und Transport ................................................ S. 21
F Sicherheitshinweise....................................................... S. 22
G Technische Daten .......................................................... S. 24

16 / 22 • GA FM 1 05.01
safeX®-floWMaRKeR
Um alle Möglichkeiten des SAFEX®-FLOWMARKER voll ausnutzen zu können, ist es
empfehlenswert, diese Gebrauchsanleitung einmal komplett zu studieren.
Die Sicherheitsanweisungen und die mit dem Ausrufezeichen versehenen Ab-
schnitte sind besonders wichtig und sollten unbedingt beachtet werden.
Das SAFEX-NEBELGERÄT®-FLOWMARKER ist ein speziell zur Sichtbarmachung langsamer
und schwacher Luftströmungen entwickeltes Gerät für Wissenschaft und Technik.
Durch die Erzeugung eines impulsarmen, thermisch praktisch neutralen Nebelflusses
können selbst schwierigste Aufgaben der Strömungsvisualisierung gelöst werden.
In strömungsberuhigten Bereichen können selbst kleine Vertiefungen mit Nebel gefüllt
werden, der wie Wasser fließend, einen „Nebelsee“ ergibt und dessen Oberfläche
schwächste Luftbewegungen erkennen lässt.
Der SAFEX®-FLOWMARKER besteht in der Grundausstattung aus:
●dem FlowMarker-Gerät selbst
●einer Einschub-Batterie (12 Volt, 2,0 Ah/20HR, Typ LC-TA122PU)
●dem aufschraubbaren Applikationsrohr Typ AR1
●einer Druckgaspackung FLOWMARKER-FOG FLUID (Nebelmittel)
●je 4 Kondensat-Aufnahmeringen Typ KR1 und KR2
●Einem Kunstoffrohr zur Entfernung des Kondensatringes KR1
●einem Stecker-Ladegerät 12 V = (1 A, 12 VA)
zum Laden der Batterie im Gerät sowie 4 internat. Steckdosenadaptern
●der Gebrauchsanleitung
Vor dem Erstgebrauch ist das Gerät zunächst auf Unversehrtheit und Vollständigkeit des
Standardzubehörs zu prüfen. Beschädigungen und das Fehlen von Teilen sind sofort
beim Lieferanten oder seiner Service-Stelle zu reklamieren.
Das Gerät ist werkseitig bereits zu ca. 50% mit Nebelfluid befüllt und entlüftet, um eine
erste Erprobung zu ermöglichen.
a. Dazu Nebelfluid-Dose senkrecht auf eine Unterlage stellen, Ventilschutzkappe
abnehmen und Dose mit einer Hand festhalten.
b. Jetzt FLOWMARKER am Handgriff mit der Düse nach oben so auf die Dose
aufsetzen, dass die auf der Rückseite des Gerätes befindliche Befüllöffnung
den Füllstift aufnimmt. Gerät dabei senkrecht so halten, dass das Tankfenster
zu sehen ist.
c. Gerät jetzt leicht auf die Dose drücken, dabei wird das Nebelfluid aus der Dose
in das Gerät gedrückt. Wichtig: Es dürfen keine Schmutzpartikel in die Befüll-
öffnung gelangen.
SYSTEM-
kOMPONENTEN
a sYsteMbescHReibUnG
b GeRÄte-VoRbeReitUnG
allGEMEINES
NEBElFluID
EINFüllEN

GA FM 1 03.05 • 22 / 17
BaTTErIE
EINSETzEN
Die Einschub-Batterie ist ebenfalls werkseitig teilgeladen, um eine erste Erprobung
des Gerätes zu ermöglichen. Es wird empfohlen, die Batterie jedoch zunächst einmal
vollständig zu laden (Siehe dazu Abschnitt „D“ WARTUNG + PFLEGE).
a. Zum Einsetzen der Batterie zuerst die Batteriefach-Siche-
rungsschraube (siehe Abb. rechts) mit einem Schrauben-
dreher durch Linksdrehen soweit herausschrauben, bis der
Schraubenkopf mit der Außenfläche des Gehäuses in etwa
fluchtet und ein leichter Widerstand zu spüren ist. Dazu
keinesfalls vermehrte Kraft anwenden, da sonst eine
Beschädigung des Batteriefachs unvermeidbar ist.
b. Batterie jetzt in das Batteriefach des Gerätes so einschieben,
dass die Batterie mit der Beschriftung nach oben und den
Kontaktflächen voraus im Batteriefach hörbar/spürbar
einrastet und bündig mit dem Gehäuse abschließt.
c. Anschließend Batterie-Sicherungsschraube unbedingt wieder
durch Rechtsdrehen festsetzen, auch hier Schraube nur
handfest anziehen.
Diese Sicherungsmaßnahme ist erforderlich, denn die Blei-
Gel-Batterie sollte keinesfalls aus dem Gerät fallen können, da
sie zerbrechen und ätzende Batteriesäure austreten kann.
d. Das Gerät ist jetzt betriebsbereit und wird durch ca. 2 sek. langes Betätigen
des weißen Knopfes aktiviert, die gelbe LED „HEIZUNG“ leuchtet dabei auf.
Leuchtet die rote LED „Batterie“ auf, ist die Batterie entladen und muss mind.
10 Minuten mittels des Ladegerätes aufgeladen werden (siehe dazu Abschnitt
„D“ WARTUNG + PLEGE).
d. Der Befüllungsvorgang ist im Tankfenster erkennbar: Der Tankkolben mit der
roten Markierung bewegt sich zur Geräterückseite. Der Befüllungsvorgang ist zu
beenden, wenn die gelbe Markierung 80% des Sichtfensterausschnittes
zurückgelegt hat. (Tank keinesfalls überfüllen!)
e. Befüllstift wieder aus der Befüllöffnung herausziehen und Ventil-Schutzkappe
zurück auf die Dose setzen. (Verschmutzung der Befüllteile unbedingt vermei-
den)
f. Befüllöffnung ggf. mit einem Papiertuch von anhaftenden Fluidresten reinigen.
(SAFEX-Nebelfluid ist ungiftig und ungefährlich und stellt keine Gefahr dar)
Zum optimalen Gebrauch müssen die im Gerät befindlichen Flüssigkeitswege nach
jedem Auffüllvorgang entlüftet werden.
a. Gerät durch kurzes Betätigen des weißen Nebelknopfes aktivieren und aufhei-
zen.
b. Nach vollständigem Aufheizvorgang, der bei kaltem Gerät ca. 30 sek. dau-
ert,
(grüne LED „BEREIT“ leuchtet und die gelbe LED „Heizung“ ist erloschen!)
Gerät mit der Düse bzw. aufgesetztem Applikatorrohr senkrecht nach oben halten
und ca. 45 sek. den Nebeltaster drücken, bis gleichmäßig Nebel austritt.
Die Entlüftung kann nur senkrecht nach oben erfolgen!
FluIDwEGE
ENTlüFTEN

18 / 22 • GA FM 1 05.01
c inbetRiebnaHMe
●Zunächst Gerät durch 2 sek. langes Betätigen des weißen Knopfes aktivieren/
einschalten
●Gerät ca. 20-30 sek. aufheizen lassen
●Wenn gelbe LED „HEIZUNG“ erlischt und nur grüne LED „BEREIT“ aufleuchtet,
kann Nebel durch Betätigen des weißen Nebelknopfes erzeugt werden.
aPPlIkaTIONSrOhr
GEräT akTIVIErEN
Der SAFEX®-FLOWMARKER ist dazu konstruiert, in allen Betriebslagen eingesetzt werden
zu können. Der Nebel kann daher mittels des Applikationsrohres in jeder Gerätelage an
die gewünschte Stelle bzw. in den zu untersuchenden Luftstrom gebracht werden.
Bei gefülltem Tank und vollständig geladener Batterie ist eine ununterbrochene Nebel-
erzeugung über ca. 20 Minuten möglich.
Üblicherweise wird der Nebelfluss jedoch nur wenige Sekunden benötigt, das Gerät
also impulsweise benutzt.
Zur Energieersparnis und damit einer langen Batterienutzungsdauer ist der SAFEX®-
FLOWMARKER mit einem Stromsparmodus ausgerüstet.
Wird innerhalb von ca. 2 Minuten kein Nebel entnommen, also der weiße Taster
nicht betätigt, schaltet sich das Gerät automatisch komplett aus.
Es kann jedoch sofort wieder durch 2 sek. langes Drücken des Tasters aktiviert werden
und ist dann, abhängig von der nicht benutzen Zeit, in wenigen Sekunden (max. 30 sek.
bei vollständig ausgekühltem Wärmetauscher) wieder betriebsbereit.
Um die besonderen Vorteile des patentierten SAFEX®-FLOWMARKER nutzen zu können,
ist für impulsarme und thermisch neutrale Nebelerzeugung das Nebel-Applika-tionsrohr
erforderlich.
Standardmäßig wird die 30 cm lange Version AR1 mit schwarzem Kunststoffrohr gelie-
fert. Durch die besondere Form und den Werkstoff wird der aus dem Gerät austretende
Nebel auf Raumtemperatur gebracht und strömungstechnisch „beruhigt“.
Zusätzlich ist die Applikatorbasis mit einer regelbaren Luftzufuhr in Form eines
schwarzen Kunststoffringes versehen. Durch seitliches Verdrehen des Ringes können
die sechs Luftzuführöffnungen im Applikator verkleinert oder ganz verschlossen wer-
den, was deutliche Auswirkung auf den Nebel bzw. sein Fließverhalten hat. So kann der
Nebelfluss nach den Erfordernissen des Anwenders angepasst werden.
Zum Auffangen des unvermeidlich im Applikationsrohr entstehenden Nieder-
schlags sind die Kondensatringe in das Rohr gemäß Abschnitt D - WARTUNG UND
PFLEGE auf Seite 21 einzusetzen.
Für spezielle Anwendungen sind Verlängerungsrohre lieferbar bzw. können nach Kun-
NEBElErzEuGuNG
denwunsch entwickelt werden.
Standardmäßig steht z. Z. folgende Ausführung zur Verfügung:
VERLÄNGERUNGSROHR AR2 - 75 cm lang
versehen mit einer Steckmuffe, mit dem eine Anwendungslänge von 1,00 m
erreicht wird.
Dieses System ist speziell zur Untersuchung von Luftströmungen an Zimmer-
decken, oder z. B. von Rauchmeldern geeignet.
aPPlIkaTIONSrOhr-
VErläNGEruNG
Luftzufuhr-Regulierring

GA FM 1 03.05 • 22 / 19
laDEN DEr
BaTTErIE
WaRtUnG UnD pfleGe D
Die Batterie wird im Gerät geladen. Das mitgelieferte Laderät erzeugt die erforderli-
che Gleichspannung und wird über die Ladebuchse (siehe Abb. 1) mit dem Gerät bei
eingesetzter Batterie verbunden. Das Ladegerät selbst ist in eine vorschriftsmäßige
Netzsteckdose mit 100 - 240 V AC / 50-60 Hz. einzustecken.
Das Laden der Batterie erfolgt nach Netzverbindung automatisch auch bei aus-
geschaltetem Gerät. Eine 80%ige Ladung ist nach ca. 2 Std. erreicht, eine 100%ige
Ladung benötigt ca. 3 Std.
Bei häufigem Einsatz empfiehlt es sich, das Gerät bei Nichtgebrauch immer wieder mit
dem Ladegerät zu verbinden und ggf. auch „über Nacht“ am Netz zu belassen.
Zur Pflege der Batterie, die keinen Memory-Effekt aufweist, ist es sogar von Vorteil,
wenn das Gerät über längere Zeit, ggf. über Jahre mit dem Netz verbunden bleibt.
Dieser „Rund um die Uhr“-Lademodus ist jedoch technisch nur sinnvoll, wenn
die Ladesteckdose keine Nachtabschaltung hat, da sonst die Batterien über das
Ladegerät wieder entladen wird!
WICHTIG: Es muss sicher gestellt sein, dass der Nebeltaster nicht bei Lagerung oder
Transport versehentlich betätigt wird, z. B. durch darauf liegende Gegenstände.
BaTTErIE
ENTNEhMEN
BaTTErIE ExTErN
laDEN
Stehen mehrere Batterien zur Verfügung, kann das Gerät kurzfristig mit einer vollen
Batterie versehen werden.
Dazu Batteriefach-Sicherungsschraube lösen, Gerät mit der Düse nach oben halten und
mit der Batteriefachkante leicht auf den Handballen der geöffneten Hand schlagen, bis
sich die Batterie löst und in die Handfläche gleitet. Anschließend gemäß Abschnitt B
„BATTERIE EINSETZEN“ S. 17 eine „frische“ Batterie verwenden.
Das Gerät ist nur für den Betrieb mit Originalbatterien vorgesehen.
Neben der Möglichkeit, die Batterie im Gerät zu laden, steht ein Ladeadapter mit
Steckerlader als Sonderzubehör zur Verfügung. Mit diesem Zubehörteil können
Reservebatterien unabhängig vom Gerät geladen werden.
Dazu Ladeadapter (Clip) auf die Kontakte der Reservebatterie aufsetzen, Steckernetzteil
in vorschriftsmäßige Steckdose (100 - 240 V AC) stecken und so Batterie mind. 2 Std.,
besser 3 Std. aufladen.
Im Gerätetank befindliche Nebelfluidreste können ohne Beeinträchtigung bis zu 2 Jah-
ren im Gerät verbleiben. Auch die Nebelfluid-Druckgaspackung ist mindestens 2 Jahre
lagerfähig. Die Lagerung sollte nicht unter -15°C und bei max. + 30° C erfolgen.
Durch sehr feine Konstruktionsdetails ist der SAFEX-FLOWMARKER sehr empfindlich
gegen Verschmutzung der Flüssigkeitswege und des Nebelfluides selbst. Daher
müssen die Befüllungsöffnung und das Dosenventil der Fluiddose vor Verschmutzung
durch Fasern, Fussel und klebrige Flüssigkeiten aller Art geschützt werden.
Der Ventilstift der Fluiddose ist durch die Dosenkappe abzudecken, er kann ggf. mit
warmem Wasser gereinigt werden.
Die Einfüllöffnung ist nach der Befüllung mit einem saugfähigen Papier von ggf. anhaf-
tenden Fluidresten zu reinigen und vor einer erneuten Befüllung von Fusseln und Staub
mittels einer weichen Bürste oder einem kräftigen Pinsel zu reinigen, auch diese Stelle
kann durch warmes Wasser gereinigt werden. (Alle Gehäuseteile sind aus Edelstahl)
Es darf jedoch kein Wasser in das Innere des Gerätes gelangen.
FluIDFülluNG uND
TaNk

20 / 22 • GA FM 1 05.01
NEBElFluIDDOSE
uND FluIDDruCk
Selbstverständlich ist das Befüllsystem des SAFEX-FLOWMARKER mit einem hochwirksa-
men Filter ausgerüstet, der bei Bedarf auf einfache Weise gewechselt werden kann.
Ist beim Nachfüllen von Nebelfluid mit einer „frischen“, mit ausreichend Druck versehe-
nen Fluiddose zu beobachten, dass sich nur sehr langsam oder praktisch kein Fluid in
den Tank einbringen lässt, so kann, neben einer leeren oder drucklosen Fluiddose als
Ursache der Einfüllfilter verstopft sein.
Der Filterwechsel ist dann wie folgt vorzunehmen:
1. Einfüll-Filterkartusche (siehe Abb. links) mittels einer Münze
durch Linksdrehen aus dem Gerät herausschrauben.
2. Weißen Microporenfilter (30 my) aus der Filterkartusche ent-
nehmen (ggf. Pinzette verwenden) und entsorgen. Gleichzeitig
auch schwarzen Dichtungs-O-Ring entfernen.
3. Neuen Micro-Filter in vorgesehene Vertiefung ohne Kraftan-
wendung drücken und ebenfalls neuen O-Ring in Nut einlegen.
(O-Ring muß faltenfrei und gleichmäßig in der Nut liegen). Dabei
auf äußerste Sauberkeit achten.
4. Jetzt Filterkartusche wieder in das Gerät schrauben und mittels
Münze handfest anziehen.
Der ausgebaute Filter sollte nicht gereinigt oder wiederver-
wendet werden, auch ist eine Reinigung der Befüllungsöffnung
mittels spitzer Gegenstände unangebracht.
Das Gerät sollte auch unter keinen Umständen ohne Filter be-
trieben werden, da bereits kleinste Partikel zu einer ernsthaften,
reparaturaufwendigen Beschädigung des Gerätes führen können.
Eine Verstopfung der Flüssigkeitswege oder des Wärmetauschers
kann nicht mit Säuren, Entkalkern oder anderen Reinigungs-
mitteln behoben werden, ohne das Gerät ernsthaft zu zerstören.
Eine sachgerechte Reparatur ist nur im Herstellerwerk möglich.
Austausch-Heizkörper stehen als Ersatzteil zur Verfügung.
FIlTErwEChSEl
Das in der Fluiddose befindliche Nebelmittel ist ungefährlich und kein Gefahrstoff,
die Dose steht jedoch unter Gasdruck und ist daher als Gefahrgut im Sinne internatio-
naler Transportvorschriften unter UN-Nr: „1950 AEROSOLE“ anzusehen. Das Druckgas
ist unbrennbar, ungiftig und umweltneutral.
Nach europäischen Vorschriften unterliegen die Safex-Fluiddosen bis 10 kg pro Packstück
erleichterten Bedingungen beim Transport auf der Straße bzw. mit der Eisenbahn und
müssen lediglich gut verpackt sein. (GGAV, Ausnahme Nr. 9).
Der Druck der Dose ist temperaturunabhängig, er nimmt bei jedem Füllvorgang ab. Es
dauert daher jedes Mal einige Sekunden länger um den Tank zu befüllen.
Um die Dose nicht fehlerhaft zu „entlüften“, darf der Befüllvorgang des Gerätes nur mit
dem Ventilstift senkrecht nach oben erfolgen, eine Befüllung in waagerechter oder
anderer Position ist nicht möglich!
Für spezielle Anwendungen kann es erforderlich sein, dass nur sehr wenig Nebel erzeugt
wird. Da die Ausstoßmenge vom Befüllungsgrad des Tanks abhängig ist, kann es daher
sinnvoll sein, den Tank ggf. nur zu einem Drittel oder zur Hälfte zu füllen.
Table of contents
Languages:
Popular Laboratory Equipment manuals by other brands

Metrohm
Metrohm 942 Extension Module Vario ONE/Deg manual

Koehler
Koehler K4304X Operation and instruction manual

Himedia
Himedia COLONY COUNTER LA660 quick start guide

Oxford Instruments
Oxford Instruments OptistatDry BL4 System manual

flexcell
flexcell BioFlex user manual

Bertin Technologies
Bertin Technologies Coriolis m user manual