Sakar GP-5568 User manual

pro track ultra
Bluetooth activity tracking band
Instruction Manual
Item #GP-5568
© 2016 Sakar International, Inc. All rights reserved.

1
Introduction
The Sakar pro track ultra Bluetooth activity tracking band allows you to track your steps, distance, calories
burned and quality of sleep. It is compatible with iOS and Android devices so that you can track your daily,
weekly, monthly and yearly data via app on your mobile device. Please read this manual first before using this
device in order to get best results.
Intended Use
The pro track ultra Bluetooth activity tracking band is a home fitness product only and it is not intended to
serve as a substitute for the advice of a physician or medical professional. Do not use this device for diagnosis
or treatment of any health problem or disease. This is not a medical device.
Important Note
Your pro track ultra Bluetooth activity tracking band can be used as a Bluetooth device so that you can monitor
your steps using iPhones and iPads which run iOS 7 and above, and Android devices running Android 4.3 or
above. In addition, your phone or tablet needs to support Bluetooth LE (Bluetooth low energy). To use your
tracking band with your smartphone or tablet, you must make sure the Bluetooth function is enabled.

2
Package Contents
1. Pro track ultra Bluetooth activity tracking band
2. User’s manual with warranty information
Features
Tracks Steps, Distance, Calories Burned and Quality of Sleep
Wirelessly Syncs Data to Smartphones and Portable Devices
Rechargeable Lithium Ion battery
LED Display Shows 4 Different Modes
-Step Mode Displays Number of Steps Taken
-Time Mode Displays the Current Time
-Calorie Mode Displays Number of Calories Burned
-Distance Mode Displays Distance Traveled
LED Lights Indicate Workout Intensity
-Blue LED = Low Intensity
-Green LED = Medium Intensity
-Red LED = High Intensity

3
Assembling Your Device
After opening the device packaging, make sure that all of the accessories are present.
To fully assemble your tracking band, slide the receiver into the wrist band as shown in the graphic below.
Then push the receiver down so that the clasp enters the two holes that best allow your wristband to fit
comfortably, yet securely.
Charging Your Device
Your tracking band must be charged before using. In order to charge, follow the steps below:
1. Remove the receiver piece from the wristband.
2. Insert the receiver piece into an available USB port on your computer.
3. Charging the product may take about two hours for a full recharge.

4
Using Your Tracking Band
Normal Activity Mode
The Normal Activity Mode records your step and calorie activity.
Short press the Mode button on your wristband to toggle through the different modes.
The Normal Activity Mode option includes:
Time Mode : In Time Mode, the current time and battery level are displayed.
Step Mode : In Step Mode, the amount of steps you take is displayed.
NOTE: When your steps taken exceed 10000 steps in one day, the wristband vibrates 3 times and
displays a red light.
Calorie Mode : In Calorie Mode, the amount of calories burned is displayed.
Mode Button

5
Temporary Activity Mode
Temporary Activity Mode allows you to view your activity data on your device during a specific period of time.
Long press the Mode button on your wristband for 3 seconds to access this mode. The elapsed time and
battery level appear on the wristband screen. Short press the Mode button to toggle between the options.
Every time you enter this mode the data starts recording from zero. The data is displayed only on your device.
To return to the Normal Activity Mode, long press the Mode button on your wristband for 3 seconds again.
The Temporary Activity Mode options include:
Step Mode : In Temp Step Mode, the amount of steps taken while in temp mode is displayed.
Calorie Mode : In Temp Calorie Mode, the amount of calories burned while in temp mode is
displayed.
Distance Mode : In Distance Mode, the distance traveled in meters while in temp mode is
shown.
LED Light
The LED light on your wristband’s Mode button indicates the intensity of your workout.
If a BLUE LED light is flickering, a low amount of activity is detected, < 60 steps/min.
If a GREEN LED light is flickering, a medium amount of activity is detected, 60-120 steps/min.
If a RED LED light is flickering, a high amount of activity is detected, > 120 steps/min.
NOTE: Double click the Mode button to turn the flickering of the LED light on or off.

6
Setting up the Sakar Fitness App
Mobile Device Requirements
Your Pro track ultra Bluetooth activity tracking band can be used as a Bluetooth device, compatible with most
iPhone/iPad/Android phones or tablets which support Bluetooth LE (Bluetooth low energy).
DEVICE REQUIREMENTS
iPhone with iOS 7 and above
Android phone with OS 4.3 and above
NOTE
:
Your Android mobile device, tablet, iPhone, or iPad requires Bluetooth LE

7
Installing the Sakar Fitness App
Automatically and wirelessly sync your Pro track ultra Bluetooth activity tracking band with your mobile device
so you can view your latest stats, graphs and charts on your smartphone or tablet.
The Sakar Fitness app can be found on the iOS App store or Google Play store by searching for ‘Sakar Fitness’.
If you already have installed the Sakar Fitness application, check for available updates to make sure you have
the latest version.
1. Use your mobile phone or tablet to search for Sakar Fitness in Google Play (for Android OS) or the Apple
App Store (for iOS).
Alternatively, scan the QR codes below to find the application.
2. Install the application according to the instructions.
QR Code: Android QR Code: iOS

8
Initial Setup and Device Pairing
Your Sakar pro track ultra Bluetooth activity tracking band must be paired directly through the Sakar Fitness
App.
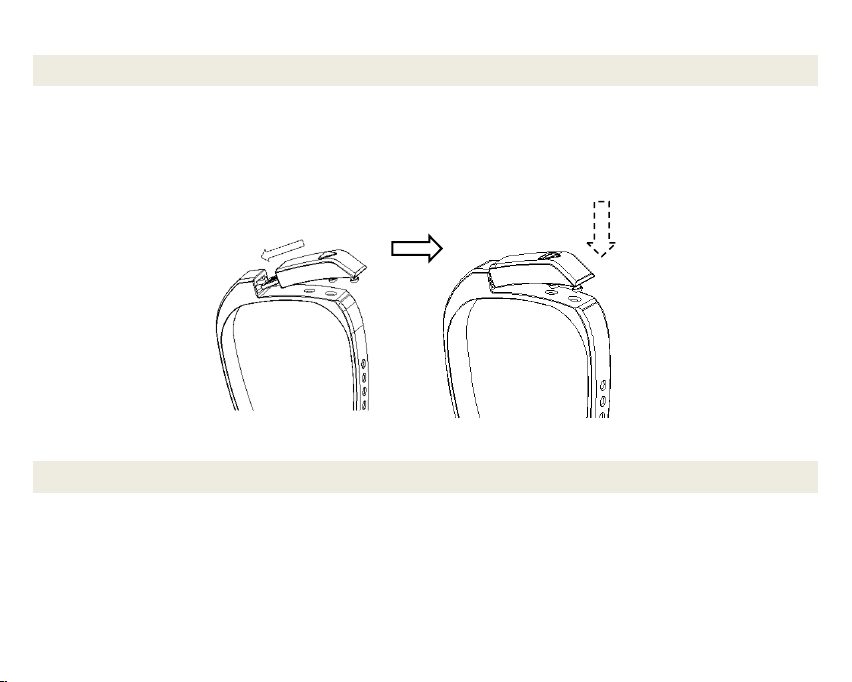
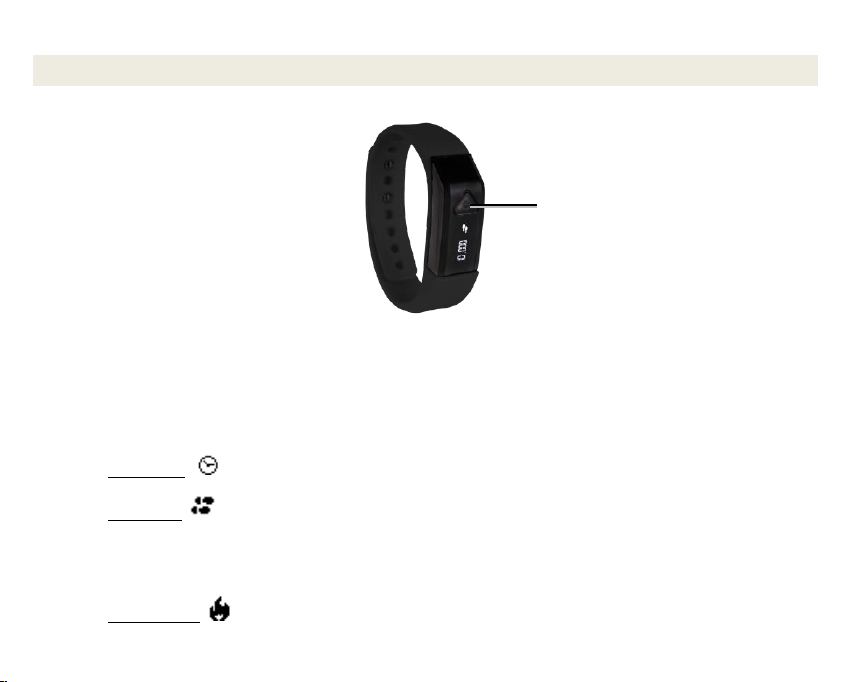
1. Press the Mode button on your Sakar activity tracking band to activate it.
2. Power on your smartphone or tablet. Make sure your smartphone or tablet is set to Bluetooth ‘On’. Check
your mobile device settings if needed.
3. Tap the Sakar Fitness App from your mobile device to launch the app and begin the initial setup.
3. The Sakar Fitness App Initial Setup: Start
The ‘Setup Wizard’ appears. Tap Start to personalize and create your account.
4. Personal Data
Enter your personal data:
Select an image of yourself, enter your name, preferred measure unit, gender and birthday.
Tap Next to continue.
Enter your height, weight and stride length. Tap Next to continue.
NOTE: All personal data must be entered in order continue to the next screen. To measure your stride
length, walk ten steps, measure the distance in inches and divide by ten.
5. Pairing: Connecting Your Device
Select your device to pair with your smartphone/tablet:
Make sure your smartphone/tablet is in the Bluetooth discovery mode.
Make sure your Sakar activity tracking band is activated (press the Mode button to activate).
The list of Sakar Bluetooth devices appears.
Tap your device to select it and then tap Connect.
Enter the code that appears on the device screen and tap Pair. Tap Connect to complete the pairing.

9
6. Goals
Enter your personal goals for steps, distance, calories and sleep time.
After entering your daily goals, tap Next to continue the setup.
NOTE: All ‘’Goals’ data must be entered in order continue to the next screen.
7. The Sakar Fitness App: Setup Complete
Tap Finish to complete the setup and begin using your Sakar Fitness application with your Sakar device.
NOTE: You can set up and register one Sakar Heart Rate Monitor device and one Sakar activity tracking band
with the Sakar Fitness application.
Using the Sakar Fitness App
IMPORTANT NOTE:
In order to maintain sufficient transmission range it is necessary to keep your Sakar Bluetooth activity
tracking band within 30 feet of your phone/tablet. It is recommended to keep your smartphone/tablet in
front of you or in your pocket during use.
If your Bluetooth activity tracking band is not making a proper Bluetooth connection, check your
smartphone/tablet Bluetooth settings menu.

10
Getting Started
1. Make sure your Sakar Bluetooth activity tracking band has been charged and been placed properly on
your wrist. Power on your iPhone/Tablet/Android device and launch the Sakar Fitness app.
2. Once you have registered and paired your device as described in the previous section, the ‘Home’ screen
appears.
3. Tap Daily Activity to open the ‘Daily Activity’ screen or Sleep Activity to open the ‘Sleep Monitor’ screen.
NOTE:
Options that appear on the ‘Home’ screen which are not available for your selected Sakar device will be
inactive.
If you have not created your account, a message appears when trying to enter screens beyond the ‘Home’
screen notifying that you must first register your Sakar Fitness device.
Home Screen

11
Daily Activity Measurements
DAILY ACTIVITY SCREEN
If you have tapped and selected Daily Activity, from the Home screen, the ‘Daily Activity’Home screen appears
with the following options and information:
DAILY ACTIVITY SCREEN: TAB OPTIONS
NOTE: Tab options not available for your selected Sakar device will appear inactive.
-Daily Activity Tab: This tab appears automatically highlighted and indicates that you are viewing the Daily
Activity home screen.
-Sleep Activity Tab: Opens the ‘Sleep Monitor’screen.
Daily Activity Screen Activity Monitor Screen

12
-Heart Rate Tab: Opens the ‘Heart Rate’screen when the Sakar Heart Rate Monitor device is connected.
NOTE: Not available for the GP-5568.
-Activity Monitor Tab: Opens the controls for recording your steps.
-Sync Data Tab: Syncs data from your Sakar Bluetooth activity tracking band and adds any saved data to the
app.
DAILY ACTIVITY SCREEN: MEASUREMENT INFORMATION/DATA
-Activity Level Bar: Displays your daily activity level percentage measurement of blended goals.
-Steps Bar: Displays the number of steps, your goal and percentage of achieved goal.
-Distance Bar: Displays daily distance measurement, your goal and percentage of achieved goal.
-Calories Bar: Displays the number of daily calories burned, your goal and percentage of achieved goal.
ACTIVITY MONITOR SCREEN: RECORDING YOUR STEPS
1. Tap the Activity Monitor button to open the ‘Activity Monitor’screen.
The Activity Monitor takes your periodic step measurements in real time.
2. START:
Tap Start for your Pedometer to begin counting your steps. Note that once you start your Pedometer, it
is locked so that you do not accidentally stop or reset it.
Your step measurements appear in the center in real time. Note that data will only be recorded once you
tap the Start button. The following data is displayed under the steps counter: Time, Distance, Calories
3. STOP/RESET:
To stop or reset your pedometer, tap the Lock icon first to unlock it. The Unlock icon appears.
Then press the Stop or Reset button.
4. SAVE:
Tap Back to save your data and return to the ‘Daily Activity’ screen. Your measurements appear updated
as per the saved data.

13
Sleep Activity Measurements
To measure the quality of your sleep, tap Sleep Activity from the ‘Home’screen.
The ‘Sleep Monitor’ screen opens.
Home Screen Sleep Monitor Screen

14
SLEEP MONITOR SCREEN
The ‘Sleep Monitor’screen takes periodic sleep measurements.
1. START:
Tap Start in the Sakar Fitness app to begin the sleep
measurements.
The sleep time is displayed in the Sleep Counter in the center of
the screen.
2. STOP:
Tap Stop to stop taking the sleep measurements.
3. SAVE:
Tap Back to save your sleep measurements.
The periodic sleep measurements are saved and can be viewed in
the ‘Sleep Activity History’ screen.
4. DATA DISPLAYED:
-Went to bed: Displays the start time.
-Wake up: Displays the stop time.
NOTE: The application does not save periodic measurements separately.
The app automatically saves the data into the accumulated daily sleep activity.
Sleep Monitor Screen

15
SLEEP ACTIVITY SCREEN
The Sleep Activity screen accumulates daily measurements taken from the Sleep Monitor. These daily
measurements can be seen after saving the recorded data. Tap the Sleep Activity tab to open the ‘Sleep
Activity’ screen.
The following options and information appear on the ‘Sleep Activity’ screen:
SLEEP ACTIVITY SCREEN: TAB OPTIONS
NOTE: Tab options not available for your selected Sakar device will appear
inactive.
-Daily Activity Tab: Tap the Daily Activity tab to open the ‘Daily Activity’
screen.
-Sleep Activity Tab: This tab appears highlighted when you are viewing
this screen.
-Heart Rate Tab: Opens the ‘Heart Rate’ screen when the Sakar Heart
Rate Monitor device is connected.
NOTE: Not available for the GP-5568.
-Sleep Monitor Tab: Tap the Sleep Monitor tab to open the
‘Sleep Monitor’ screen.
-Sync Data Tab: Tap the Sync Data tab to sync data from your
Sakar Pedometer and add any saved data to the app.
SLEEP ACTIVITY SCREEN: MEASUREMENT INFORMATION/DATA
-Sleep Time
-Sleep Quality: No Sleep Activity, Normal Sleep, Irregular Sleep
Sleep Activity Screen

16
Navigation Bar
The bottom navigation bar includes tabs that allow you to quickly access the Home screen, your exercise goals,
history and charts.
Tap the Home tab to enter the Home screen or the previously viewed screen.
Tap the Goals tab to open the Goals screen that displays the status of your set goals as per the percentage
achieved. You can edit and reset your personal goals through the ‘Goals’ menu option.
Tap the History tab to display the history of your recorded measurements in the calendar view.
Tap the Chart tab to display the chart view of your recorded measurements.

17
Menu Options
Tap the Menu icon on the top right to open the Sakar Fitness Menu options.
NOTE: Some Android mobile devices include a Menu button. Tap the Android’s Menu button to open the
application’s Menu options.
The Menu includes the following options:
1. Personal Data
The Personal Data menu option allows you to edit your user information: Name, Picture (tap on the
picture to select a photo from your Gallery or take a new photo), Gender (Male/Female), Birthday, Height,
Weight, Stride Length, Measure (Metric or Imperial).
2. Set Goals
The Goals menu option allows you to edit the measurements you would like to achieve for Steps,
Distance, Calories and Sleep Time.
3. Bluetooth Devices
REGISTERED Sakar FITNESS DEVICES
The Bluetooth Devices menu option allows you to view the Sakar Fitness Bluetooth devices that have
been registered/set up with via the Sakar Fitness app.
The status of each device is displayed: Connected Devices or Disconnected Devices
NOTE: You can set up and register one Sakar Heart Rate Monitor device and one Sakar Pedometer or
Activity Tracking device with the Sakar Fitness application.
AVAILABLE DEVICES
Tap Scan to open a list of available Sakar devices connected via Bluetooth.
- Add Device: If you have not registered a Sakar device or have added only one, you have the option to
select one of the devices from the list to add the device. You will be prompted to confirm the selection.

18
Once confirmed, the device will appear in the Registered Sakar Fitness devices list.
- Change Device: Select one of the registered devices from the list. You will be prompted to confirm
before the devices are switched.
4. Alarm
The Alarm menu allows you to set alarms using the Sakar Fitness App.
To set the alarm, tap Create alarm + . Scroll to set the time and if you would like to repeat the alarm on a
specific day then tap the specific day(s). When finished setting the alarm, tap Done to save the setting.
To change or delete an alarm setting that you have created and saved, tap Edit and then select the alarm
you would like to change.
When the alarm is activated, the wristband vibrates continuously and the green light flickers. Press the
Mode button to stop the alarm.
5. About
The About menu option opens a window with the Sakar Fitness app copyright and version.
6. Help Guide
The Help Guide menu option opens the online help in an external browser.
7. User Manual
The User Manual menu option opens the online manual in an external browser.
8. Exit
Exits the app.
NOTE: The Exit menu option is applicable on Android devices.

19
Viewing the Recorded Data
The data that has been saved can be accessed and viewed when tapping the History, Chart and Goals
navigation bar tabs.
History View
Tap the History tab on the bottom navigation bar to display all historical data
taken from your Sakar devices. The History calendar’ screen appears. The
History calendar allows you to browse through months and years by tapping
on the Previous and Next arrows by the date.
The History calendar also displays different colors for each day as per the
goals that have been achieved. The colors indicate the following:
Gold: Shows that your goals have been met.
Silver: Shows that 80% of your goals have been met.
Red: Shows not enough activity for that day.
History Calendar Screen
Table of contents
Other Sakar Fitness Tracker manuals