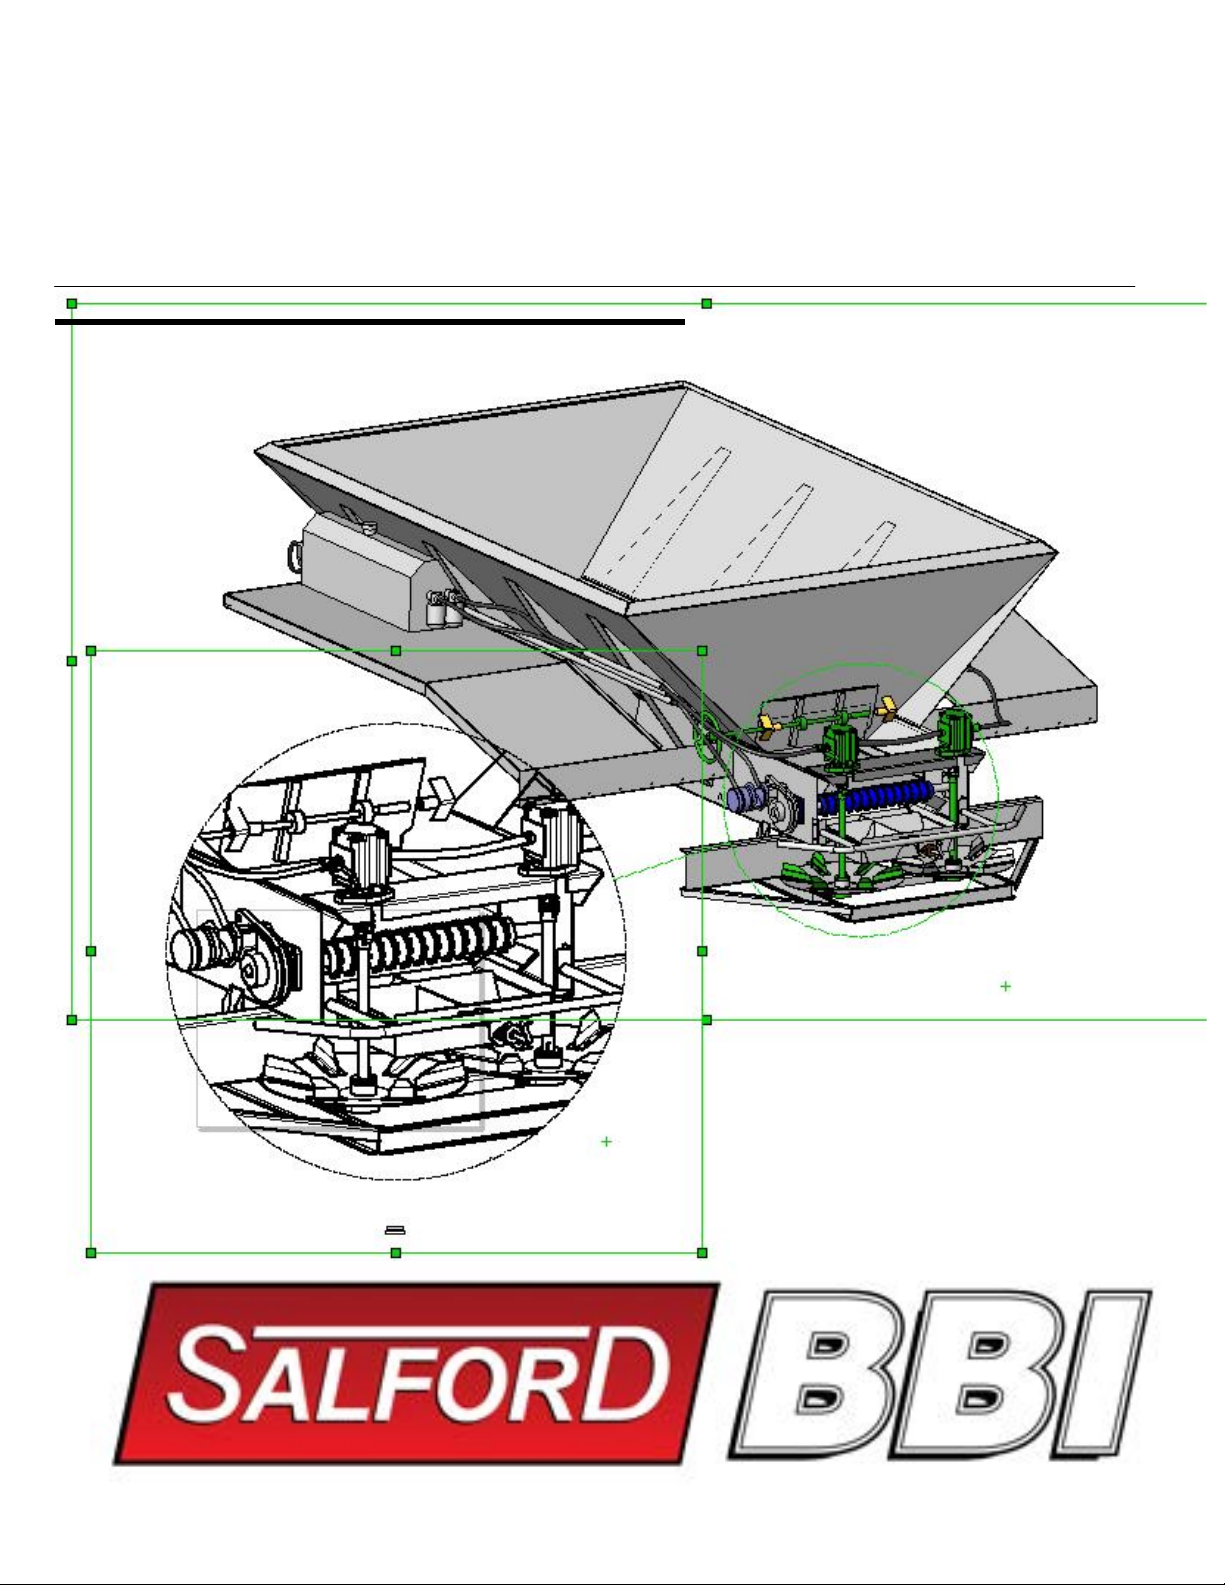
Salford BBI MAGNASPREAD User manual

FT TRUCK MT 1
Owners Manual
MAGNASPREAD
HYDRAULIC TRUCK MOUNT

FT TRUCK MT 2
TABLE OF CONTENTS
TO OUR CUSTOMERS_________________________________________________________
WARRANTY__________________________________________________________________
SAFETY_____________________________________________________________________
SAFETY WARNINGS________________________________________________________
AVOID ACCIDENTS________________________________________________________
SAFETY DECALS___________________________________________________________
HAZARDS TO AVOID_______________________________________________________
BASICS______________________________________________________________________
INITIAL STARTUP__________________________________________________________
ROAD TEST_______________________________________________________________
GENERAL OPERATING PROCEDURE_________________________________________
ADJUSTING YOUR SPREADER___________________________________________
ADJUSTMENTS_________________________________________________________
FERTILIZER CALIBRATION_____________________________________________
HOW TO CHECK A SPREAD PATTERN____________________________________
EFFECTIVE SWATH WIDTH____________________________________________
FINE-TUNING SPREAD PATTERNS_____________________________________
MATERIAL FLOW DIVIDER____________________________________________
SPINNERS__________________________________________________________
TROUBLESHOOTING__________________________________________________
ACCURATE METERING OF FERTILIZER MATERIALS_____________________
MAINTENANCE______________________________________________________________
HYDRAULIC SYSTEM__________________________________________________
CONVEYOR CHAIN___________________________________________________
LUBRICATION_______________________________________________________
CLEANUP____________________________________________________________
FASTENERS__________________________________________________________
PARTS_______________________________________________________________________
PARTS DIAGRAMS_________________________________________________________
PARTS LIST_______________________________________________________________
APPENDIX___________________________________________________________________
HYDRAULIC SCHEMATIC______________________________________________
MID-TECH ARC6000__________________________________________________
MID-TECH SETUP PROCEDURE_______________________________________
MID-TECH OPERATION PROCEDURE__________________________________
MAGNA SPREAD OPTION_____________________________________________
3
4
5
5
6
6
7
8
8
8
9
9
10
10
13
15
16
16
17
18
19
20
20
20
22
23
23
24
24
26
27
27
28
29
30
31

FT TRUCK MT 3
TO OUR CUSTOMERS
The BBI team takes pride in producing superior spreaders that will provide many
years of service. Components are selected for their proven performance record and
availability. Our skilled employees give special attention to detail in design and
assembly to make certain our equipment will meet or exceed your expectations.
Our parts department stands ready to serve you with replacement parts at
affordable prices. We stock a large inventory to assure support for our customers,
and take pride in offering “same day service” for those orders received before mid-
afternoon.
At BBI, we provide quality service with a friendly atmosphere. Our dealers can
offer service assistance, or we can be contacted directly. We strive to quickly
provide solutions for your needs in order to minimize any downtime or delays.
At BBI we take safety very seriously. Great concern is given to reduce any
potential safety issues, whether with equipment or in the work place. Our
equipment is designed to minimize pinch points and provide guards where they do
exist. Decals are placed on our equipment to identify and caution against areas of
pinch points and hazardous moving parts. Please be sure that those who operate
BBI equipment are properly trained. Never conduct maintenance or repairs unless
the equipment is fully disabled with the power source turned off. Never stand
inside or behind the unit while in operation or moving. Our spreaders are designed
to project materials from 30 to 90 feet, depending on the specific equipment; and
standing too close can result in injury. Please use extreme caution when operating
all farm equipment.
Thank you for choosing BBI spreading equipment. You will be glad you did.
Richard B. Hagler
President
“Spreaders That Work as Hard as You Do”

FT TRUCK MT 4
WARRANTY
Barron & Brothers International warrants all products manufactured by it to be free from defects
in material and manufacturing at the time of shipment AND for an additional period of One
Hundred Eighty (180) days, from the date invoiced to our direct customer or the dealer’s
customer AND provided the total period does not EXCEED One (1) Year from the date invoiced
to the dealer. On parts manufactured by another vendor (i.e., motors, pumps, axles, etc.), the
parts will be subject to the original manufacturer’s warranty AFTER expiration of Barron &
Brothers International’s One Hundred Eighty Day (180) Warranty.
Barron & Brothers International’s warranty SHALL BE VOID AND NOT APPLY to any
product which has been subject to misuse (including but not limited to overloading),
misapplication, neglect (including but not limited to improper maintenance), accident, improper
installation of parts, modification of the unit, improper adjustment, or improper repair of the unit.
All parts to be warranted by Barron & Brothers International must be returned to the factory for
inspection and final disposition.
NOTE: THE PART ON QUESTION MUST BE RETURNED WITHIN 30 DAYS FOR
CREDIT TO BE ISSUED!!
Barron & Brothers International’s liability for its equipment, whether due to breach of warranty,
negligence, strict liability, or otherwise, is LIMITED to providing a replacement part(s) in
exchange for the defective part(s) AND Barron & Brothers International will not be liable for
any injury, loss, damage, or expense, whether direct or consequential, including but not limited
to loss of use, income, profit, or production, OR the increased cost of operation.
PARTS
Use only genuine Barron & Brothers International Parts!
Order them from the Authorized Dealer in your area.
When placing an order, please have available:
1. The pertinent model and serial number of the spreader.
2. The part name, part number, and the quantity required.
3. The correct street address to where the parts are to be shipped and the carrier if there is a
preference. We cannot ship to P.O. boxes.
Shipping Damage
Claims for shortages or errors must be made immediately upon receipt of goods. When broken
or damaged goods are received, a full description of the damage must be made to the carrier
agent on the freight bill. If this is insisted upon, full damage can always be collected from the
transportation company. Please contact BBI as soon as possible after carrier is notified.
If your claims are not being handled by the transportation company to your satisfaction, please
contact our Customer Service Department at 1-800-282-3570 for assistance.

FT TRUCK MT 5
SAFETY WARNINGS
TAKE NOTE! THIS SAFETY ALERT SYMBOL
FOUND THROUGHOUT THIS MANUAL IS USED TO
CALL YOUR ATTENTION TO INSTRUCTIONS
INVOLVING YOUR PERSONAL SAFETY AND THAT
OF OTHERS, FAILURE TO FOLLOW THESE
INSTRUCTIONS MAY RESULT IN INJURY OR
DEATH.
In this manual and on the safety signs placed on your spreader, the words “ DANGER,”
WARNING,” “CAUTION,” and “IMPORTANT” are used to indicate the following:
DANGER! Indicates an imminently hazardous situation that, if not avoided WILL
result in death or serious injury. This signal word is to be limited to the
most extreme situations and typically for machine components that, for
functional purposes, cannot be guarded.
WARNING! Indicates a potentially dangerous situation that, if not avoided, COULD
result in death or serious injury, and includes hazards that are exposed
when guards are removed. It may also be used to alert against unsafe
practices.
CAUTION! Indicates a potentially hazardous situation that, if not avoided, MAY result
in minor or moderate injury. It may also be used to guard against unsafe
practices.
IMPORTANT! Is used for informational purposes in areas that may involve damage or
deterioration of equipment and would generally not involve personal
injury.
The need for personal safety cannot be stressed enough. At Barron & Brothers, Int’l. we
strongly urge you to make safety your top priority when operating any equipment. We firmly
advise that anyone allowed to operate our equipment must be thoroughly trained and tested to
prove that they understand the fundamentals for safe operation.
The following guidelines are intended to cover general usage and to assist you in avoiding
accidents. There will be times when you will run into situations that are not covered in this
section. At those times the best standard to use is common sense. If, at any time, you have a
question concerning these guidelines, please call your authorized dealer or our factory at
(800) 282-3570.
SAFETY
Please read and understand this manual before operation.

FT TRUCK MT 6
AVOID ACCIDENTS
Most accidents, whether they occur in industry, on the farm, at home, or on the highway, are
caused by the failure of an individual to follow simple and fundamental safety rules and
precautions. For this reason, most accidents can be prevented by recognizing the real cause and
doing something about it before the accident occurs.
Regardless of the care used in the design and construction of any type of equipment, there are
many conditions that cannot be completely safeguarded against without interfering with
reasonable accessibility and efficient operation.
A CAREFUL OPERATOR IS THE BEST INSURANCE AGAINST AN ACCIDENT. THE
COMPLETE OBSERVANCE OF ONE SIMPLE RULE WOULD PREVENT THOUSANDS
OF SERIOUS INJURIES EACH YEAR. THAT RULE IS:
NEVER CLEAN, OIL, OR ADJUST A MACHINE WHILE IT IS UNDER POWER.
--National Safety Council
CAUTION! If the spreader is used to transport chemicals, check with your chemical
supplier regarding the DOT (Department of Transportation) regulations
SAFETY DECALS
DECAL MAINTENANCE INSTRUCTIONS:
1. Keep safety decals and signs clean and legible at all times.
2. Replace safety decals and signs that are missing or have become illegible.
3. Replaced parts that displayed a safety sign should also display the current sign.
4. Safety Decals are available from your local dealer’s Parts Department or our factory.
SAFETY

FT TRUCK MT 7
HAZARDS TO AVOID:
1. Refrain from wearing loose fitting clothing on or around this piece of machinery. There are
many places that loose clothing may become wrapped or pulled into devices.
2. Be aware of any moving parts on this machinery. Make sure that any person or persons on
or around this piece of machinery are aware of the dangers as well. There are many places
where injury may occur. Learn your unit and the dangers of it. Always use caution in the
operation of this piece of machinery.
3. Be sure that any individuals operating this equipment are trained and are aware of the
dangers of this equipment.
4. Check for rocks, sticks, or anything of solid mass that may cause bodily harm to you or
damage your unit.
5. Never work on or repair this piece of equipment while it is running. The P.T.O. and/or any
other power source must be completely disengaged while working on this unit.
6. Those working around this unit should remain at least 100 feet from it while it is in
operation. The fans are able to propel objects at a high speed up to this distance.
7. Use extreme caution while operating the driven portion of this unit. Its size may limit your
field of vision.
8. Never allow a leak of hydraulic fluid to persist. Hydraulic fluid is kept under very high
pressure, and may cause serious injury if it hits the facial area, especially the eyes.
9. Shut down the entire system before checking hydraulic fluid level, or adding fluid to the
system.
SAFETY

FT TRUCK MT 8
INITIAL STARTUP
Check over entire unit to be sure all guards and fasteners are in place and fasteners are properly
tightened. NOTE: Stand clear of moving machinery. Do not load spreader with material.
1. Check to be sure that no loose parts or other material are in the hopper, on conveyor, or
on spinner. Be sure to remove any loose pieces and ensure all guards are in place.
2. Check to make certain that no one is within 50 feet of the spinners. Engage PTO, which
in turn engages the spinners.
3. Engine RPM should be increased to same as when running. Set spinners to desired speed.
4. Open feed gate to appropriate spread rate (reference chart on side of hopper).
5. Engage conveyor drive system.
6. Begin road testing spreader.
DO NOT check leaks with hands while system is operating, as high-pressure oil
leaks can be dangerous! DO NOT check for leaks adjacent to moving parts while
system is operating, as there may be danger of entanglement.
If your unit has a self-contained hydraulic system, check the oil reservoir and refill as
required. IMPORTANT! Change the hydraulic oil filter after the first week or 50
hours of operation.
ROAD TEST
Prior to first use of the machine, prior to each spreading season, and following any major repair
or overhaul, the machine should be road tested to verify that all systems and components are
functioning properly. Road testing may be done on any suitable course that will allow the
spreader to be driven at similar speeds to be used during spreading. The following procedure is
offered as a guide.
CAUTION! To observe conveyor and spinner speeds while vehicle is in
motion, proper safety precautions should be taken. These may include use of suitable
mirrors clamped to permit observation by a safely seated observer, following the
spreader in another vehicle at a safe distance or other suitable means. DO NOT stand
in the body or on any part of the spreader, as there is danger of falling off vehicle or into moving
machinery. Use great care while performing this test.
BASICS

FT TRUCK MT 9
GENERAL OPERATING PROCEDURES
To operate the spreader, the following sequence should be observed:
1. Be sure the unit has been serviced and is in good operating condition.
2. Disengage the PTO.
3. Fill the body with material to be spread.
4. Drive to the location where spreading is to be done.
5. Adjust the unit’s hydraulic control valve (priority valve) to the setting required for the
material used, based on the desired spread pattern.
6. Adjust the material flow divider to provide proper delivery to spinners.
7. Set the feed gate opening to obtain the desired yield.
8. Engage the PTO
9. Drive at a speed that allows the engine to run at a proper RPM and maintain good control
for the terrain.
ADJUSTING YOUR SPREADER
IMPORTANT! Spinner assembly and material flow dividers have not been
adjusted at the factory. Before spreading material, spread
pattern tests must be conducted to properly adjust the spreader.
THE MANUFACTURER OF THIS SPREADER WILL NOT
BE LIABLE FOR MISAPPLIED MATERIAL DUE TO AN
IMPROPERLY ADJUSTED SPREADER.
It is recommended that spread pattern tests be conducted prior to each spreading season, after
any spreader maintenance, and periodically during the season. Spread pattern tests must be
conducted whenever a new product is to be applied.
The spread pattern is affected by a variety of conditions including:
1. Spinner speed.
2. Point of delivery of material to the spinner dishes.
3. The condition of the fins on the spinner dishes (i.e. damaged, bent, broken, rusted, dirty,
etc.)
4. Material granule size.
5. Material flow characteristics.
6. Material weight per cubic foot.
7. Rate of delivery of material.
8. Balance between deliveries to both spinner dishes.
9. Cleanliness of the fins and the dishes themselves.
10. Level of spreader.
11. Wind.
Because most of these characteristics will change with each load of material being spread, a
certain amount of experience mixed with some testing will determine the adjustments needed to
obtain the spread width and pattern desired. Detailed information is provided in later sections on
how to read the conditions you have and how to make changes to get the spread pattern you
need.
BASICS

FT TRUCK MT 10
FERTILIZER CALIBRATION
General Factors That Affect Spread Patterns:
Fertilizer Size and Density
The particle size will also determine the maximum spread pattern width. The spread pattern can
vary anywhere from 25 ft for powder type materials such as lime or up to 60 ft for fertilizer
pellets.
Large, dense particles will be thrown further than finer materials with lower density. Even after
un-sized fertilizer has been thoroughly blended, segregation will occur during the spreading.
Size is more important than density in determining the distance a particle is thrown. For
example, granular urea is less dense than potash or phosphate materials, but it has a larger
particle. In most cases when spreading a blend, a higher percentage of urea will be found on the
outer edge of the spread pattern.
Driving at an interval to obtain a 100% overlap will minimize the effect of segregation (See
Diagram A).
Application Rate and Ground Speed
These two factors combine to produce a flow rate. Drivers should avoid situations where both
factors are high. As application rate is increased, ground speed should be lowered accordingly.
When both ground speed and application rates are high, too much material is delivered to the
spinner. When this happens the material will dribble off the spinners instead of being thrown,
causing a heavy swath directly behind the spreader.
Generally, the best spread patterns are obtained when a spreader is operated at 5-10 mph.
Spinner RPM
Spinner speed is adjustable from approximately 400 to 900 RPM. However, spinners should be
operated at approximately 550-650 rpm. As spinner speed is increased within the recommended
range, the spread width will widen. This is a function of the hydraulic spinner system, which can
be controlled by the priority valve.
ADJUSTMENTS
Diagram A

FT TRUCK MT 11
Driving Interval
Variations in material being spread will change the swath width of any particular spreader.
Diagram B shows the effect of driving interval on the fertilizer distribution across the field. BBI
truck mounted spreaders are designed to run on a 30-40 foot swath spreading lime and
approximately 60 feet spreading blended fertilizers. You can vary the swath widths as you
become familiar with it and run your particular types of materials.
Effect of Driving Interval on Fertilizer Distribution
(Arrows indicate the direction of travel of the spreader.)
ADJUSTMENTS
Dia
g
ram B

FT TRUCK MT 12
Slope of Land
Spreading fertilizer up or down hill may cause the materials to be placed on a different area of
the spinner, thus changing the spread pattern. Spreaders with discharge chutes extending down
close to the spinners and having small openings through which fertilizer falls on the fans reduce
the variation due to slope.
On hillsides, the spreader will throw material further down hill than up. However, this just shifts
the spread pattern sideways and subsequent passes overlap properly. It is important to divide the
flow of the fertilizer equally between both distributors. This is accomplished with a center
divider, which extends from the flow divider to the gate.
Humidity
This causes fertilizer to adhere to flow divider and spinner blades. This build-up of material will
change the spread pattern. More of a problem is the fertilizer that adheres to the conveyor chain
and is carried forward under the spreader. This fertilizer falls off in a narrow streak and will
show up as a difference in crop growth. Any build-up of fertilizer on the spreader should be
cleaned off when it first begins to form.
Wind
When the wind is with or against the direction of travel it does not offset the spread pattern too
much. A crosswind will shift the entire pattern sideways. The final pattern remains reasonably
accurate for wind up to 15 mph. Crosswinds have more of an affect on lower density materials.
Diagram C shows how wind can affect spread patterns.
Effect of Cross Wind
ADJUSTMENTS
Dia
g
ram
C

FT TRUCK MT 13
HOW TO CHECK A SPREAD PATTERN
Spread Pattern Test Kit
The test kit used for checking spread patterns contains the following items:
•13 plastic pans (14” x 18”) with 5” sides
•13 plastic test tubes with ¾” opening
•1 test tube rack
•1 tape measure
•1 funnel
•1 weigh cup to determine weight per cubic foot or five gallon bucket
Setting up the Test Area
The test area should be 250 feet in length and as wide as necessary, depending on the swath
width of the spreader to be checked.
Use the chart below to determine the interval that the pans should be placed. A swath width
from 30’-80’ will be sufficient to check most spreaders.
SWATH NUMBER OF PANS INCHES BETWEEN
WIDTH NEEDED EACH PAN
(center to center)
30' 7 60"
35' 8 60"
40' 9 60"
45' 10 60"
50' 11 60"
55' 12 60"
60' 13 60"
Lay out test pans on a level area so the spreader can be driven into or with the wind. If the wind
is greater than ten miles per hour, a spread pattern check should not be attempted.
Position the pans so the spreader can be running at least 100’ before it reaches them and can
continue spreading 150’ beyond the pans. Place a marker at the beginning and end of the test
area as guides for the operator.
Level the pans and place them at essentially the same height. Place a marker at the center of
each pan so after the pans have been picked up they can be placed back in their original position
without measuring. Diagram D shows the area requirements for a 50’ spread pattern test.
ADJUSTMENTS

FT TRUCK MT 14
Reviewing The Spread Pattern
Select the application rate, which is common to your operation. To get a good spread pattern
check, 200-400 pounds per acre is adequate. For a single check, 25 pounds of fertilizer per 100
pounds per acre application rate will be needed. Potash can be used for the checking because it
is less expensive than other materials. Once the spreader is set to give an even distribution of
potash, other fertilizer materials such as urea and blends should be used to see if the pattern
differs.
When loading the spreader, care should be taken to place the fertilizer materials against the gate.
Fill the scale, included in the test kit, with material to be spread. Balance the scale on a nail or
knife to find the weight per cubic foot.
OR
If you do not have a hand held scale, simply weigh a 5-gallon bucket of your material and
subtract the weight of the bucket (or tare weight). Multiply this weight by 1.5 to get 7.5 gallons
of material, which is equal to 1 cubic foot.
The charts on the spreaders refers to material in “weight per cubic foot”
Determine the gate setting by using the chart on side of the spreader hopper. Note: fertilizers
usually weigh 60-65 lbs. per cubic foot and lime usually weighs approximately 90 lbs. per cubic
foot.
Begin operating the spreader 100’ before the pans. Straddle each end pan with the spreader and
drive 150’ past the pans before stopping the spreader.
Using a funnel, empty each pan into its corresponding test tube.
Numerically record the amount and plot the results on the graph paper provided with the kit.
ADJUSTMENTS
Dia
g
ram D

FT TRUCK MT 15
EFFECTIVE SWATH WIDTH
The effective swath width is the interval that a particular spreader should be driven to obtain
uniform application. Driving at an interval other than an effective swath width will result in a
non-uniform application (Diagram B). The effective swath width will vary with the type of
material being spread and the rate per acre it is applied. Spread pattern checks should be made
before different fertilizer materials are spread.
There are basically three acceptable spread patterns, the flat top, pyramid and oval (Diagram E.)
With the correct swath spacing, all of these will give a uniform rate of application throughout a
field.
When one of these patterns is obtained, further adjustment is unnecessary and the effective swath
width can be determined.
ADJUSTMENTS
Dia
g
ram
E

FT TRUCK MT 16
FINE-TUNING SPREAD PATTERNS
A spreader can have three main adjustments: an adjustable material flow divider, movable
spinner blades on some models and the spinner rpm. On standard units, the flow divider is the
main control. Keep in mind that adjustable components are all interrelated, which means
changing one may cause others to be affected in unexpected ways.
MATERIAL FLOW DIVIDER
The purpose of the flow divider is to funnel fertilizer materials from the conveyor chain to the
spinners. It is designed to place the material on a specific location on the spinners. It is
adjustable forward and backward using the Crank Handle above and in the center of the spinners.
A good starting point for setting the flow divider is on “3”. From there you can adjust it forward
or to the rear as needed.
Moving the flow divider forward (toward front of truck)
will increase the material thrown to the center of the
pattern (directly behind the truck). Moving the flow
divider backward (toward the rear of the truck) will
increase the material thrown to the outside of the pattern.
Flow
Divider
Gauge
Flow Divider
Crank
Crank-handle adjusts flow divider forwards
and backwards.
ADJUSTMENTS

FT TRUCK MT 17
Spread patterns can also be adjusted by moving the point of delivery toward the outer edge of the
spinner or into the center. Placement of fertilizer near the outer edge of the spinner will increase
the amount of fertilizer deposited behind the spreader. Shifting the point of delivery to the
center of the spinner will increase the amount of material thrown to the sides.
The material divider should be adjusted in conjunction with spinner speed to obtain the best
spread pattern. Trial and error will help determine the correct position most of the time. After
experience is obtained with a variety of materials, the trial and error will become less and less of
an effort but never completely eliminated.
SPINNERS
Proper spinner speed adjustment is very important in obtaining good spread patterns. Its use will
depend entirely on the material being spread. Once set for a particular material, use a marker to
label the location of the flow control lever so as to avoid having to rerun the trial and error
testing for that particular material again.
Spinner Speed
On hydraulic driven spinners, the speed is controlled by a
priority valve. The priority valve can be adjusted to regulate a
constant spinner speed, as long as enough oil is being supplied
by the pump. The amount of oil being supplied to the spinner
system is directly related to the truck’s engine RPM’s. If
engine speed is too slow, then spinners will not have sufficient
oil supplied to keep them at the desired speed. Engine speed
requirements will differ for individual trucks depending on the
percentage of the P.T.O. and pump size.
Spinner speed will vary depending on the type of material
being spread. The size and weight of the particle determine the
speed required. Too high a spinner speed will dump everything
behind the truck. For finely powdered materials the speed will
be fairly low but for large particle materials, the speed may be
very high. In general, the speed will probably be in the range of
550 to 650 RPM.
Predicting how an increase or decrease in spinner speed will affect the pattern of distribution is
difficult. This adjustment should be made only after other methods of adjustment fail to give a
satisfactory pattern. Increasing spinner speed may increase or decrease the material directly
behind the spreader, depending on the material being spread, the original spinner RPM, and type
of blade setting. Adjustments with spinner speed will be by trial and error and is less predictable
than other means of adjustment.
Perhaps the best way to adjust the spinner speed is to observe the way material spins off the
spinner. At slow speed the material leaves the blades in bands. At medium speeds it forms wide
bands in the air, and at higher speeds the bands form into one thick blur.
ADJUSTMENTS
The hydraulic flow control
(priority valve) regulates
spinner speed.

FT TRUCK MT 18
Spinner Blades or Fins
IMPORTANT! Keep your spinners clean. The smallest amount of build-up, rust, or
anything that causes a rough surface will affect the outcome of the spread
pattern.
The purpose of the spinner blades is to catch the material deposited on the spinner and guide it so
the fertilizer is thrown off at the proper angle.
Spinner blades, or fins, are formed in a manner to give an effective loft and trajectory of
material. However, in time, they will wear and disfigure from the abrasiveness of the materials.
Excessive wear can cause an uneven spread pattern. Worn fins should be replaced before they
affect the spread pattern. They can be purchased from your nearest dealer or by calling our BBI
parts department.
CAUTION! Contact with spinners and other moving parts is very dangerous. Please
exercise caution when working around the spreader. Stand clear of the
discharge coming off the spinners. Do not ride on a moving spreader. Do
not make adjustments while the machinery is moving. Always wear eye
protection.
DO NOT STAND ON THE FENDER WHILE
THE SPREADER IS IN MOTION
ADJUSTMENTS
KEEP YOUR
SPINNERS CLEAN!

FT TRUCK MT 19
Troubleshooting
Here are some common results of spread pattern tests and how to correct them.
Pattern 1: Two heavy swaths located directly behind the spinners; material is seen blowing
over the tops of the spinners.
Cause: Spinner speed too fast, material blows over the tops of the spinners and falls to
the ground directly behind the unit.
Cure: Decrease spinner speed.
Pattern 2: Heavy on one side only.
Cause: 1. More material is being deposited on one spinner.
2. Material has collected on the divider panels.
Cure: 1. Accurately measure the position of the flow divider.
2. Keep divider scraped clean of material build-up.
Pattern 3: Heavy in the center, no material exists ahead of fans.
Cause: Divider is too far forward.
Cure: Move divider toward rear.
Pattern 4: Heavy at outer edges. Excessive material strikes front deflector panels.
Cause: 1. Deflector is too far rearward.
2. Spinner speed too fast.
Cure: 1. Adjust divider forward.
2. If adjusting flow divider does not fix problem, adjust spinner speed.
Pattern 5: Good pattern
Cause: Proper spinner and divider setting
Effect: Material exits on arc from near spinner to front deflector. Pattern density tapers
off to nothing at outer 10% on each side of total spread width.
ACCURATE METERING OF FERTILIZER MATERIALS
Once an adequate spread pattern has been obtained, the spreader should be calibrated to deliver
the desired rate per acre.
Tables for determining the gate setting can be found on the spreader decal on the side of the
hopper. Many times an operator will set the gate according to the rate chart and be disappointed
when he comes up short or has product left over at the end of the field. This discrepancy is
usually caused by the miscalculation of the bulk density or weight per cubic foot. The
guesswork of estimating the weight per cubic foot of a blend can be eliminated with the use of
the weigh scale or weighing 7.5 gallons as previously discussed.
After the spreader has been successfully calibrated and tested, it is ready for use.
Remember to USE EXTREME CAUTION and FOLLOW ALL
SAFETY INSTRUCTIONS while operating this machinery.
ADJUSTMENTS

FT TRUCK MT 20
PREVENTATIVE MAINTENANCE
IT PAYS!
The handling and spreading of commercial fertilizers is very corrosive on the metal parts of your
spreader due to the chemical agents in the material. Without an established preventative
maintenance program, your spreader will decay in a relatively short time. If the cleaning,
lubrication, and maintenance recommendations that we provide are followed, your spreader will
have a much longer life, more satisfactory service, and overall costs will be lower.
Hydraulic System
If your unit has a self-contained hydraulic system, the right grade and type of oil is critical for it
to function properly. A good, quality 30-weight oil is used in BBI systems. Next in importance
is that the oil must be clean. To help achieve this, keep the hydraulic oil in closed containers and
clean the top of the container before opening and pouring. If you must transfer the oil to another
container, measure or transfer through a funnel, make sure they are very clean. Refer to the
appendix at the end of this manual for a general hydraulic schematic.
SERVICE SCHEDULE
1. Check the hydraulic fluid level daily. Add oil if needed. Periodically inspect the hoses and
fittings for leaks.
2. Change the hydraulic oil filter after the first 50 hours of work every season.
3. After the first filter change, replace the filter, as the schedule requires.
4. The reservoir should be drained through the drain plug (not through the suction outlet),
flushed, refilled, and the element filter changed annually. If the oil or filter shows any signs
of breaking down (i.e. discoloration, etc.) under continuous high-pressure operation, change
the oil and filter.
Conveyor Chain
Hose down the machine and remove any material build-up on the sprockets or under the chain.
If material is allowed to build up, the chain may ride up and damage the chain and the body.
NOTE: If material builds up under the chain, the chain will ride on the material instead of the
bottom panel. The more material allowed to build, the closer the chain becomes to the chain
shields. If the chain should catch a chain shield, it could permanently distort the chain, the chain
shield, or the body. In the same manner, if the material is allowed to build up in the sprockets,
the same sort of damage will occur. Do not remove material while the chain or spinners are
running.
Lubricate the conveyor chain at least once a week. Use a mixture of 75% fuel oil and 25% SAE
10 oil in a pressurized hand sprayer.
DANGER! When the conveyor is running, stay out of the hopper and away from all
moving parts, nor should you use tools on the conveyor while it is
operating. To lubricate chain, shut down spinners, and run conveyor very
slowly, spray the oil mixture between the links. Do this once a week after
washing the machine, allow it to dry before lubricating.
MAINTENANCE
Table of contents
Other Salford Spreader manuals
Popular Spreader manuals by other brands

Meyer
Meyer SEL SERIES Installation and operating instruction manual

BVA Hydraulics
BVA Hydraulics HFS05 instruction manual

Chapin
Chapin 8201A Assembly / operation instructions / parts

Chapin
Chapin 82400 manual

Chapin
Chapin 82500 Assembly instructions

Meyer
Meyer Blaster 350 Series Operation and maintenance manual