Salora CRU628DAB User manual

Instruction Manual
CRU628DAB
IMPORTANT: Please read all instructions carefully before use and keep for future reference
DAB+/FM Alarm Clock Radio

Instructions GuideControls and Functions
1. Standyby/
Mode
2. Volume -
3. Scan
4. Preset/Dimmer
5. Enter/Snooze
6. Info/Menu
7. Previous
8. Volume +
9. Next
10. USB Out
11. USB Out
3 4 6 7 91
10
2 85
12
16
11

Instructions GuideControls and Functions
12.
13. DC In
14. Earphone Jack
15. Antenna
16. LCD Screen
17. Back Up Battery
9
13 14
17
8
12 15
3 4 6 7 91
13 14
172 85
12 15
16
9
13 14
178
12 15

Instructions Guide
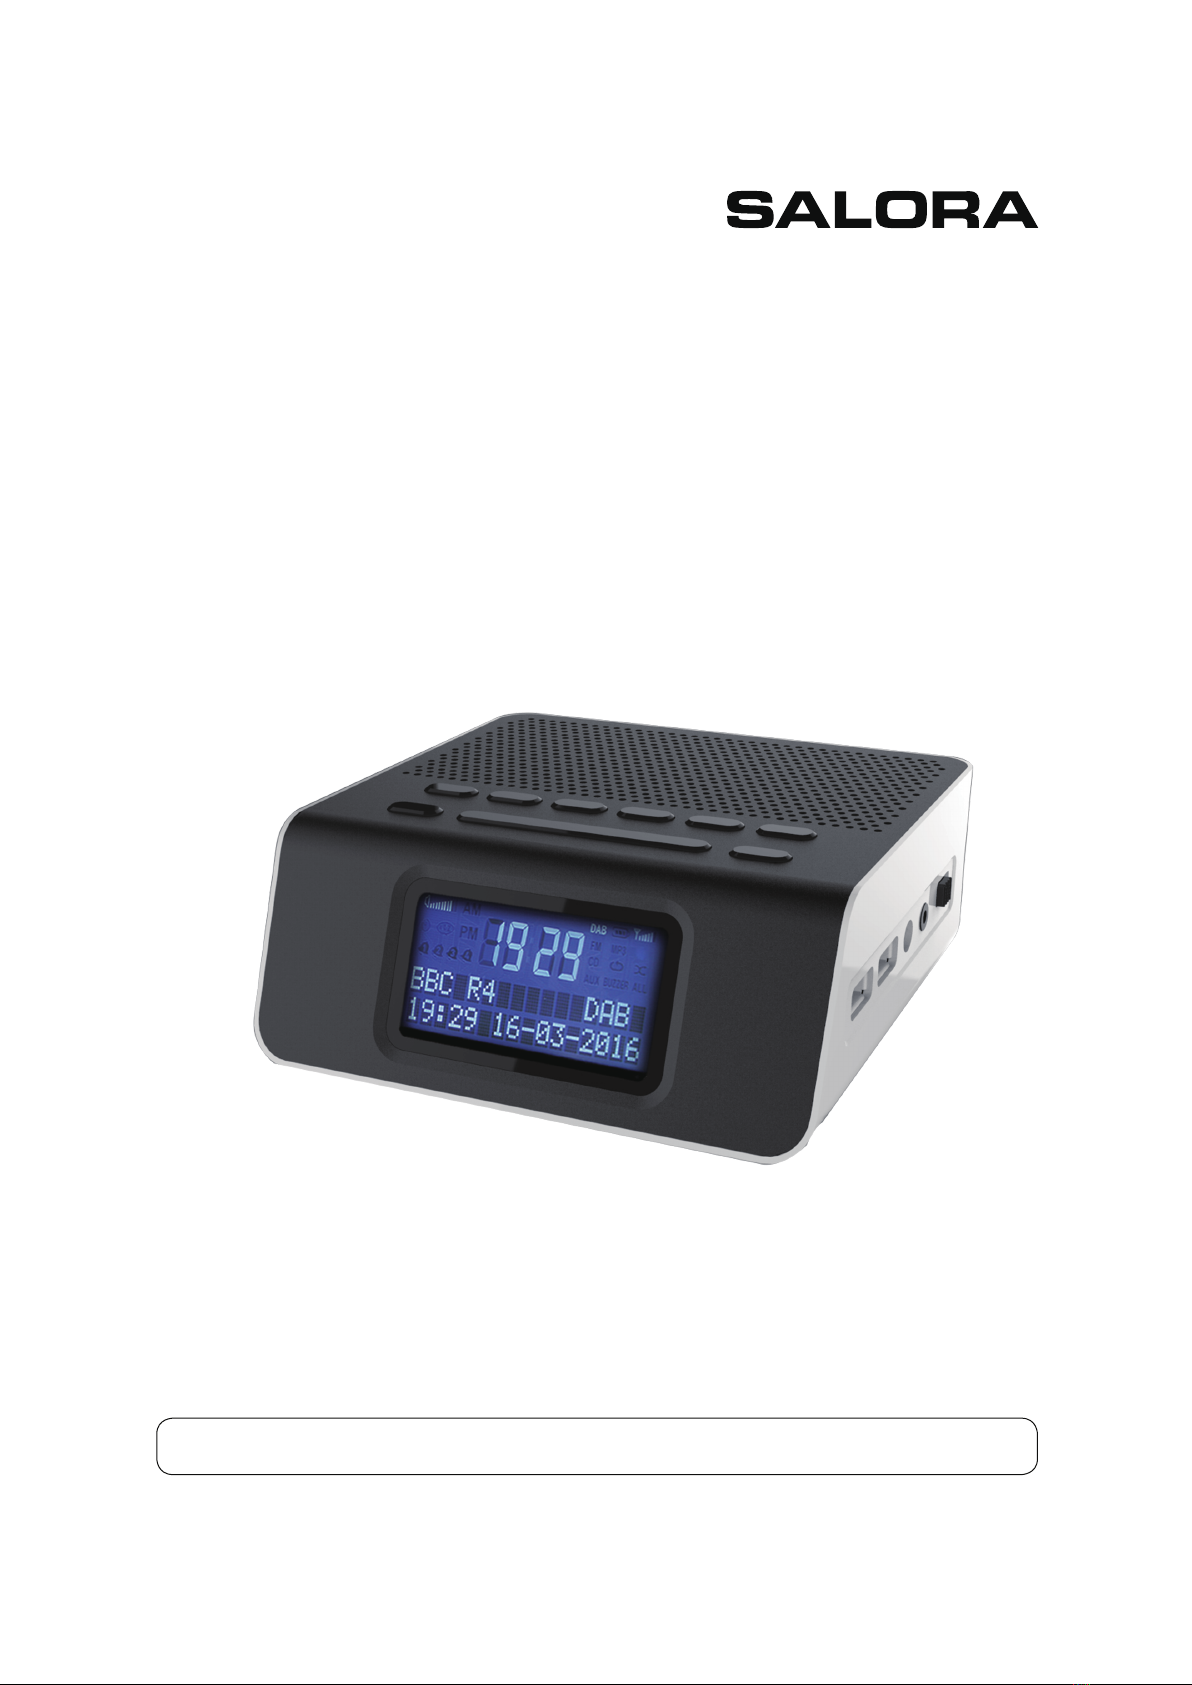
Please note all (Ref.) refer to the Controls and Functions
mapping guide on Pages 1-2.
Basic Operation
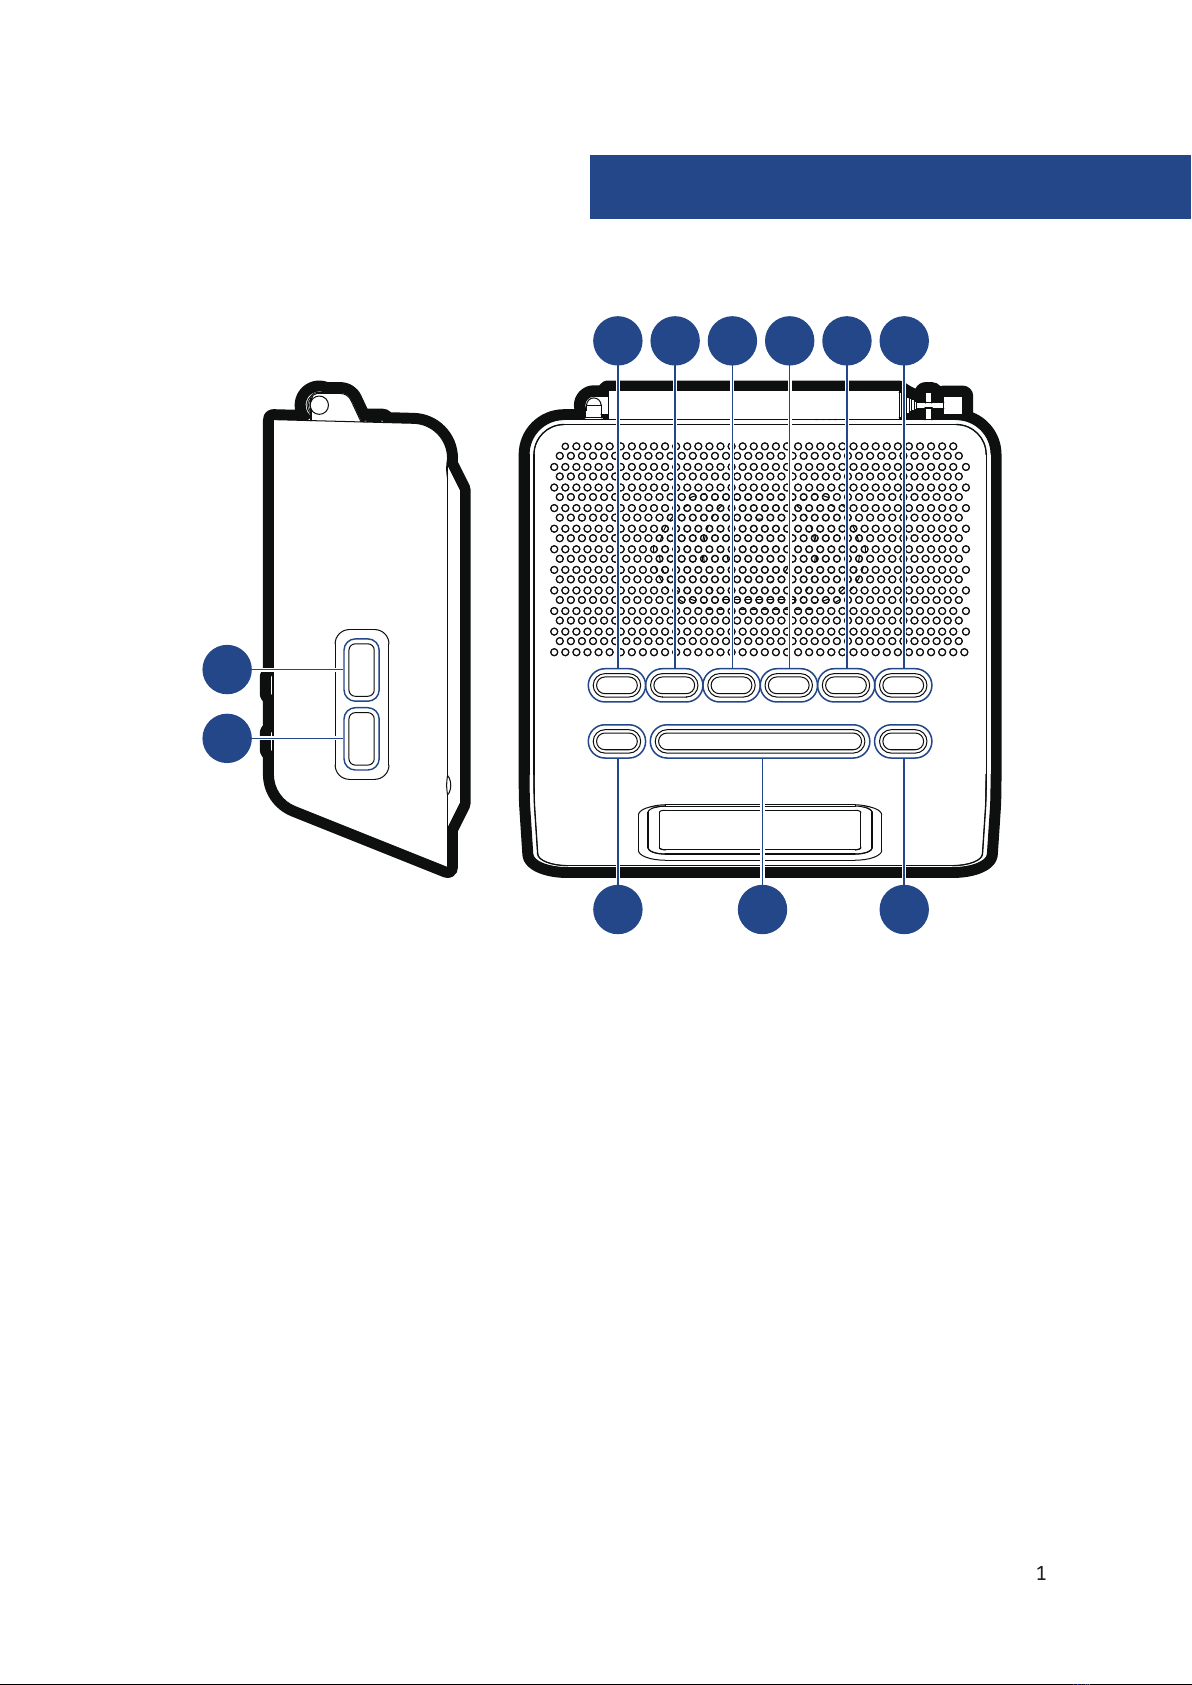
Plug the power supply plug into the mains and the connector
into the back of the system labelled DC IN (Ref.13).
Power Supply ON/OFF at back of system (Ref.12).
Fully extend the antenna (Ref.15) so that it can rotate to get the
best FM signal.
Press the ‘Standby/Mode’ button (Ref.1) to turn the unit on.
The system should go straight to DAB Radio mode and
automatically start scanning for stations. The display will show
“Searching” and can take a few minutes to scan.
Press the ‘Standby/Mode’ button (Ref.1) to switch to FM or
press again to switch back to DAB.
Standby
To change the music system back into standby, press and hold
the ‘Standby/Mode’ button (Ref.1).
the button on rear of the unit (Ref.12
mains. The cord must be out of reach of children.

Instructions GuideInstructions Guide
DAB Radio
Press the‘Standby/ Mode’button (Ref.1) to switch to DAB Radio.
.
Fully extend the antenna (Ref.15).
To auto scan (if the unit hasn’t automatically done so, or shows
no signal) press the ‘Scan’ button (Ref.3) and then release. This
will start scanning up the frequency band and store all stations
that have a good signal. Please note, if you aren’t in a good DAB
signal area then your signal may be very weak.
The radio will automatically save all the stations with a strong
signal.
.
To listen to all stations that have been stored use the ‘Next’
(Ref.9) and ‘Prev’ (Ref.7) buttons to scroll through the stations.
The radio will display station information when you press the
‘Info/Menu’ button (Ref.6). Press multiple times to view all
information available (see page 10).
automatically tune to the same station (DAB or FM) that was
last selected.

Instructions Guide
How to store a preset radio station
Up to 10 preset stations can be set. To store a station that you
are currently playing:
Press and hold ‘Preset/Dimmer’ button (Ref.4). “Preset Empty
.
Press ‘Prev’ (Ref.7) or ‘Next’ (Ref.9) button to change the “1” to
the number you want to store the station as. Then press ‘Enter/
Snooze’ button (Ref.5) to save. The display will then show
“Preset (1) stored”.
How to play a preset radio station
Press the ‘Preset’ (Ref.4).
Press ‘Prev’ button (Ref.7) or ‘Next’ (Ref.9) to scroll through your
preset stations, up to 10.
Press ‘Enter’ button (Ref.5) to select your choice.
IMPORTANT: Please make sure you have
extended the antenna (Ref.15) to its full
length. This will then enable you to rotate it
to get the best signal.

Instructions Guide
FM Radio
Press the ‘Mode’ button (Ref.1) to switch to FM.
you do this FM frequency “87.5 MHz” will be displayed on the
screen.
Fully extend the antenna (Ref.15).
To auto-scan press and release the‘Scan’ button (Ref.3).
This will then start scanning up the frequency band and play
.
hold the ‘Next’
button (Ref.9) to search up the bandwidth quickly and ‘Prev’
button (Ref.7) to search down quickly. It will stop searching
when the button is released. To search slowly press the ‘Next’
(Ref.9) and ‘Prev’ button (Ref.7) multiple times rather than
holding.
Mono and Auto
In working mode, press and hold‘Info/Menu’ button (Ref.6), use
the‘Prev’(Ref.7) or‘Next’(Ref.9) buttons to choose your option.
Choose“AUDIO MODE”and press the‘Enter/Snooze’button (Ref.5).
Press ‘Enter/Snooze’ (Ref.5) multiple times to change between
Mono and Auto. The display will show which mode you are in.

Instructions Guide
How to store a preset radio station
Up to 10 preset stations can be set. To store a station that you
are currently playing:
Press and hold ‘Preset/Dimmer’ button (Ref.4). “Preset Empty
.
Press ‘Prev’ (Ref.7) or ‘Next’ (Ref.9) button to change the “1” to
the number you want to store the station as.
Press ‘Enter/Snooze’ button (Ref.5) to save.
The display will then show “Preset (1) stored”.
How to play a preset radio station
Press the ‘Preset’ button (Ref.4).
Press ‘Prev’ (Ref.7) or ‘Next’ (Ref.9) button to scroll through your
preset stations, up to 10.
Press ‘Enter’ button (Ref.5) to select your choice.

Instructions Guide
FM Sensitivity
This is a measurement of how well the tuner can pick up
signals. The lower the number (it’s usually in the range of 9 to
11), the better.
Press and hold the ‘Info/Menu’ button (Ref.6).
To make your choice use the ‘Prev/Next’ buttons (Ref.7/9) to
choose your option.
Choose “FM SENSITIVITY” and press the ‘Enter’ button (Ref.5).
To make your choice use the ‘Prev/Next’ buttons (Ref.7/9) to
highlight your option, then press ‘Enter/Snooze’.
IMPORTANT: Please make sure you have
extended the antenna (Ref.15) to its full
length. This will then enable you to rotate it
to get the best signal.

Instructions Guide
Station Information for DAB and FM Radio
DAB Radio
Press the ‘Info/Menu’ button (Ref.6) repeatedly to show the
.
Bit Rate: Shows the data rate at which the signal is being
transmitted.
Bit Error Rate (BER): Provides details of the signal error rate.
Channel and Frequency: Displays the station’s transmission
channel number and frequency.
PTY (Programme Type): Shows the type and description of the
programme provided by the DAB station.
Time and Date: Displays the time and date information
provided by the broadcaster.
DAB Indication: Indicates DAB mode.
Dynamic Label Segment (DLS): Displays scrolling text
information supplied by the broadcaster.

Instructions Guide
FM Radio
Press the ‘Info/Menu’ button (Ref.6) repeatedly to show the
.
Signal Strength: Displays a signal bar with the strength of the
current station.
Time and Date: Displays the time and the date.
Frequency: Displays the station’s transmission frequency.
Audio Type: Displays the audio type of the station you are
listening to. It will either be Stereo or Mono.
Radio Text: Displays scrolling text information supplied by the
broadcaster.
Programme Type: Displays a description of the type of
programme provided by the broadcaster.

Instructions Guide
Clock and Date Setting
Manually Setting the Date
Ensure the unit is in working mode (i.e. listening to DAB/FM
Radio).
Press and hold the ‘Info/Menu’ button (Ref.6).
Use the ‘Prev/Next’ buttons (Ref.7/9) to choose your option.
Choose “SET TIME/DATE” and press the ‘Enter’ button (Ref.5).
T. Using the ‘Prev’
(Ref.7) or ‘Next’ (Ref.9) button press until the required year
is displayed.
T(Ref.5) button.
T. Using the
‘Prev’ (Ref.7) or ‘Next’ (Ref.9) buttons press until the required
month is displayed.
T(Ref.5).
T. Using the
‘Prev’ (Ref.7) or ‘Next’ (Ref.9) buttons press until the required
date is displayed.
T(Ref.5) button.

Instructions Guide
Manually Setting the Time
The time can be changed straight after changing the date.
T. Using the ‘Prev’
(Ref.7) or ‘Next’ (Ref.9) buttons, press until the required hour
is displayed.
T(Ref.5) button.
T. Using the
‘Prev’ (Ref.7) or ‘Next’ (Ref.9) button press until the required
minute is displayed.
T(Ref.5).
The time is now set.

Instructions Guide
Dual Alarm Setting
Alarm 1/Alarm 2 Setting
Ensure the radio is in working mode (i.e. listening to DAB or FM
Radio and not in standby mode).
Press and hold ‘Info/Menu’ button (Ref.6). Use the ‘Prev’ (Ref.7)
or ‘Next’ button (Ref.9) to choose your option.
Choose “SET ALARM1” and press the‘Enter’ button (Ref.5).
To turn the Alarm on, press the‘Next’button (Ref.9) so that“ON”
(Ref.5) .
T. Press the ‘Prev’ or ‘Next’
buttons (Ref.7/9) to change the hour and press ‘Enter/Snooze’
button (Ref.5) .
Press the ‘Prev’ or ‘Next’ buttons (Ref.7/9) to change the
minutes and press the ‘Enter/Snooze’ button (Ref.5) .
Press the ‘Prev’ or ‘Next’ buttons (Ref.7/9) to choose when you
want the alarm to sound: Daily/Weekdays/Weekends/Once,
and press the ‘Enter/Snooze' button (Ref.5) .
Press the ‘Prev’ or ‘Next’ buttons (Ref.7/9) to select your
preferred alarm sound: BEEPER/DAB/FM, and press the ‘Enter/
Snooze’ button (Ref.5) .
Press the ‘Prev’ or ‘Next’ buttons (Ref.7/9) to change the alarm
volume and press the ‘Enter/Snooze’ button (Ref.5) .
To set Alarm 2, follow Alarm 1 instructions but choose“Alarm 2 Set”.

Instructions Guide
Alarm Sound, Snooze and Dual USB Ports
Alarm Sound
If the alarm is set to “DAB/FM” mode it will play DAB/FM Station.
If there is no signal it will automatically revert to BEEPER.
If two alarms are set, and ALARM 1 is sounding when ALARM 2
.
T
automatically.
When alarm sounds, press the ‘Enter/Snooze’ button (Ref.5) to
snooze for 9 minutes. You can keep snoozing every 9 minutes
for up to an hour.
If ALARM 1 is snoozed then ALARM 2 will also be snoozed.
T
(Ref.1).
Dual USB Ports – Charging your Phone
Both USB Ports (Ref.10 & 11) output 5V/2A. When connected
via a USB lead into the USB port (Ref.10/11) a phone or tablet
can be charged. You can not play your music via the USB
connection: it is only used for charging a phone or tablet.

Instructions Guide
Other Functions
Sleep Setting
selection of set times up to 90 minutes from activation.
In working mode, press and hold ‘Info/Menu’ button (Ref.6).
Use the ‘Prev’ (Ref.7) or ‘Next’ (Ref.9) buttons to choose your
option.
Choose “SET SLEEP” and press the‘Enter/Snooze’ button (Ref.5).
Using the ‘Prev/Next’ buttons (Ref.7/9), choose from:
OFF, 10mins, 20mins, 30mins, 40mins, 50mins, 60mins, 70mins,
80 mins or 90mins.
When your choice is displayed press‘Enter/Snooze’ (Ref.5).
The system will automatically start the timer.
T
select “OFF”from the choices.
Once the timer has been set the minutes will count down on
the display screen on right hand side.
. The radio
will then go into standby mode.

Instructions Guide
Display Brightness
To change the display brightness, ensure the system is in
standby. Press the ‘Dimmer/Preset’ button (Ref.4) to adjust the
screen brightness.
levels of brightness.
System Reset
Press and hold ‘Info/Menu’ button (Ref.6). Use the ‘Prev’ (Ref.7)
or ‘Next’ (Ref.9) buttons to choose your option.
Choose “SYSTEM RESET” and press the ‘Enter/Snooze’ button
(Ref.5).
The display will show “Press enter key to reset”. Press ‘Enter/
Snooze’ button (Ref.5).
SW Version – Software Version Display
Press and hold ‘Info/Menu’ button (Ref.6). Use the ‘Prev’ (Ref.7)
or ‘Next’ (Ref.9) buttons to scroll through to show software
version “DS540 v1.00”.

Power Supply 100-240V AC INPUT
5V/2.5A DC OUTPUT
Mode FM 87.5-108MHz
DAB/DAB+ 174-240MHz
Output Power 2 W
Standby Mode Show Clock
LCD Black background white fonts,
negative LCD

IMPORTANT SAFETY INFORMATION
1. Read these instructions.
2. Keep these instructions.
3. Heed all Warnings.
4. Follow all instructions.
5. Do not clean the apparatus near or with water.
6. Clean only with a dry cloth.
7. Do not block any ventilation openings.
Install in accordance with the manufacturer’s
instructions.
8. Do not install near any heat sources such as
radiators, heat registers, stoves, or other
heat.
9. Protect the power cord from being walked on or
pinched particularly at plugs, convenience
receptacles, and the point where they exit from
the apparatus.
10. Only use a
the manufacturer.
11. Unplug this apparatus during light storms or
when unused for long periods of time.
12. R
personnel.
Servicing is required when the apparatus has
been damaged in any way, such as power-
supply cord or plug is damaged, liquid has
been spilled or objects have fallen into the
apparatus, the apparatus has been exposed to
rain or moisture, does not operate normally or
has been dropped.
13. ces, such as lit candles,
should be placed on the apparatus.
14. Dispose of used electrical products and
batteries safely according to your local
authority and regulations.
ADDITIONAL WARNINGS
The apparatus shall not be exposed to dripping or
vases, shall be placed on apparatus.
Main plug is used to disconnect device and it
should remain readily operable during intended
use. In order to disconnect the apparatus from the
main mains completely, the mains plug should be
disconnected from the main socket outlet
completely.
Battery shall not be exposed to excessive heat
.
RECYCLING ELECTRICAL PRODUCTS
You should now recycle your waste electrical
goods and in doing so help the environment.
This symbol means an electrical product
should not be disposed of with normal
household waste. Please ensure it is
taken to a suitable facility for disposal
.
IMPORTANT: Please read all instructions carefully
before use and keep for future reference
Risk of electric shock.
Do not open
Read all instructions carefully before use
and keep for future reference
When servicing, use only identical
replacement parts
CAUTION
RISK OF ELECTRIC SHOCK
DO NOT OPEN
ATTENTION
RISQUE D'ELECTROCUTION
NE PAS OUVRIR
IMPORTANT: Please read all instructions carefully
before use and keep for future reference

DAB+FMWekkerradio
GEBRUIKERSHANDLEIDING
CRU628DAB
BELANGRIJK:Leesdezeinstructieszorgvuldigdoorvoordatuhetapparaatgebruiktenbewaardeze
voortoekomstigeraadpleging
Table of contents
Languages:
Other Salora Clock Radio manuals