Salora DVP-7021TWIN User manual

Portable DVD player with two 7” LCD screen
Owner’s Manual
PDF created with FinePrint pdfFactory Pro trial version http://www.fineprint.com
MONITOR
PORT 1
MONITOR
PORT 2
M E N U
SD/DVD
PREV
NEXT
OPEN
STOP
DVP-7021TWIN

Notice:
This Productincorporates copyrightprotection technologythat is pro-
tectedby methodclaims of certain U.S. Patents andotherintellectual
property rights ownedby Macrovision Corporationandother rights own-
ers. Use ofthiscopyright protectiontechnologymust be authorizedby
MacrovisionCorporation,andisintendedforhomeandotherlimitedview-
inguses onlyunless otherwise authorized byMacrovision Corporation.
Reverse engineeringor disassemblyis prohibited.
PDF created with FinePrint pdfFactoryPro trial version http://www.fineprint.com

Content
A. Introduction ........................................................................... 1
B. Cautions and Warnings ...................................................... 1
C. Contents ............................................................................... 3
D. Powering and installation .................................................... 3
E. Controls, Indicators, and Connectors ................................. 6
F. Loading and Playing a Disc ................................................ 8
G. Setup..................................................................................... 9
H. Basic Operation ................................................................... 13
I. Menu ................................................................................... 14
J. Display................................................................................. 14
K. Variable Playing Mode ............................................... 18
M. Specifications ...................................................................... 25
N. Troubleshooting .................................................................. 26
PDF created with FinePrint pdfFactory Pro trial version http://www.fineprint.com
L. Connecting to other Electronic Equipment..........................
24

1
A.Introduction
Thank you for choosing the portableDVD player with twin7 LCD
screen. The main features includetwo7"Wide Screen(16:9Aspect
Ratio)Liquid CrystalDisplay(LCD)monitorsandasingle DVD player.
Please read the entireinstruction manual supplied with thisproduct
priortousing.Thedocumentationwillassistyouininstallingthesystem
properly to obtainthebest equipment performance.Please save this
manual for later use.
B. Cautions and Warnings
1. Placement
Toprevent fireor electricshock,do not expose this applianceto
rain or moisture. Do not place the set on an unstable cart, stand,
tripod,bracketor table topreventitfromfalling.Keep the unitaway
from strongmagnets,heatsources,direct sunlight,excessive
dust. Ifthe unit is brought directly from a cold to a warm location,
moisturemay condenseinside theunit. When youmove itfroma
cold to a warm location,wait forabout one hour before operating
the unit, or remove the disc and leave the unit turned on until the
moisture evaporates.
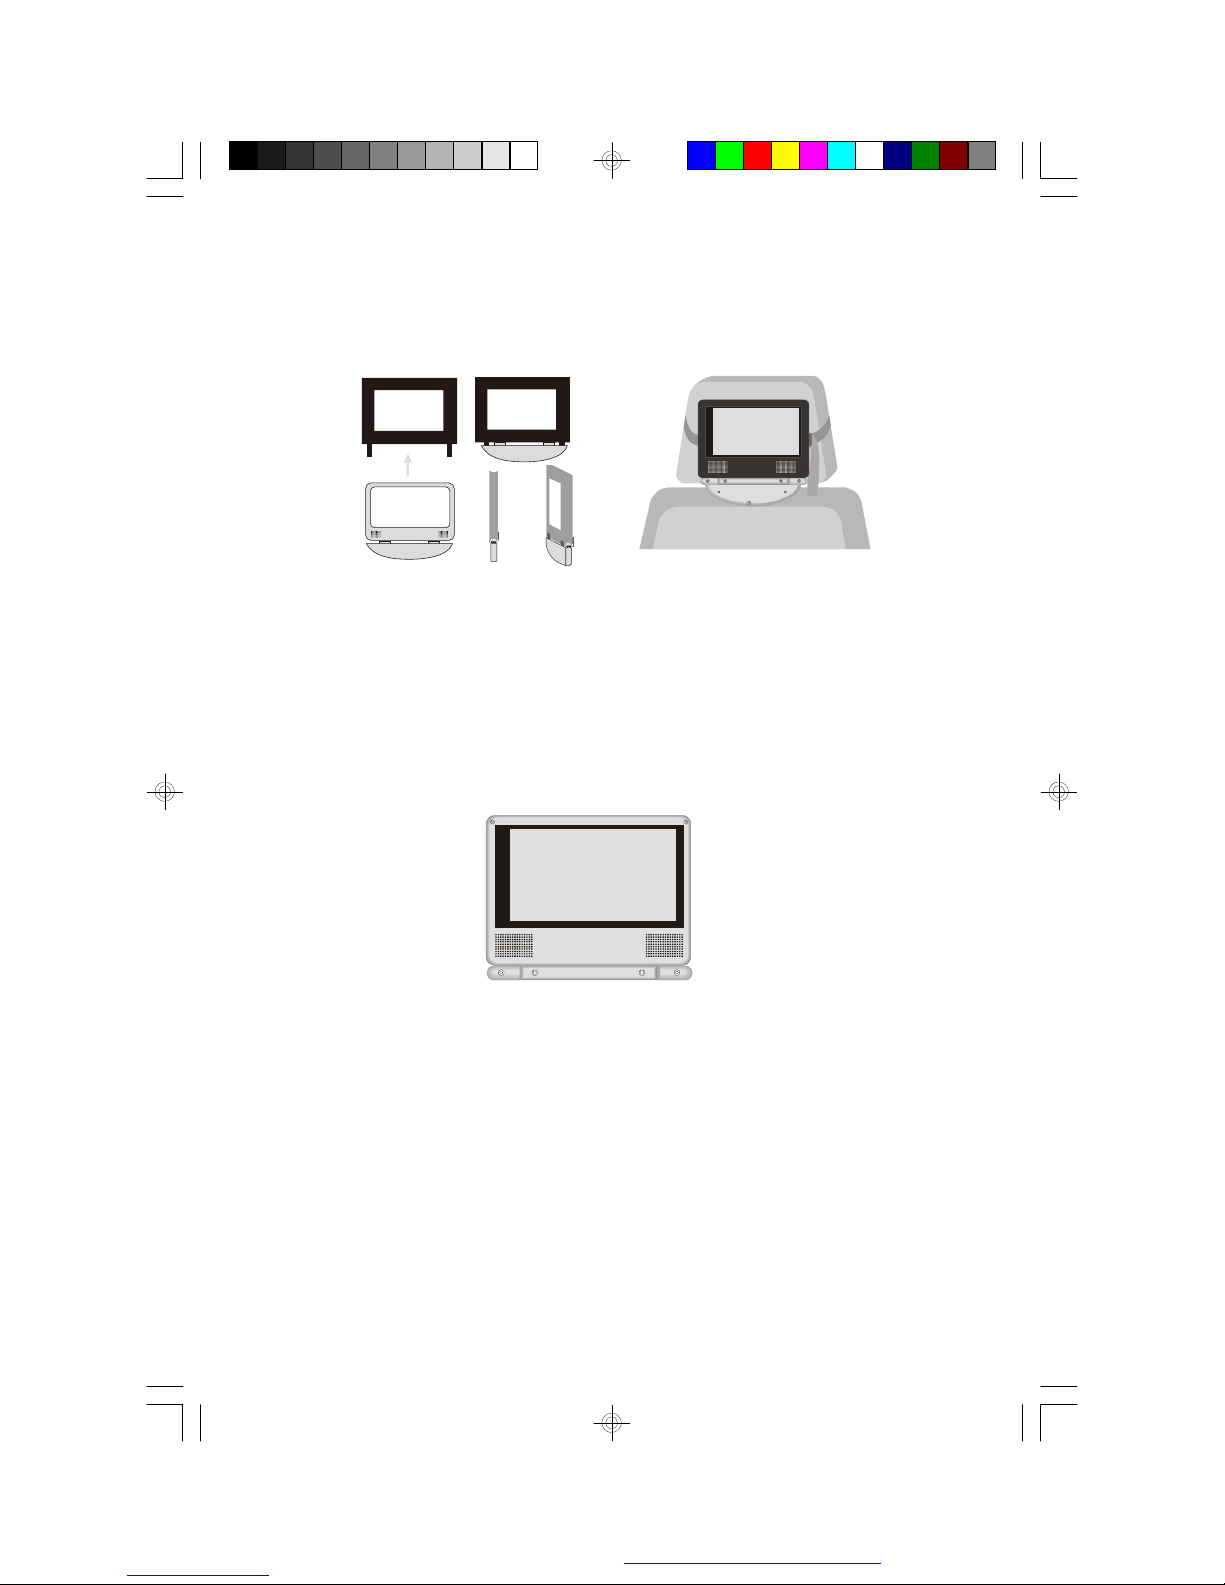
2. Installation
Ensurethat 7 the DVD player andmonitors are installed in
accordance withtheinstructions andillustrations provided in this
manual.
3. Caution
Donotpushobjectsof anykindintothe unitthroughopenings;do
notspill or sprayliquid ofany kind on orin the system (this may
result in a fireor electricshock). Donot place anything heavyon
the unit. To ensure proper ventilation and proper operation, never
coverorblocktheslotsandopenings withaclothorothermaterial.
Keep theunitaway from anopenflamesuchasfire,candle etc.It is
hazardous to replace theremote controlbatteryincorrectly.Replace the
batteryonly with the same or equivalent type, in orderto protect
PDF created with FinePrint pdfFactoryPro trial version http://www.fineprint.com

2
theenvironment,please disposethebattery properly.Do notuse
the unit intemperatures higher than 95degrees Fahrenheit or 35
degrees Celsius.
4.Disassemble
Do not attempt to disassemble the cabinet. There is ariskofelec-
tricshock and/orexposure to LaserRadiation. Contact qualified
service personnel ifyour system needs repair.
5.Cleaning Unit
Whencleaning,makesurethesystem isunplugged fromthepower
source. Donotuseliquid cleaners or aerosolcleaners. Usea cloth
lightly dampenedwith waterfor cleaningtheexterior ofthe system
only.
6. Disc
Do not use irregularlyshaped discs such asheart orstar-shaped
discs as theymay cause the unittomalfunction.Donotstickpaper,
tapeor glue on the disc. Do not expose thedisc to direct sunlight
or heat sources. Do not touchthe surface ofdisc. Handle thedisc
by itsedge. Cleanthedisc bywipingthedisc from the center out
with acleaning cloth. Removethe disc from the unit and store it in
its case after playing. Some playbackoperationsofdiscs maybe
intentionally fixed bysoftwareproducers. Since this unitplays discs
according to the disc contentsthesoftwareproducers designed,
some playbackfeatures maynot be available. Also refer to the in-
structionssuppliedwiththediscs.
7.Regional Coding
BoththeDVDplayeranddiscarecoded byregion.Theseregional
codesmustmatch in orderfor thedisc toplay. Ifthecodesdon’t
match,thedisc won’tplay.Thisunit’scodeisregion 2. DVD’swith
otherregional codes cannot be played in this unit.
PDF created with FinePrint pdfFactoryPro trial version http://www.fineprint.com

3
C. Contents
1. 1 x DVD Player
2. 2 x 7 Monitors
3. 1 xRemote Control with battery(CR2025)
4.2xDINtoAVAdapter
5.1xAC toDCAdapter
6. 1 x CigaretteLighterAdapter
7. 1 x InstructionManual
8. 1 xCarryBag
9. 2 xPouch for7 single monitor
10. 1 xPouch for DVD
D. Powering and installation
1. Powering the system indoors (Refer to Figure 1)
Plugone end oftheACtoDC adapterintotheDC Input jackonthe
right sideof the DVD player,then plugthe other endintothe
100~240VAC power receptacle.
2. Powering the system in a car (Refer to Figure 1)
Plug one end ofthecigarette lighter adapter into the DCInputjack
on the DVD player, thenplug theotherend into thecigarettelighter
socket.
Figure1
PDF created with FinePrint pdfFactoryPro trial version http://www.fineprint.com

4
Figure 2
Note: Unplug the apparatus when not using for a long time or intent to
disconnect from the Mains power.
3. Connection with DVD player and monitors (Refer to Figure 2)
The single monitors only can be powered by DVD player.
4. Installation Prior to use
1) Pouching the DVD player (Refer to Figure 3)
Pull out the slide fastener of the pouch to slide the DVD player into
the pouch, and feed the bottom piece of the DVD into the bottom of
the pouch. Then close the slide fastener.
Figure 3
PDF created with FinePrint pdfFactory Pro trial version http://www.fineprint.com
7"LCD MO NITOR
7"L CD MONITOR
MONITOR
PORT 1
MONITOR
PORT 2
M E N U
SD/DVD
PREV
NEXT
OPEN
STOP
MONITOR
PORT 1
MONITOR
PORT 2
M E N U
SD/DVD
PREV
NEXT
OPEN
STOP

5
2) Positioning the Monitor
Option 1 Vehicle Headrest (Refer to Figure 4)
Figure 4
Slide screen in to the case with display pointing out Squeeze the
magic tape between tilting foot and display and fix on back side. Then
loop the strap of the pouch around the headrest in the vehicle and
pull the end of the strap while holding the buckle until the pouch is
tightly secured.
Option 2 Flat Surface (Refer to Figure 5)
Figure 5
Rotate the base of Monitor backward and place it on a flat surface.
Adjust the screen for a proper viewing angle. This can be done with
the Monitor inside or outside the pouch.
PDF created with FinePrint pdfFactory Pro trial version http://www.fineprint.com

6
E. Controls, Indicators, and Connectors
1. Unit View (Refer to Figure 6)
Figure 6
1)
2) Previous Button
3)
Next Button
4)
Button
5) Menu Button
6) Up button
7) OK Button
8) Right Button
9) Button
10)
Left
11)
DC 9V Input Jack
12)
LED
13)
Remote Control Sensor
14)
15)
Power On/ Off Switch
16)
Volume Control
17)
Optical Jack
19)
AV Out Jack
20)
Monitor Port 1
21)
Monitor Port 2
PDF created with FinePrint pdfFactory Pro trial version http://www.fineprint.com
MONITOR
PORT 1
MONITOR
PORT 2
M E N U
SD/DVD
PREV
NEXT
OPEN
STOP
DC 9V
VOL
SD
1
2
3
4
5
6
78
9
10
11
12
13
14
15
16
17
18
19 20
21 22
SD/DVD
Stop
Down Button
Open Button
Power
18)
HiFi Jack
22)
SD Card

7
2. Single Monitor View (Refer to Figure 7)
Figure 7
1). Brightness Up/Down Control
2). Power Off/On Switch
3). AV In Jack
4). DC 9-12V Input Jack
5). Headphone Jack
6). Up/Down Switch
7). Volume Up/Down Control
NOTE: Press the Up/Down Switch, you can reverse the screen
image.
PDF created with FinePrint pdfFactory Pro trial version http://www.fineprint.com

8
3. Remote Control View (Refer to Figure 8)
1) Setup Button
2) Up Button
3) Skip Button
4) Enter Button
5) Reverse/Left Keypad
6) DOWN Button
7) Numeric Button
8) Display Button
9) Zoom Button
10) DVD/SD Button
11) Skip Button
12) A-B Repeat Button
13) Forward/Right Keypad
14) 1/All Repeat Button
15) Stop Button
16) Menu Button
17)
Audio Button
Figure 8
18)
19) Play/Pause Button
F. Loading and Playing a Disc
a. After connecting power to the unit, power on “DVD player” with the
power switch. The power indicator will light.
b. Open the disc tray by pressing OPEN, and place a disc into the
tray with the label side facing up.
c. Close the tray by pressing the “CLOSE” button.The unit will load
the disc and start playing.
d. Rotate BRIGHTNESS and VOLUME to adjust the LCD’s bright-
ness and the DVD player’s volume.
e. To stop playing a disc, press STOP.
PDF created with FinePrint pdfFactory Pro trial version http://www.fineprint.com
Button
Sub

9
G. Setup
1. GeneralSetup Page
1)Withnodiscinsidetheplayer,press‘SETUP’todisplaythe Mainscreen
ofthe Setup Menu on the screen and “General Setup Page appears.At
the same time, “ ishighlighted. Press ‘SETUP’againto exitthe
Setup Menu and theunit will resume it’slast playbackmode.
2)Press the ENTER button, “SPDIF Output is highlighted.
3) Press the or button to select the other menus in general setup
page.
4) Press to enter the sub menu.
5) Press the or button to select the sub menu and press the
ENTER to confirm your selection.
6) Repeat steps 3-5 for other menus.
Note: Press to return the previous menu.
a) SPDIFOutput
* SPDIF Off: Thedigital signal audiooutput willbe off.
*SPDIF/RAW:The audio output will benot modulated.
* SPDIF/PCM: The audiooutput will be modulated in Pulse Code
Modulationmode.
b) TV Display
* Normal/PS: When the player outputs signal toa normal TV, a nor-
mal picture is shown on the full screen.
* Normal/LB: When the player outputs signal to a normal TV, a nor-
mal picture is shownon the screen withablackstripatboththetop
andbottom ofthescreen.
*Wide:When theplayeroutputs signal to awidescreenTV, a
wide picture is shown on the full screen.
PDF created with FinePrint pdfFactoryPro trial version http://www.fineprint.com

10
c) Angle Mark
*On:Thescreenwillshow the angle mark icon.(*If an angle option is
available).
* Off:The screen will not display theAngle Mark
NOTE: Not all discs contain abovefeatures. The abovefeatures are
discdependent.
d)OsdLanguage
Chosse different language as your OSDlanguage
e). ScreenSaver
*On: Enables screen saver
*NOTE: The DVD playerwill enter the Screen Savermode after ap-
proximatelyfiveminutesifthesameimage remainsonthe screen.
*Off: Disables screen saver (off)
f) Last Memory
*On: The unit will return to the last position on the disc.
*Off: Theunit will not return to the last position on the disc.
Note: The Last position memoryfunction onlyeffect for OPEN
operation.
2.Video QualitySetup
1)InSetup menu, Pressthe or button toselect“Video QualitySetup
and is highlighted.Press ENTER to enter thevideoqualitysetup
page.
2)Press the ENTER button, “Brightness is highlighted.
3)Press the or button to select the other menus in video quality
setuppage.
4) Press to enter the sub menu.
5) Press the or button to adjust the quantityand press the ENTER
to confirm your selection.
6) Repeat steps 3-5 for other menus.
Note: Press to return the previous menu.
a) Brightness b) Contrast
c) Hue d) Saturation
PDF created with FinePrint pdfFactoryPro trial version http://www.fineprint.com

11
3.Password
In Setupmenu, Pressthe or button toselect “Password Setup
Page and is highlighted. Press ENTER to enter the password page.
PressENTERtwice to enter thePassword Change Page.Input the Old
Password or theDefault Password,theNew Password, andthe Con-
firmedNewPassword. Press ENTER to confirm the change.
Note: The default password is 3308.
4. Preference Page
1) In Setup menu, Pressthe or button toselect“PreferencePage and
ishighlighted. PressENTER to enter thepreferencepage.
2)Press theENTER button, “Audio ishighlighted.
3)Press the or button to select the other menus in preference
page.
4) Press to enter the sub menu.
5) Press the or button to select the sub menu and press the
ENTER to confirm your selection.
6) Repeat steps 3-5 for other menus.
Note: Press to return the previous menu.
a)Audio b) Subtitle
c) Disc Menu
Note: Language and subtitle selectionis onlyavailablefor discsthat
are recordedin theabovelistedlanguages.Iftheselected language
isnot available,theplayer willplayand displayonthe screenthe
original recordedlanguage containedinthedisc.
PDF created with FinePrint pdfFactoryPro trial version http://www.fineprint.com

12
d) Select ‘Parental’usingthe UP/DOWNbutton, then pressRIGHT to
enter thesubmenu.
Select the parental level you desireusingtheUP/DOWN button for
discs with lock-out function or multiplerating levels. Theseare listed
from the lowestlevel (1 KidSafe) tothehighest level(8Adult). Press
ENTERandinput 4 digit password,then press ENTER again tocon-
firm the parentallevelsetting.
NOTE: The levelof8Adult isthe factorydefault.
e)Select ‘Default’usingtheUP/DOWNbutton, then pressRIGHTtoen-
terthesubmenu. PressENTER to make thesettingreturnto thefac-
tory-set mode.
NOTE: The parental setting isnotaffected bythedefault reset
function.
NOTE: The DefaultPassword is3308.This passwordis always
effective even after you have selected your ownpasswordand
changed it. Toavoidthe possibilityof others usingthe default
passwordto set theparentalleveland changethe password,
you can recordthisdefaultpasswordinanother area and
delete itfrom this manual.Some discs can be limited depend-
ingon the ageof users whilesome discs cannot.
PDF created with FinePrint pdfFactoryPro trial version http://www.fineprint.com

13
H. Basic Operation Turnthe uniton/off
Remove/load the disc
Start Play/Execute item or setting
Still Picture
(1time) Stopatthepresentplaying point /
(2 times) Stop playing
Go tothe next chapter, trackor scenedur-
ing play back
Gobacktothe previous chapter, trackor
scene duringplay back
Scan forwardat 2,4,8,16or 32times speed
Scanbackwardat2,4, 8, 16 or32times
speed
Used forMenu Navigation
Execute item or confirm setting
Select item or setting
Display the mainmenu ofthe disc
Repeat playingtitle, chapter, or track
RepeataspecificportionfrompointAtopoint
B ofthe disc
Display information(title, chapter, track,
time, etc.).
Changethe viewingangles on thescene
Select the subtitle languageand turn it on/
off
Selecttheaudio language
Enlargean imageto 2, 3, or 4 times the
original size.
Displaythe setup menuto selectandset
items, and exit the setup menu.
POWER
OPEN
PLAY
PAUSE
STOP
NEXT
PREVIOUS
FORWARD
REVERSE
LEFT/RIGHT/UP/DOWN
ENTER
NUMBERS
MENU
REPEAT
A-B
DISPLAY
ANGLE
SUBTITLE
AUDIO
ZOOM
SETUP
PDF created with FinePrint pdfFactoryPro trial version http://www.fineprint.com

14
I.Menu
A DVD is divided into sections called titlesandchapters. When you
play a DVD,aroot menu ofthedisc will appearonthescreen ofyour
TV orMonitor. Thecontentsof themenu varyfrom disc todisc.Press
MENU duringplaybackto display the menu. Some DVDs onlyallow
you to select disc playbackoptionsusingtheDVD root menu.
J.Display
1. PLAYINGTIME AND REMAININGTIME
a. Duringplaybackpress the ‘DISPLAY’button to displaythe cur-
rent Title Number (1), the total Number ofTitles (2), the current
ChapterNumber (3), thetotal Numberof Chapters (4), andthe
Playing elapsedTimefor thetitle (5). Theheadingwill disappear
automaticallyafter 3 seconds ifDISPLAYbuttonis not pressed.
Title, Chapter Number, and TimeScreenDisplay
b.Press ‘DISPLAY’constantlytochoosethe options below circularly.
TitleElapsed: The elapsedtime ofthe title
Title Remain:The remaining time ofthe title
Chapter Elapsed: The elapsed time ofthe chapter
Chapter Remain: The remainingtime ofthe chapter
Display Off: The DVD’stime Information will not be displayed.
TitleElapsed
TitleRemain
Chapter Elapsed
Chapter Remain
Display Off
PDF created with FinePrint pdfFactoryPro trial version http://www.fineprint.com

15
2. ANGLE
Duringplayback ofadisc,press‘ANGLE’todisplaythe availableangles
fordiscscontainingmulti-angles*, with the current angle number (1)
andthetotal numberof angles(2) displaying.Press‘ANGLE’toselect
another angle, thenpress again toexit andreturn to the normalview-
ingangle.The angle displaywill disappearautomaticallyifthe‘ANGLE’
button is not pressed again within3 seconds.
*NOTE: Notall discscontain this feature.
AngleScreenDisplay
3. SUBTITLE
Duringdisc playbackpress ‘SUBTITLE’toselectthe subtitle language
youdesire*,withthecurrentSubtitle LanguageNumber(1) andthe
total Number of Subtitle Languages(2)displayed. Ifthere are mul-
tiplelanguagespress ‘SUBTITLE’againto selectanother subtitlelan-
guage.Toturn subtitles OFF,press the ‘SUBTITLE’button until ‘Sub-
titleOff’isdisplayed.TheSubtitledisplay willdisappearautomatically
ifthe ‘SUBTITLE’button is not pressed again within 3 seconds.
SubtitleScreenDisplay
*Some DVDsonly allowaccessto this functionthrough theDVDmenu
PDF created with FinePrint pdfFactoryPro trial version http://www.fineprint.com

16
4. AUDIO
Duringplaybackpress ‘AUDIO’to select the audio languageyou
desire*, withthecurrent AudioChannelNumber(1)and the total num-
ber of AudioChannels(2)displayed. Press AUDIO again to select
anotheraudio language.Theaudio display will disappearautomati-
callyifthe ‘AUDIO’button is not pressed within for 3 seconds.
Audio Language Screen Display
*SomeDVDs onlyallowaccesstothis functionthrough the DVD
menu.
5.ZOOM
Duringplaybackpress ‘ZOOM’to enlargethe picture by2x, 3x or 4X
with thecurrent zoommultiple.(1)Press “zoom onetime ,thepicture
will beenlarged2X.(2)Press “zoom asecondtime ,thepicturewillbe
enlarged 3X.(3)Press “zoom a 3rd time ,the picture will be enlarged
4X.(4)Press “zoom a 4thtime ,the picture will return to normal size.
Zoom Screen Display
PDF created with FinePrint pdfFactoryPro trial version http://www.fineprint.com

17
6. A-B REPEAT
a. During playback press a first time ‘A-B’ to set the Starting Point A.
A-B Repeat Starting Point Screen Display
b. Press ‘A-B’ a second time to set the Ending Point B and the player
will repeatedly play the part between Point A and Point B.
A-B Repeat Ending Point Screen Display
c. Press A-B a third time to cancel A-B repeat and resume normal
playback.
A-B Repeat Cancelled Screen Display
PDF created with FinePrint pdfFactory Pro trial version http://www.fineprint.com
Table of contents
Languages:
Other Salora Portable DVD Player manuals