SAMCHULLY BT Series User manual

삼천리 ER 콜렛척 취급설명서
ER弹簧刀柄操作说明书
ER Collet Chuck Instruction Manual
BT, BTT Series
ER Collet Chuck

Model Number
BT, BTT ER Chuck

3
Instruction Manual
목 차
콜렛 체결방법 6
체결 시 주의사항 7
주의사항 10
01.
02.
03.

Table of Contents
Clamping the Collet 14
Precautions on clamping 15
Precautions 18
01.
02.
03.

5
Instruction Manual
目 录
01.
02.
03.

6Tooling System
콜렛 체결방법
①
콜렛 삽입방법
콜렛의 원주에 있는 홈을 그림1과 같이 너트 뒷면의 마크 방향에 있는 리브에 끼운 후 안쪽으로 밀어 넣으십시오.
Depress
(제거)
PUSH
(삽입)
E
R
3
2
-
B
N
S
A
M
C
H
U
L
L
Y
리브
마크
콜렛 홈
그림 1
01.
②
콜렛 제거방법
너트의 “ ”가 표시된 쪽에서 콜렛을 화살표 방향으로 누르십시오.

7
Instruction Manual
체결 시 주의사항
① 최적의 정확도를 유지하기 위해 다른 제조업체의 콜렛이나 너트를 사용하지 마십시오.
② 척에 조립하기 전에 반드시 콜렛을 먼저 너트에 끼우십시오. (그림 2.참조)
③ 최상의 결과를 얻으려면 가능한 공구를 콜렛 내경의 전체길이에 삽입하십시오.
(콜렛 내경 길이보다 2/3 이하로 짧은 공구는 사용하지 마십시오. 그림 3.참조)
Chucking 부가 짧게 되면 절삭공구와 Collet의 파손을 초래하며, 또한 Chuck 본체에도 국부적인 손상을 주게 됩니다.
(적정 Chucking 길이 = 절삭공구 x 4~5배 이상)
④ Spanner에 Pipe등으로 연장시켜 사용하지 마십시오.
그림 2
그림 3
02.

8Tooling System
Chuck 출하시에는 Torque 설정이 되어있지 않기 때문에 Spanner 또는 Torque Wrench를 사용하여 Torque를 설정하여 주십시오.
체결 Torque가 너무 강하면 Collet 및 Chuck 본체에 손상이 생길 수 있으므로 유의하시기 바랍니다.
Torque Wrench를 사용시에는, Torque Limiter에서 찰칵 소리가 나면 체결완료 상태이므로 즉시 체결을 멈추어 주십시오.
Torque Limiter를 초과하지 않도록 유의 하십시오.

9
Instruction Manual
ER 너트 체결 토크
torque(Nm)
1.0~5.0 - - ER08S-N 6
1.0~2.9 ER11-N 8ER11S-N 8
3.0~7.0 24 16
1.0
ER16-BN
6.4
ER16S-N
8
1.5~3.5 16 20
4.0~4.5 32 24
5.0~10.0 56 24
1.0
ER20-BN
12
ER20S-N
16
1.5~6.5 24 28
7.0~13.0 80 28
1.0~3.5
ER25-BN
20
ER25S-N
24
4.0~4.5 48 32
5.0~7.5 72 32
8.0~17.0 104 32
2.0~2.5
ER32-BN
20
3.0~7.5 128
8.0~22.0 136
3.0~26.0 ER40-BN 176

10 Tooling System
절삭 공구 장착시
① 손상 혹은 균열이 있거나 런아웃이 과도한 척은 사용하지 마십시오.
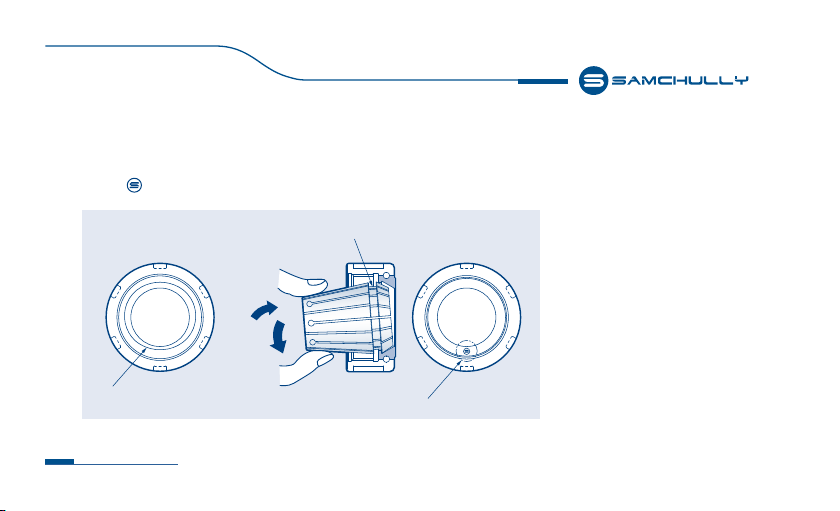
② 척 및 절삭 공구 Shank에 부착된 이물질을 깨끗이 제거하십시오.
③ 여유면 마모가 0.4mm 이상 마모된 절삭 공구는 사용하지 마십시오.
④ 부상을 입지 않도록 천 또는 천과 유사한 물건을 사용해 절삭 공구를 잡아야합니다.
⑤
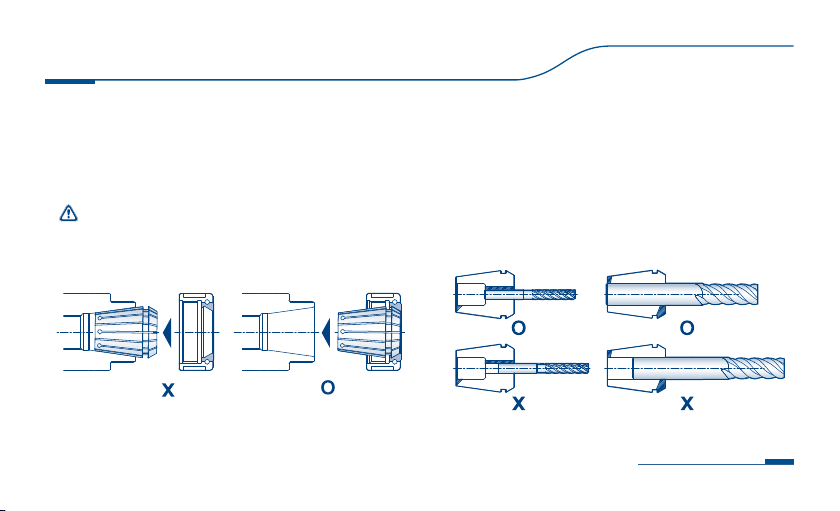
공구의 Shank경 공차는 h7의 제품을 사용하십시오.
⑥ Shank에 노치가 있거나 Shank가 평평한 절삭 공구는 사용하지 마십시오.(우측그림참조)
작업중
① 진동 / 떨림이 나타날 경우 사용을 중단하십시오.
② 스핀들이 회전 중 일 때에는 척 또는 절삭 공구를 만지지 마십시오.
기타
① 절삭공구를 끼우지 않은 상태에서 너트를 체결하지 마십시오.
② 삼천리기계는 당사의 풀 스터드를 사용할 것을 권장합니다. 풀 스터드는 소모품으로 2년마다 교체해야 하며, 손상 흔적이 있거나 변형된 풀 스터
드는 사용하지 마십시오.
주의사항
03.


아래와 같이 품질을 보증합니다.
본 제품은 철저한 품질관리와 엄격한 검사과정을 거쳐서 만들어진 제품입니다.
제품에 이상이 발생되었을 때에는 대리점이나 소비자 상담실의 안내를 받으십시오.
부품 보유기간 5년 (사양은 예고없이 변경될 수 있습니다.)
품명 ER Collet Chuck
규격
제품번호
품질보증기간 12개월
구입일 . .
품질보증서

품질기간 이내에 정상적으로 사용한 상태에서 자연발생한 고장의 경우에는
이 보증서 기재 내용에 따라 무상으로 수리하여 드립니다.
무상서비스 안내
1. 품질보증기간이 경과한 경우
2. 품질보증기간 이내인 경우
- 사용상 부주의로 인한 고장의 경우
- 임의의 개조로 인한 고장의 경우
- 천재지변에 인한 고장의 경우
유상서비스 안내
소비자 상담실 안내
[405-820] 인천광역시 남동구 남동대로 99
A/S 및 고객상담
서비스센터.
1544-3122

14 Tooling System
①Inserting the collet
Place the groove on the circumference of the collet on the rib in the direction marked on the rear of the nut as
shown in Fig. 1 and push the collet inward.
②Inserting the collet
Press the collet in the direction of the arrow on the side of the nut marked " "
Depress
PUSH
E
R
3
2
-
B
N
S
A
M
C
H
U
L
L
Y
Rib Mark
Collet Groove
01.
Clamping the Collet
Fig. 1

15
Instruction Manual
①To maintain optimal precision, do not use the collets or nuts of other manufacturers.
②Insert the collet into the nut before assembling the collet on the chuck. (See Fig. 2.)
③To ensure optimal results, fully insert the tool into the collet such that as much of the diameter as possible.
(To ensure optimal results, the cutting tool shank must be inserted at least 3/4 of the collet bore. See Fig. 3.)
Shortening of the chucking part will cause damage to the cutting tool and the collet and cause local damage to the
chuck body. (Appropriate chucking length = Cutting tool x 4-5 times or more)
④Insert the collet into the nut before assembling the collet on the chuck. (See Fig. 2.)
Fig. 2 Fig. 3
그림 3
02.
Precautions on clamping
그림 2

16 Tooling System
The chuck is delivered with the torque not set. Set the torque with spanner or torque wrench.
Note that applying excessive torque may cause damage to the collet and chuck body.
When fastening is completed, a click sound is heard from the torque limiter while using a torque wrench,
In such case, immediately stop fastening. Care shall be exercised to prevent exceeding the torque limit.

17
Instruction Manual
ER Nuts Tightening torque
torque(Nm)
1.0~5.0 - - ER08S-N 6
1.0~2.9 ER11-N 8ER11S-N 8
3.0~7.0 24 16
1.0
ER16-BN
6.4
ER16S-N
8
1.5~3.5 16 20
4.0~4.5 32 24
5.0~10.0 56 24
1.0
ER20-BN
12
ER20S-N
16
1.5~6.5 24 28
7.0~13.0 80 28
1.0~3.5
ER25-BN
20
ER25S-N
24
4.0~4.5 48 32
5.0~7.5 72 32
8.0~17.0 104 32
2.0~2.5
ER32-BN
20
3.0~7.5 128
8.0~22.0 136
3.0~26.0 ER40-BN 176

18 Tooling System
When mounting the cutting tool
①
Do not use a damaged or cracked chuck.
②
Completely remove foreign substances from the chuck and the cutting tool shank.
③
Hold the cutting tool with cloth or similar materials to prevent injury.
④
Use a tool whose shank tolerance is h7.
⑤
Do not use a cutting tool with notched or flat shank (see the figure on the right).
During work
①
If excessive vibration, trembling, or noise occurs during operation, immediately stop using the tool.
②
Do not touch the chuck or cutting tool during operation.
Others
①
Do not tighten the toolholder nut and collet assembly without a cutting tool. Collets under pressure without
a cutting tool will deform or crack.
②
For optimal performance, please use Samchully pull studs. Pull studs should be considered as consumable
items that should be replaced every 2 years.
03.
Precautions


The company provides the following quality warranty.
The product is manufactured with strict quality control.
If any defects are discovered, do not continue to use the toolholder and contact Samchully Workholding.
Part retention period: 5 years (Specifications are subject to change withour prior notice.)
Product name ER Collet Chuck
Dimensions
Product number
Quality warranty period 12 months
Purchase date . .
Quality warranty
Other manuals for BT Series
1
This manual suits for next models
1
Table of contents
Languages:
Popular Cables And Connectors manuals by other brands

Erco
Erco 3000053406 Mounting instructions

Philips
Philips SWV4123S/10 user manual

ReelCraft
ReelCraft SGA3650 OLP Operating instructions and parts list

Lux Tools
Lux Tools SW-360 Assembly and operation instruction

Hall Research Technologies
Hall Research Technologies UHBX-3S user manual

AV TOOL
AV TOOL AVT-8120 instruction manual