Samsung s3c6410-TFA User manual

S3C6410-TFA Android development started


TABLE OF CONTENTS
Introduction to S3C6410-TFAAndroid development .................................................... .................................- 1 -
1 .Installation and use Android .......................................................................... .............................................- 5--
1.1 Install Android ................................................................................................. .........................................- 5--
1.2 touch screen calibration ...................... .................................................. ..................................................- 6--
1.3 Rotate the screen display ................................................................................. ........................................- 7--
1.4 Android shortcut icon on the status bar shows.................................................................................... ....- 7--
1.5 Play mp3 ................................................................................................. .................................................- 7--
1.6 Adjust the volume ................................................................................................ ....................................- 8--
1.7 Recording ............................................... .................................................. ................................................- 9--
1.8 to use WiFi wireless Internet access .......................... .................................................. ..........................- 10 -
1.9 graphical interface cable network settings ............................................................................... ..............- 13 -
1.10 using the 3G card on the dial-up ....................................... .................................................. .................- 16 -
1.11 using a USB Bluetooth ..................................... .................................................. ...................................- 22 -
1.12 Use USB ................................................................................................ .................................................- 33 -
1.13 Backlight adjustment settings ................................................................................... ............................- 36 -
1.14 Serial Assistant ................................................................................................. .....................................- 37 -
1.15 LED test ............................................... .................................................. ...............................................- 38 -
1.16 PWM buzzer test ............................................ .................................................. ...................................- 39 -
1.17 ADC testing ............................................... .................................................. .........................................- 40 -
1.18 I2C-EEPROM test ............................................. .................................................. ...................................- 41 -
2 Create Android build environment ................................ ............................................ ..............................-. 42 -
2.1 on the development platform and cross compiler ............. .................................................. .................- 42 -
2.2 Extracting installer source code ............................................................................. .................................- 42 -
2.3 Configure and compile U-boot ....................... .................................................. ......................................- 43 -
2.3.1 Configuring the Compile NAND boot support for the U-boot ... ..........................................................- 43 -
2.3.2 SD card support is compiled in the configuration of the U-boot start ............................................... .- 44 -
2.4 Configuring and compiling the Linux kernel.............................................................................................- 44 -
2.5 from source code to create Android ........................................... ................................. ..........................- 45 -
3 made to install or run the file system image .................................................................... .........................- 46 -
3.1 Production yaffs2 format file system image ............................. .......................................................... ...- 46 -
3.2 Production UBIFS file system format image ....................................................................................... ....- 46 -
3.3 Production ext3 file system image .......................... .................................................. ……………………......- 46 -

S3C6410-TFAAndroid development started
S3C6410-TFAsoftware and S3C6410-TFA is fully compatible, so the path is set, the default configuration file,
have followed the S3C6410-TFA of manuals, based on the actual situation may be slightly different, if in
doubt, please contact us: Info@Esys.ir
Before, for the Android system, we mainly used to solve the Android file system UBIFS fast programming,
and provides a running Android through SD card method, and their steps are very simple to use.
After a period of exploration and learning, we have mastered the basic knowledge of Android application
development system, now provides the latest Android system, already contains a number of commonly
used functions, such as the most popular 3G wireless Internet access, Bluetooth, SD WiFi, excellent
automatically mount disk identification, graphical interface cable card settings and so on.Especially the 3G
dial-up, it can automatically recognize the USB card dialer, and supports WCDMA, CDMA2000, TD-SCDMA
and other formats on the card.
Now, you can use the Android 2.3 it!
This manual will focus on Introduction to Android development or basic knowledge, such as the Bootloader
compiled production, kernel compilation production, production, and so the firmware.
Android BootLoader used with traditional Linux system kernel and the difference is not great, compilation
methods and procedures basically no difference, but slightly different configuration file.Android's main
secret is that it's part of the file system, we are referring to the Android system will be it, so in this section
referred to the Android system is actually used by the Android system the target file system.
To this section, we recommend that you first understand and master the "Linux Developer's Guide" to
create a development environment chapters.
In addition, "Android Application Development Guide" has been released, mainly on how to build an
Android application development environment and how to use S3C6410-TFAand S3C6410-TFAfor USB
debugging, the documentation is located under the CD-ROM A "development documentation and tutorials \
02 Android Programming Developer's Guide "directory.
1 installation and use Android
Description: Memory capacity of 128M with the development board, running directly through the SD card
ext3 format Android may sometimes not run smoothly; use 256M memory capacity of the development
board is no problem, we recommend to the Nand Flash to Android programming in operation.
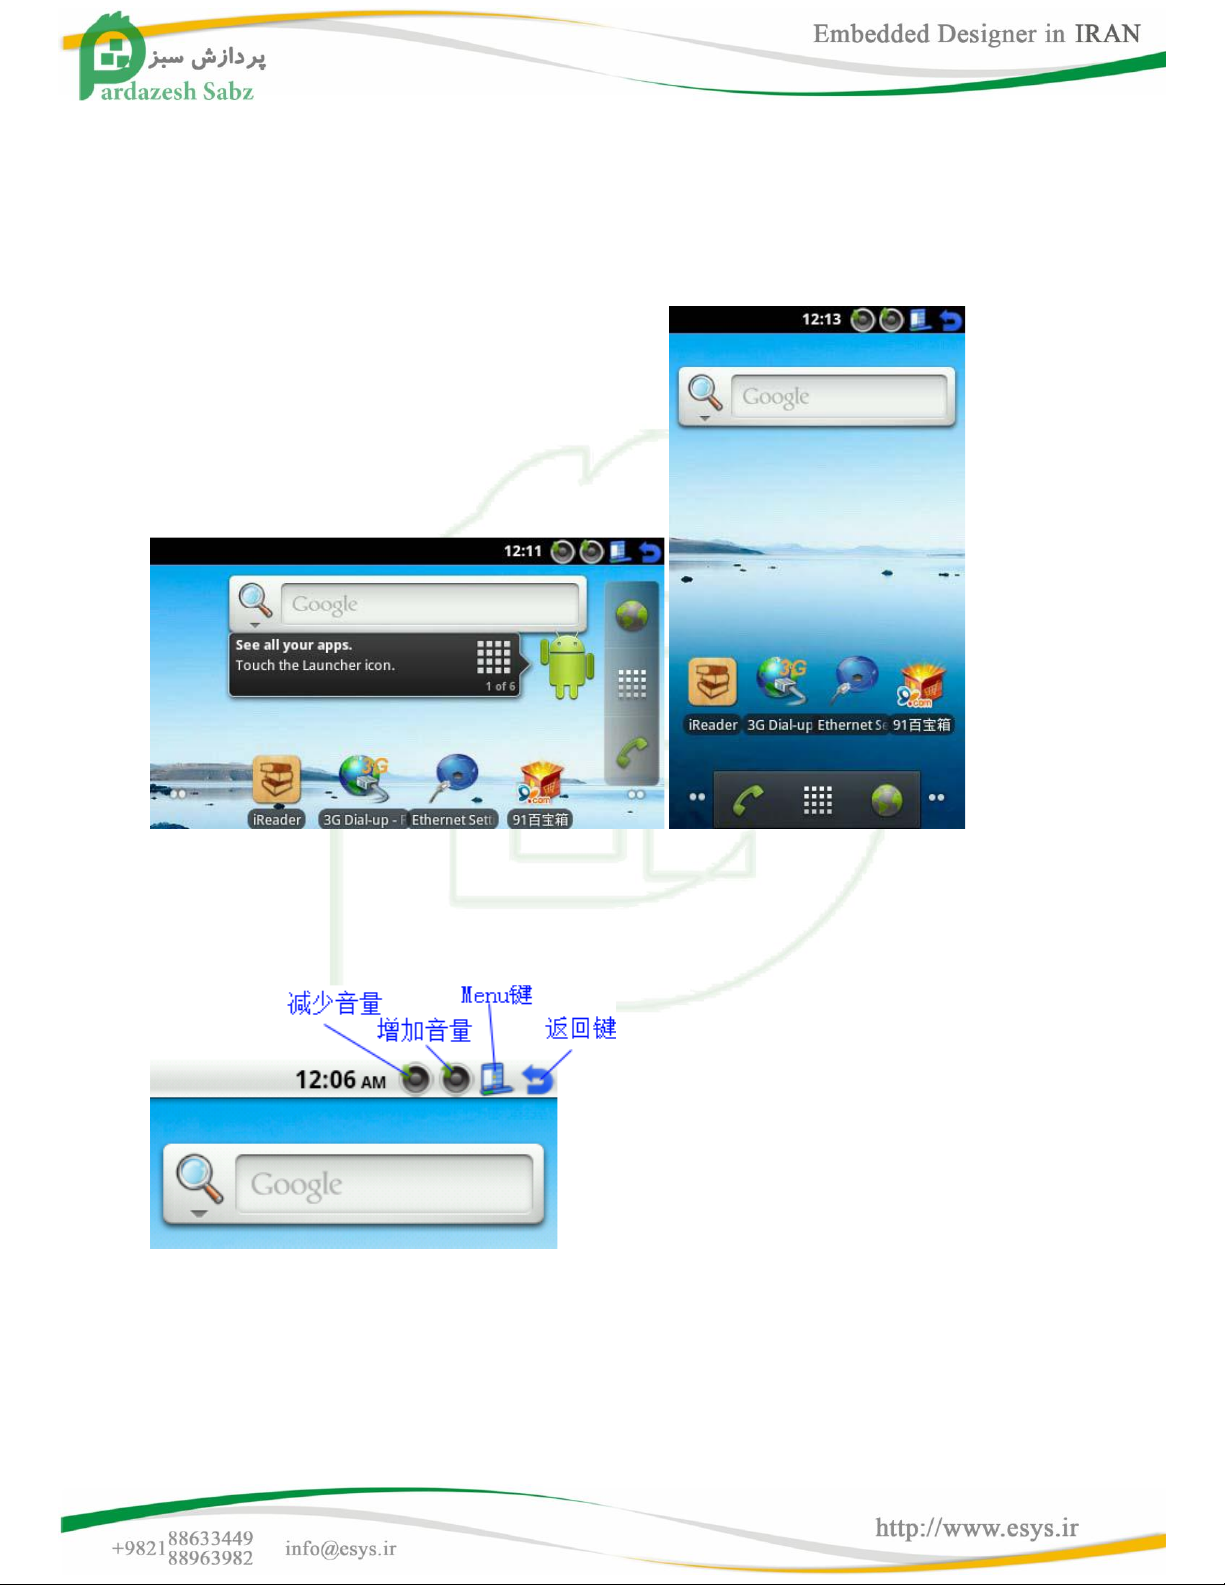
1.1 Install Android installation methods, see "Brush Guide" on the key layout

The development board a total of eight user key, which is defined in the android system in the following
table:
Key Number Function defined Key Number Function defined
K6 on K8 OK
K5 next K7 Cancel
K4 left
K3 Right
K2 Menu (long press menu to rotate the screen display)
K1 Home
1.2 touch screen calibration
When you install the Android system, the first time, there will be a calibration interface, as shown, the
calibration process automatically detects the device you are using the touch screen, touch the line, if
adopted, will show: / dev/touchscreen-1wire
If you are using ARM itself with the touch screen controller is displayed: / dev / touchsreen, Fig.
Follow the prompts, then click the center of the cross calibration, until into the system, if you point the
location of more partial, or when alignment jitter, the cycle will be corrected.
1.3 screen rotation

As you can see the front, Android 2.3 is a cross in the startup screen display, to switch to vertical screen
display, you can press the Menu key development board (that is, K2) can, portrait and landscape screen
display as shown below:
1.4 Android shortcut icon on the status bar shows
Operation We Android2.2 the status bar added four shortcut icons, easy to use touch screen to be able to
complete all
1.5 mp3 player
Android system can automatically recognize the SD card in the mp3 file, find the program group in the
Android music player:

You can use the arrow keys on the board selection, and OK, Cacel keys and other open or close the
program, the following is the playback interface.
1.6 adjust the volume
Any time, you can click the status bar on the two small speakers for volume control, as shown below:

1.7 Recording
We built in Android DroidRecord recording software, you can use it for recording and playback, the program
icon as shown in the picture below on the left, click on it to start the recording process, recording the
program starts, the interface as shown:
Please refer to the following steps to start the recording, and the recovery record:

1.8 use WiFi wireless Internet access
S3C6410-TFAand S3C6410-TFAsupport SD-WiFi as well as most USB WiFi wireless LAN market, following the
SD-WiFi WiFi is set up as an example, USB WiFi setup is basically the same:
Before turning it on, the SD-WiFi module is first received the SDIO pin development board seat, that is,
CON11, Fig.

Then boot into the Android system, according to the Menu (K2) Setting key points
Enter the System Setup main menu:
Interface appears as shown in Figure menu, point wireless network settings option "Wireless & network",
can also use the arrow keys to select, and point the OK button (K8) to enter
Click on "Wi-Fi" or press OK to confirm (K8), will open the SD WiFi

Point "Wi-Fi settings", or use the arrow keys to select it, press the OK key (K8) to enter
This can be seen already in search of wireless access point, select the connection you want, set a password
window, enter the password, click "Connect" to connect the beginning
Connection is successful, will appear in the top task bar icon for WiFi

@as shown in the following picture
Then press the Home button to return to the main Android interface, point the browser, enter the URL, you
can browse the Internet, and
1.9 graphical interface cable network settings
Development board pre-installed Android system, the desktop has an Ethernet Setup, as shown:
Click to enter, it will automatically connect to the network (by default to use DHCP), wait a moment will be
connected to complete a successful connection to, click the green ICON, you can view the network
information, as shown below:

(Connection ...) (connection success) (see web for details)
1. Manually set the IP address and other network parameters at the interface point "Settings" button to
begin setting up the network parameters.
You can see the first line "Ethernet Network" is checked, indicating that Ethernet is enabled. The second line
"Use static IP" is set to check the status, which means you need to manually set the IP address. Point of the
third line of the "IP address", set the window appears, depending on your network environment is set the
corresponding IP address in OK to return.

Followed by the same method set up other network parameters: Gateway, Netmask, DNS, note that if you
want on the Internet, be sure to set up DNS.
After setting, press K1 key development board (Back) to return on an interface, it will automatically
reconnect to the network.
2. Automatically set the IP address using DHCP
Parameter settings in the network interface, if the "Use static IP" option is checked, then click on it a bit, it
will cancel the check, while the following prompt text will become "Using DHCP", as shown:
Development board by key K1 (Back) to return to the previous interface, automatically reconnect to the
network using DHCP.

1.10 using the 3G card on dial-up
For your convenience, we designed and developed specifically for the Android platform a 3G dial-up
program that can automatically detect and support the 100 kinds of models of USB card, which is mainly
based on internal use of the chip on the card depending on the model, covering WCDMA, CDMA2000, TD-
SCDMA and other standard network.Here we use the WCDMA Unicom customized version of the card, for
example on the use of steps to explain it, other models or your own network authentication standard.
Step1 first SIM card installed, as shown in Figure
Step2 the card into the development board, and open the 3G Dialer
Step3 Dial-up procedures will be based on the card chip model, detection use the chip to a known card
type, as shown, we can see several uses of the chip on the card, select it and click, enter the dial-up
interface

Step4 the dialer interface, you can see an orange icon with a minus sign, which means that networks are not
connected, the following text also "Disconnected", points dialer button below "Connect" start the
connection.
A window will pop up in this choose your 3G wireless network standard used for some models we've tested,
such as HUAEI E1750, etc., the dialer will automatically identify and select the appropriate network
standard, click Continue.
Step5 This is the process of connection, wait a moment

Step6 connection is successful, the orange icon with a hook into the green, the following text into the
"Connected", while there will be a system status bar at the top of 3G icon will appear, as shown in Figure .
Step7 tap the green icon to view the current network connection information, as shown in Figure
Step8 After networking in order to meet other network applications, you can point "Hide" button to dial-up
program in the background.

Step9 any time in the connection, you can slide down through the top status bar to return to the dialer
interface, you can dial interface in the mid-point of "Disconnect" button to disconnect from the network.
Step10 on Youku look at it, speed is good
Here are S3C6410-TFAand S3C6410-TFAsupport USB 3G card model list.

Huawei E169 (CDMA2000) Huawei E1750/E1550 (WCDMA) ZTE AC581 (CDMA2000)
ZTE AC8710 (CDMA2000) ZTE MU351 (TD-SCDMA)
Other support for USB 3G card type:
ZTE 6535-Z
ZTE AC2710 (EVDO) ZTE AC2726
ZTE K3520-Z ZTE K3565
ZTE MF110 (Variant) ZTE MF112
ZTE MF620 (aka "Onda MH600HS") ZTE MF622 (aka "Onda MDC502HS") ZTE MF628
ZTE MF638 (aka "Onda MDC525UP") ZTE WCDMA Stick from BNSL
HuaXing E600 (NXP Semiconductors "Dragonfly") Huawei E1612
Huawei E1690
Huawei E180
Huawei E270 + (HSPA + modem) Huawei E630
Huawei EC168C (from Zantel) Huawei K3765
Huawei K4505
Huawei R201
Huawei U7510 / U7517
Huawei U8110 (Android smartphone) Onda MW833UP
A-Link 3GU
AT & T USBConnect Quicksilver (made by Option, HSO driver) AVM Fritz!Wlan USB Stick N
Alcatel One Touch X020 (aka OT-X020, aka MBD-100HU, aka Nuton 3.5G), works with Emobile
D11LC
Alcatel X200/X060S Alcatel X220L, X215S
AnyDATA ADU-500A, ADU-510A, ADU-510L, ADU-520A
Table of contents
Other Samsung Motherboard manuals

Samsung
Samsung AlphaPC 164UX Product manual

Samsung
Samsung AlphaPC 164UX User manual

Samsung
Samsung Artik 530 User manual

Samsung
Samsung S3FM02G User manual

Samsung
Samsung API Ultimate Performance UP1100 Instruction Manual

Samsung
Samsung S3F401F Instructions for use

Samsung
Samsung UP1500 800-A1 User manual

Samsung
Samsung SyncMaster 710V User manual