Sandia 80-6001 User manual

Copyright © 2015 Ultimate Solutions | Sandia Products
Safety, Operation and Maintenance
Manual with Parts List
Please read before use!
2-Stage Motor, 1725 RPM Pump, 40.0 GPM
Important Information and Safety Instructions
Register your Machine Online or Return your Machine Warranty Card!
Serial No:
SNIPER FLOOD PUMPER
24-Gallon Portable Flood Pumper
REGISTER
YOUR
MACHINE
ONLINE!
Another Innovative
Product from
New Equipment Warranty
Limited Warranty
Sandia Products warrants new equipment against defects in material and
workmanship under normal use and service to the original purchaser. Any statutory
implied warranties, including any warranty of merchantability or tness for a
particular purpose, are expressly limited to the duration of this written warranty.
Sandia Products will not be liable for any other damages, including but not limited
to indirect or special consequential damages arising out of or in connection with the
furnishing, performance, use or inability to use the machine.This remedy shall be the
exclusive remedy of the purchaser. The warranty period is subject to the conditions
stated below.
Lifetime Warranty on Body, 2-Years on Vacuum Motor, 1-Year on
Pump and all Electrical Parts, 90-Days on Tools and Accessories
Sandia Products warrants the roto-molded body to be free from defects in material
and workmanship, under normal use and service for a lifetime. Sandia Products
warrants the motor and to be free from defects in material and workmanship,
under normal use and service for two (2) years from the original date of sale and the
pump/electrical parts one (1) year. Parts replaced or repaired under this warranty
are warranted for the remainder of the original warranty period. Service labor
charges are covered for one (1) year from the date of purchase, when performed by
a manufacturer-authorized service provider.
Labor is only provided by authorized service centers. If an authorized service
center is not near you, it is the purchaser’s responsibility to take their machine to an
authorized service center.
Normal wear items such as capacitors, cords, nishes or switches will be warranted
for manufacturing defects for ninety (90) days from the purchase date.
All warranties of motors and associated components will be voided: if the machine
is serviced by anyone other than an authorized service provider; if the machine is
mechanically modied; if the machine is operated when not operating properly; or if
the machine is misused or abused.
The warranty starts on the purchase date by the original purchaser from Sandia
Products subject to proof of purchase. The Machine Registration Card must be
completed and returned immediately at the time of purchase. Registration may
also be performed online at: www.sandiaplastics.com/registration.aspx. If proof of
purchase cannot be identied, the warranty start date is ninety (90) days after the
inventory stocking date at the distributor’s warehouse.
Make a copy of this card for future reference.
Copyright © 2015 Ultimate Solutions | Sandia Products. All Rights Reserved.
Ultimate Solutions Corporate Oce
15571 Container Lane, Huntington Beach, CA 92649
Phone: 800-983-5834 | Fax: 714-901-8404
www.us-group.com | www.sandiaplastics.com
Manufactured with
Pride in the U.S.A.
Model No. 80-6001
https://harrissupplyind.com-ToOrderPartsCall608-268-8080

(2) 24-Gallon Sniper Flood Pumper
Dear Valued Client,
Congratulations on the purchase of your 24-Gallon Flood Pumper! The world of
carpet and oor cleaning is becoming more high-tech and competitive and we strive
to provide you with the most innovative products. Our Flood Pumper is yet another
example of this, bringing a new dimension to ood restoration and cleaning with its
cutting-edge features, quality and value.
Please review this manual paying careful attention to the Safety Instructions section.
Keep in mind that any unnecessary damage, neglect or abuse of this machine will void
your warranty. You can be condent that simple maintenance will ensure that your
Flood Pumper provides quality performance for many years to come.
If warranty questions arise, please consult your manual or contact your distributor.
Should you have any questions regarding maintenance, replacing parts or ordering
parts, please call an authorized distributor.
Before you begin using your ood pumper, thoroughly review the Owner’s Manual.
Again, congratulations on the purchase of your 24-Gallon Flood Pumper!
Questions or Comments?
Phone: 714-901-8400
Toll Free: 800-983-5834
Fax: 714-901-8404
Ultimate Solutions Corporate Oces:
15571 Container Lane, Huntington Beach, CA 92649
Visit our website at: www.sandiaplastics.com
Register your machine online at: www.sandiaplastics.com/registration.aspx
Mail to:
Ultimate Solutions Corporate Oces
15571 Container Lane
Huntington Beach, CA 92649
See reverse side for Warranty Information.
Make a copy of this card for future reference.
Copyright © 2015 Ultimate Solutions | Sandia Products. All Rights Reserved.
WARRANTY REGISTRATION
Please take a moment to register your machine. Fill out the
information below and mail back to Sandia Products immediately.
The warranty starts on the purchase date by the original purchaser subject to proof
of purchase. This Machine Registration Card must be completed and returned
immediately at the time of purchase. If proof of purchase cannot be identied,
the warranty start date is ninety (90) days after the inventory stocking date at the
distributor’s warehouse.
Your machine may also be registered online at:
www.sandiaplastics.com/registration.aspx
Machine Model Purchase Date
Motor Type Serial No.
Place of Purchase
Shipped To
Your Name Phone
E-mail Fax
Address Line 1
Address Line 2
City State Zip
Comments:
https://harrissupplyind.com-ToOrderPartsCall608-268-8080

Please ll out the following information:
Model No:
Serial No:
Distributor Name:
Distributor Phone No:
Date of Purchase:
24-Gallon Sniper Flood Pumper
By Ultimate Solutions | Sandia Products
24-Gallon Sniper Flood Pumper (3)
Returned Material Authorization (RMA) Procedure
Original purchaser (distributor/service center) must contact the manufacturer to follow correct
RMA/warranty procedures. Must include a copy of RMA Sheet enclosed in the box with returned
item. No returns shall be authorized unless proper RMA procedures are followed. It is the
responsibility of the distributor to repair the client’s equipment as soon as possible. Labor is only
provided by authorized service centers. If an authorized service center is not near you, it is the
purchaser’s responsibility to take their machine to an authorized service center.
Client must contact the distributor prior to working on or changing out any parts, etc. Manufacturer
must issue an RMA Sheet containing approved labor time and replacement parts. Do not send
parts or equipment back to manufacturer without an RMA number and approval. No labor will
be paid for, nor part costs paid for or reimbursed that have not been previously approved by the
manufacturer. All warranty work must be approved and authorized to qualify and appropriate
warranty procedures must be followed.
Copyright © 2015 Ultimate Solutions | Sandia Products
The Ultimate Solutions Group
Our Family of Companies
TOGETHER WE’RE BETTER!
Ultimate Carpet Solutions
www.sandiaplastics.com
Ultimate Hard Floor Solutions
www.mercuryoormachines.com
Ultimate Cleaning Solutions
www.ultimatesolutionsinc.net
Table of Contents
Returned Material Authorization (RMA) Procedure......................................................................3
New Equipment Warranty......................................................................................................................4
1.0 Safety Instructions ............................................................................................................................5
2.0 Grounding Instruction s..................................................................................................................6
3.0 Care of your Flood Pumper ...........................................................................................................7
4.0 Set-Up and Operation .....................................................................................................................7
5.0 Shutdown Procedures .....................................................................................................................8
6.0 Maintenance .......................................................................................................................................9
7.0 Storing your Flood Pumper ........................................................................................................ 10
8.0 Trouble Shooting Guide .............................................................................................................. 11
9.0 Machine Wiring Diagram............................................................................................................. 12
https://harrissupplyind.com-ToOrderPartsCall608-268-8080

New Equipment Warranty
Lifetime on body, 2-years on vacuum motor, 1-year on pump and all electrical components,
90-days on tools and accessories.
Warranty Policy
All equipment is inspected and tested before shipping from the manufacturer. All parts are
warranted to be new and free from defects in workmanship and material, under normal use to the
original retail purchaser. This warranty limits manufacturer’s liability for defects in workmanship
or materials for replacement of defective parts only. The manufacturer accepts no liability for
incidental or consequential damages arisen from the use of any equipment, defective or not. This
warranty is in lieu of all expressed or implied warranties and is extended only to the original retail
purchaser. Manufacturer sales and service representatives are not authorized to waive or alter
the terms of this warranty, or to increase the obligations of the manufacturer under the warranty.
Parts replaced or repaired under this warranty are warranted for the remainder of the original
warranty period.
Labor is only provided by authorized service centers. If an authorized service center is not near
you, it is the purchaser’s responsibility to take their machine to an authorized service center.
The manufacturer covers up to one (1) year (365 days) of service labor at the manufacturer’s
calculated hourly labor rate/repair time when performed by a manufacturer-authorized service
provider. Ultimately, labor reimbursement costs are at the discretion of the manufacturer. At no
time is the manufacturer responsible for travel time to complete on-call repairs. After one (1) year,
the original retail purchaser is responsible for all labor costs with no manufacturer reimbursement.
The original purchaser must contact the manufacturer to follow correct RMA/warranty procedures.
They must include a copy of the RMA Sheet enclosed in the box with the returned item. No returns
shall be authorized unless the proper RMA procedures are followed. It is the responsibility of the
distributor to repair the client’s equipment as soon as possible.
The manufacturer charges a 25% restocking fee for any items that are being returned to stock.
Items must be new, unused, free of damage and are only good for up to 30 days. After 30 days, the
manufacturer does not accept the return of any items for a store credit.
Authorized warranty replacement parts need to come directly from the manufacturer. Any use of
any other parts will void warranty. The manufacturer does not reimburse for parts used by client
that were not supplied directly for the machine under warranty.
The client must contact the manufacturer prior to working on or changing out of any parts, etc.
The manufacturer must issue an RMA Sheet containing approved labor time and replacement
parts. Do not send parts or equipment back to the manufacturer without an RMA Number and
approval. No labor will be paid for, nor parts cost paid for or reimbursed, that have not previously
been approved by the manufacturer. All warranty work must be approved and authorized to
qualify, and appropriate warranty procedures must be followed.
The warranty starts on the purchase date by the original purchaser from an authorized distributor,
subject to proof of purchase. The Machine Registration Form must be completed and sent to
the original manufacturer at the time of purchase. If proof of purchase cannot be identied, the
warranty start date is ninety (90) days after the date of sale to an authorized distributor.
24-Gallon Sniper Flood Pumper (13)(4) 24-Gallon Sniper Flood Pumper
Notes:
https://harrissupplyind.com-ToOrderPartsCall608-268-8080

1.0 Safety Instructions
READ THIS MANUAL BEFORE OPERATING MACHINERY. KNOW THE
PROPER SET-UP, OPERATION, CORRECT APPLICATIONS AND THE
LIMITATIONS OF THIS EQUIPMENT BEFORE USE.
This ood pumper will afford you many years of trouble-free operating satisfaction,
provided it is given the proper care. All parts have passed rigid quality control standards
throughout the assembly process. Prior to packaging, your ood pumper was again
inspected for assurance of awless operation.
This machine is protectively packed to prevent damage in shipment. We recommend that
upon delivery, unpack the unit and inspect it for any possible damage. Only a visual
inspection will reveal damage that may have occurred.
If damage is discovered, immediately notify the transportation company that delivered
your equipment. As a shipper, we are unable to report any claim for damage. You must
originate any claim within ve (5) days.
This manual is for your protection and information. Please read carefully since failure to
follow precautions could result in discomfort or injury.
Reduce the Risk of Fire, Electric Shock or Injury
Use only as described in this safety operating manual. Use only the manufacturer’s
recommended attachments, accessories, replacement parts and lters. Replace damaged
or worn parts immediately with genuine, original equipment parts to maintain safety and
to protect your limited warranty.
Always turn OFF the ood pumper before connecting, disconnecting or working on
the machine. This equipment must be connected to a properly grounded outlet only
(see grounding instructions). The extension cord provided with this unit is (1) 25-foot,
12/3-gauge safet power cord and MUST be used with this unit to ensure grounding
protection. Turn off all controls before unplugging. Make sure the on/off switch is in
the off position. This is not a toy. Close attention is necessary when used around or near
children. Use extra care when cleaning on stairs.
• DO NOT leave the ood pumper when plugged in. Unplug it from the outlet when not
in use and before servicing.
• DO NOT use this ood pumper with a damaged cord or plug. If the equipment is not
working as it should because it has been dropped, damaged, left outdoors, etc., contact
an authorized service center.
• DO NOT unplug the ood pumper by pulling the cord. To unplug, grasp the plug, not
the cord. DO NOT pull the unit by the cord, use the cord as a handle, close a door on
the cord, or pull the cord around sharp edges or corners. Keep the cord away from
heated surfaces. Lift using only the appropriate handles.
• DO NOT overstretch the safety power cord between the equipment and the electrical
outlet in the wall.
• DO NOT tie an extension cord to the pigtail cord. This will damage the cord and will
VOID your warranty.
• DO NOT handle the plug of the vacuum with wet hands.
• DO NOT move the machine up or down stairs with uid in the machine.
24-Gallon Sniper Flood Pumper (5)(12) 24-Gallon Sniper Flood Pumper
9.0 Machine Wiring Diagram
https://harrissupplyind.com-ToOrderPartsCall608-268-8080

1.0 Safety Instructions Continued
Reduce the Risk of Fire, Electric Shock or Injury.
• DO NOT pick up anything that is burning or smoking such as cigarettes, matches or
hot ashes.
• DO NOT use the machine to pick up ammable or combustible liquids such as
gasoline or use in areas where they may be present.
• DO NOT use where oxygen or anesthetics are used.
• DO NOT put objects into openings or use with any openings blocked. Keep free
of dust, lint, hair and anything that may reduce air ow. Keep hair, loose clothing,
ngers, and all body parts away from openings and moving parts to ensure safe
operation.
• DO NOT use if any hoses or nozzles are damaged, cut or punctured.
• DO NOT expose to rain or use on wet surfaces, to avoid electric shock. Store indoors.
• DO NOT leave machine outdoors, in extreme heat or cold. Harsh weather elements
will damage components and void warranty.
• DO NOT lubricate the motor. If the motor is lubricated, this will VOID your warranty.
2.0 Grounding Instructions
DANGER: IMPROPER GROUNDING METHOD CAN RESULT IN A RISK OF
ELECTRIC SHOCK!
Electrical equipment must be grounded. Improper connection of the equipment grounding
conductor can result in a risk of electric shock. If the equipment should malfunction or
breakdown, grounding provides a path of least resistance for electrical current to reduce
the risk of electric shock.
This vacuum is equipped with a cord containing a grounding conductor and grounding
plug. The plug must be inserted into an appropriate outlet that is properly installed and
grounded in accordance with all local codes and ordinances.
Check with a qualied electrician or service person if you are in doubt as to whether the
outlet is properly grounded. DO NOT modify the plug provided with the equipment. If it
will not t into the outlet, have a proper outlet installed by a qualied electrician.
If repair or replacement of the cord or plug is necessary, DO NOT connect the grounded
wire to a at bed terminal. The wire with insulation having an outer surface that is green
with or without yellow stripes is the grounding wire.
NOTE: In Canada, the use of a temporary adapter is not permitted by the Canadian
Electrical Code.
8.0 Trouble Shooting Guide
CAUTION: Always disconnect the power cord before servicing equipment.
WARNING: Never operate this ood pumper when the equipment is not
performing as expected or when any part is visibly damaged. Repairs should
only be performed by an authorized service center. Failure to do so will VOID
warranty.
System Problem Possible Cause Remedy
Vacuum
System
No Vacuum
/ Weak
Vacuum
1.
2. Float Shut-Off Tank Screen Dirty
3. Float Ball Stuck
4. Damaged or Loose Vacuum Hose
5. Dump Valve Open
6. Access Lid not Sealed
7. Vacuum Hose Clogged
8. Air Intake Grid Clogged
9. Leak in Recovery Tank
1.
2. Clean the Screen with Water
3. Tap Float to Unstick then Clean
4. Attach or Replace
5. Close Valve
6. Replace Gasket
7. Clear Debris
8. Clean
9. Clean and Dry Area, Patch with Silicone
Electrical
System
Unit will not
Turn On
1. Extension Cord not Plugged In
2. Switch not in the “On” Position
3. Building Circuit Overloaded
4. Wiring Connections Loose
1. Check if Machine and Cord are Plugged In
2. Check Switches, Replace if Necessary
3. Reset Circuit
4. Unplug Machine and Check for Loose
Wires
Burning
Smell
1. Vacuum Motor Hung Up
2. Pump Motor Hung Up
3. Debris in Vac Motor
1. Replace Vacuum Motor
2. Replace Pump
3. Contact an Authorized Service Center
Pump
System
Pump is not
Running
Properly
1. No Power to the Pump
2. Propellor in Pump is not Operating
3. Jets on Wand are Clogged
4. In-Line Water Filter is Clogged
5. Kinked or Loose Hose
6. Pump Failed
7. Hoses not Attached Poperly
1. Check the Electrical System
2. Needs Replaced - Contact an Authorized
Service Center
3. Clean In-Line Filter
4. Clear Debris
5. Check and Replace Hose if Necessary
6. Replace Pump
7. Push Hoses into Place
24-Gallon Sniper Flood Pumper (11)(6) 24-Gallon Sniper Flood Pumper
https://harrissupplyind.com-ToOrderPartsCall608-268-8080

2.0 Grounding Instructions Continued
This electric equipment is for use on a normal 120 volt circuit. It has a grounded plug that
looks like the plug illustrated in (Fig A). A temporary adapter, such as illustrated in (Fig B
and C), may be used to connect this plug into a two-pole receptacle, as shown in (Fig B),
if a properly grounded outlet is not available.
The temporary adapter should be used only until a properly grounded outlet (Fig A) can
be installed by a qualied electrician. The green color rigid ear lug or the like extending
from the adapter must be connected to a permanent ground such as a properly grounded
outlet box cover. Whenever the adapter is used, it must be held in place by a metal screw.
3.0 Care of your Flood Pumper
Treat your machine as you would any other high grade, precision made product.
Dropping, unreasonable bumping across thresholds and other misuses may result in a
damaged unit which will not be covered under warranty.
After each use, wipe the extractor body, accessories and power cord with a slightly damp
cloth. When not in use, the remove the power cord and hoses. Stored in a dry area.
WARNING: DO NOT use the ood pumper as a dry vacuum. It is for wet pick-up
only. Failure to do so with damage the pump and VOID your warranty.
4.0 Set-Up and Operation
DO NOT USE ON WET SURFACES. DO NOT EXPOSE TO RAIN. STORE
INDOORS.
This machine comes with (1) 25-foot, 12/3-gauge safety power cord, (1) 25-foot,
2” blue auto-dump hose and (1) 25-foot 1-1/2” vacuum hose.
4.1 Connect the Auto-Dump Hose
The auto-dump hose is a 25-foot, 2” blue hose.
• Locate the QD dump port located on the front of the machine’s base.
• Push the end of the auto-dump hose onto the QD dump port. Close the latches on each
side of the hose so that it is securly locked to the dump port. Note: only one side of
this hose will properly t onto the dump port. Do not force.
• Place the other end of the hose in a commode or drain connected to a sanitary sewer
system.
4.2 Connect the Vac Hose
The vacuum hose is a 25-foot, 1-1/2” vacuum hose.
• Locate the vacuum hose port located on the front of the machine next to the switch
panel.
• Push the vacuum hose onto the end of the vacuum hose port.
• Next, attached a tool of your choosing to the end of the vacuum hose.
6.0 Maintenance Continued
6.2 Clean Auto-Dump Pump-Out and Recovery Tank
Continued
6.3 Clean Dump Valve
The dump valve, located on the back of the machine, has a track inside of it. Open the
dump valve and check the track for build-up. This build-up could prevent the dump valve
from closing and cause leaking. Use a toothbrush to clean the track of the dump valve.
6.4 WD-40 Vacuum Motor
Should moisture ever enter the vacuum motor, completely drain the recovery tank, open
the recovery tank lid, remove the vacuum oat assembly, turn on the vacuum motor and
spray a burst of WD-40 into the standpipe. Continue to run the vacuum motor for at least
three (3) minutes.
To prevent moisture from damaging the vacuum motor during storage, empty the
recovery tank and store with the lid open.
7.0 Storing your Flood Pumper
Store your Flood Pumper in temperatures over 40 degrees Fahrenheit. To prevent
moisture from damaging the vacuum motor during storage, empty the recovery tank and
store with the lid open. Store in an upright position in a dry area.
24-Gallon Sniper Flood Pumper (7)(10) 24-Gallon Sniper Flood Pumper
https://harrissupplyind.com-ToOrderPartsCall608-268-8080

4.0 Set-Up and Operation
4.3 Attach the Power Cord
The machines comes with a 25-foot, 12/3-gauge safety power cord.
• Locate the pigtail on the back of the machine’s base.
• Plug the lighted end of the power cord into the pigtail.
• Plug the cord into a 20 AMP grounded wall outlet.
20 AMP circuits are normally found in kitchens and bathrooms. Never remove the ground
prong from the plug. If a circuit breaker trips during operation, turn machine off, reset the
breaker and move the electrical cord to a different outlet and resume operation.
4.4 Machine Switches
The left-hand switch provides power for the vacuum motor. The right-hand switch
provides power for the pump.
4.5 Automatic Vacuum Shut-Off
The oat assembly shut-off, located in the recovery tank on the vacuum stand pipe,
prevents the waste tank from overowing into the stand pipe and damaging the vacuum
motor. The oat assembly will cut-off vacuum to the waste tank. The motor will also
reach a fast, high-pitched sound alerting you when the recovery tank is about to over
ow. When this happens, immediately turn off the vacuum motor and empty the waste
tank. If the operator continues to use machine after the tank is full, it will void the
Warranty.
The oat assembly has a lter to prevent debris from entering the stand pipe. Refer to the
“Maintenance” section for removal and proper cleaning.
If moisture enters the vacuum motor, contact an authorized service center. To prevent
moisture from damaging the vacuum motor during storage, empty the recovery tank and
store with the lid open.
5.0 Shutdown Procedures
• Turn both switches to the OFF position.
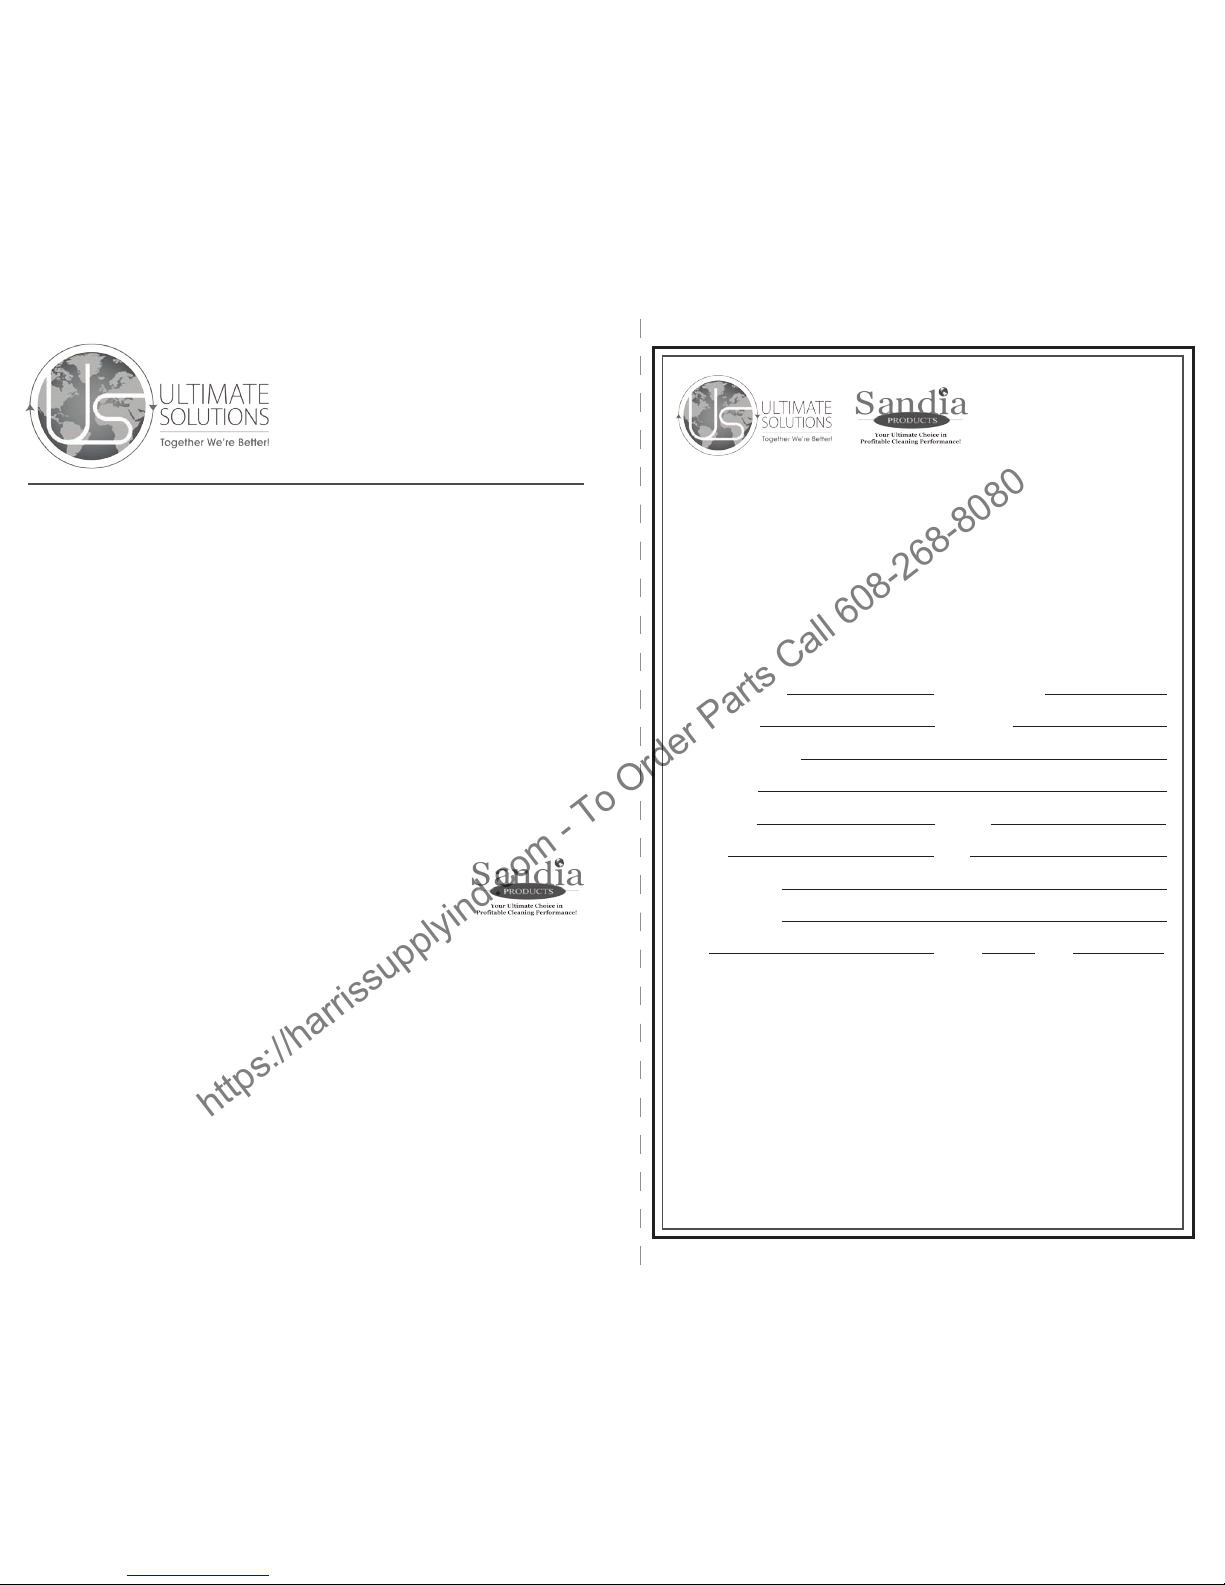
• Locate the dump valve on the back of the machine’s base.
• Place the dump valve over a drain or a bucket and drain the
water from the recovery tank into a sanitary sewer system.
CAUTION: use separate buckets to drain and ll the tank.
Even the smallest debris can cause issues.
• Disconnect all hoses and tools.
6.0 Maintenance
WARNING: Disconnect electrical power cord before performing any service or
maintenance inside the machine base or before testing or repairing switches or power
cords. Failure to do so may result in severe personal injury or death.
Regular maintenance is required to keep your ood pumper in proper working condition.
Failure to properly maintain your machine could VOID warranty. Thoroughly clean all
equipment and accessories after each use:
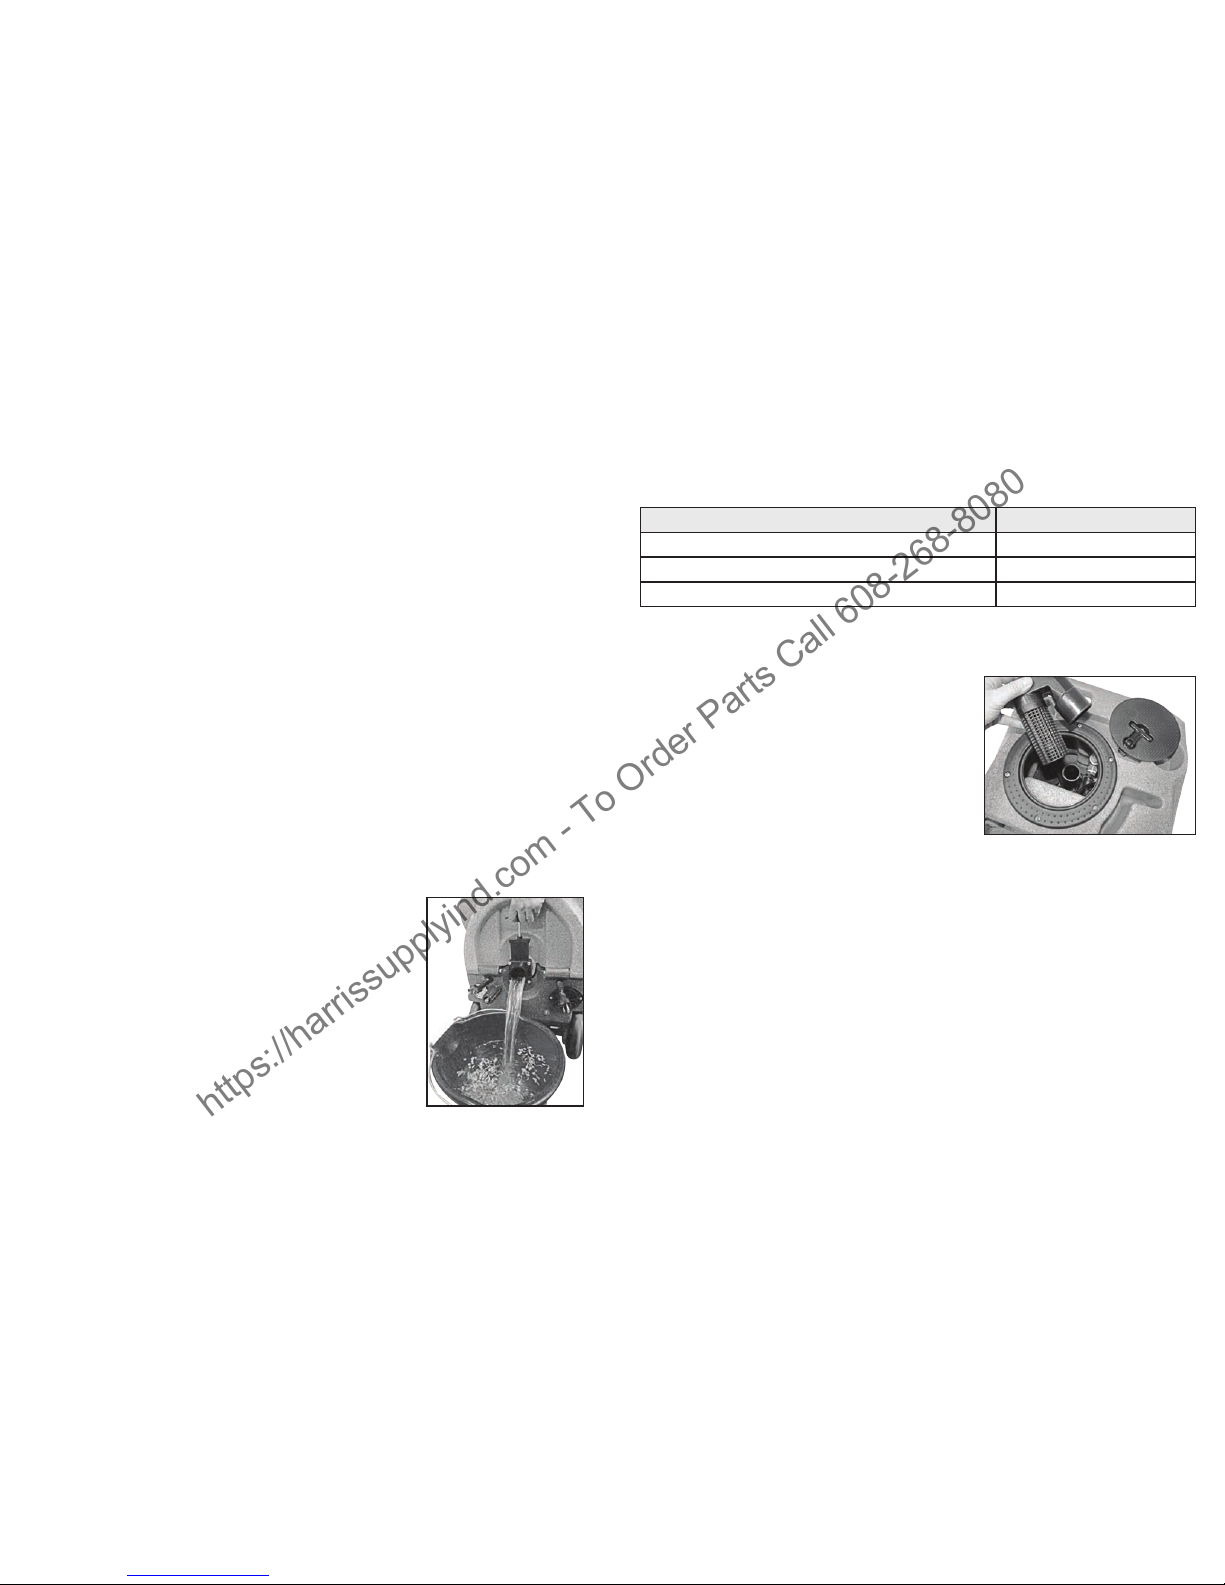
Operation Interval
Clean Vacuum Float Assembly Screen Daily - After Each Job
Clean Auto-Dump Pump Out / Recovery Tank Daily
Clean Dump Valve Daily
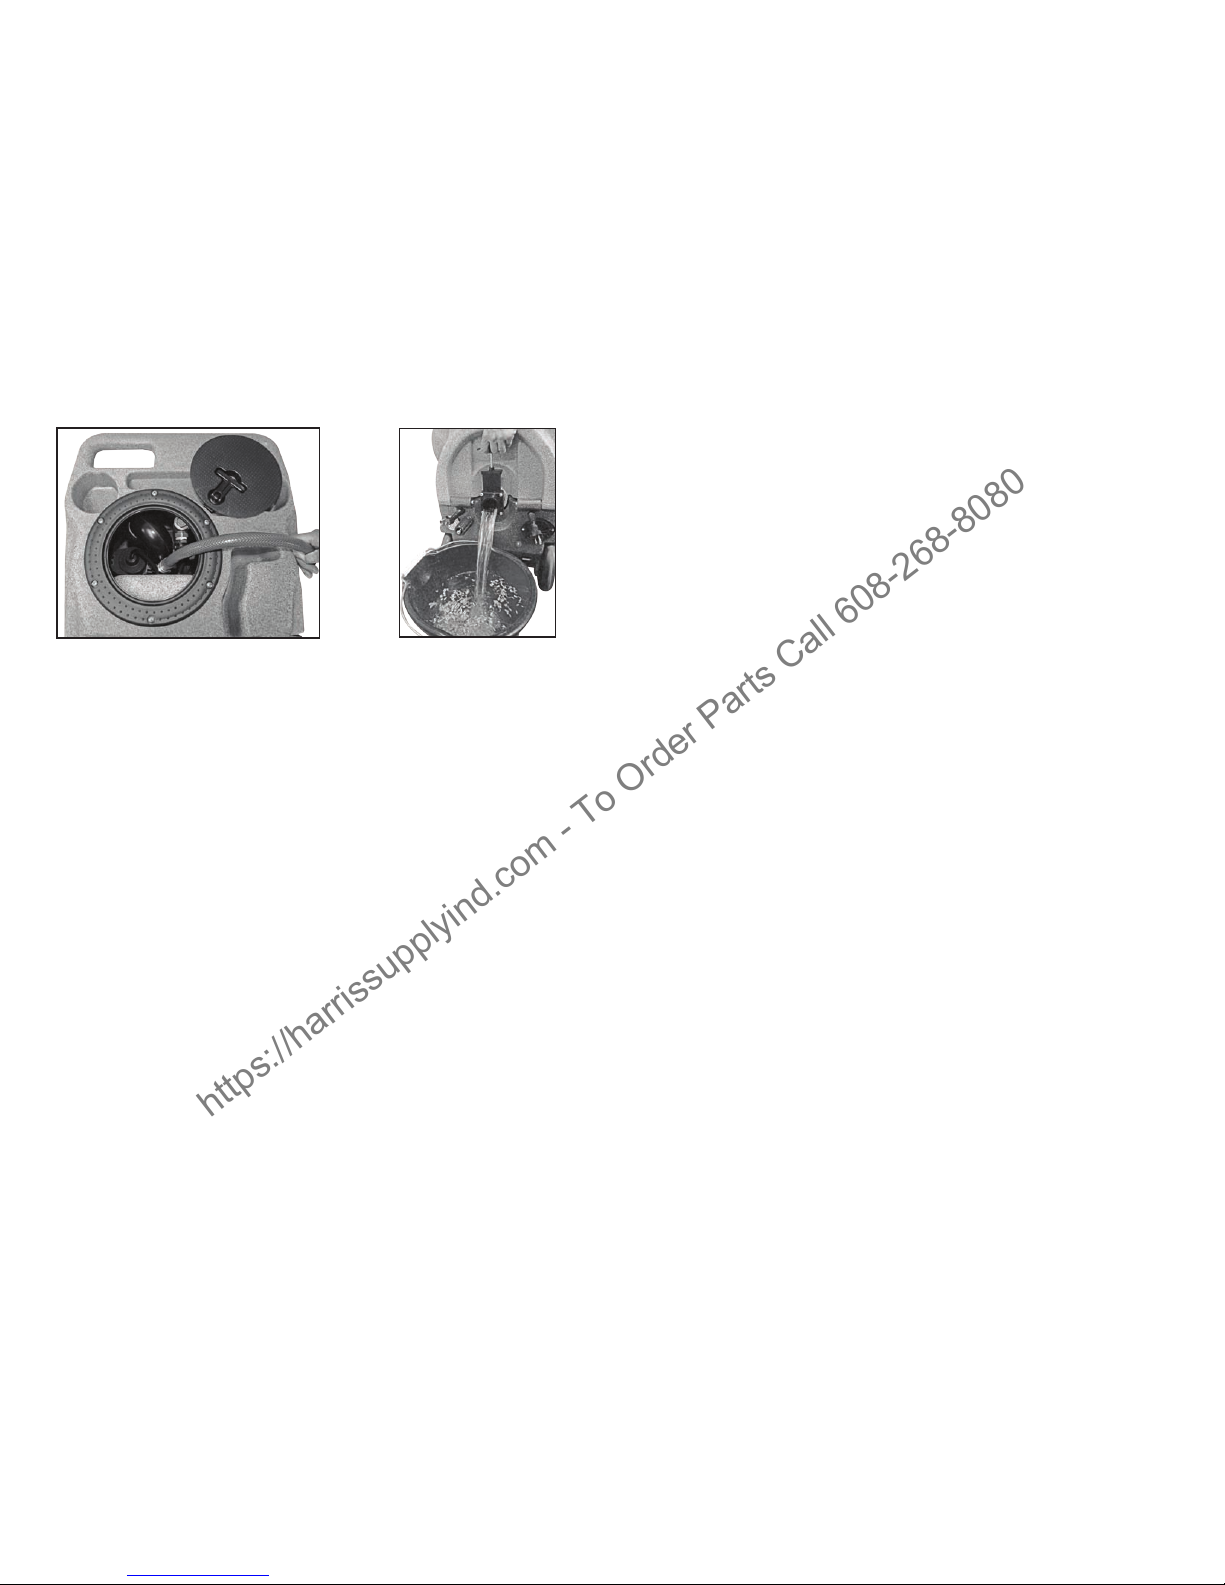
6.1 Clean Vacuum Float Assembly Screen
Inside the recovery tank, on top of the stand pipe, is the vacuum oat assembly. It
functions to prevent debris and water from being
sucked into the vacuum motor. Operating the
equipment without the oat assembly or with a
poorly maintained assembly, will greatly decrease
the life of the vacuum motor and will VOID the
warranty.
If debris builds up on this lter, it will reduce
the vacuum air ow and may cause a signicant
decrease in the rate of water recovery. If debris
prevents the oat ball from moving or seating inside
the assembly, it may not stop the airow when the
tank lls with water and water will be sucked in the
vacuum and blow out the exhaust.
To clean, twist off the oat assembly from the stand pipe and clean the screen. Pull bers
and lint off and rinse with clean water. Push the assembly back onto the stand pipe and
replace the recovery tank lid.
This screen should be cleaned daily, especially if the ood pumper is being operated in an
environment which has an abnormal build-up of lint and debris, such as cleaning newly
installed carpet. Loss of vacuum is most normally associated with lint build-up in this
lter at the top of the vacuum stand pipe.
6.2 Clean Auto-Dump Pump-Out and Recovery Tank
Build-up of ne silt and debris can damage the auto-dump pump and dump valve. Clean
out the recovery tank on a regular basis to extend the life of these components as well as
keep the tank and machine smelling better.
To rinse out recovery tank, remove the recovery tank lid and open the dump valve. Place
a bucket under the dump valve. Use a hose to rinse the dirt and debris out of the recovery
tank. Close the dump valve and spray the tank with deodorizer or disinfectant. Replace
the recovery tank lid and dispose of the dirty water and debris.
Vacuum Shut-Off Assembly
24-Gallon Sniper Flood Pumper (9)(8) 24-Gallon Sniper Flood Pumper
https://harrissupplyind.com-ToOrderPartsCall608-268-8080
Table of contents
Other Sandia Floor Machine manuals
Popular Floor Machine manuals by other brands

Nilfisk-Advance
Nilfisk-Advance BU800 51BT Instructions for use

Trusted Clean
Trusted Clean TPL-17-150-CE-HEAT-TCP Owner's manual & parts list

Tennant
Tennant 1220 Operator and parts manual

Clarke
Clarke DS-20 Operator's manual and parts list

Fimap
Fimap FSR B Use and maintenance manual

Tennant
Tennant 1230 Operator and parts manual