Sandstrom SDW60W10N User manual

Installation / Instruction Manual
Dishwasher
SDW60W10N / SDW60X10N
Installation / Instruction Manual
Dishwasher GB
Installasjons- / brukerveiledning
Oppvaskmaskin NO
Installations- och bruksanvisning
Diskmaskin SE
Asennus / Käyttöopas
Astianpesukone FI
Installation / Instruktionsvejledning
Opvaskemaskine DK
SDW60W10N
SDW60X10N
SDW60W_X10N_IB_5L_100921.indb 1 21/09/2010 5:50 PM

SDW60W_X10N_IB_5L_100921.indb 2 21/09/2010 5:50 PM

Contents GB
Unpacking.........................................................................................................6
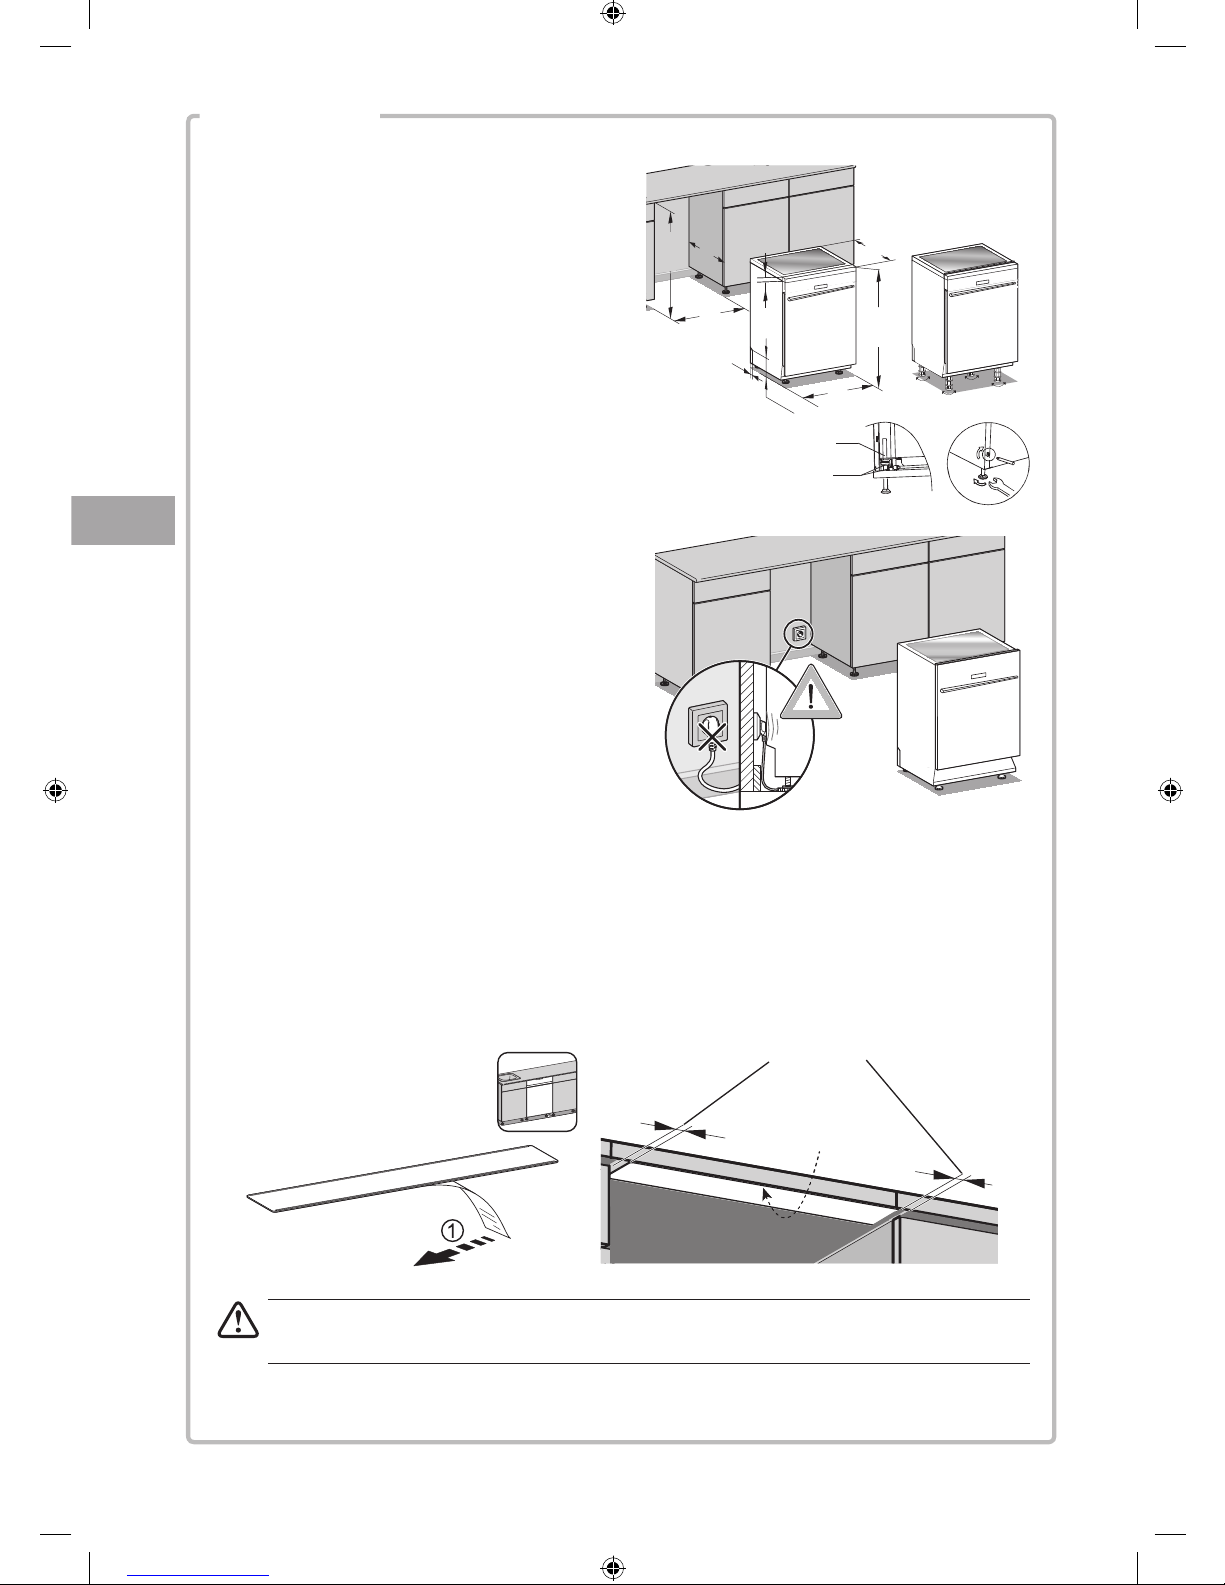
InstallingYour Dishwasher................................................................................7
Product Overview............................................................................................11
Before Use.......................................................................................................13
Wash CycleTable......................................................................................13
Before Operating .....................................................................................14
Items Not Suitable for Use in the Dishwasher ..........................................14
Adding the Detergent or DetergentTablet...............................................15
Adding of Rinse Aid .................................................................................16
Adjusting Rinse Aid Reservoir ..................................................................17
Adding Salt..............................................................................................17
Adjusting Salt Consumption ....................................................................18
Loading the Dishwasher..................................................................................19
Before Loading the Dishwasher ...............................................................19
Upper Basket ...........................................................................................19
Adjusting the Upper Basket................................................................20
Loading the Upper Basket for 12 Place Settings .................................20
Hinged Cup Rack ................................................................................20
Lower Basket ...........................................................................................21
Hinged Spikes.....................................................................................21
Loading the Lower Basket..................................................................21
Cutlery Basket..........................................................................................22
Loading the Cutlery Basket.................................................................22
Starting a Wash Cycle...............................................................................23
Changing a Programme...........................................................................23
At the End of a Programme......................................................................23
Switching O the Unit .............................................................................23
Unloading the Dishwasher.......................................................................24
Delay Start...............................................................................................24
Half Load .................................................................................................24
Cleaning After Use...........................................................................................25
External Care............................................................................................25
The Door and the Door Seal................................................................25
The Control Panel ...............................................................................25
Internal Care............................................................................................25
Filtering System .................................................................................25
Spray Arms.........................................................................................26
Frost Precaution..............................................................................................26
Moving the Dishwasher ..................................................................................26
Maintenance After Prolonged Period of Non-Operation..................................26
Troubleshooting Guide....................................................................................27
Fault Code................................................................................................27
Technical Problems..................................................................................27
Specication ...................................................................................................28
Safety First!...................................................................................................121
Innhold NO
Utpakking .......................................................................................................29
Installere oppvaskmaskinen............................................................................30
Oversikt over produktet...................................................................................34
Før bruk...........................................................................................................36
Tabell over vaskesyklus............................................................................36
Før du bruker enheten .............................................................................37
Elementer som ikke egner seg for oppvaskmaskinen...............................37
Legge i vaskemiddel eller vasketablett....................................................38
Ha i skyllemiddel .....................................................................................39
Justere skyllemiddelbeholder..................................................................40
Ha i salt....................................................................................................40
Justere saltforbruk...................................................................................41
Laste i oppvaskmaskinen ................................................................................42
Før du laster i oppvaskmaskinen..............................................................42
Øvre kurv .................................................................................................42
Justere den øvre kurven .....................................................................43
Laste i den øvre kurven for 12 kuverter ..............................................43
Hengslet koppkurver..........................................................................43
Nedre kurv...............................................................................................44
Hengslete spisser ...............................................................................44
Laste inn den nedre kurven................................................................44
Bestikkurv................................................................................................45
Laste inn bestikkurven .......................................................................45
Starte et vaskeprogram............................................................................46
Endre program.........................................................................................46
Ved slutten av et program........................................................................46
Slå av enheten.........................................................................................46
Laste ut av oppvaskmaskinen..................................................................47
Forsinket start..........................................................................................47
Halv vask .................................................................................................47
Rengjøring etter bruk......................................................................................48
Vedlikehold av utsiden.............................................................................48
Døren og dørpakningen .....................................................................48
Kontrollpanelet..................................................................................48
Vedlikehold av innsiden...........................................................................48
Filtreringssystem................................................................................48
Spylearmer.........................................................................................49
Sikkerhetsforholdsregler for frost....................................................................49
Flytte oppvaskmaskinen .................................................................................49
Vedlikehold etter lange perioder uten bruk.....................................................49
Feilsøkingsguide .............................................................................................50
Feilkode...................................................................................................50
Tekniske problemer..................................................................................50
Spesikasjon...................................................................................................51
Sikkerhet først!..............................................................................................122
SDW60W_X10N_IB_5L_100921.indb 3 21/09/2010 5:50 PM

Innehåll SE
Uppackning.....................................................................................................52
Installation av din diskmaskin.........................................................................53
Produktöversikt...............................................................................................57
Före användning.............................................................................................59
Diskcykeltabell.........................................................................................59
Innan användning ...................................................................................60
Föremål som inte är lämpliga att använda i diskmaskinen ......................60
Lägga till diskmedel eller diskmedelstablett ...........................................61
Lägga till sköljmedel................................................................................62
Inställning sköljmedelsbehållare.............................................................63
Lägga till salt...........................................................................................63
Inställning av saltförbrukningen..............................................................64
Ladda diskmaskinen .......................................................................................65
Innan diskmaskinen laddas .....................................................................65
Övre korg .................................................................................................65
Justering av övre korgen.....................................................................66
Ladda den övre korgen med 12 kuvert ...............................................66
Fällbart koppställ ...............................................................................66
Nedre korgen...........................................................................................67
Nedfällbara piggar .............................................................................67
Ladda den nedre korgen.....................................................................67
Bestickkorg..............................................................................................68
Ladda bestickkorgen ..........................................................................68
Start av diskcykeln...................................................................................69
Byte av program ......................................................................................69
Vid slutet av programmet........................................................................69
Stänga av enheten...................................................................................69
Urplockning av diskmaskinen..................................................................70
Fördröjd start...........................................................................................70
Halvfullt...................................................................................................70
Rengöring efter användning...........................................................................71
Yttre vård.................................................................................................71
Luckan och lucktätningen ..................................................................71
Kontrollpanelen .................................................................................71
Inre vård ..................................................................................................71
Filtreringssystem................................................................................71
Sprutarmar.........................................................................................72
Frostskydd.......................................................................................................72
Flyttning av diskmaskinen..............................................................................72
Underhåll efter en lång period utan användning............................................72
Felsökningsguide............................................................................................73
Felkod......................................................................................................73
Tekniska problem.....................................................................................73
Specikationer................................................................................................74
Säkerheten först!...........................................................................................123
Sisältö FI
Purkaminen pakkauksesta..............................................................................75
Astianpesukoneen asentaminen.....................................................................76
Tuotteen yleiskatsaus......................................................................................80
Ennen käyttöä.................................................................................................82
Pesuohjelmataulukko..............................................................................82
Ennen käyttöä..........................................................................................83
Astianpesukoneessa käytettäväksi sopimattomat kohteet.......................83
Pesuaineen tai pesuainetabletin lisääminen............................................84
Huuhtelukirkasteen lisääminen...............................................................85
Huuhtelukirkastesäiliön säätö..................................................................86
Suolan lisääminen ...................................................................................86
Suolan kulutuksen säätö..........................................................................87
Astianpesukoneen täyttö................................................................................88
Ennen astianpesukoneen täyttöä.............................................................88
Yläkori .....................................................................................................88
Yläkorin säätö.....................................................................................89
Yläkorin täyttö 12-paikkaisella asetuksella ........................................89
Kaatuva kuppiteline...........................................................................89
Alakori.....................................................................................................90
Kaatuvat pidikkeet .............................................................................90
Alakorin täyttäminen.........................................................................90
Ruokailuvälinekori...................................................................................91
Ruokailuvälinekorin täyttäminen.......................................................91
Pesuohjelman käynnistäminen................................................................92
Pesuohjelman muuttaminen...................................................................92
Pesuohjelman lopussa.............................................................................92
Koneen sammuttaminen.........................................................................92
Astianpesukoneen tyhjentäminen...........................................................93
Viivekäynnistys........................................................................................93
Puolitäyttö...............................................................................................93
Puhdistus käytön jälkeen ................................................................................94
Ulkopuolen ylläpito .................................................................................94
Ovi ja oven tiiviste..............................................................................94
Ohjauspaneeli ....................................................................................94
Sisäpuolen ylläpito ..................................................................................94
Suodatusjärjestelmä ..........................................................................94
Suihkuvarret.......................................................................................95
Jäätymisvarotoimet ........................................................................................95
Astianpesukoneen siirtäminen........................................................................95
Ylläpito pitkän käyttämättömyysjakson jälkeen .............................................95
Vianhakuopas .................................................................................................96
Vikakoodi.................................................................................................96
Tekniset ongelmat ...................................................................................96
Tekniset tiedot ................................................................................................97
Turvallisuus ensin!.........................................................................................124
SDW60W_X10N_IB_5L_100921.indb 4 21/09/2010 5:50 PM

Indholdsfortegnelse DK
Udpakning ......................................................................................................98
Installation af din opvaskemaskine.................................................................99
Produktoversigt.............................................................................................103
Inden brug....................................................................................................105
Skema over vaskecyklus.........................................................................105
Før brug.................................................................................................106
Emner, der ikke er egnede til vask i opvaskemaskinen...........................106
Tilførelse af opvaskemiddel eller opvaskemiddeltablet..........................107
Tilførelse af skyllemiddel.......................................................................108
Justering af skyllemiddelbeholder.........................................................109
Tilføjelse af salt......................................................................................109
Justering af saltforbrug..........................................................................110
Fyldning af opvaskemaskinen.......................................................................111
Før opvaskemaskinen fyldes..................................................................111
Øverste kurv...........................................................................................111
Justering af den øverste kurv............................................................112
Fyldning af den øverste kurv til 12 kuverter .....................................112
Hængslet hylde til kopper................................................................112
Nederste kurv ........................................................................................113
Hængslede spyd...............................................................................113
Fyldning af den nederst kurv............................................................113
Bestikkurv..............................................................................................114
Fyldning af bestikkurv......................................................................114
Start af vaskecyklus ...............................................................................115
Skift af program.....................................................................................115
Ved programmets afslutning.................................................................115
Slukning af enheden..............................................................................115
Tømning af opvaskemaskinen................................................................116
Udskudt start.........................................................................................116
Halv last.................................................................................................116
Rengøring efter brug.....................................................................................117
Udvendig pleje.......................................................................................117
Låge og lågepakning........................................................................117
Kontrolpanelet.................................................................................117
Indvendig pleje......................................................................................117
Filtersystem......................................................................................117
Spray-arme ......................................................................................118
Frostsikring ...................................................................................................118
Flytning af opvaskemaskinen........................................................................118
Vedligeholdelse efter længere periode ude af drift.......................................118
Fejlndingsguide..........................................................................................119
Fejlkode.................................................................................................119
Tekniske problemer................................................................................119
Specikationer..............................................................................................120
Sikkerhed først!.............................................................................................125
SDW60W_X10N_IB_5L_100921.indb 5 21/09/2010 5:50 PM

6
GB
Congratulationson the purchase of your new Sandstrøm Dishwasher.
These operating instructions will help you use it properly and safely.
Unpacking
Remove all packaging from the unit. Retain the packaging. If you dispose of it please do so according to
local regulations.
The following items are included:
This product has been wet tested to ensure correct operation. As a result some water may remain inside
the unit. This is normal and safe.
Remove any water droplets from the exterior if necessary.
The Main Unit
Salt Funnel x 1
P.N.:673002200043
U-shape Hose Holder x 1
P.N.: 673006200003
Condensation Strip x 1
P.N.: 675001300715
Safety Supply Hose x 1
P.N.: 673000900093
Instruction Manual x 1
P.N.: SDW60W-X-10N-001
Detergent Measuring Spoon x 1
P.N.: 673002200079
1 full spoon = 20g (approx.)
Measuring Cup x 1
P.N.: 673006200004
1 full cup = 60ml (approx.)
SDW60W_X10N_IB_5L_100921.indb 6 21/09/2010 5:50 PM

7
GB
INSTALLATION
Installing Your Dishwasher
Please refer to this guide for the installation process.
1. Remove all packaging before positioning the machine.
2. Please ensure the dishwasher is installed by a qualified technician.
3. Unscrew the two screws and adjust the distance of left and right plinth tab to your need. The
adjustable range is from 39mm to 134mm.
4. Fix the plinth on the plinth tab. According to your need to adjust the plinth height, the adjustable
range is from 56mm to 122mm.
screw
SCREW
CONE GEAR
screw
plinth
plinth tab
SDW60W_X10N_IB_5L_100921.indb 7 21/09/2010 5:50 PM

8
GB
INSTALLATION
5. Ensure there is clearance each side of the
unit to allow slight sideways movement for
servicing when required. Good levelling is
essential for correct closure and sealing of
the door. When the unit is correctly levelled,
the door should not catch the inner liner on
either side of the cabinet. The adjustable feet
may be loosened or tightened in order to
obtain the optimum levelling of the unit.
6. If required, the worktop of the dishwasher
can be removed. The height without the
worktop is 820 mm. The above figure outlines
the minimum dimensions required to
accommodate the dishwasher within fitted
kitchen furniture units.
Do not connect the unit to the mains before
installation. Ensure you are not installing the
unit right in front of the mains. This is to avoid
potential damage to the back of the unit.
7. The condensation strip must be fitted to the underside of the worktop above your dishwasher to
protect it against any moisture. Its purpose is to protect your worktop’s underside from steam rising
from the dishwasher.
- Ensure the surface is clean prior to sticking the condensation strip to the underside of the
worktop.
- Remove the backing paper from the condensation strip.
- Stick the condensation strip to the underside of the worktop.
Failure to attach the condensation strip could result in damage to the underside of your
worktop!
Leave some space
Stick the Condensation
Strip under the worktop,
where you want to install
the dishwasher.
600
600
820
30
820
600
620
min.100
80
level
level
level
level
Unit in mm
SCREW
CONE GEAR
SDW60W_X10N_IB_5L_100921.indb 8 21/09/2010 5:50 PM

9
GB
INSTALLATION
8. Position the dishwasher next to a water tap and a drain. Ensure the water inlet and drain hoses are
not kinked or squashed. The unit must not stand on the mains cable.
9. Make sure your plumbing is suitable for use with the dishwasher. If in doubt contact a qualified
plumber. This unit must be connected to cold water mains using the new water inlet hose. Old hose
sets must not be re-used. The water pressure from the water mains needs to be at a minimum of
0.04 MPa and a maximum of 1.00MPa.
- Connect one end of the safety water supply hose to your dishwasher, and then connect the other
end of the hose to your water mains. Please ensure the black rubber seal is in place.
- After connecting the hose, turn on your water mains and check for leaks.
- Connect the dishwasher to the mains socket.
Water mains
Y-Adaptor
(not included)
Connect
to another
appliance
if required.
Safety water supply hose
- Do not bend your drain hose.
You may use a Y-adaptor (not included) for additional water feed for another appliance,
for instance a washing machine. This is only applicable for cold water mains. A Y-adaptor is
available from most dry stores.
SDW60W_X10N_IB_5L_100921.indb 9 21/09/2010 5:50 PM

10
GB
INSTALLATION
- You may use the U-shaped drain hose holder to secure your drain hose and to avoid bending it.
- Secure the water drain hose to the waste pipe to avoid it coming off during the washing process.
• The waste pipe must only be connected to the foul drains and not the surface water drainage
system!
• The water drain hose should be placed between 40 cm and 100 cm from the floor level and
must not be extended, otherwise the unit may not be able to expel the waste water properly.
ST4 screws
U-shaped drain
hose holder Water drain hose
SDW60W_X10N_IB_5L_100921.indb 10 21/09/2010 5:50 PM

11
GB
3in 1 intensive normal economy rinse glass rapid
P1 P2 P3 P4 P5 P6 P7
p
1/2
1/2
Product Overview
The Unit
(Front view)
(Rear view)
(Internal view)
Control Panel
Spray Arms
Salt Reservoir
Detergent Dispenser
Water Inlet
(connect to safety supply hose)
Mains Cable
(connect to electrical mains outlet)
Cutlery Basket
Filtering System
Rinse Aid Dispenser
Display Window
Door Handle
Drain Hose
SDW60W_X10N_IB_5L_100921.indb 11 21/09/2010 5:51 PM

12
GB
The Upper Basket
The Control Panel
The Exterior Display Window
The Lower Basket
Cup Racks Spikes
1
1
2
2
3 4 5 6
Half Load Indicator Light
• Illuminates when the half load
washing cycle is selected.
• Only the upper spray arms will be in
function.
• Load the soiled dishes in the upper
basket.
Rinse Aid Refill Warning Light
• Illuminates when the rinse aid
dispenser needs refilling.
Salt Refill Warning Light
• Illuminates when the salt reservoir
needs refilling.
Display Window
• Display delay start time and fault codes.
• Displays programme selected, programme time, delay start time and fault codes etc.
3Delay Start Button
• To preset the wash timer and delay the
starting time by up to 24 hours.
• Each press of this button
increases the delay start time by 1 hour
intervals.
4Half Load Washing Button
• Press this button to select the half load
washing cycle.
5Programme Button
• Press this button to select the washing
programme.
6On/Off Button
• To turn the dishwasher on and off.
• The led light illuminates when the
dishwasher is on.
1/2
1
2
3 in 1
SDW60W_X10N_IB_5L_100921.indb 12 21/09/2010 5:51 PM

13
GB
Before Use
Wash Cycle Table
Programme Cycle
Cycle
Selection
Information
Process
Detergent
Amount
(Pre-wash /
Main wash)
Running
Time
(min.)
Energy
Consumption
(Kwh)
Water
Consumption
(I)
Rinse
Aid
3 in 1 3 in 1
Pots, utensils
and cutlery.
Highly soiled.
•pre-wash(50°C)
•wash(50°C)
•rinse
•rinse(70°C)
•drying
•3in1
155 1.2 16
Intensive
Pots, pans,
casserole dishes.
Dishes that have
been sitting
with dried food
on them for a
while.
•pre-wash(50°C)
•pre-wash
•wash(65°C)
•rinse
•rinse
•rinse(55°C)
•drying
•pre-wash
(5g)
•main
wash
(25g)
130 1.4 22
Normal
Pots, plates,
glasses and
lightly soiled
pans. Normally
soiled.
•pre-wash(50°C)
•wash(50°C)
•rinse
•rinse(65°C)
•drying
•pre-wash
(5g)
•main
wash
(25g)
160 1.2 16
Economy*
(EN50242)
Plates, glasses,
bowls. Lightly
soiled.
•pre-wash
•wash(55°C)
•rinse(65°C)
•drying
•pre-wash
(5g)
•main
wash
(25g)
155 1.05 13
Rinse
For dishes that
need to be
rinsed and dried
only.
•wash(40°C)
•rinse(70°C)
•drying
•n/a
80 0.8 8
Glass
Glasses, crystal
and fine china.
A shorter wash
for lightly soiled
loads.
•pre-wash
•wash(40°C)
•rinse
•rinse(60°C)
•drying
•main
wash
(20g) 95 0.8 15
Rapid
A shorter wash
for lightly soiled
loads that do
not need drying.
•wash(40°C)
•rinse
•rinse(45°C)
•main
wash
(20g) 30 0.45 12
* To comply with Standards of Performance, i.e. EN50242, please ensure to use economy washing cycle for
the test.
SDW60W_X10N_IB_5L_100921.indb 13 21/09/2010 5:51 PM

14
GB
Before Operating
To open the door
• Pull the door handle.
• If the door is opened during operation all functions are automatically interrupted.
To close the door
• After loading the dishes, push the baskets fully into the dishwasher.
• Lift the door upwards and push until it clicks into position.
• Do not slam the dishwasher door.
Items Not Suitable for Use in the Dishwasher
When purchasing new crockery and cutlery, please make sure they are dishwasher-proof. Some items are
not suitable for dishwashers.
• Wooden cutlery and crockery or items with wooden parts may discolour and fade. The glue used in
these items is not dishwasher proof and wooden handles may come loose after being washed in a
dishwasher.
• Craft items, antiques, valuable vases and decorative glassware are also not suitable for dishwashers.
• Plastic items (e.g. tupperware) which are not heat resistant may melt or loose shape due to the high
temperature in the dishwasher.
• Copper, brass, tin and aluminium items may discolour or become matt.
• Clouding may occur on glasses and delicate glassware after frequent washing. Do not wash delicate
glassware, or glassware containing lead crystal in a dishwasher. Wash delicate glassware by hand
instead.
• Silver and aluminium parts have a tendency to discolour during washing. Residues like egg white,
egg yolk and mustard often cause discolouring and staining on silver. Therefore, please clean the
residues from silver immediately after use.
The following items are not suitable
Towels and sponges
Small plastic items
(Milk bottle nipple)
Plastic items that are
not dishwasher safe
Cast iron pans
Scratched non-stick cookware
Copper pots and pans
Crystal glasses
Silverware
Valuable vases
Cracked/chippedchina
SDW60W_X10N_IB_5L_100921.indb 14 21/09/2010 5:51 PM

15
GB
Adding the Detergent or Detergent Tablet
Only use detergents specifically designed for use in dishwashers. To be more environmentally friendly,
please use no more than the correct amount of detergent.
Bleach and
Countertop detergent
Irritant
Keep out of the reach of children
• Irritating to eyes.
• Avoid contact with eyes. In case of contact with eyes, rinse immediately with plenty of water and
seek medical advice.
• If swallowed, seek medical advice immediately..
Please follow the steps below to fill the detergent dispenser.
1. Push the button on the lid of the detergent dispenser in the direction of the arrow until the flap springs
open.
2. Fill the detergent dispenser with detergent powder or insert the detergent tablet. The marking
indicates the filling level.
You can choose to add a detergent tablet alone or to add detergent powder to both the main
wash detergent chamber and the pre-wash detergent chamber for your selected wash cycle.
All programmes with pre-wash need an additional detergent dosage that must be placed in the
pre-wash detergent chamber. (Please refer to the wash cycle table) This detergent will take effect
during the pre-wash phase.
3. Close the lid firmly so that it clicks into place.
Push up from the right side
Main wash detergent chamber
Pre-wash detergent chamber
or
SDW60W_X10N_IB_5L_100921.indb 15 21/09/2010 5:51 PM

16
GB
Adding of Rinse Aid
Rinse aid helps to ensure water does not cling and leave marks on crockery during the drying phase and
helps crockery dry faster after it has been washed. Only pour rinse aid that is for domestic dishwashers into
the reservoir. This model is designed to use liquid rinse aids only.
Please follow the steps below to pour the rinse aid into the storage reservoir, and the amount will dispense
automatically.
1. Turn the cap and open as indicated.
2. When the cap open marking is aligned, you may lift the cap up.
3. Pour the rinse aid in until the level indicator turns completely black in colour and close the cap.
4. Be careful not to overfill the reservoir. Wipe up any spills. The approximate volume of the rinse aid
reservoir is 110ml.
If the water hardness in your area is soft, you may not need rinse aid as it may cause white film to
develop on your dishes.
Rinse aid warning light will illuminate when the reservoir is running out of
rinse aid and requires refilling.
Alternatively, you can judge the amount of rinse aid by checking the rinse
aid indicator right next to the reservoir’s cap. When the indicator is black, it
means it is full. When it is clear, it means it is almost empty.
1/2
Rinse aid indicator
Open
Rinse Aid Warning Light
SDW60W_X10N_IB_5L_100921.indb 16 21/09/2010 5:51 PM

17
GB
Adjusting Rinse Aid Reservoir
The rinse aid reservoir has six settings. Both the recommended setting
and the factory setting is “4.” If the dishes are not drying properly or are
spotted, adjust the dial to the next higher number until your dishes are
spot-free.
Adding Salt
If the water in your area is hard, deposits will form on your dishes and utensils. As such, this appliance
contains a salt reservoir for you to reduce the hardness of the water.
Please follow the steps below to pour the salt into the salt reservoir and it must be set to correspond to the
water hardness level in your area.
1. Remove the lower basket and unscrew the reservoir cap.
2. Fill the reservoir with approximately 500ml of water (first use only).
3. Place the funnel provided over the salt reservoir.
4. Pour in approximately 1.2kg of dishwasher salt depending on the brand used.
5. Clean any excess salt from around the reservoir opening and then screw the cap on again firmly.
6. Run the “rapid”wash programme immediately (without any crockery in the dishwasher) to remove any
traces of salt from the compartment.
The salt warning light will illuminate when the reservoir is running out of salt
and requires re-filling. The salt warning light will cease to illuminate within a
few days depending on how quickly the salt dissolves.
1/2
OPEN
Open Open
Open
Salt Warning Light
SDW60W_X10N_IB_5L_100921.indb 17 21/09/2010 5:51 PM

18
GB
Adjusting Salt Consumption
To optimise and customise the level of salt consumption, please
follow the steps below to adjust the salt consumption.
1. Remove the lower basket and unscrew the reservoir cap.
2. There is an arrow-shaped indicator in the reservoir, which allows
you to turn. You may turn it to the “-” or “+” settings based on the
water hardness in your area.
It is recommended that adjustments should be made in accordance with the following chart.
WATER HARDNESS Selector
Position
Salt Consumption
(gram/cycle)
Auto nomy
(cycle/1.2 kgs)
˚dh ˚fh ˚Clark mmol/l
0-8 0-14 0-10 0-1.4 /0/
8-22 14-39 10-28 1.4-3.9 - 20 60
22-45 39-80 28-56 3.9-8 Mid 40 30
>45 >80 >56 >8 + 60 20
1˚dh(Germandegree)=1.25mmol/l 1˚fh(Frenchdegree)=0.178mmol/l 1˚Clark(Britishdegree)=1.78mmol/l
Turn
SDW60W_X10N_IB_5L_100921.indb 18 21/09/2010 5:51 PM

19
GB
Loading the Dishwasher
Before Loading the Dishwasher
In general, please observe the following notes before loading your cutlery and crockery in the
basket.
• Remove lipstick stains and any food residues from crockery and dishes. Rinse if necessary.
• Dishes and cutlery must not lay inside one another, or cover each other.
• Load your cutlery and crockery so that water can access
all surfaces.
• Ensure all items are securely positioned.
• Hollow items such as cups, glasses, pans, etc. must be
placed upside down in the basket.
• Wide based items should be placed at an angle so that
water can run off them freely.
• The spray arms must not be blocked by items which are
too tall or hang through the baskets. If in doubt, test for
free movement by manually rotating the spray arms.
• Ensure that small items cannot fall through the holders in
the baskets.
Do not wash items soiled with ash, sand, wax, lubricating grease or paint in the dishwasher. Ash
does not dissolve and can distribute in the dishwasher. Wax, sand, lubricating grease and paint
can cause damage to the dishwasher.
For safety reasons, do not operate the dishwasher without the upper and lower baskets in place.
Upper Basket
Please use the upper basket for small and lightweight items
such as cups, saucers, glasses, dessert bowls, etc. Shallow
pans or casserole dishes can also be placed in the upper
basket.
SDW60W_X10N_IB_5L_100921.indb 19 21/09/2010 5:51 PM

20
GB
Long items such as soup ladles, mixing spoons and long knives
should be placed lying down across the front of the upper
basket.
Adjusting the Upper Basket
More space can be created for large items on the upper or lower baskets by adjusting the height of the
upper basket.
Ensure that the rail stop is placed back properly after the height adjustment.
Loading the Upper Basket for 12 Place Settings
For loading the upper basket, please refer to the table below.
Number Item
1 Cups
2 Saucers
3 Glasses
4 Small serving bowl
5 Medium serving bowl
6 Large serving bowl
7 Dessert dishes
Hinged Cup Rack
To make room for taller items in the upper basket,
raise the cup rack upwards. You can then lean the
tall glasses against it. You can also remove it when
it is not required for use.
To prevent water dripping from the upper
basket onto the dishes in the lower basket, we
recommend that you empty the lower basket first
and then the upper basket.
1
4
1
11
3
22
7
7
5
6
1
4
1
7
7
5
6
3
33
3
3
3
3
3
33
3
3
3
IN
Lift
Remove
the stop
slide the basket
out from the rail
Raise upwards
SDW60W_X10N_IB_5L_100921.indb 20 21/09/2010 5:51 PM
Other manuals for SDW60W10N
1
This manual suits for next models
1
Table of contents
Languages:
Other Sandstrom Dishwasher manuals

Sandstrom
Sandstrom SDW60B10 User manual

Sandstrom
Sandstrom SID60W14N Service manual

Sandstrom
Sandstrom SDW60W10N Service manual

Sandstrom
Sandstrom SDW60B10 User manual

Sandstrom
Sandstrom SDW60W14N Service manual

Sandstrom
Sandstrom SID60W12N Service manual

Sandstrom
Sandstrom SIDTTX11 User manual

Sandstrom
Sandstrom SDW60W15N Service manual

Sandstrom
Sandstrom SDW60B12 User manual

Sandstrom
Sandstrom SDW60B10 User manual