sanindusa LUXE 4153400 User manual

ES Manual de instalación
IT Manuale di istallazione
DE Einbauanleitung
PT Manual de instalação
EN Installation guide
FR Manuel d’installation
4153400
PT Secador de mãos automático 2600W
EN 2600W Automatic hand dryer
FR Sèche-mains automatique 2600W
ES Secamanos automático 2600W
IT Asciugamani automatico 2600W
DE Händetrockner 2600W
LUXE
4153411

2

3
Para remover a tampa
To remove the cover
2.25 m
0.6 m 2.4 m
volume 1 volume 2 volume 3
PT INSTRUÇÕES DE INSTALAÇÃO EN INSTRUCTIONS FOR INSTALLATION
IMPORTANTE
Antes da instalação leia atentamente as instruções.
GENERALIDADES
O secador de mãos Luxe foi desenvolvido para puder ser instalado numa casa de
banho.
LIGAÇÃO ELÉCTRICA
Este aparelho pertence à Classe II de isolamento eléctrico, pelo que não necessita
de ligação à terra.
Garanta que a instalação possui um interruptor omnipolar com uma distância entre
contactos de pelo menos 3mm.
INSTALAÇÃO EM CASA DE BANHO
Este aparelho pertence à classe II de isolamento eléctrico e tem um índice IP23
podendo ser instalado nos volumes 2 ou 3, desde que o circuito eléctrico da casa
de banho esteja protegido com um interruptor diferencial de sensibilidade máxima
de 30 mA.
INSTALAÇÃO
O APARELHO DEVE SER INSTALADO A UMA DISTÂNCIA MÍNIMA DE 50 CM DE
QUALQUER SUPERFÍCIE HORIZONTAL REFLECTORA OU BRILHANTE.
1- Para retirar a tampa: desapertar os parafusos a meia altura e retirar a tampa.
2- Colocar o cabo de alimentação no furo e fixar o aparelho à parede.
3- Ligar a fonte de energia ao bloco de ligação (terminais identificados por setas,
ver fig. 1).
O cabo de alimentação deve ficar na parte de trás do aparelho e inacessível
após fixação à parede. De contrário, deve ser utilizada a abraçadeira fornecida
(ver fig. 2).
4- Reposicionar a tampa e apertar os dois parafusos com a chave Allen. A cabeça
dos parafusos deve ficar à face.
UTILIZAÇÃO
O aparelho entra em funcionamento automaticamente quando o utilizador coloca as
mãos por baixo do mesmo.
AJUSTE DA SENSIBILIDADE
A sensibilidade pode ser ajustada através do potenciómetro P acessível pelo
pequeno furo localizado sob o aparelho. Rodando no sentido anti-horário o secador
torna-se mais sensível, rodando no sentido horário a sensibilidade diminui.
GARANTIA DE 2 ANOS
Qualquer erro na ligação ou deterioração proveniente de uma utilização abusiva
ou contraditória a esta instrução anula a garantia.
Este aparelho cumpre com as directivas europeias 2006/95/CE e 2004/108/CE.
IMPORTANT
Read this instructions leaflet carefully before beginning the installation
GENERAL POINTS
The Luxe hand dryer has been designed to permit its installation in a bathroom.
ELECTRICAL CONNECTION
As the appliances are rated Class II, they do not need earthing.
Ensure that your installation has a multipole separation with an aperture of at least
3 mm.
IN CASE OF AN INSTALLATION IN A BATHROOM
Installation in a bathroom is permitted in area 2 and 3 in view of its IP23 and class
II classification on one condition: the whole electrical circuit for the bathroom must
be protected by an earth leakage circuit breaker with a maximum sensitivity of 30
mA which could disconnect.
MOUNTING
AVOID MOUNTING THE APPLIANCE AT A DISTANCE INFERIOR TO 50 CM FROM A
REFLECTING OR BRIGHT HORIZONTAL PLANE.
1- To remove the cover: unscrew half-way the screws and move the bottom of
the cover away.
2- Insert the power wire in the hole and fix the appliance on the wall
3- Connect the power supply to the connecting block (terminals identified by the
arrows, fig. 1).
The power wire must be at the back of the appliance and must be out of
reach when the hand dryer is screwed on the wall. If not, you must use the
drilling clamp supplied with the appliance as indicated ( fig. 2).
4- Replace the cover and fix it with the two screws and the allen key supplied
with the appliance. The screw head has to appear on the surface.
OPERATION
The appliance automatically starts when you put your hands under the unit.
ADJUSTMENT OF THE SENSITIVITY
The sensitivity of the appliance can be adjust with the potentiometer P accessible
thanks to the little hole under the appliance. When you turn anticlockwise the
hair dryer will be more sensitive. If you turn clockwise the hair dryer will be less
sensitive.
2-YEAR WARRANTY
Faulty connection or any damage resulting from wrongly usage or in contradic-
tion to the instructions on this leaet cancels the warranty.
This equipment complies with the regulations in European directives 2006/95/EC
and 2004/108/EC.
resistência
resistance
motor
azul
blue
castanho
brown
preto
black
preto / black
preto
black
azul / blue 230 V
Fig. 1
Fig. 2
cerra-cabos
drilling clamp
abraçadeira

4
FR NOTICE D’INSTALLATION ES INSTRUCCIONES DE INSTALACIÓN
IMPORTANT
Avant toute installation bien lire l’ensemble de cette notice.
GÉNÉRALITÉS
Le sèche-mains Luxe a été étudié pour pouvoir être installé en sale d’eau
RACCORDEMENT ELECTRIQUE
L’appareil étant de classe II, il ne nécessite pas de raccordement à l aterre.
Un dispositif de séparation omnipolaire ayant une distance d’ouverture des contacts
d’au moins 3 mm doit être prévu dans l’installation fixe.
EN CAS D’INSTALLATION EN SALLE D’EAU
L’installation en salle d’eau, compte tenu de la classification IP23 et classe II, est
autorisée dans les volumes 2 et 3 si lénsemble du circuit électrique de la salle
d’eau, est protégé par un disjoncteur différentiel d’une sensibilité maximum de 30
mA pouvant servir de sectionneur.
FIXATION
EVITER DE PLACER L’APPAREIL A MOIS DE 50 CM D’UN PLAN HORIZONTAL
RÉFLÉCHISSANT OU D’ASPECT BRILLANT.
1- Pour enlever le capot: dévisser à moitié les vis et écarter la base du capot vers
l’extérieur
2- Insérer le câble d’alimentation par le trou et fixer l’appareil au mur.
3- Raccorder votre arrivée de courant sur le domino (bornes identifiées par les
flèches, fig. 1).
Le câble d’alimentation doit se trouver à l’arrière de l’appareil et ne doit plus
être accessible après la fixation au mur. Si le câble d’alimentation est
accessible, le serre-câble fourni avec l’appareil doit être mis en place comme
indiqué (fig. 2).
4- Replacer le capot et fixer le à l’aide des deux vis et de la clé allen fournie avec
l’appareil. La tête de vis doit affleurer.
FONCTIONNEMENT
La mise en marche est automatique lorsque l’on avance les mains sous l’appareil.
REGLAGE DE LA SENSIBILITÉ
La sensibilité de l’appareil peut être ajustée à l’aide du pontentiomètre P accessible
perl e petit trou sotué sous l’appareil. En tournant das les sens anti – horaire le
sèche mains será plus sensible. Dans le sens horaire le sèche mains será moins
sensible.
GARANTIE DE 2 ANS
Toute erreur de branchement ou toute détérioration venant d’une utilisation
abusive ou en contradiction avec cem ode d’emploi annule la garantie.
Ce matériel satisfait aux prescriptions des directives européennes 2006/95/CE et
2004/108/CE.
IMPORTANTE
Antes de la instalación lea atentamente las instrucciones
GENERALIDADES
El secador de manos Luxe fue concebido para poder ser instalado en un cuarto de
baño
CONEXIÓN ELÉCTRICA
Este aparato cuenta con aislamiento eléctrico Clase II, por lo que no necesita de
conexión a la tierra. Asegúrese de que la instalación cuenta con un interruptor de
corte omnipolar con una distancia entre contactos de por lo menos 3mm.
INSTALACIÓN EN EL CUARTO DE BAÑO
Este aparato cuenta con aislamiento eléctrico Clase II y tiene un índice de protec-
ción IP23 pudiendo instalarse en los volúmenes 2 ó 3, siempre y cuando el circuito
eléctrico del cuarto de baño esté protegido con un interruptor diferencial con una
sensibilidad máxima de 30 mA.
INSTALACIÓN
EL APARATO DEBE INSTALARSE A UNA DISTANCIA MÍNIMA DE 50 CM DE CUAL-
QUIER SUPERFICIE HORIZONTAL REFLECTORA O BRILLANTE.
1- Para retirar la tapa: suelte los tornillos hasta la mitad y retire la tapa
2- Coloque el cable de alimentación en el orificio y fije el aparato a la pared
3- Conecte la fuente de energía al bloque de conexión (terminales identificadas
por flechas, fig. 1).
El cable de alimentación debe quedar en la parte posterior del aparato e
inaccesible después de su colocación en la pared. De lo contrario, deberá
utilizarse la abrazadera suministrada (fig. 2).
4- Vuelva a colocar la tapa y apriete los dos tornillos con la llave Allen. La cabeza
de los tornillos no debe sobresalir.
UTILIZACIÓN
El aparato entra en funcionamiento automáticamente cuando el utilizador coloca las
manos por debajo del mismo.
AJUSTE DE LA SENSIBILIDAD
La sensibilidad puede ser ajustada por medio de un potenciómetro P, accesible
a través de un pequeño orificio situado en la parte inferior del aparato. Girándolo
en sentido antihorario la sensibilidad del secador aumentará, girándolo en sentido
horario la sensibilidad disminuirá.
APARATOS GARANTIZADOS 2 AÑOS
Cualquier error en la conexión o deterioro como resultado de una utilización
abusiva o contraria a estas instrucciones anulará la garantía.
Este aparato cumple con las directivas europeas 2006/95/CE y 2004/108/CE.
Pour enlever le capot
Para retirar la tapa
2.25 m
0.6 m 2.4 m
volume 1
volumen 1
volume 2
volumen 1
volume 3
volumen 3
resistance
resistencia
motor
bleu
azul
marron
marrón
noir
negro
noir / negro
noir
negro
bleu / azul 230 V
serre-cáble
sujetacables
Fig. 1
Fig. 2

5
Per rimuovere il coperchio
Entfemen der Abdeckung
2.25 m
0.6 m 2.4 m
volume 1
Bereich 1
volume 2
Bereich 1
volume 3
Bereich 3
IT MANUALE D’ISTALLAZIONE DE EINBAUANLEITUNG
IMPORTANTE
Prima dell’istallazione, leggere attentamente il presente manual.
GENERALITÀ
L’asciugamani Luxe è stato studiato per poter essere istallato in una stanza da
bagno.
COLLEGAMENTO ELETTRICO
L’apparecchio appartiene alle classe II e pertanto non è necessario effetuare il
collegamento alla messa a terra. Per l’istallazione fissa deve essere previsto un
dispositivo di separazione onnipolare con una distanza di apertura dei contatti di
almeno 3 mm.
IN CASO DI ISTALLAZIONE IN UNA STANZA DA BAGNO
L’istallazione in una stanza da bagno, tenuto conto dellaclassificazione IP23 e della
classe II, è consentita nei volumi 2 e 3 qualora il circuito elettrico della stanza da
bagno sia protetto, in conformità alla normativa NFC15-100 (CEI 364...), da un
disgiuntore differenziale con sensibilità massima di 30 mA che possa servire da
sezionatore.
FISSAGGIO
EVITARE DI POSIZIONARE L’APPARECCHIO A MENO DI 50 CM DA UN RIPIANO
ORIZZONTALE RIFLETTENTE O LUCENTE.
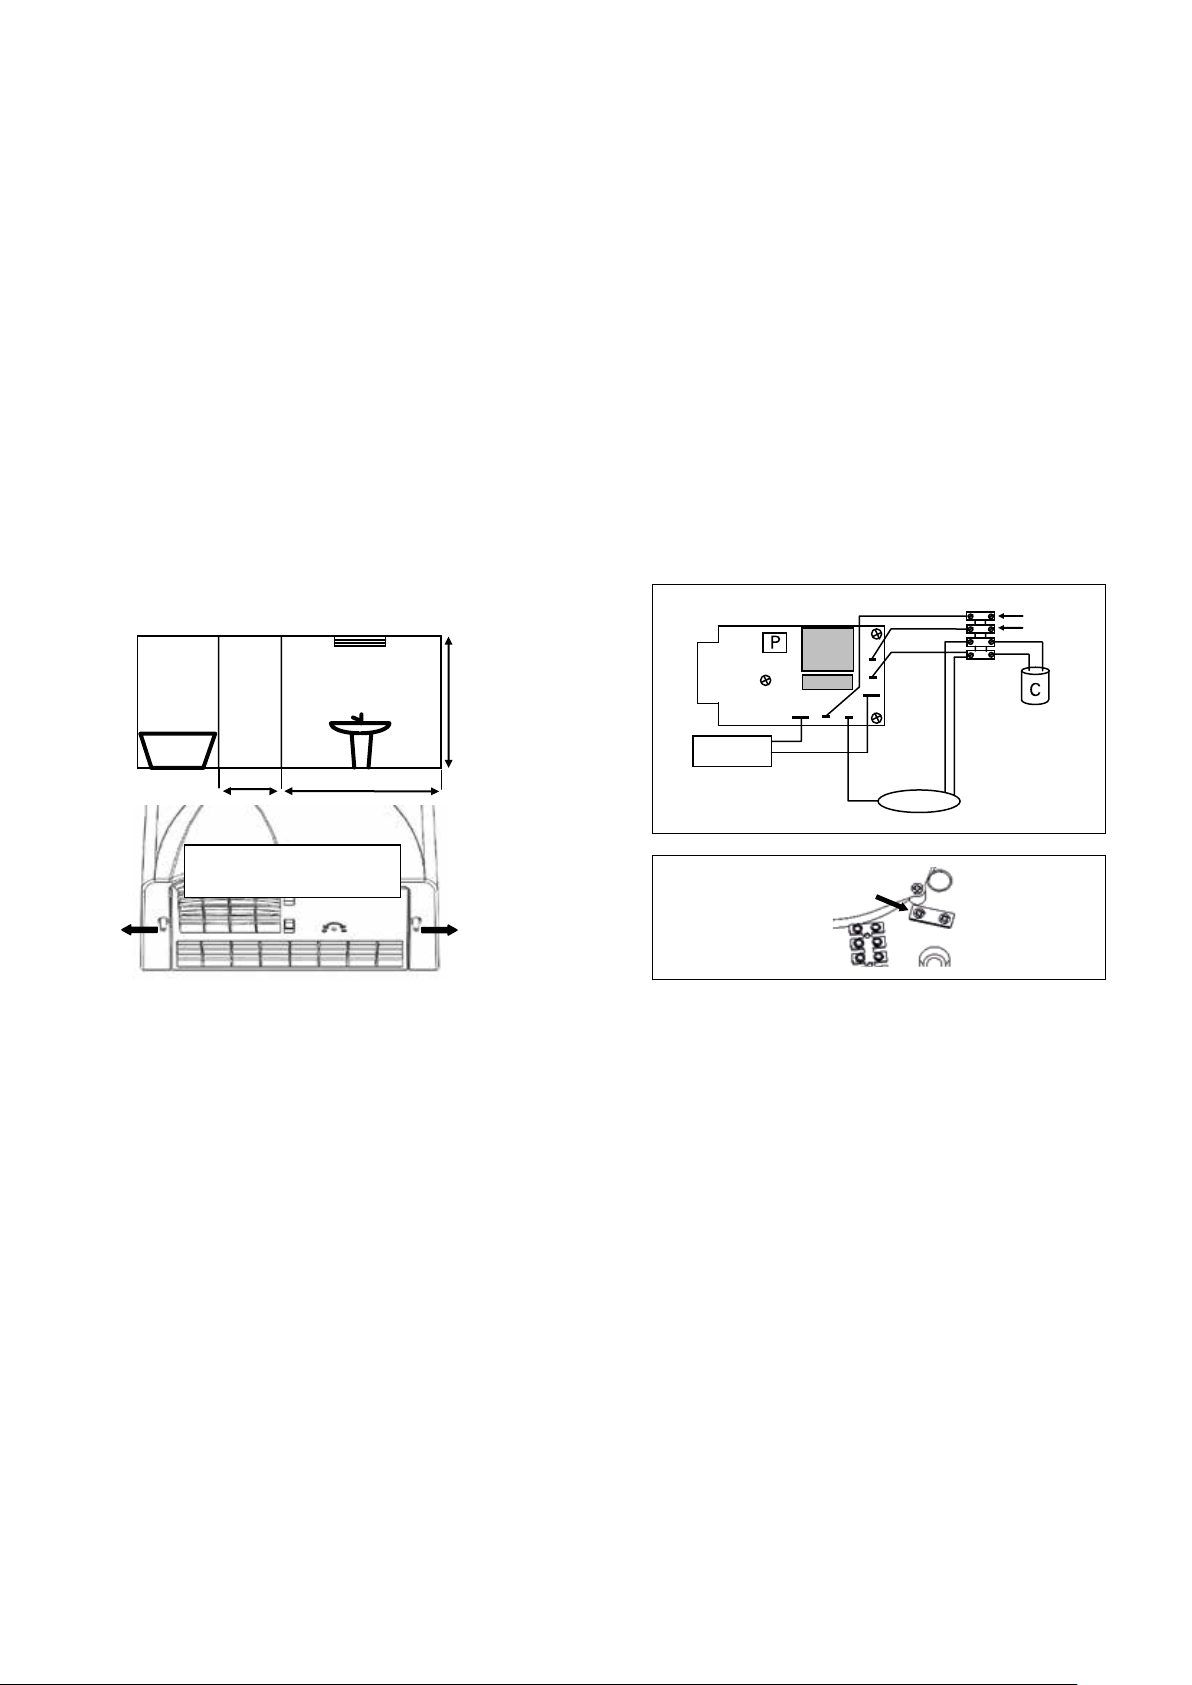
1- Per rimuovere il coperchio:svitare per metà le vite e spostare la base del
coperchio verso l’esterno.
2- Inserire il cavo di alimentazione dal foro e fissare l’apparecchio al muro.
3- Collegare l’entrata di corrente alla presa multipla (terminali individuate dalle
frecce, fig. 1).
Il cavo di alimentazione deve essere posizionato dietro l’apparecchio e non
deve essere accessibile dopo il fissaggio al muro. Qualora esso sia
accessibile, è necessario posizionare come indicato il serrafilo fornito in
dotazione (fig. 2).
4- Riposizionare il coperchio e fissarlo servendosi di due viti e della chiave “allen”
forniti in dotazione.
FUNZIONAMENTO
L’accensione è automatica non appena si posizionano le mani sotto l’apparecchio.
REGOLAZIONE DELLA SENSIBILITÀ
La sensibilità dell’apparecchio può essere regolata mediante un potenziometro P
accessibile dal piccolo foro situato sotto l’apparecchio stesso. Ruotando in senso
antiorario, l’asciugamani sarà più sensibile; in senso orario, meno sensibile.
APPARECCHI GARANTITI 2 ANNI
Qualsiasi errore di collegamento o qualsiasi deterioramento derivante da un utilizzo
scorretto o dall’inosservanza del presente manuale annulla la garanzia.
Questo prodotto è conforme alle direttive europee 2006/95/CE e 2004/108/CE.
WICHTIG
Vor dem Einbau bitte die gesamte Anleitung durchlesen.
ALLGEMEIN
Der Handetrockner Luxe kann vom Konstruktionsprinzip her in Naßzellen installiert
werden.
ELEKTRISCHER ANSCHLUSS
Da das Gerät zur Schutzklasse II gehört, wird kein Erdanschlußbenötigt. In der
Festinstallation ist eine Trennvorrichtung mit mindestens 3 mm Kontaktöffnung für
jeden Pol vorzusehen.
BEI EINAU IN EINER NASSZELLE
Aufgrund der Schutzart IP23 und der Scutzklasse II ist der Einbau in der Bereinchen
2 und 3 von Naßzellen zulässig, wen der gesamte Stromkreislauf der Naßzelle nach
NFC15-100 (IEC 364...) durch einen Differentialschalter mit einer maximalen Empfin-
dlichkeit von 30 mA geschützt ist, der als Trennschalter dienen kann.
BEFESTIGUNG
DAS GERÄT SOLLTE MINDESTENS 50 CM VON REFLEKTIERENDEN ODER GLÄN-
ZENDEN WAAGERECHTEN FLÄCHEN ENTFERNT SEIN.
1- Entfernen der Abdeckung: Schrauben halb herausdrehen und das Unterteil
derAbdeckung nach außen wegziehen.
2- Anschlußkabel durch die Öffnung einführen und Gerät an der Wand befestigen.
3- Stromzufuhrkabel an der Lüsterklemme anschließen (Klemmen durch Pfeile
gekennzeichnet, fig. 1).
Das Stromkabel mußsich an der Geräterückseite befinden und darf nach der
Befestigung na der Wand nicht mehr zugänglich sein. Falls doch, ist die mit
dem Gerät mitgelieferte Kabelklemme wie angegeben zu verwenden (fig. 2).
4- Abdeckung wieder einsetzen und die mit dem Gerät mitgelieferten beiden
Schrauben mit dem Inbusschlüssel anziehen.
FUNKTIONSWEISE
Geht automatisch an, sobald man die Hände unter das Gerät häit.
EINSTELLUNG DER EMPFINDLICHKEIT
Die Empfindlichkeit des Geräts kann mit dem Potentiometer P eingestellt werden,
das durch eine kleine Öffnung under dem Gerät zugänglich ist. Durch Drehen gegen
den Uhrzeigersinn wird die Empfindlichkeit des Händetrockners höher gestelit.
Durch Drehen im Uhrzeigersinn wird die Empfindlichkeit heruntergeregeit.
2 JAHRE GARANTIE AUF DIE GERÄTE
Wird das Gerät falsch angeschlossen oder ist eine Beschädigung auf unsachge-
mäßen Gebrauch oder Nichtbeachtung dieser Bedienungsanieitung zurüchzuführen,
so erlischt die Garantie.
Dieses Gerät esfüllt die Anforderungen der europäischen Richtlinien 2006/95/EG
und 2004/108/EG.
resistenzia
Widerstand
motore /motor
azzurro
blau
marrone
braun
nero
schwarz
nero / schwarz
nero
schwarz
azzurro / blau 230 V
serrafile
Kabelldemme
Fig. 1
Fig. 2

6
Este produto é abrangido pela directiva relativa aos Resídu-
os de Equipamentos Eléctricos e Electrónicos (REEE)
2002/96 CE.
Este produto não deve ser colocado no lixo doméstico comum.
Por favor, reciclar onde há disponibilidade. Procure aconselha
mento junto dos organismos locais para reciclagem e elimina
ção adequada.
This product falls within the scope of the Waste Electrical &
Electronic Equipment Directive (WEEE) 2002/96 EC.
This product should not be disposed of with household waste.
Please recycle where facilities exist. For recycling and proper
disposal, contact your local authorities.
Ce produit est conforme à la Directive 2002/96 EC (WEEE) du
recyclage des composants électroniques.
Ce produit ne doit pas être jeté à la poubelle avec les ordures
ménagères. Il ne peut être mis que dans les endroits autorisés
pour être recycle.
Este producto está cubierto por la Directiva sobre Residuos
de Aparatos Eléctricos y Electrónicos (RAEE) 2002/96 CE.
Este producto no puede ser tirado a la basura doméstica.
Por favor , hay que reciclarlo en el lugar apropiado. Busque
consejo para su reciclaje y eliminación adecuados.
Questo prodotto rientra nell’ambito di applicazione della
direttivasuiriutielettriciedelettronici(RAEE)2002/96CE.
Questo prodotto non deve essere smaltito con i rifiuti domes
tici. Riciclare dove esistono impianti. Verificare con le autorità
locali per i consigli sul riciclaggio.
Dieses Produkt fällt in den Geltungsbereich der Richtlinie
über Elektro- und Elektronik-Altgeräte (WEEE) 2002/96 EG.
Dieses Produkt sollte nicht mit dem Hausmüll entsorgt werden.
Bitte recyceln, wo Einrichtungen vorhanden sind. Zum Recy-
cling und zur Entsorgung, kontaktieren Sie bitte Ihrer
Gemeindeverwaltung.
PT INFORMAÇÃO IMPORTANTE
EN IMPORTANT NOTE
FR NOTE IMPORTANT
ES INFORMACIÓN IMPORTANTE
IT INFORMAZIONE IMPORTANTE
DE NOTIZ

7
PT ALTURA DE INSTALAÇÃO RECOMENDADADA
EN RECOMMENDED MOUNTING HEIGHT
FR HAUTEURS D’INSTALLATION RECOMMANDÉES
ES ALTURA DE INSTALACIÓN RECOMENDADA
IT ALTEZZA DI MONTAGGIO RACCOMANDATA
DE EMPFOHLENE MONTAGEHÖHEN
PT DIMENSÕES
EN DIMENSIONS
FR DIMENSIONS
ES DIMENSIONES
IT DIMENSIONI
DE ABMESSUNGEN
X
X
1300mm - Homem / Adult male / Homme / Hombre / Uomo / Mann
1250mm - Mulher / Adult female / Femme / Mujer / Donna / Frau
1200mm - Criança / Children / Enfant / Niño / Bambini / Kinder
1000mm - PMR
265 149
302
200
100
110
180

Sanindusa - Indústria de Sanitários S.A.
Zona Industrial Aveiro Sul
Apartado 43
3811-901 Aveiro, Portugal
T. +351 234 940 250
F. +351 234 940 266
www.tec.sanindusa.pt
www.sanindusa.pt
www.departiraloica.com
sanindusa.portugal
sanindusa
sanindusasanitarios
sanindusa
sanindusa
DG061-15
This manual suits for next models
1
Table of contents
Popular Dryer manuals by other brands

ffuuss
ffuuss eos user manual

KitchenAid
KitchenAid 53-3498 installation instructions

Schulthess
Schulthess Spirit topLine TW 8340 operating instructions

Whirlpool
Whirlpool LGR4624BW0 parts list

World Dryer
World Dryer AirMax D M5-972A manual

Alliance Laundry Systems
Alliance Laundry Systems ADEE9BSS user guide