Sanlida SM-1505 User manual

Stand Mixer
SM-1505
Instruction Manual
Keep this manual for future reference and pass it on
with the equipment to any future users.
SANLIDA ELECTRICAL TECHNOLOGY CO.,LTD
101,building a,27 jiangjunmao community,Wulian community,Longgang street,Longgang
District,Shenzhen,GD,P.R.China

Technical Data
Model: SM-1505
Rated voltage: AC120V 60Hz
Power consumption: 660W
General Safety Instructions
Read the operating instructions carefully before putting the appliance into operation and keep the instructions
including the warranty, the receipt and, if possible, the box with the internal packing. If you give this device to other
people, please also pass on the operating instructions.
Read all instructions.
To protect against risk of electrical shock do not put base in water or other liquid.
This appliance is not intended for use by persons (including children) with reduced physical, sensory, or mental
capabilities, or lack of experience and knowledge, unless they are closely supervised and instructed
concerning use of the appliance by a person responsible for their safety. Close supervision is necessary when
any appliance is used by or near children. Children should be supervised to ensure that they do not play with
the appliance.
Turn the appliance OFF, then unplug from the outlet when not in use, before assembling or disassembling
parts and before cleaning. To unplug, grasp the plug and pull from the outlet. Never pull from the power cord.
Avoid contacting moving parts.
Do not operate any appliance with a damaged cord or plug or after the appliance malfunctions, or is dropped or
damaged in any manner. Contact the manufacturer at their customer service telephone number for information
on examination, repair, or adjustment.
The use of attachments not recommended or sold by the manufacturer may cause fire, electric shock or injury.
Do not use outdoors.
Do not let cord hang over edge of table or counter.
Keep hands, hair, clothing, as well as spatulas and other utensils away from beaters during operation to reduce
the risk of injury to persons, or damage to the mixer.
Remove beaters from mixer before washing.
Household use only.
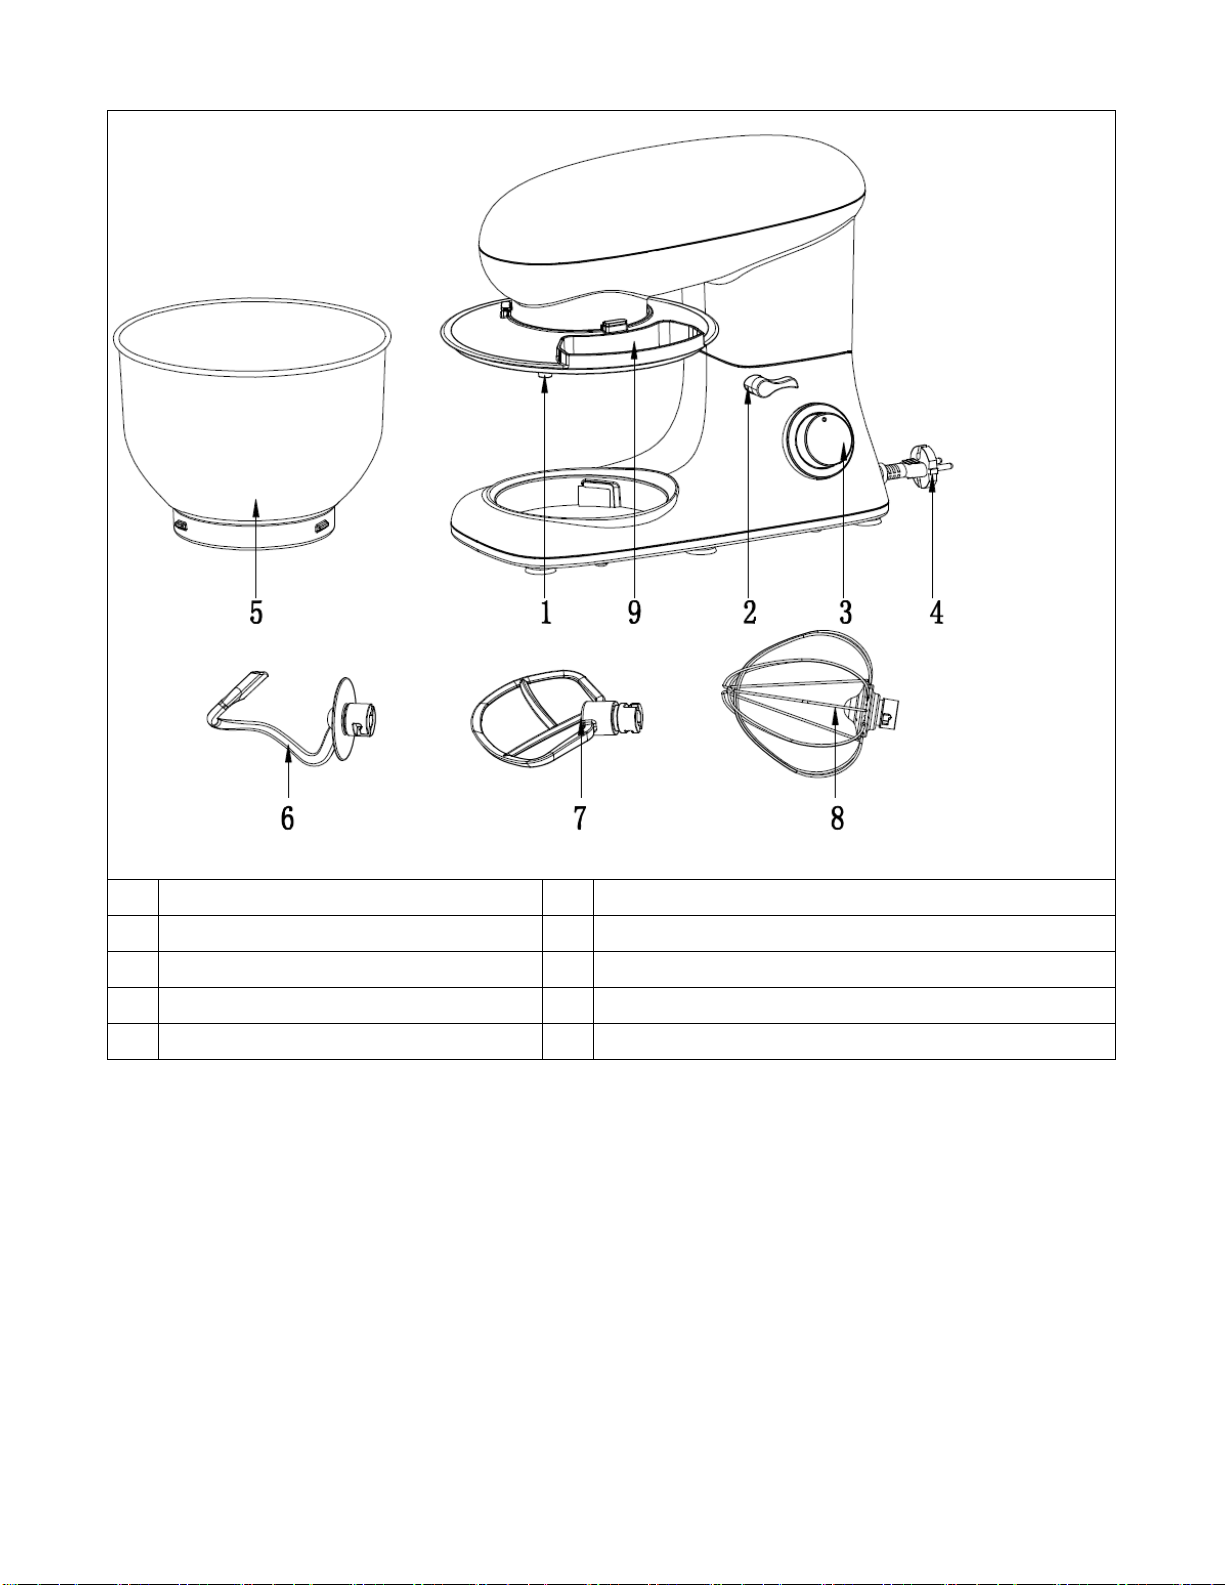
Special safety Instructions for this Machine
Only operate this machine under supervision.
Do not interfere with any safety switches.
Do not insert anything into the rotating hooks while the machine is working.
Place the machine on a smooth, flat and stable working surface.
Do not insert the mains plug of the machine into the power socket without having installed all the necessary
accessories.
This appliance has a polarized plug(one blade is wider than the other). To
reduce the risk of electric shock.this plug will fit in a polarized outlet only
one way. If the plug is not fully plugged into the socket,reverse the plug.if it
still does not fit, contact a qualified electrician.Do not modify the plug in any
way.
Maintenance Please call NO : 0755-********

Overview of the Components
Main Components and Standard Accessories:
1
Output shaft
6
Dough hook
2
Rise knob
7
Beater
3
Speed knob
8
Whisk
4
Power Cord
9
Pot cover
5
Mixing bowl
Using the Mixing Bowl
1. In order to lift the arm, clockwise rotation the rise knob (2) . The arm will now move upwards.(FIG1)
2. Place the pot cover into its body. (FIG2)
3. Place the mixing bowl into its holding device(Step①) and turn the bowl clockwise until it locks into place(Step
②). (FIG3)
4. Mount the required utensil(Dough hook or Beater or Whisk)by inserting the top into the output shaft,
and turn anti-clockwise until it locks into place. (FIG4&FIG5)
5. Now fill in your ingredients.
Do not overfill the machine - the maximum quantity of ingredients is 1.5kg.
6. Lower the arm using the rise knob (2). (FIG6)
7. Insert the mains plug into a properly installed AC120V 60Hz safety power socket.
8. Switch the machine using the speed knob to a speed between 1 and 6 (corresponding to the mixture).

9. For pulse operation (kneading at short intervals), turn the switch to the “PULSE” position. The switch has to be
held in this position according to the desired interval length. When the switch is released it returns automatically
to the “0” position.
10. After kneading/stirring turn the speed knob (3) back to the “0” position as soon as the mixture has formed a ball.
Then remove the mains plug.
11. Push the rise knob (2) downwards and the arm will be raised.
12. The mixture can now be released with the help of a spatula and removed from the mixing bowl.
13. The mixing bowl can now be removed.
14. Clean the parts as described under “Cleaning” .
Adjusting the Levels and Using the Dough Hook for not more than 1.5kg of Mixture
Use
Picture
Levels
Time(Min)
Maximum
Operation method
Dough hook
1-3
3-5
1000g flour and
538g water
1 speed run for 30s,
the 2 speed run for
30s, and then the 3
speed run for 2 min to
4 min to form a cluster.

Beater
2-4
3-10
660g flour and
840g water
2 speed run for20s, the
4 speed run for more
than 2min40s
Whisk
6
3-10
3 egg whites
(Minimum)
Open 5 or 6 speed to
run 3min above.
Troubleshooting
NO.
Troubles
Solution
1
The machine doesn't work
·Check if the plug is in good contact with the socket.
·Check if the rise button spring back in place.
·Check if the machine works continuously more than
6-10 minutes, and wait until the motor cool down.
2
Noise in the mixing bowl when
working (the accessory scraped the
bowl)
·Check if the mixing bowl is properly installed.
·Check if the accessory installed properly on
machine.
3
The pot cover doesn’t fit the mixing
bowl properly
·Check if the pot cover placed on the machine
properly.
·Check if the mixing bowl installed properly on
machine and locked correctly.
4
The machine doesn’t work on certain
speed
·Check if the mark on speed knob correspond to the
speed silkscreen on housing.
·Rotate speed knob to 0 ,and re-check if the machine
works .
5
Movements when the machine
working
·Check if the anti-slip feet fall off.
·Check if the machine is placed on a smooth and flat
tabletop.
6
The rise button didn’t spring back in
place after installing the mixing bowl
and pot cover
·Check if the pot cover placed on the machine
properly.
·Check if the mixing bowl is properly installed.
Cleaning
Before cleaning remove the mains lead from the socket.
Never immerse the housing with motor in water!
Do not use any sharp or abrasive detergents.
Motor Housing
Only a damp rinsing cloth should be used to clean the outside of the housing.

Mixing Bowl, Mixing Equipment
CAUTION:
The components are not suitable for cleaning in a dishwasher. If exposed to heat or caustic
cleaners they might become misshapen or discolored.
Components that have come into contact with food can be cleaned in soapy water.
Allow the parts to dry thoroughly before reassembling the device.
Please apply a small quantity of vegetable oil likely to the screens after they have dried.
Disposal
Do not dispose of the device in normal domestic waste.
Dispose of the device over a registered waste disposal firm or through your communal waste disposal facility.
Observe the currently valid regulations. In case of doubt, consult your waste disposal facility.
Table of contents
Other Sanlida Mixer manuals
Popular Mixer manuals by other brands

Sunbeam
Sunbeam StickMaster Platinum user guide

Elba
Elba ESMB-C4035 owner's manual

EUROPRO
EUROPRO MIXPRO 14 user manual

TREVIDEA
TREVIDEA G3 Ferrari G20075 user manual

KitchenAid
KitchenAid KHM7T - Ultra Power Plus Hand Mixer Instructions and recipes

Metcalfe
Metcalfe SM5 Installation & operating instructions