Sansisco A21 User manual
封面
Multi-Language User Manual
DANGER
Only suitable
for age 14+
A21
Email: [email protected]
Web: www.sansisco.com
Email: [email protected]
Email: [email protected]
Email: [email protected]
Email: [email protected]

DE
EN
01 - 12
13 - 24
Catalog
封面背面
User Manual
Benutzerhandbuch

01
Package List
RC Drone Smart batteryRemote control
Extra Propellers (A&B) USB Charging Cable
User manual
Screwdriver
Safety Precaution
1. In order to ensure the requirements of electromagnetic environment of
aviation radio station, it is forbidden to use all kinds of model remote
controllers in the area with radius of 5000m and center point of airport
runway. During the period when the relevant national departments issue
radio control orders, the remote controller of the model shall be stopped
according to the requirements.
2. Fly in warm, sunny and windless weather. Do not fly in severe weather
conditions such as overheating, supercooling, strong wind and rainstorm.
3. In order to avoid accidents, please fly indoors or outdoors in an open
space, keep a safe distance from people, pets, empty wires and other
obstacles, and do not let the aircraft out of sight.
4. After the aircraft started, please do not touch the high-speed rotating gear,
rotor and other parts of the aircraft, so as to avoid the risk of strangulation.
EN
User Manual
DANGER
Onlysuitable
forage14+
A21
Email:[email protected]
Web:www.sansisco.com
Email:[email protected]
Email:[email protected]
Email:[email protected]
Email:[email protected]
Email:[email protected]
Email:[email protected]

02
Aircraft Overview
Propeller A Propeller B
Left
Front
Right
Rear
Power Switch
Drone Cover
Receiver
Emitter
Motor
Tip: The aircraft has two types of blades ("A" and "B"). The logo
"A" or "B" is printed on the arm and propeller respectively.
When replacing propeller, please match according to the
corresponding "A" or "B" logo.
Aircraft Profile

03
Install The Battery
Open the battery cover, insert the battery (keep the side with
information down) and male plug, then buckle it up.
Charge
Charge the battery as shown in the figure. When charging, the
red light of USB charger will be on. It will turn solid green when
charged finish.
Phone Charger Power Bank Computer Charging Car Charger
Charging voltage/current: 5V 1A
04
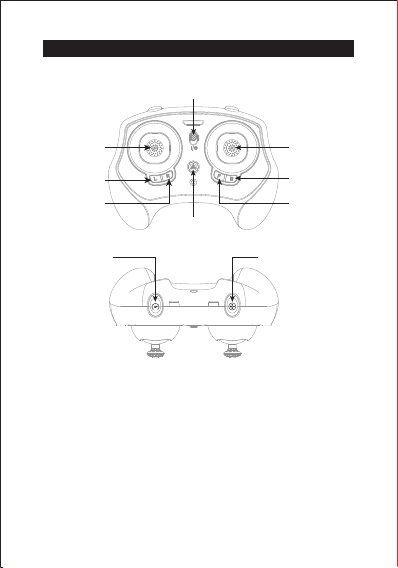
Remote Control Overview
Remote Control Profile
Power Switch
Slow/Normal/Fast Short Click: Shooting
Long Press: Headless Mode
Left stick Right stick
Left Trimming
Right Trimming Front Trimming
Back Trimming
Take off and Land
Prompt:
1. The drone supports two control modes, mode 1 and mode 2.
Mode 1: Left joystick controls the drone’s ascending / descending,
turn left / right; Right joystick controls forward / backward, left / right
side flight.
Mode 2: Left stick controls forward / backward, turn left / right; Right
joystick controls drone’s ascending / descending, left / right side flight.
Note: Mode 1 is the default setting; To switch control models to Mode
2, please press and hold the “Slow / Normal / Fast” key meanwhile
turn on the remote control every time before flight.
2. The following describes the control methods, taking mode 1 as an
example.

05
Install The Remote Control Battery
Quick Start
Open the remote control battery cover, insert 2 AAA batteries(not
included).
Frequency Matching
1. Turn on drone, four lights on it will flash. Then place it on a
horizontal surface.
2. Turn on remote control, it will pair with drone automatically. It
indicates the linking is successful once it beep triple time. At
this time, all lights on remote control and drone will turn solid.
Calibration
Push the two control sticks downwards outward 45° together.
Tips:
1. During calibration, the remote control beeps, the drone indicators
flashes quickly, and the calibration complete indicator light is
always on.
2. When the drone crashes, please recalibrate it.

06
Take Off
Method 1:
Press this button to take off.
Method 2:
1. Push the two control sticks at same time as shown in the figure.
2. Push the left stick up slowly and the drone will take off.

07
Method 1:
Method 2:
Landing
Press this button, and the drone will land slowly.
Pull the left stick down slowly until the drone lands, keep the left
stick at the lowest position until the motor stops rotating, and the
drone lands successfully.
Emergency Stop
In an emergency, press these two buttons simultaneously for 1
second, the motor of the drone will stop and fall.
Only stop motors during the flight when emergent situation
happens, so as to reduce the risk of damage or injury.
08
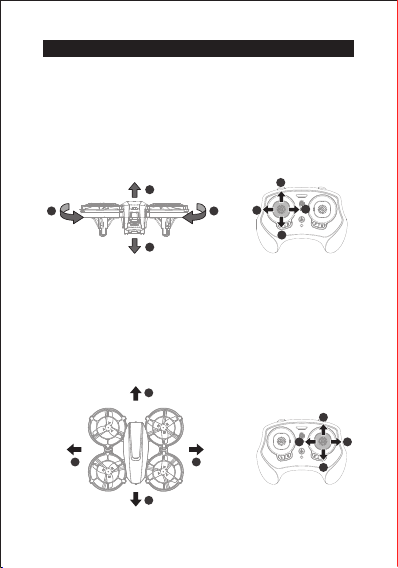
Basic Flight
Note: The flight example is in the case of remote control is
under mode1.
Altitude & Rotate
Use “left control stick” to control the altitude & rotation
during flight.
Ascend
Decend
Use “right control stick” to control forward / backward / left / right
during flight.
Backward
Forward
RightLeft
Forward / Backward / Left / Right
1
1
1
2
2
2
3
3
3
4
4
4
1
2
3
4
Table of contents
Languages:
Other Sansisco Drone manuals


 user manual")


