Santon DFB 25 User manual

INSTRUCTIONS
DFB - Cisternless Rectangular Waterheater with Thermostatic Blender
Models DFB25, 50 & 75
Contents
1. Introduction
2. Taking delivery
3. Technical specification
4. Selection guide
5. Wall mounting
6. Cold water supply
7. Pipework design
8. Electrical connections
9. Commissioning
10. Trouble shooting
11. Routine maintenance
12. Servicing
13. Spares list
IMPORTANT
This heater must only be installed and serviced by qualified persons.
Read all these instructions before commencing installation and leave them with the user.
Do not use these heaters for any purpose other than described in these instructions.
DFB Waterheaters should be stored in a safe place prior to installation to ensure that no
damage to the appliance or associated components can occur.
SY - 64259 - 00 Revision 7 March 2002
SY6425900 7/2/05 9:12 am Page 1

DFB is designed specifically to minimise the risk from legionella.
BS6700 (1997) recommends that
“in premises where occupants are particularly susceptible, such as health care premises. In
order to reduce the risk of colonisation of a water system the temperature of cold water
pipes and cisterns should not exceed 20°C and hot water should be stored at a
temperature of not less than 60°C”.
DFB is a vented cisternless rectangular water heater. It is designed to store water at 75°C.
The integral thermostatic blender then blends the water temperature down to suit customer
requirements.
DFB has dry running protection, a thermal cut-out, a fail-safe Blending Valve and a unique
patented safety overflow. It is designed to be the safest on the market.
The following parts are supplied:
A Waterheater
B Wall mounting bracket
C 22mm copper outlet pipe
D Brass blender outlet boss
Should anything be missing please contact our Customer Services department.
Storage Volume DFB 25 - 25 litres DFB 50 - 50 litres DFB 75 - 75 litres
Element Incoloy sheathed,
Rated 3.0 kW @ 240 V ac ~ 2.8 kW @ 230 V ac ~
Construction Copper water container
Case - corrosion resistant enamelled steel
Thermal Insulation CFC-free polystyrene slab
Thermostat Cotherm GTL Capillary Thermostat
Pre-set at a nominal 75°C.
3. Technical Specification
2. Taking Delivery
1. Introduction
SY6425900 7/2/05 9:12 am Page 2

Blender Cazzaniga. Aquamix AM101
Outlet temperature - user adjustable from 35 to 50°C
Outlet temperature stability typically ±2°C
The blender leaves the factory set at a nominal 43°C
The blender is fail-safe - if the cold water supply fails the
blender will shut off the mixed outlet port.
Safety 1) Thermostat failure protection
A thermal cut-out is fitted.
It will operate at 85°C ±3°C and is manually re-setable.
When triggered the unit will neither fill nor heat.
2) Dry running protection
A commissioning switch isolates the element during fillings
preventing the element operating in air.
Dry running operation may also trigger the thermal cut-out.
IMPORTANT The thermostat and thermal cut-out on this waterheater
are essential for your protection. If either fail it must be
replaced before further use. Do not remove or bypass
either the thermostat or thermal cut-out.
3) Safety Overflow - UK Patent 9800614.1
DFB has a unique patented low temperature overflow. If the
inlet solenoid valve sticks fully open then only water at a safe
temperature will be discharged from the overflow pipe.
It is self resetting.
Water Pressure Minimum recommended inlet pressure 0.5 bar
Maximum permissible inlet pressure 7.0 bar
Water Connections Inlet - 15mm compression fitting
Outlet - 22mm solder connection
Overflow - 22mm tube.
E.M.C. Complies with all applicable European directives.
Approvals WRAS Approval number 9803067
Manufactured in a BS EN ISO 9002 registered factory.
Dimensions (mm)
& Weight (kg) Unit Height Width Depth Weight Weight
(Empty) (Full)
DFB 25 770 600 180 22 47
DFB 50 770 600 280 26 76
DFB 75 870 600 330 30 105
SY6425900 7/2/05 9:12 am Page 3

The delivery volume quoted is with the blender set at 43°C. The outlet flow rate will be
shared between the outlets served. The maximum simultaneous demand must be
considered when selecting the unit.
Warning: Do not use the pipework to lift the unit.
This heater is designed to be wall hung using the mounting bracket supplied. Ensure that
the wall is of sufficient strength to support the heater. Once fixed at the top the grey bottom
cover should be removed. This allows access to an additional fixing point which must be
used to secure the heater in position.
The following clearances are required
Above the unit - 20mm
- to allow the front cover to slide
up for removal.
To either side - 15mm
- to allow your fingers to grip the
side of the front cover.
Below the unit - 200mm
- to allow for element removal
The unit should be mounted as high as possible to maximise the flow rate at the taps
which is affected by the head of water available from the unit. We recommend that the
bottom of the unit be a minimum of 1m above the highest tap.
If the heater is installed where the possibility of freezing conditions occur it is recommended
that the heater be left switched on or drained down completely during periods of disuse.
National wiring rules may contain restrictions concerning the installation of these
units in bathrooms.
5. Wall Mounting
Delivery Maximum Maximum Maximum
Unit Volume Flow rate Flow rate number of Frequency
above 40°C @ 1.5m head @ 2.0m head basins of use
DFB 25 40 litres 10 l/m 12 l/m 4 - 5 light
DFB 50 70 litres 10 l/m 12 l/m 4 - 5 medium
DFB 75 110 litres 10 l/m 12 l/m 4 - 5 heavy
4. Selection Guide
15mm
15mm
20mm
200mm
SY6425900 7/2/05 9:12 am Page 4

The water supply must come from a potable source. This is usually direct from the cold
main but may be via a header tank with a minimum static head of 5m.
The heater as supplied is suitable for incoming water pressures between 0.5 and 7 bar.
DFB has an integral isolating valve with a 15mm compression fitting and no additional
isolation is normally required.
High Water Pressures
An ADDITIONAL EXTERNAL pressure reducing valve must be used where incoming
mains water pressure can exceed 7 bar - at any time. Incoming mains water pressures
are often higher during the night and allowances for these higher pressures must be made.
The pressure reducing valve should be fitted before the integral isolating valve and set in the
range 2 - 3 bar.
Filtration
As an aid to filtration an integral filter mesh is fitted inside the brass turned part that
connects the chromed isolating valve to the Tectite push-fit tee.
Where additional filtration is necessary it should be fitted prior to any additional external
pressure reducing valve. An additional means of isolating the water supply prior to either the
filter or the pressure reducing valve should be provided to aid servicing of the filter.
Hard Water Areas
In areas where the water hardness exceeds 200mg/litre we recommend the installation of a
water softener/scale preventer.
Casework knockouts
A full set of knockouts have been provided in the casework. You can choose whether to
route the pipework through the bottom or the rear of the case.
Channels have been incorporated into the rear of the case to allow you maximum flexibility
in the routing of your pipework and/or wiring.
Mixed Outlet
Connection to the mixed outlet of the blender is made using the 22mm brass bush
provided. Your pipework can either be routed directly through the wall or alternatively
through the bottom of the heater using the pre-bent pipe supplied. In either case do not
solder the joint with the fitting connected to the blender as this will cause damage to the
blender.
7. Pipework Design
6. Cold Water Supply
SY6425900 7/2/05 9:12 am Page 5

No isolator need be fitted in the outlet pipe from the DFB. A simple method of isolating
the outlet pipework without draining the DFB is outlined in section 12 - Servicing.
In order to present the minimum resistance to flow we recommend that the outlet
pipework be 22mm for as much of its length as possible.
Similarly we recommend full bore service valves prior to any terminal fitting. The choice of
terminal fittings will also have an influence on the flow availability and best results will be
obtained when using DFB with conventional basin taps or spray taps.
We do not recommend the use of non-concussive taps with DFB. Under low head
conditions the self closing action of the tap operates too quickly and they also tend to be
very restrictive resulting in reduced flow rates.
Overflow Connection
The overflow pipe is the plain 22mm copper pipe situated behind the solenoid. The overflow
pipework can be run in either plastic or copper pipe. A stainless steel filter mesh is fitted,
just inside the overflow pipe in order to comply with Water Regulations Guide G16.13
(previously Byelaw 30). It is recommended that the filter mesh be made accessible for
service cleaning should this become necessary.
The pipework should be a minimum of 19mm bore and fall continuously along its length.
The maximum pipework length that may be run in 19mm internal diameter is 9m. This
maximum length should be reduced by 1m for every right angle bend fitted in its length.
No isolating valves should be fitted and the final discharge point must be in a safe, visible
place.
SY6425900 7/2/05 9:12 am Page 6

Ensure that mains electricity supply is ‘off’ before commencing electrical installation.
This appliance must be earthed. It is the installer’s responsibility to ensure that all pipe
work to and from the appliance is earth bonded to other service pipes in the vicinity.
In the UK the installation must conform to the I.E.E. wiring regulations (BS7671).
Please check that the voltage on the rating label corresponds with mains voltage supply.
Provision must be made in the fixed wiring for a means of disconnection from the electrical
supply using a switch having contact separation of at least 3mm on all poles (fused spur).
The heater must be connected to the electrical supply using a 3 core cable with a minimum
cross sectional area of 1.5mm2.
Electrical connections must be made to the terminal block. A cable entry gland is provided.
Ensure that the cable is held securely.
8. Electrical Connections
SY6425900 7/2/05 9:12 am Page 7

Commisssioning takes place with the grey outer cover removed, thus exposing electrical
connections - extreme caution must be exercised during commissioning.
Disconnect the electrical supply before touching any electrical connections in the heater.
A condensed version of the commissioning instructions is printed on the electrical box as
an aide-memoir.
With the outlet taps closed, turn on the water at the blue handled isolating valve.
The commissioning switch must be in the fill position. This will isolate the element
circuit preventing accidental triggering of the thermal cut-out.
Turn on the electrical supply. Filling takes place automatically. A green neon will light
indicating that the unit is filling.
Typical Filling times: DFB 25 - 3 minutes
DFB 50 - 6 minutes
DFB 75 - 9 minutes
When the unit is full and the green light is extinguished the commissioning switch should be
put into the heating position. The red heating neon will light indicating that the unit is
heating. This will extinguish when the unit reaches set temperature.
Typical Heating times: DFB 25 - 30 minutes
DFB 50 - 60 minutes
DFB 75 - 90 minutes
Check for leaks from pipework and joints.
Isolate the cold supply and inspect the inlet filter (fitted after summer 1998).
Finally purge the air as detailed below.
Purging Air from the outlet pipework
With water flowing, turn the maroon knob from minimum to maximum and back a few
times. Then set it to minimum for 1 minute before returning it to the desired temperature
setting.
Blender Setting
The setting of the blender can be altered at any time by turning the maroon knob.
The setting is done against the embossed triangular indicator on the top of the valve body.
Adjustment is possible from 35 to 50°C.
9. Commissioning
SY6425900 7/2/05 9:12 am Page 8

10. Troubleshooting
Water from taps is cold. Unit
has power but is not heating.
Remove grey cover.
Is the commissioning switch in
the heating position? Switch to heating position.
Is red heating neon lit? If unit still does not heat,
check element for open circuit.
Does pressing the cut-out
reset button light the red
heating neon?
Wait until the unit heats up.
If the cut-out trips, either the
thermostat has failed in the
on position, the cut-out is
faulty or the element rods
have moved and are touching
the cut-out tube.
Is there power present at the
terminal block?
Either the thermostat has
failed in the off position or the
cut-out is faulty.
Trace fault back through fused
spur to main fuse etc.
No
Yes
Yes
No
No
No
Yes
Yes
SY6425900 7/2/05 9:12 am Page 9

Unit won’t fill - Check solenoid valve for failure in closed position. This is usually caused
by an open circuit coil. This can be detected by removing the wires to the solenoid and
checking for continuity across the two terminals. An open circuit coil has no continuity.
No water flow - The most common reasons are a lack of power or water.
It is, however, possible that the pressure reducing valve is fitted the wrong way round.
To check, loosen the connections slightly and swivel the valve so that you can see the back.
There is a small arrow moulded into the body on the inlet port of the pressure reducing
valve and it should point towards the blender.
Poor water flow - This may occur when the unit is first commissioned. The mechanism of
the blender benefits from being loosened up. Turn the maroon knob from minimum to
maximum and back about ten times.
Likewise check the filters for blockage. Again if the unit is newly installed then debris could
have found its way into the blender restricting its movement and causing poor flow. The
blender can easily be stripped down for servicing whilst on site following this procedure.
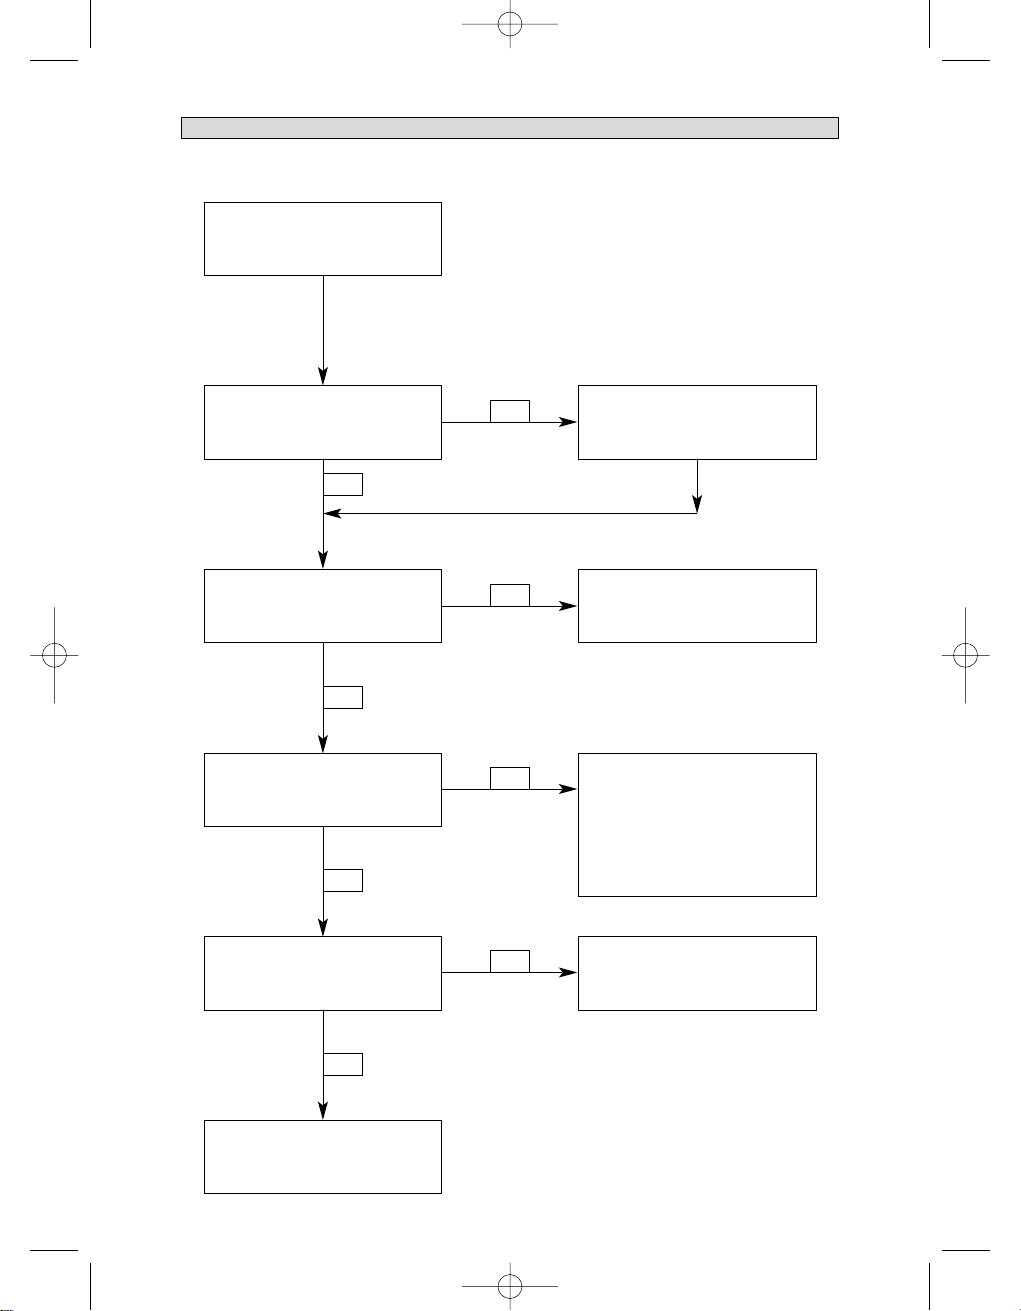
1. Pierce centre circle of nameplate with a screwdriver and remove screw and hand wheel.
2. Loosen upper nut (do not remove) to allow engaging an adjustable wrench on lower
nut. Unscrew lower nut (counter clockwise). This removes top assembly.
3. Brass top assembly will pop up. Remove lower assembly and spring.
4. Carefully remove any scaling (calcium deposits) or foreign particles from valve seat
and other internal parts. Use vinegar to remove calcium. Soak parts in vinegar until
calcium becomes soft and can be scrubbed and washed off. Do not use solvents or
scratch metallic surfaces.
5. Replace cleaned spring and lower assembly following instructions below.
a Insert spring with large diameter on bottom into body.
b Fit valve top assembly into lower assembly and insert into valve.
c Tighten lower nut. Line up U slot with raised dot or arrow on body and hold while
tightening upper nut.
d Turn plastic star wheel clockwise until it stops, then back a quarter of a turn.
e Place hand wheel on position 1 over raised dot or arrow and insert screw. Turn hand
wheel to desired temperature setting.
Unstable delivery temperature - First check that the blender has been fitted the correct
way round with the cold port being closest to the pressure reducing valve. Alternatively the
pressure reducing valve may have failed. The outlet pressure is factory set and sealed at
0.5 bar. Higher outlet pressures than this may lead to unstable temperature delivery.
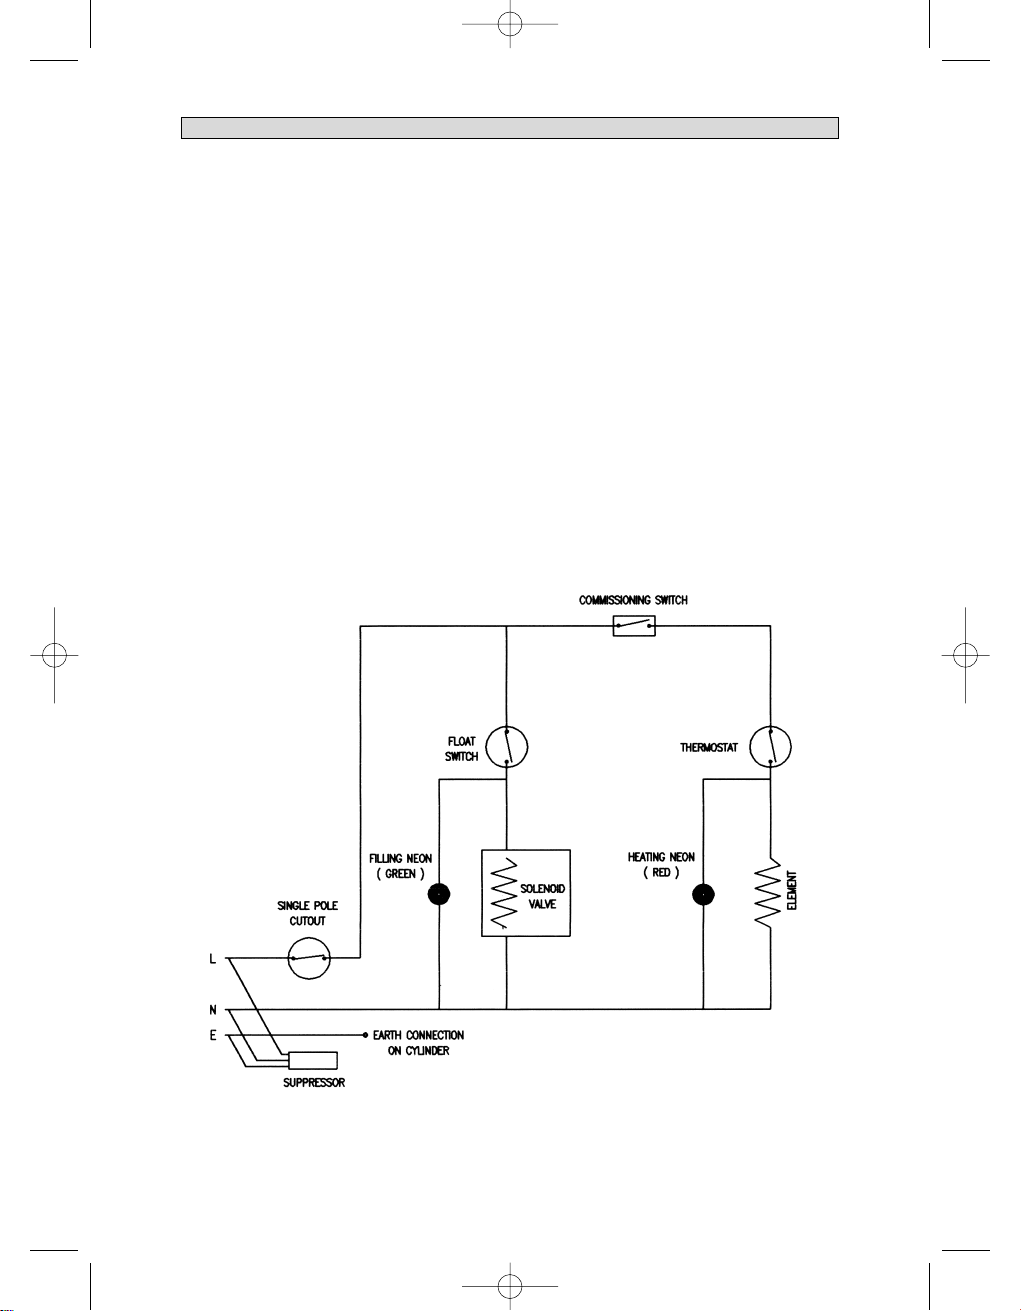
Water discharging from the overflow - Turn off the power supply to the unit. If the flow
stops (this may take up to one minute) then the float switch has failed or is stuck in the up
position. If flow continues however then the solenoid has probably failed in the open position.
Note: If the unit has been turned on dry with the commissioning switch in the heating
position the float switch may have been damaged by the high temperatures created.
Water dripping from the overflow - Scale or other deposits may be preventing either the
hot side non-return valve or the solenoid seating. In both cases the symptoms are the
same, that of water seeping into the tank. The water level will rise, eventually reaching the
overflow. Inspect, clean and/or replace as necessary.
SY6425900 7/2/05 9:12 am Page 10

We recommend that the following routine maintenance be carried out each year:
Disconnect the blender/pressure reducing valve/solenoid assembly.
Dismantle carefully and clean, paying particular attention to the following areas.
• The blender internals (see previous section for cleaning details).
• The filter in the brass turned part that connects the chromed isolating valve from the push-
fit tee.
• The filter in the solenoid valve.
• Remove the brass plate with the float switch and inspect. Pay particular attention to the
pivot area particularly in hard water areas.
• Clean and inspect the non-return valve. In hard water areas we recommend that this
inexpensive item be replaced every year.
To drain the outlet pipework for maintenance of the taps use the following procedure.
1. Isolate the heater from the electrical supply.
2. Open hot taps as appropriate. Water will flow for a minute or so.
3. You can now service the taps even though the DFB is still almost full.
4. After servicing the taps switch on the electrical supply. Wait until the fill light goes out and
purge the air from the system.
1. Isolate the heater from the electricity supply and remove the grey cover.
2. Isolate the water supply using the blue lever on the inlet valve.
3. Attach a hose to the drain valve and drain down the unit.
4. Remove pressure reducing valve and blender.
5. Undo the element plate securing nuts (8mm A/F nuts).
6. Remove the element carefully from the unit. There are two tapped push off holes if
required.
7. Clean the gasket face on the unit.
8. Fit the new element using the new gasket provided. Take care not to over tighten.
9. Refit the other components in reverse order to above.
1. Isolate from the electrical supply and remove the lower grey cover.
2. Open hot taps as appropriate. When the water stops flowing, after a minute or so, close
the taps.
3. Remove the screws securing the upper front panel and unhook from the main unit.
4. Remove the screws securing the electrical enclosure and secure it to one side.
5. Disconnect the two wires to the float switch from the electrical enclosure.
6. Undo the float switch plate securing nuts (8mm A/F).
7. Pull the float switch plate carefully from the unit, noting the orientation.
8. Clean the gasket face on the unit.
9. Undo the old float switch from the brass plate and fit the new float switch.
10. Refit the float switch plate in the correct orientation. Take care not to over tighten.
11. Refit the other components in reverse order.
12. Switch on the electrical supply. Wait until the fill light goes out and purge the air from the
system.
12. Servicing
11. Annual maintenance
Servicing the TapsServicing the Taps
Element Removal
Float Switch Replacement
SY6425900 7/2/05 9:12 am Page 11

S.165 Mk.1 and 2 Element/float switch plate gasket
S.6501 Mk.1 /S.6512 Mk.2 Element Assembly 3 kW + gasket
S.6502 Mk.1. and 2 Float switch + gasket
S.6503 Mk.1 /S.6513 Mk.2 Capillary Thermostat
S.6504 Mk.1 /S.5514 Mk.2 Double pole energy cut-out
S.6505 Mk.1 and 2 Solenoid valve
S.6506 Mk.1 /S.6515 Mk.2 Non-return valve
S.6507 Mk.1 and 2 Inlet valve
S.6508 Mk.1 /S.6516 Mk.2 Thermostatic blender + gaskets
S.6509 Mk.1 and 2 Gasket set for thermostatic blender
S.6510 Mk.1 and 2 Pressure reducing valve
Note: DFB Mk.1 Serial Numbers: 000001–001399
DFB Mk.2 Serial Numbers DF 001400 – Onwards
Other parts may be ordered by description.
For safety reasons the maintenance of the unit and the fitting of replacement parts should be
carried out by qualified service engineers only. For warranty claims our Customer Services
department is able to arrange for the local service engineer to call. Alternatively they can inform
you of your local agent.
For service and spare parts please contact our Customer Services department.
This product is guaranteed against faulty materials and manufacture for a period
of 2 years from the date of purchase provided that:
1. The unit has been installed in accordance with the Installation and Service
Instructions and all relevant Codes of Practice and Regulations in force at the
time of Installation, and that all necessary controls and safety valves have
been fitted correctly.
2. Any valves and controls are of the Santon recommended type and specification.
3. The unit has not been modified or tampered with in any way, and has been
regularly maintained as detailed in the Installation and Service Instructions.
4. The unit has been used only for heating potable water.
The unit is not guaranteed against damage by frost, and the inner container with
integral immersion heater is not guarannteed against excessive scale build-up.
This Guarantee in no way affects the statutory rights of the consumer.
The policy of Santon is one of continuous product development and, as such, we
reserve the right to change specifications without notice.
Environmental Information
Santon products are manufactured from many recyclable materials.
At the end of their useful life they should be disposed of at a Local Authority
Recycling Centre in order to realise the full environmental benifits.
Insulation is by means Approved CFC - free polyurethane foam.
13. Spares List
Hurricane Way
Norwich Airport
Norfolk
NR6 6EA
Main No: 01603 420140
Main Fax: 01603 420218
Sales: 01603 420130
Sales Fax: 01603 420149
Service: 01603 420347
Service Fax: 01603 420349
Guarantee
SY6425900 7/2/05 9:12 am Page 12
This manual suits for next models
3
Table of contents
Popular Heater manuals by other brands

iGenix
iGenix IG9509 user manual

Scarlett
Scarlett Comfort SC-FH211S instruction manual

Dru
Dru Metro 80E Installation and service manual

Pinnacle Climate Technologies
Pinnacle Climate Technologies Master MH-45-KFA User's manual & operating instructions

Suntec Wellness
Suntec Wellness KLIMATRONIC Heat Supreme 2000 manual

EQUATION
EQUATION YD02-5 Safety instructions

Chromalpx
Chromalpx PF474-2 Installation, operation and maintenance

cecotec
cecotec READYWARM 1500 POWER CEILING instruction manual

Fakir
Fakir QS 1200 Instructions for use

Black Body
Black Body AIR FLASH Assembly instructions

Sentiotec
Sentiotec CP-RM-HSR-4S Instructions for installation

Rowenta
Rowenta CO3030 user guide