Sanyo CLT-186X User manual

Sxylmo
INSTRUCTION MANUAL CLT-186X
CORDLESS TELEPHONE
i
o
#
im
000
000
000
000
00
.
Please read these instructions completely before use.
If you have aproblem with your cordless telephone, please see
“TROUBLESHOOTING” on page 15 and “COMMON PROBLEM -
QUICK CHECK GUIDE” on page 16 before celling for service.
CAUTION *
THISPROOUCTISINTENOEOFORUSEINNEWZEALANDONLY.
SALEORUSEINOTHERCOUNTRIESMAYVIOLATELOCALLAWS.
IMPORTANT!
HANDSET BATrERY PACK
Charge the hendeet battery pack for afull 12 hours befora uelng your
cordless phone for the first time. (See pages 4- 5.)
RINGERSWITCH
IftheRINGERswitchIsset10theerrposition,noringIsheardwhenanincomingcallisrecehwd.
(Seepages7.)
GENERAL WARNING
The grsnt of aTelepermil for any item of terminal equipment indicates that only
Telecom has accepted that the item complies with minimum conditions forconnection
to its network. It indicates no endorsement of the product by Telacom, nor does if
provide any sortofwarranty. Above all, itprovides no assurance that any item willwork
correctly in all respects, with another item of Talepennitfed equipment of adffferent
make or model, nor does it imply that any product is compatible with all of Tefecom’s
networtr services.
IMPORTANT NOTICES
1.
2.
3.
4.
5.
This equipment may not provide for the effective hand-over of acell to another
device connected to the same Iina.
Under power failure conditions, thistelephone may notoperate. Please ensure that
aseparate telephone, not depandant on local power, is available for emergancy
use.
This telephone does not include any date function and tharefore Year 2000
compliance is not applicable.
Pulse dialling may not be used on thk talephone.
Tha “flash time” setting of Wla talephone must be 600ms.
Congratulations ..........................................................................................2
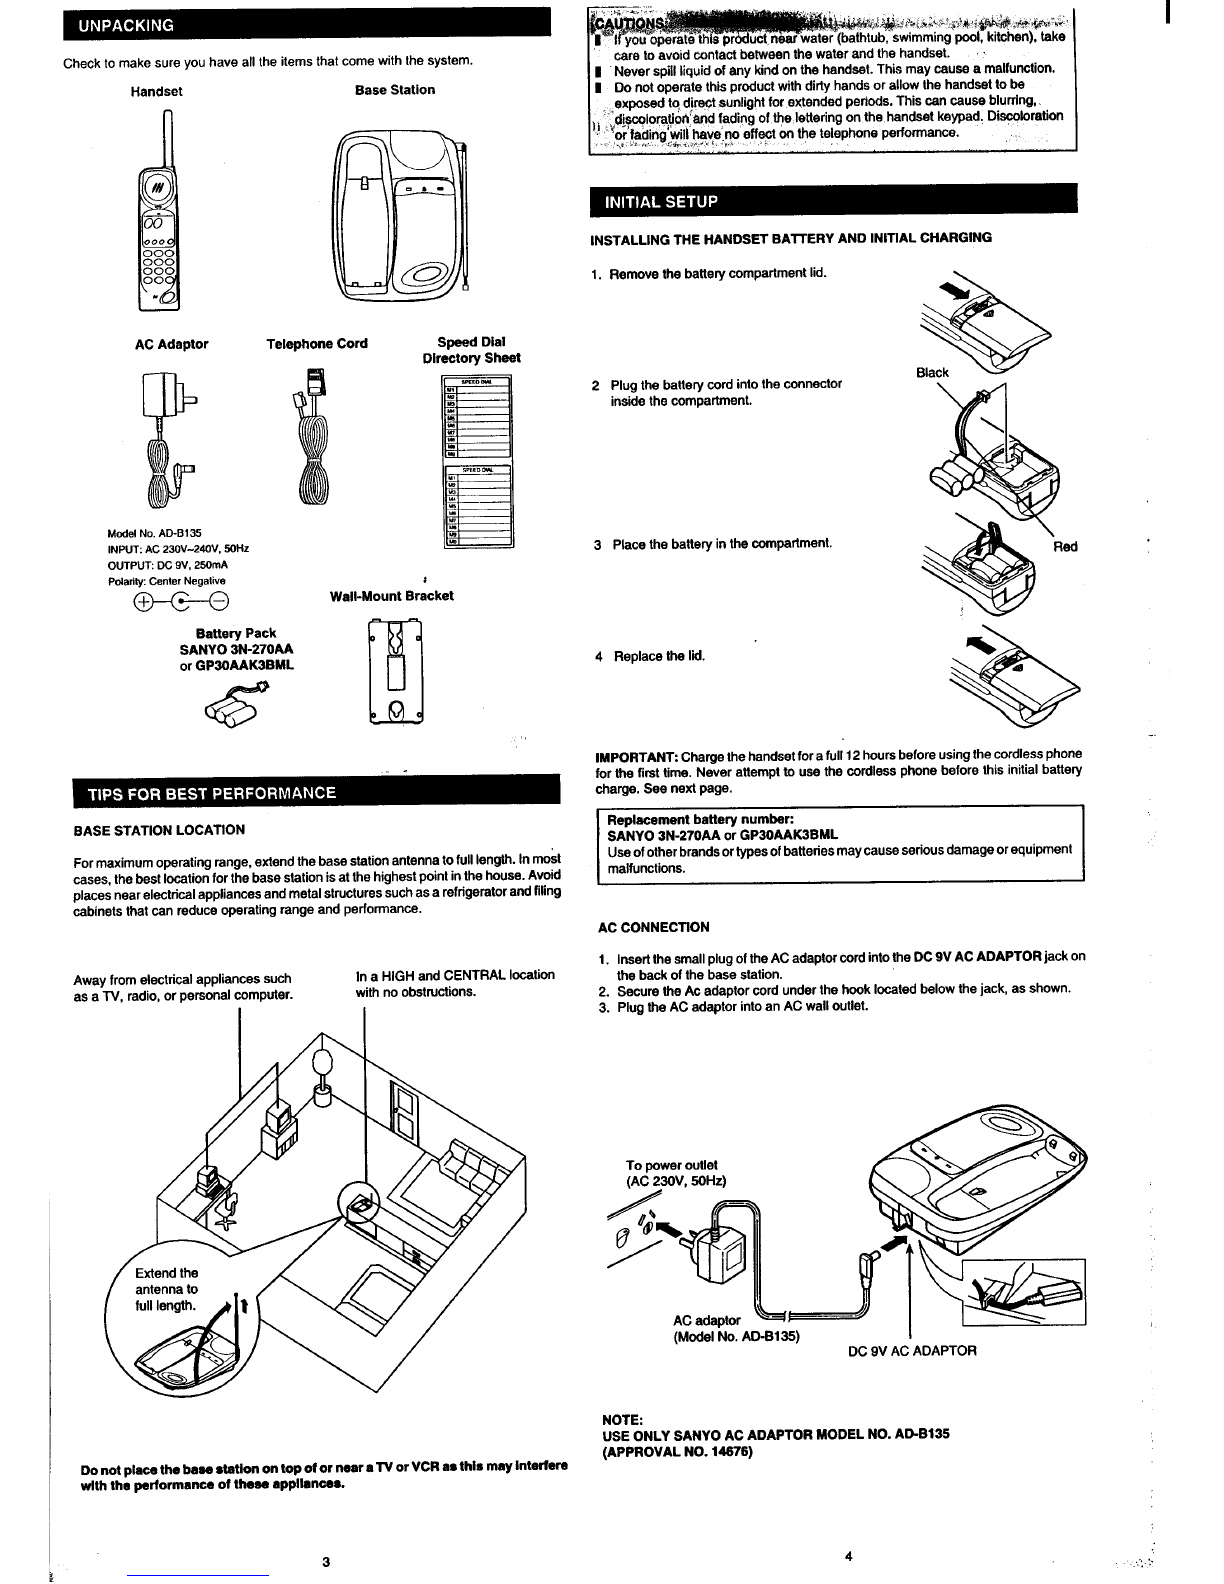
UNPACKING ........................................ ...............................................................3
TIPS FOR BEST PERFORMANCE ......................................................................3
INITIAL SETUP
Instaltfngthe handset battery and initial charging ............................................4
AC mnndm ..................................................................................................4
Charging the handset .......................................................................................5
Phone fina connection ......................................................................................5
Security code ...................................................................................................6
NAMES OF CONTROLS
Handset . .
... .... ..............................................................................................6 -7
Seee station ................................................................................................7 -8
BASIC OPERATtON
Before using the phone ....................................................................................8
10-channel acceae/auto scan ..........................................................................6
Placing acell ....................................................................................................9
Answering acell ...............................................................................................9
Using the handset speakerphone ..................................................................10
ADVANCED FEATURES
Speed dial ...................................................................................................... 11
Radial .............................................................................................................12
Flash button ................................................................................................... 12
Handaet lmtor ..............................................................................................12
MAINTENANCE
Power back up system ...................................................................................13
Wall mounting ................................................................................................ 14
Rechargeable handset battery ....................................................................... 14
MALFUNCTIONS ...............................................................................................15
~OUBLESHOOTING ........................................................................................ 15
COMMON PROBLEM -QUICK CHECK GUIDE ............................................... 18
Your Sanyo SUPER-COMPANDER cordless telephone is afine-quality home
communications product. It is carefully designed and produced by worfd leader of
&
consumer and industrial electronics equipment. With proper mainte nce and care, it
will provide you with years of enjoyment and convenience.
The CLT-I 88X has many unique advanced features inctuding:
Hande-Free on Handset
Hands-Free speakerphone ia now incfuded on the cordless handset. You can
have atelephone conversation without holding the handset.
SUPER-COMPANDER Nofee Reductfon
This Sanyo’a original noise reduction technology now filters out m&sbackground
noise.
Power Back Up System
This unique feature aflowe you to place or receive acall on the cordless
telephone during apower interruption of up to 48 hours. Four AA alkaline
bettarias are required (not supplied with the telephone).
Itl-channal auto scan
Your new telephone uaea one of 10 channels that are now available for cordless
telephones. Itautomatically selects aclear channel every time you receive or place
acell on the handset. Should you wish to switch channels duringacall, the handset
provides aCHANNEL button.
Extended operathrg range
flfuminated handset kaypad
46day atendby
Noti-
This cordless telaphona uses radio communication between the handset and the base
station and may not ensure privacy of communication. Other devices, including other
cwdleee telephones, may interfere with the operation of this cordless telephone or
ceusa noise duringoperation. Cordless telephones must notcause interference to any
licensed radio service.
S*O
1AOSP1P047SJ
(Ni!) SANYO Electric Co., Ltd.
Printed in Malayaia
12

a-re 10avoid contact between the water and the handset. ~
~Never spill liquid of any kind on the handset. This may cause amalfunction.
1Do not operate this product with dirty hands or allow the handset to be
.+exposed t? cf@ct sunlight for extended periods. This can cause blurring,
~~#@c@or@o~Wrd fading of the lettering on the handset keypad. Discoloration
or facting~~i~,,~~e~no eff~t on the Ieiephone perfo~~ce.
,.,. .,,... . . .
Check to make sure you have all the items that come with the system.
Handset Base Station
m
---
0
B
0
/#
.
00
000
000
000
ggo
.
INSTALLING THE HANDSET BAITERY AND lNITtAL CHARGING
Remove the battery compartment lid. \
1.
AC Adaptor Telephone Cord Speed Diaf
Direotow Sheet
2Plug the battery cord into the connector
inside the compartment.
ad
3Place the battery in the compartment.
ModelNo.AD-B13S
INPUT.AC230V-240V,SOHZ
OUTP~ DC9V,2SOmA
PolarityCenterNegaliie ;
w+ Wall-Mount Bracket
Battery Pack
SANYO 3N-270AA
or GP30AAK3BML
6M*
5Csr
4Replace the fii.
lMPORTAN~ Charge the handset for afull 12 hours before using the cordless phone
for the first time. Never attempt to use the cordless phone before this initial battery
charge. See nerd page.
Repfaoement battery numbsm
SANYO 3N-270AA or GP30AAK3BML
Use ofother brands or types ofbatteries may cause serious damage or equipment
malfunctions.
BASE STATION LOCATION
For maximum operating range, extend the base station antenna to fulllength. In most
cases, the best location for the base station is at the highest point inthe house. Avoid
places near electrical appliances and metal structures such as a refrigerator and fifing
cabinets that can reduce operating range and performance. AC Connection
1. Insert the small plug ofthe AC adaptor cord into the DC 9V AC ADAPTOR jack on
the back of the base station.
2. Secure the Ac adaptor cord under the hook located below the jack, as shown.
3. Plug the AC adaptor into an AC wafl outlet.
In aHIGH and CENTRAL location
with no obstructions.
Away from efactrical appliances such
as a TV, radio, or personal computer.
To power outlet
(AC 230V, 50Hz) fiw
AC adaptor &d I~
(Modal No. AD-B135) 1~ 1
DC 9V AC ADAPTOR
NOTE:
USE ONLY SANYO AC ADAPTOR MODEL NO. AD-B135
(APPROVAL NO. 14676)
Do not place the beee station on top of or neer eTV or VCR ae thie mey Interfere
wfth the parformense of these eppllenaee.
4
3
.,..,,,.

CHARGING THE HANDSET
1, Place lhehandset onthebasestation for12hours. ~eCHARGE indatorhghts.
tol
2. Remove the handset from the base station.
From then on, recharge the handset for continuous 12 hwra when the BAT1.LOW
indicator lights.
BAIT. LOW —~
SECURIN CODE
This cordless telephone has adigital security system with 10,000,000 possible codes.
This system helps prevent the unauthorized use of your telephone tine by another
cordless telephone.
How to reset your security code
1. Pia& the handset in the base station cradle.
o
Keep the charging contacts on the handset and base ststiin clean. Dirty contacts may
prevent the handset battery from charging.
NOTE: No battery charging takes place while the unit is being powered by the power
back up system.
Standby time
When the handset battery is fully charged, your Sanyo cordless phone offers up to 49
days of continuous stendby time orup to 13 hours of continuous talk time. (Listed
standby time is measured under asituation inwhich handset is kept in standby mode
only-no phone calls are made orreceived). Under normal usage conditions, recharging
is required more often. Also note that the listed continuous talk time shortens if the
handset speakerphone is continuously used.
CAUTION: Repeated recharging for shorter periods may reduce battery capacity.
PHONE LINE CONNECTION
Note
Please make sure that the handset battery is fully charged before connecting the
phone line cable.
tNormally, fully
extend the antenna
To telephone line ~“- I
Telephone cord TEL LINE
WARNINGS
Thk cordless telephone may, on some longer fines, have difficultyhanding over to
another device connected to the same line.
Immediately disconnect the equipment should itbecome physically damaged, and
arrange for its disposal or repair.
The operation ofthisequipment on the same line as telephones orother equipment
with audible warning devices or automatic ringdetectors will give rise to bell tinkle
or noise and may cause false tripping of the ring detector. Should such problems
occur, the user is not to contact Telecom Faults Service.
CAUTfON
This tefephone is for use with a“tone dialing system” only. If you have pulse dialing
lines, you can’t use this cordless telephone.
5
0
P—
2. Within 8seconds, press ~on the base s~tion.
The IN USE indicator flashes, and then goes out. The security code is now set.
NOTES
ITo change your aecurfty code at any time, simply repeat the above steps.
Anew security code is automatically set each time.
iIfyou experfencedW~ulfyin resetting ascurifycode, firstdisconnecttheAC adaptor
from the unit, reconnect it, and then try again.
IThesSC@YCOCfSCSnnotk reset while the unitis being powered bythe power beck
up system.
REMEMBER:
If you do not install backup batteries in the base station, the security code will be lost
when the power is interrupted (if the AC adeptor is disconnected to move the unit to
anothsr room, for example).
HANDSET wAntenna
Earpiece
\II BAIT. LOW Indicator
Lights when the battery
pack needs recharging.
(If the bsttety pack is
mmpletely exhausted, this
ind=tor does not fight.)
CHANNEL Button
Press to change to aclear
channsl if you hear noise
or interference during a
call.
REDIAUP (pause) Button
Press to redial the last
number dialed.
If you press any other
dialing buffon before
pressing this button, it
functions as a pause
button.
MEMORY Button
Press to store phone
numbers in sDeed dial /~~~~~ztintimt.
F’R%%$’as’Omd/l,I
Microphone Contact Points
For handset battery
charging.
Press to use the handset
speakerphone.
Also used to change fhs
volume level (normal or
loud) of the handset
speakerphone. Also lights
when the handset
speakerphone is in use.
8,:.,.,,:.:y’

I
HANDSET BASE STATION
n
7
Speaker
Located on the rear.
............ -..
;:;:::: ::::..
----- :::::
Z_. .:::::
:-.:....-......
:..-.....-............
...........
d
.....................
.........
.......
.:::..
.......
...
t
Battery compartment
BASE STATfON
POWER FAILURE
RINGER Switch
Turns thehandset ringer on and off.
Thk switch must be set to the “on”
position in order to haar aring when
an incoming call is received.
If the ringer cfkturbs you, set to the
“off”position, the ring of the handset
will be muted.
CHARGE Indicator
BAITERY LOW indicator IN USE Indicator Liohts when the
Lights when backup Lights when the h&deet battery is
batteries are exhausted or telephone is in use. bahg recharged.
not installed with the AC
adaptor connected.
\\ /
Backup battery
compartment
Located on the
underside.
Antenna
1
For optimum
perion-nanca,
extend to full
length.
Con(act Points \PAGEIFIND Button
For handset battery Press to page the
charging. handset user.
Aleo used to reset the
security code.
7
,2(\-pJ
AC Adaptor Jack Modular Telephone Jack
(DC 9V AC ADAPTOR) (TEL LINE)
1. Take the handset to the location you want to use it.
2. Preea ~. Verify that you get adial tone and the TALK indicator fights.Your
handset is ready to use.
3. Place acell or press ~to hang up.
*
oEND
TALK W
000
000
000
000
00.
19-CHANNEL ACCESS/AUTO SCAN
Every time you answer or place acell using the handset, this cordless telephone
automatically eeieofs acfeer channel from 10 channels available to transmit signals
between the base station and handset. If you notice interference during acell,
slmpfy press-l on the handset to access a clear channel.
8...:;.

PLACING ACALL USING THE HANDSET SPEAKERPHONE
1. Press~.
(Or liftthe handset from the base station and then press ~.)
The TALK indicator lights and the dialing buttons light for approximately 10
seconds.
2. Dial the number.
3. Press ~tohang up.
@
To adjust the voluma
Press lTAL~OLIJMEj once during acall. The mlume level changes –normal or
loud –each time lTALmOLUME{ is pressed. 4
ANSWERING ACALL
When acall comes in, the dding buttoneand the TALK and IN USE indicators ffash.
.
nWUsf
1. Preae ~.
(Or liftthe handset from the baaa station.)
ANY KEY ANSWER
You can aleo press any key on the handset except the ~key to answer the
cell.
2. Press ~to hang up.
NOTES:
IIf the handset RINGER switch is set to the off position, the handset will not ring.
IIfthe handset is too faraway from the base station, pressing ~may not hang
up acall. If this happens, come closer to the base station and than press ~.
9
The handset speakerphone lets you have aHands-Frae phone –no need to holdthe
handset.
To placa acall using the speakerphone:
1. Preea -l and listen for adial tone.
The dialing buttons and the TALK and SPEAKER indutom light.
o
~“
2. Dial the number.
Talk into the microphone.
The cellet’s voice is heard from the speaker on the beck of the handset.
3. Praae ~to end the cell.
@
To anawer a 0s11using the apeskarphon=
1. Press ~[,
2. Preae ~to and tha call.
To adjuat the apeskar VOIUIW
Prass 1~1 once during acall. The speakerphone sound level chengea -
normal or loud -aach time the button is pressed.
CAUTfON
when using the Handa-Frw handset apaake~hone, keep the speaker (located on
the back of the handset) away from yuur ear to prevent any damage to your ear.
10
. ... . ..... . . .. ........

SPEED DIAL
The handset can store up to 10 phone numbers in its memory. You can dial astored
number simply by pressing -j and the assigned l-digit memory location
number.
To store numbers in memory
1.
2.
3.
Press [~1.
The TALK indicator flashes.
The dialing buttons light for approximately 10 seconds.
Dial the phone number you want to store.
If you maka an error while storing anumber, press ~to cancel the operation.
To resume, begin with stap 1.
—Up to 16 digits can be stored. (A pauae munte es one digit.)
Press 1~[.
1
4. Press anumber button (O-9) to assign amemory location number to the phone
number.
%..
Abeep sounds. The diating button tightgoes oft. The phone number is now stored
in the handset memory.
5. Write the stored phone number on the speed dial directory sheet (included).
6. Repeat slaps 1-5 to stora other numbers or tochange previously stored numbers.
To ineeR apau=
Stored phone numbers can include a2-second pauaes between two digits (after 1to
get an outside line inaPBX system, forexample). Press p] atterthe firstdigit.
NOTE:
To dear astored phone number, press 1~1 twice, and then the asaigned
index number.
To dial anumber stored in the memory
1. Press 1- orl~l. @or@
2. Press -1
3. Enter the Iceetion number (O-9).
The apead dial memory maybe erased ifthe handset battery is replaced orexheueted.
11
REDIAL
You can automatically redial the last number called using [~[ onthe handset.
Anumber of up to 32 digits can be redialed.
NOTE:
To redial after hearing abusy signal, press ~, then [~ or ~, then
~.
FLASH BUITON
Youcanusa~~ toanewertheeecondparly when you subacribeCALL WAITING
seivice offered by your phone company and PBX system.
If you subscribe to CALL WAITfNG...
1.
2.
3.
If acall cornea in when you are already on the phone, abeep sounds.
Press ~].
The first cell is placed on hold, and you can talk to the second caller.
3
Press =again.
The second caller is placed on hold, and you can talk to the first caller.
8
NOTE PHI may also be used to get anew dial tone without pressing’ ~or
replacing the handset in the base station cradle. However, if your telephone tine has
special service features (fike CAU WAITING), ~] may not operate in this way.
HANDSET LOCATOR
If you misplace the handset, press ~{ on the base station to maka the
handset baep.
m
NOTE
If the handset RINGER switch is set to the off position, no beep will be produced.
12

POWER BACK UP SYSTEM
This cordless telephone has apower backup system 10allow operalion during apower
interruption up to48 hours ofslandby time or up to 13 hours of continuws handset talk
time (handset with fully charged Ni-Cd battery).
For optimum performance during apower failure, the backup batteries must be fresh
and the handset battery must be fully charged at the beginning of the power outage.
The power back up system requires 4AA alkafine batteries (not supplied).
To instsll bsckup batteries:
1. Makecetiain thatthe ACadaptor isconnected tothebaseshtion.
2. Openthe backup battery compartment tidbypushing the notches.
3. tnstall 4AAbatieries (notsuppKed) asind@ted inthehRe~wmpatiment.
4. Close the lid.
NOTES
#lfbackup btieries arenotinstalled, thetelephone siopsfu@oning imm@ately
when the power is interrupted (forexample, ifthe AC adaptor is unplugged to move
the base station).
IThe POWER FAILURE BAITERY LOW indicator fightswhen the backup batteries
are exhausted or not installed w“ththe AC adaptor connected.
IThe power back Up system is inactive when AC power is suppfied to the base
station.
When installing the batteries:
To prevent corrosive leakage from batteries, which can cause personal injury and
damage to the unit, obsewe the following precautions
1Match the polarities (+ and -signs) on baftaries to the polarities shown inside the
battery case.
1Do not mix new batteries with old or used batteriee.
tOnly use batteries of the same type and brand.
sIfthe unitis not tobe used foran extended period of time, remove the batteries and
store them in acool place.
ICarefully followthe battery manufacfurets instructionsforproper use and disposal.
IDO NOT ALLOW YOUNG CHILDREN TO HANDLE BATTERIES.
NOTE
SPENT OR DISCHARGED BA?TERfES MUST BE RECYCLED OR DISPOSED OF
PROPERLY IN COMPLIANCE WITH ALL APPLICABLE LAWS.
WALL MOUNTING
To mount the base statjon on awall
1.
2.
3.
Insert the hooks of the wall-mount bracket in the holes@ on the underside of the
base station.
Then push them in the direction of arrow @ae shown.
To
socket
To wall
hWall-mount
bracket
Connect ashort modular telephone cord (not supplied) to the wall plate.
Mount the base station on the wall phone plate and seat it securely.
RECHARGEABLE HANDSET BAITERY
Recharge handset in tha base station cradle for acontinuous 12 hours when the
BAIT. LOW indicator fights. (See page 5).
Repeated recharging for shorter periods may reduce battery capacity.
Battery Refresh
Ifyour battery seems to need recharging more offen than usual, it may have lost part
of its charging capacity because of premature recharging. To return the battery to its
full capacity, try the battery refresh procedure.
#Discharge the battery by Ieavfng the-handset in talk mode until the BA~.LOW
indicator fights. (First, disconnect baee etation from phone tine.)
ICharge the handset for 12 hours.
1Repeat this procedure once more.
If performance still doesn’t improve, it’s time to replace the battery.
REMEMBER: Reset security code after abattery refresh (page 6).
IREMEMBER:
Your handsel battery needs recharging when the BATT.LOW indicator
Iighte.
Cleaning the contact points
To ensure that the handset battery chargee property, clean the contact points on the
handset and the baee station once amonth with aaoft cloth.
1
@
m-
000
000
000
000
00
.
}
:,..
Y
Contact points
13 14

“Ifyou have aproblem with your cordless telephone, try the followina suaaestions
Although itis unlikely that the base station will malfunction, ifitdoes, disconnect itfrom
the telephone line until proper repairs are campleted. “.
before calling for service”
SYMPTOM
NOfSE
CHECK
The cordless telephone uses radio frequencies for transmission and rec6ption, and is
subject tocertain operating conditions. The following conditions are normal and coufd
affect the operation of your system.
IF
NO
YES
YES
YES
YES
YES
YES
YES
YES
NO
YES
YES
]
o.
1.
J
—
—
—
—
2.
—
—
—
3.
—
—
4.
—
SOLUTION
Fully extend the
antenna.
A. Is the antenna of the
base station fully
extendad?
1. NOISE
Electrical pufse noise is present in most homes at one time or another. Thbais most
intense during electrical storms. Certain kinds of electrical equipment such as fight
dimmers, fluorescent bulbs, motors, fans, etc., also generate these noise pulses.
Because radio frequency transmissions are susceptible to these Pulses. on occae~
you may hear them inyour handset. Generally they area minor annoyance and shaufd
not be interpreted as a defect in your system.
B. fefheraenyefactdc
equipmentnearby?
(t%egparsmal
CWQWW, FM aft)
Move the base station
and handset further
away from them.
Tryto move the base
station to another
bcation.
C. Is there any object
which obstructs radio
frequencies between
the base station and
handset? (For eg
concrete, tile wane or
metal object, etc)
2. RANGE
Because radio frequencies are used, the location of the base station can affect the
operation range. Try several locations in your home or bueiness and pick the one that
gives you the clearest signal tothe handset. Turning around while holding the handset
may help you find the best position.
3. INTERFERENCE
Electronic circuits activate arelay toconnect the cordless telephone toyourtelephane
line. These electronic circuits operate in the radio frequency spectrum. While several
protection circuits are used to prevent unwanted signals, there maybe periods when
these unwanted signals enter the base station. You may hear cticks or hear the refay
activate while you are notusing thecordless handset. Ifthisstarte occurring frequently,
itcan be minimized or eliminated by lowering the height of your base station antenna,
or relocating the base station. Check for interference before selecting your final base
station location by plugging it in and monitoring it for clicks.
D. fs another cordless
phone nearby? Tw to change the
channel us&f by
pressing ~1
on the handset.
Move the base station
and handeat further
away from them.
E. Fluorescent famps ar
other electronic
equipment may
generate noise
pulses.
Two cordless systems should not be operated 100 close to each other because of
interference. Tfds interference can be reduced by lowering your base station antenna,
thereby reducing its range. 8F. Is the BAIT. LOW
indicator lit? The handset battery is
low.
Recharge it.
Recharge the handset
battery.
CUT OFF A. Is the BAIT. LOW
indicator fit?
B. Is the telephone fine
cutting off during
phone conversation?
Make certain that the AC
adaptor is firmly
connected to boththe
base station and an AC
wall outlet. Aleo make
certain that the handset
battery is firrnfy
cmnected to the socket
in the compartment.
Check the ebwe ITEM
(B-E) of NOISE
SYMPTOM, No.1.
Most cordless phone problems can be corrected quickly and easily —without service.
Ifyou experience difficulties, try the suggestions befow before taking your phane in for
service.
If the phone doesn’t work at afl
ISecurity code may have been cencefled. To reset, see page 6.
IAC adaptor may not be plugged into wall outiet or base station.
ITelephone line may not be connected.
IHandset battery maybe extremefy low. If BAIT.LOW ind=tor lightsin talk mode,
recharge battery. (See page 14).
IHandset maybe too far from base station. Move closer.
C. Isthe phone
intermpted during
phone Corwersetion?
NO
CHARGE
LOSS OF
SECURITY
CODE
A. Is the CHARGE
ind~tor fiiwith tha
handeat placed on
the base station
cradle?
:Iean the battery
:harging terminafs on
the handset and bees
stationwith asoft cloth.
The operating range seems shorter
ICheck the base station focetion for interfering objects. (See pS9e 3.)
IExtend the base etetion antenna to full fength.
Handset battery fife or standby time aeame shorter
IBattery may not be fulfycharged due to dirty contact points. Wipe with asoft cloth.
IHandset battery may have been repeatedly recharged before baingfullyexhausted.
Try Battery Refresh (See page 14).
IBattery may need replacing (See Page 4.)
B. Does the BA~. LOW
indicator not go off,
even if the handset
battery is recharged?
Same as abwa.
If the performance still
does not improve,
replace the handset
battery.
A. Doss acontinuous
beep sound in the
handpiece?
incoming calls do not ring on handeet
IHandset maybe too far from beea station. Move cfoser.
IHandset RfNGER switch maybe eat to off.
IMore than one cordless phone is connected to the same fine and they maybe
using asame channel. Change the channel of aphone by pressing ICHANNEL].
1.Place the handset in
the credfe of the base
etetii.
2.Preea ~D]
on thebase station
(within8seconds).
Abeep sounds within
30 aaconds. Tfre
eacudty coda is now
Set.
Reception is noisy (interference, humor atatlc)
1Switch to aclearer channel. (See page 8.)
8Base station maybe too close to electrical equipment. Try another location.
1Handset maybe too close to large metal object(s). Move to another fm%dion,or
change direction while using handset.
1Lower base-station antenna to reduce interference range.
If phone stiff does not work
IReset base station and handset as foflows
1. Okconnect AC adaptor and backup batteries. Reconnect AC adaptor and
reinstall the backup batteries.
2. Dkconnecf then reconnect the handset battary.
3. Reset security code. (See page 6.)
16
15 :,,
,.
Other manuals for CLT-186X
1
Table of contents
Other Sanyo Cordless Telephone manuals

Sanyo
Sanyo CLT-937 User manual

Sanyo
Sanyo CLA-837X User manual

Sanyo
Sanyo CLT-9820 User manual

Sanyo
Sanyo CLT-J30 User manual

Sanyo
Sanyo CLT-2410 User manual

Sanyo
Sanyo CLT-D6614 User manual

Sanyo
Sanyo CAS-D6320 User manual

Sanyo
Sanyo CLT-2415 User manual

Sanyo
Sanyo CLT-538 User manual

Sanyo
Sanyo CLT-2420 User manual

Sanyo
Sanyo CLT-2402 User manual

Sanyo
Sanyo CLT-A5832 User manual

Sanyo
Sanyo CLT-138X User manual

Sanyo
Sanyo CLT-9665 User manual

Sanyo
Sanyo CLT-9660 User manual

Sanyo
Sanyo LNS-W10 - Wide-angle Zoom Lens User manual

Sanyo
Sanyo CLT-2418 User manual

Sanyo
Sanyo CLT-586X User manual

Sanyo
Sanyo CLT-9950 User manual

Sanyo
Sanyo CLT-D6620(WH) User manual