manuals.online logo
Brands
  1. Home
  2. •
  3. Brands
  4. •
  5. Sanyo
  6. •
  7. Cordless Telephone
  8. •
  9. Sanyo CLT-2419 User manual

Sanyo CLT-2419 User manual

Other manuals for CLT-2419

3

This manual suits for next models

1

Other Sanyo Cordless Telephone manuals

Sanyo CLT-J40 Mounting instructions

Sanyo

Sanyo CLT-J40 Mounting instructions

Sanyo CLT-538 User manual

Sanyo

Sanyo CLT-538 User manual

Sanyo CLT-85KM User manual

Sanyo

Sanyo CLT-85KM User manual

Sanyo CLT-2402 User manual

Sanyo

Sanyo CLT-2402 User manual

Sanyo CLT-9950 User manual

Sanyo

Sanyo CLT-9950 User manual

Sanyo CLT-9660 User manual

Sanyo

Sanyo CLT-9660 User manual

Sanyo CLT-2425 User manual

Sanyo

Sanyo CLT-2425 User manual

Sanyo CAS-D6325 User manual

Sanyo

Sanyo CAS-D6325 User manual

Sanyo CLT-E23 User manual

Sanyo

Sanyo CLT-E23 User manual

Sanyo CLT-186X User manual

Sanyo

Sanyo CLT-186X User manual

Sanyo CLT-9820 User manual

Sanyo

Sanyo CLT-9820 User manual

Sanyo CLT-2420 User manual

Sanyo

Sanyo CLT-2420 User manual

Sanyo CLT-2419 User manual

Sanyo

Sanyo CLT-2419 User manual

Sanyo CLT-2430 User manual

Sanyo

Sanyo CLT-2430 User manual

Sanyo CLT-136 User manual

Sanyo

Sanyo CLT-136 User manual

Sanyo CLT-9922 User manual

Sanyo

Sanyo CLT-9922 User manual

Sanyo CLT-2435 User manual

Sanyo

Sanyo CLT-2435 User manual

Sanyo CLT-138X User manual

Sanyo

Sanyo CLT-138X User manual

Sanyo CLT-E22 User manual

Sanyo

Sanyo CLT-E22 User manual

Sanyo CLT-9920 User manual

Sanyo

Sanyo CLT-9920 User manual

Sanyo CLT-9903 User manual

Sanyo

Sanyo CLT-9903 User manual

Sanyo CLT-E22 User manual

Sanyo

Sanyo CLT-E22 User manual

Sanyo CLT-586X User manual

Sanyo

Sanyo CLT-586X User manual

Sanyo CLT-9839 User manual

Sanyo

Sanyo CLT-9839 User manual

Popular Cordless Telephone manuals by other brands

Sony SPP-SS965 - Cordless Telephone operating instructions

Sony

Sony SPP-SS965 - Cordless Telephone operating instructions

Telstra Orb user guide

Telstra

Telstra Orb user guide

Mitel DT390 Quick reference guide

Mitel

Mitel DT390 Quick reference guide

GE 25830 user guide

GE

GE 25830 user guide

Uniden EXR2460 owner's manual

Uniden

Uniden EXR2460 owner's manual

BT DIVERSE 1010 user guide

BT

BT DIVERSE 1010 user guide

BT Graphite 1500 quick start guide

BT

BT Graphite 1500 quick start guide

3Com NBX Guide

3Com

3Com NBX Guide

Panasonic KX-TGK210HK operating instructions

Panasonic

Panasonic KX-TGK210HK operating instructions

Panasonic KX-TCA181EX installation manual

Panasonic

Panasonic KX-TCA181EX installation manual

BT FREESTYLE 3200 user guide

BT

BT FREESTYLE 3200 user guide

Panasonic KX-TG7301E operating instructions

Panasonic

Panasonic KX-TG7301E operating instructions

AUDIOLINE Splash 10x operating instructions

AUDIOLINE

AUDIOLINE Splash 10x operating instructions

Amplicomms BigTel 201 user manual

Amplicomms

Amplicomms BigTel 201 user manual

GE 26992 user guide

GE

GE 26992 user guide

AT&T E1812B user manual

AT&T

AT&T E1812B user manual

AEG Voxtel D235 user guide

AEG

AEG Voxtel D235 user guide

GE 15432970 user guide

GE

GE 15432970 user guide

manuals.online logo
manuals.online logoBrands
  • About & Mission
  • Contact us
  • Privacy Policy
  • Terms and Conditions

Copyright 2025 Manuals.Online. All Rights Reserved.

Important
Charge the handset battery for 12 continuous hours prior
to first use.
2.4 GHz
Cordless Telephone
with Caller ID
Instruction Manual
CLT-2419
CLT-2423
SANYO Canada Inc.
www.sanyocanada.com
CLT-2419-2423E-NEW 3/14/03 3:32 PM Page 1
MUTE key . . . . . . . . . . . . . . . . . . . . . . . . . . . . . . . . . . . . . . . . 21
Low battery warning . . . . . . . . . . . . . . . . . . . . . . . . . . . . . . . 21
VOICE MAIL/IN USE indicator . . . . . . . . . . . . . . . . . . . . . . . . 21
CALLER ID FEATURES . . . . . . . . . . . . . . . . . . . . . . . . . . . . . . . . . . 22
Caller ID with Call Waiting . . . . . . . . . . . . . . . . . . . . . . . . . . . 22
Caller ID list . . . . . . . . . . . . . . . . . . . . . . . . . . . . . . . . . . . . . . 22
Reviewing Caller ID list . . . . . . . . . . . . . . . . . . . . . . . . . . . . . 23
Storing Caller ID entries in the directory . . . . . . . . . . . . . . . . 23
Dialing a Caller ID number . . . . . . . . . . . . . . . . . . . . . . . . . . .24
Deleting entries from the Caller ID list . . . . . . . . . . . . . . . . . 24
DIRECTORY . . . . . . . . . . . . . . . . . . . . . . . . . . . . . . . . . . . . . . . . . . 25
Storing a name/number in the directory . . . . . . . . . . . . . . . . 25
Inserting a pause in the dialing sequence . . . . . . . . . . . . . . .26
Replacing a directory entry with a Caller ID entry . . . . . . . . 26
Changing a stored number . . . . . . . . . . . . . . . . . . . . . . . . . . 26
Making calls from the directory . . . . . . . . . . . . . . . . . . . . . . 26
Reviewing and deleting directory contents . . . . . . . . . . . . . . 27
Chain-dialing from the directory . . . . . . . . . . . . . . . . . . . . . . 27
CHANGING THE BATTERY . . . . . . . . . . . . . . . . . . . . . . . . . . . . . . 28
RECYCLING NICKEL-METAL HYDRIDE BATTERIES . . . . . . . . . . . 29
POWER FAILURE . . . . . . . . . . . . . . . . . . . . . . . . . . . . . . . . . . . . . . 29
HEADSET JACK AND BELT CLIP . . . . . . . . . . . . . . . . . . . . . . . . . . 29
Headset connection . . . . . . . . . . . . . . . . . . . . . . . . . . . . . . . . 29
Belt clip installation . . . . . . . . . . . . . . . . . . . . . . . . . . . . . . . . 29
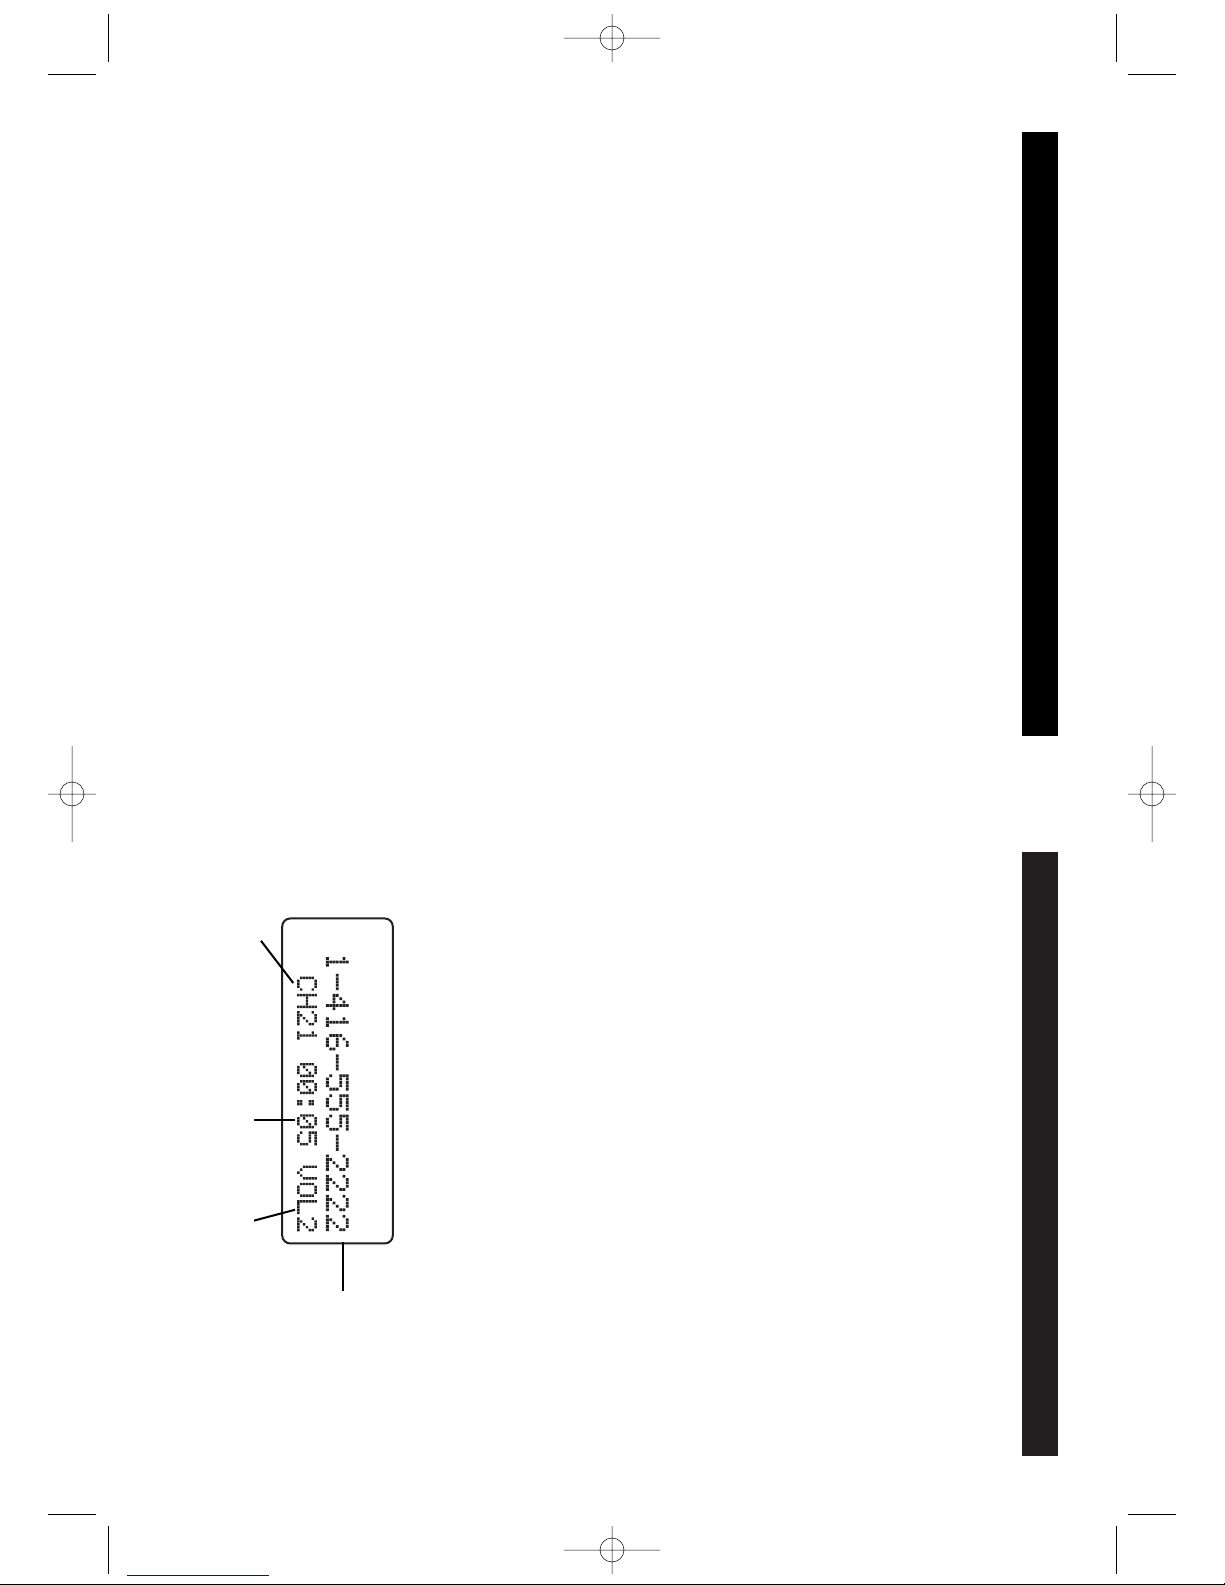
LCD SCREEN MESSAGES . . . . . . . . . . . . . . . . . . . . . . . . . . . . . . . 30
SOUND SIGNALS . . . . . . . . . . . . . . . . . . . . . . . . . . . . . . . . . . . . . 31
TROUBLESHOOTING . . . . . . . . . . . . . . . . . . . . . . . . . . . . . . . . . . . 31
MAINTENANCE . . . . . . . . . . . . . . . . . . . . . . . . . . . . . . . . . . . . . . . 33
MAXIMIZE BATTERY PERFORMANCE . . . . . . . . . . . . . . . . . . . . . .34
TECHNICAL INFORMATION . . . . . . . . . . . . . . . . . . . . . . . . . . . . . . 35
SANYO COMFORT WARRANTY . . . . . . . . . . . . . . . . . . . . . . . . . . 36
SOS HELP LINE . . . . . . . . . . . . . . . . . . . . . . . . . . . . . . . . . . . . . . . 38
3
TABLE OF CONTENTS
INTRODUCTION . . . . . . . . . . . . . . . . . . . . . . . . . . . . . . . . . . . . . . . 4
GETTING STARTED . . . . . . . . . . . . . . . . . . . . . . . . . . . . . . . . . . . . . 5
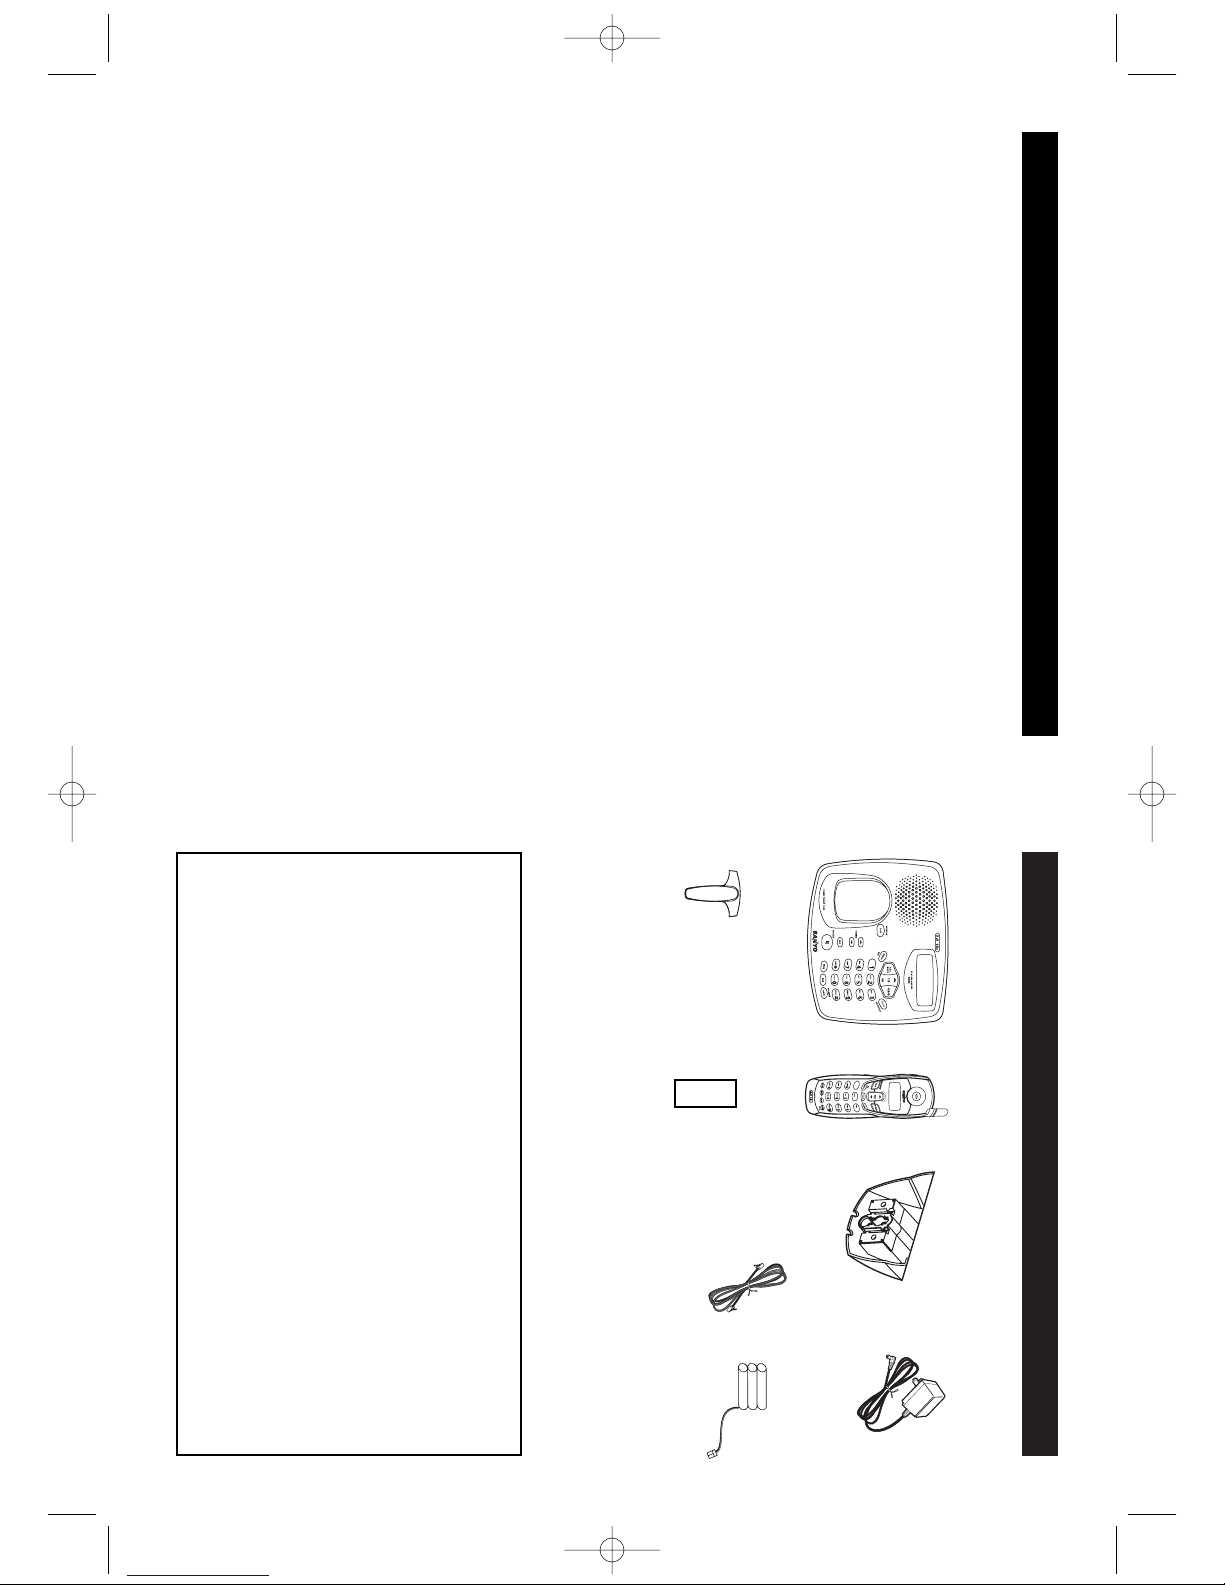
Checking package contents . . . . . . . . . . . . . . . . . . . . . . . . . . . 5
Modular jack . . . . . . . . . . . . . . . . . . . . . . . . . . . . . . . . . . . . . . 5
Installation tips . . . . . . . . . . . . . . . . . . . . . . . . . . . . . . . . . . . . 5
Battery setup . . . . . . . . . . . . . . . . . . . . . . . . . . . . . . . . . . . . . . 6
Telephone line connection . . . . . . . . . . . . . . . . . . . . . . . . . . . 6
Tone/pulse setting . . . . . . . . . . . . . . . . . . . . . . . . . . . . . . . . . . .6
Mounting on a wall . . . . . . . . . . . . . . . . . . . . . . . . . . . . . . . . 7
Digital Security System . . . . . . . . . . . . . . . . . . . . . . . . . . . . . . 7
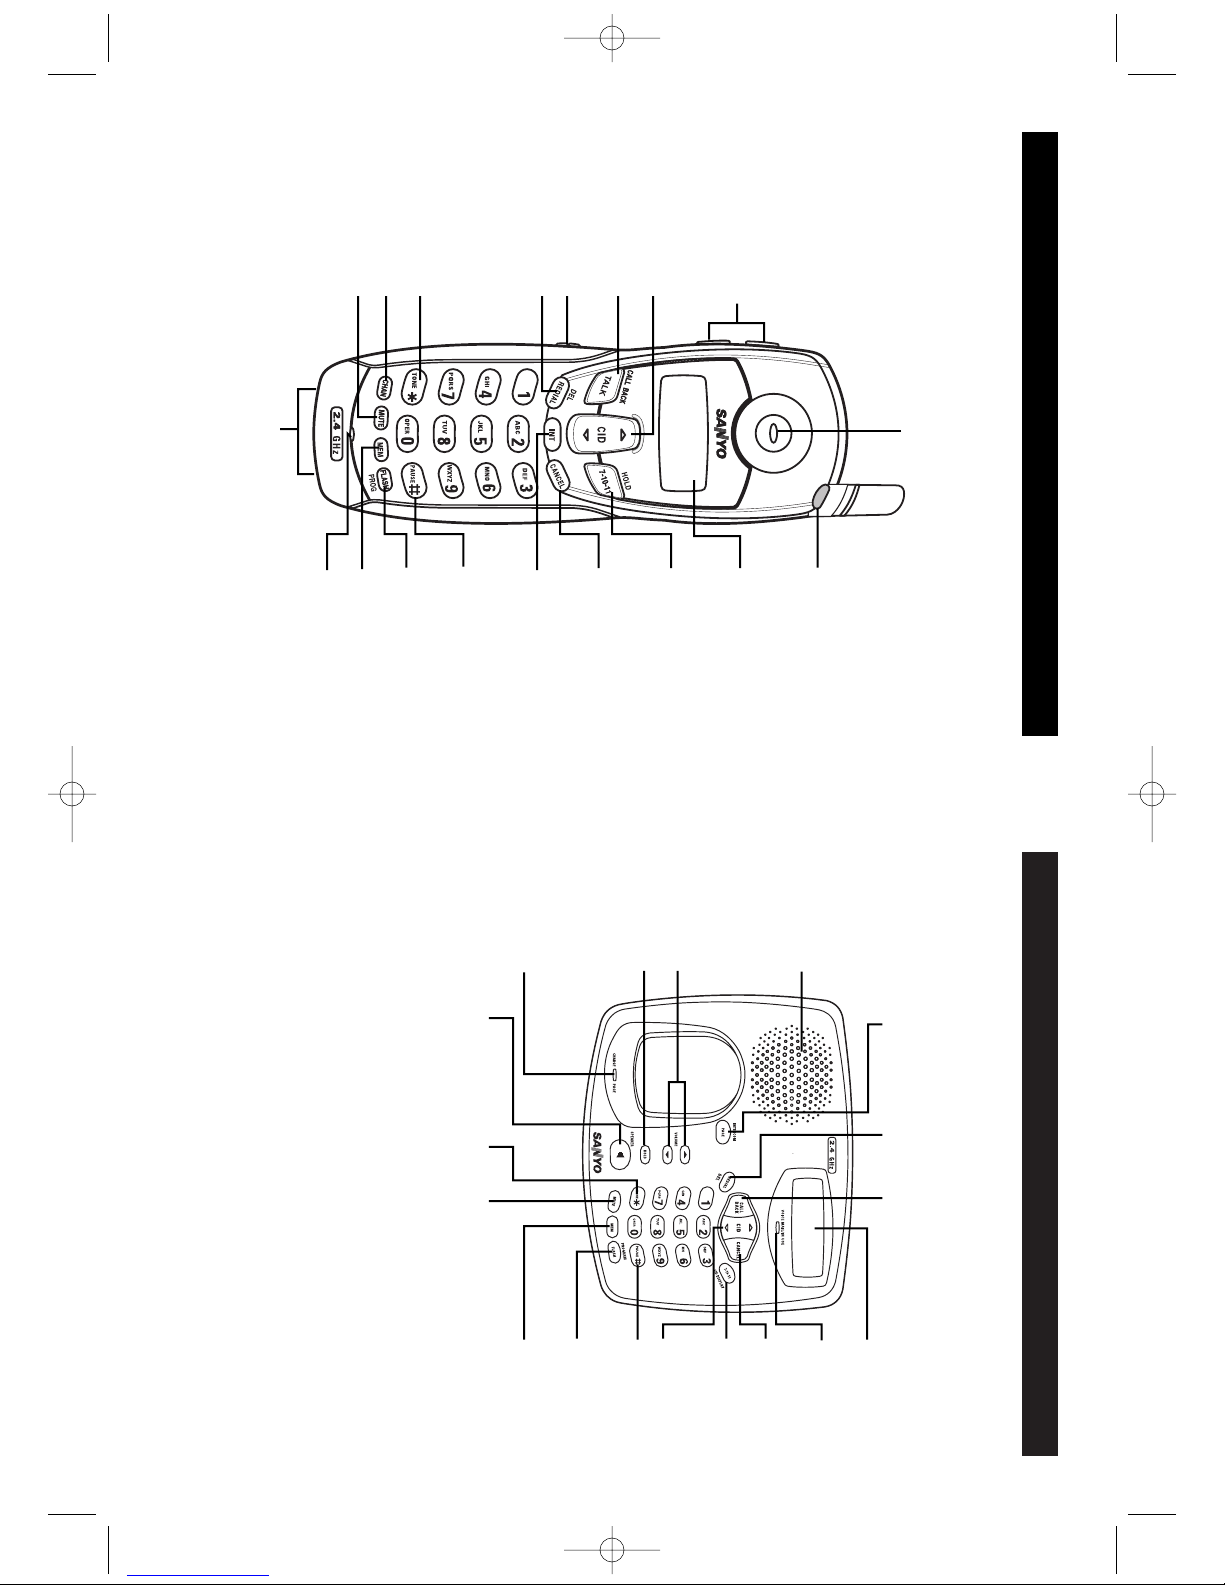
NAMES AND CONTROLS . . . . . . . . . . . . . . . . . . . . . . . . . . . . . . . . 8
Handset . . . . . . . . . . . . . . . . . . . . . . . . . . . . . . . . . . . . . . . . . . 8
Base unit . . . . . . . . . . . . . . . . . . . . . . . . . . . . . . . . . . . . . . . . . 9
INITIAL PROGRAMMING . . . . . . . . . . . . . . . . . . . . . . . . . . . . . . . 10
Language . . . . . . . . . . . . . . . . . . . . . . . . . . . . . . . . . . . . . . . 10
Screen contrast . . . . . . . . . . . . . . . . . . . . . . . . . . . . . . . . . . . 10
Area code . . . . . . . . . . . . . . . . . . . . . . . . . . . . . . . . . . . . . . . 11
Ringer tone . . . . . . . . . . . . . . . . . . . . . . . . . . . . . . . . . . . . . . 11
Time . . . . . . . . . . . . . . . . . . . . . . . . . . . . . . . . . . . . . . . . . . . 11
Resetting to default . . . . . . . . . . . . . . . . . . . . . . . . . . . . . . . . 12
BASICS . . . . . . . . . . . . . . . . . . . . . . . . . . . . . . . . . . . . . . . . . . . . . . 13
Receiving a call . . . . . . . . . . . . . . . . . . . . . . . . . . . . . . . . . . . 13
Making a call . . . . . . . . . . . . . . . . . . . . . . . . . . . . . . . . . . . . . 13
Volume adjustment . . . . . . . . . . . . . . . . . . . . . . . . . . . . . . . . 14
Ringer switch and volume . . . . . . . . . . . . . . . . . . . . . . . . . . . 15
Speakerphone use . . . . . . . . . . . . . . . . . . . . . . . . . . . . . . . . . 15
Pre-dialing . . . . . . . . . . . . . . . . . . . . . . . . . . . . . . . . . . . . . . . 16
Changing the pre-dial number . . . . . . . . . . . . . . . . . . . . . . . 16
Redialing . . . . . . . . . . . . . . . . . . . . . . . . . . . . . . . . . . . . . . . . 16
Fast redialing . . . . . . . . . . . . . . . . . . . . . . . . . . . . . . . . . . . . . 16
Switching between speaker phone and handset . . . . . . . . . 16
Intercom and room monitoring . . . . . . . . . . . . . . . . . . . . . . . 17
Using intercom while you are on a call . . . . . . . . . . . . . . . . 18
Conference calling . . . . . . . . . . . . . . . . . . . . . . . . . . . . . . . . . 18
Conferencing after intercom conversation . . . . . . . . . . . . . . 19
FLASH key . . . . . . . . . . . . . . . . . . . . . . . . . . . . . . . . . . . . . . . 19
CHAN (Channel) key . . . . . . . . . . . . . . . . . . . . . . . . . . . . . . . 20
HOLD key . . . . . . . . . . . . . . . . . . . . . . . . . . . . . . . . . . . . . . . . 20
CANCEL key . . . . . . . . . . . . . . . . . . . . . . . . . . . . . . . . . . . . . . 20
TONE key . . . . . . . . . . . . . . . . . . . . . . . . . . . . . . . . . . . . . . . . 20
Handset locator (PAGE key) . . . . . . . . . . . . . . . . . . . . . . . . . . 20
2
TABLE OF CONTENTS
The exclamation point within the triangle is a warning sign
alerting you of important instructions accompanying the product.
CLT-2419-2423E-NEW 3/14/03 3:32 PM Page 2
GETTING STARTED
Checking the package contents
Make sure your package includes the items shown here.
Modular jack
You need an RJ11 type modular phone jack. If you do not have a
modular jack, call your local phone company to find out how to get
one installed.
Installation tips
Some cordless telephones operate at frequencies that may cause
interference to nearby TVs microwave ovens, and VCRs. To minimize or
prevent such interference, the base of the cordless telephone should
not be placed near or on top of a TV, microwave ovens, or VCR. If such
interference continues, move the cordless telephone farther away from
these appliances.
Certain other communications devices may also use the 2.4 GHz
frequency for communication and if not set properly these devices may
interfere with each other and/or your new telephone. If you are
concerned with interference, please refer to the owner’s manual for
these devices on how to properly set channels to avoid interference.
Typical devices that may use the 2.4 GHz frequency for communication
include wireless audio/video senders, wireless computer networks,
multi-handset cordless telephone systems, and some long-range
cordless telephone systems.
5
INTRODUCTION
Congratulations on your purchase of this Sanyo cordless telephone.
Your Sanyo 2.4 GHz cordless telephone is a fine-quality home
communications product. It is carefully designed and produced by a
world leader of consumer and industrial electronics equipment. With
proper maintenance and care, it will provide you with years of
enjoyment and convenience.
Main Features
2.4 GHz Technology
Superior Range -The use of 2.4 GHz frequency band for signal
transmission between base and handset means greater communi-
cation range compared to conventional 43 – 49 MHz cordless
telephones.
Ultra-Low Noise -The high frequency communication has also signifi-
cantly reduced noise level.
40-Channel Auto Scan -Your new telephone uses one of 40 channels
in the 2.4-GHz frequency band. It automatically selects a clear channel
every time you receive or place a call on the handset.
COMPANDER PLUS Noise Reduction
This fourth generation of the Sanyo’s original noise reduction
technology now filters out more background noise.
•Caller ID on Handset and base
•Speakerphone and dialing keypad on the base
•Compatible with Caller ID and Visual Call Waiting
•40 name/number caller ID list: name/number, time and date
•3-line trilingual display with backlit LCD screen
•Lighted handset keypad (CLT-2423 only)
•Dial back from Caller ID list
IMPORTANT: To use all of the features of this telephone, you must subscribe
to either the standard Name/Number Caller ID Service or Caller ID with Call
Waiting Service from your telephone company. To know who is calling
while you are on the phone, you must subscribe to Caller ID with Call
Waiting Service.
4
Replacement
battery order
form
O
123
Base Handset
AC adaptor
(U120030D)
Belt clip
(CLT-2423 only) Handset
battery
Telephone
line cord
Wall mount bracket
CLT-2419-2423E-NEW 3/14/03 3:32 PM Page 4
Mounting on a wall
Do not attempt to wall-mount the phone before initial 12-hour
charging is completed.
Follow steps 1– 3 above to charge the handset.
4. Remove the handset
from the base and set
aside. Turn the base over
and align the four slots
on the bottom of the base
with the four hook-tabs
on the bracket.
5. Insert the hook-tabs into
the slots and push up
until the bracket snaps
securely into place.
6. Plug the telephone line
cord into the TEL LINE
jack on the back of the
base and into a modular
phone jack.
Note: If you have PULSE (rotary) telephone line, set the
PULSE/TONE switch on the back of the base to PULSE.
7. Slip the mounting holes over the wall plate posts and slide the
unit down firmly into place. (Wall plate not included.)
8. Place the handset in the base.
Note: If desired, gather the extra AC adaptor cord and telephone line
cord together, fasten with a wire tie, and store inside the wall
mounting bracket.
Digital Security System
Your cordless phone uses a digital security system to provide
protection against false ringing, unauthorized access and charges to
your phone line. When you place the handset in the base, the phone
verifies its security code. After a power outage or battery replacement,
you should place the handset in the base for about 20 seconds to reset
the code.
7
Battery setup
1. Remove the battery compartment cover
on the handset, insert the battery, plug
the cord into the jack (inside the
compartment) and replace the cover.
2. Set the handset RINGER switch to ON,
and place handset in the base.
3. Plug the AC adpator into the POWER DC
12V jack on the back of base and the
other end into an electrical outlet. The
CHARGE/PAGE indicator comes on
verifying the battery is charging.
Charge the handset for
12 continuous hours prior to first use. The
initial battery charge is important for best
performance.
Note: It is normal for
the handset and base
to get warm when
the handset is
charging in the base.
Note: For desktop
charging only, the
handset is able to charge facing up or down.
Telephone line connection
4. Plug the telephone line cord into the TEL LINE jack on the back of
the base and into a modular phone jack.
Tone/pulse setting
5. If you have PULSE (rotary) telephone line, set the PULSE/TONE
switch on the back of the base to PULSE. For touch-tone service
line, do nothing as your phone has been set to TONE at factory.
If you do not know which type of service you have, contact your
local telephone company.
Caution: Use only the Sanyo AC adaptor (U120030D) that is supplied
with this phone. Using another AC adaptor may damage the phone.
6
1
GETTING STARTED GETTING STARTED
LINE
123
CLT-2419-2423E-NEW 3/14/03 3:32 PM Page 6
NAMES AND CONTROLS
Base unit
9
NAMES AND CONTROLS
Handset
8
TALK/CALL BACK key
(also used to END a call)
LCD screen
VOLUME keys
CID ▲or ▼key 7-10-11/HOLD key
7-10-11 CID
DISPLAY key
HOLD key
REDIAL/DEL
(delete) key
RINGER switch
MUTE key
CHAN (channel) key
CANCEL key
CANCEL key
MEM (Memory) key
MEM (Memory)
key
FLASH/PROG
(program) key
FLASH/
PROGRAM key
Microphone
Charging
contacts
Incoming call visual
alert LED
Earpiece
PAUSE key
PAUSE key
TONE key
CALL BACK key
LCD screen
Volume
(VOLUME)
keys CID ▲or ▼key
REDIAL/DEL
(delete) key
MUTE key
PAGE/INTERCOM
key
TONE key
INT (intercom) key
O
VOICE MAIL/
IN USE indicator
SPEAKER key
CHARGE/PAGE
indicator
Speaker
TONE/PULSE selection switch is located
on the back of the base unit.
CLT-2419-2423E-NEW 3/14/03 3:32 PM Page 8
Area code setting
For proper Caller ID operation, you must enter your area code. This
setting can only be done from the base.
1. Make sure the phone is OFF (not in TALK mode).
2. Press FLASH/PROGRAM three times.
SSEETTAARREEAACCOODDEEshows on screen.
3. Enter your 3-digit area code using the number keys.
4. Press FLASH/PROGRAM to confirm.
Ringer tone setting
On the base:
1. Make sure the phone is OFF (not in TALK mode).
2. Press FLASH/PROGRAM four times. SSEETTRRIINNGGEERRTTOONNEE
shows on the screen.
3. Press CID ▲or ▼, or press the 1, 2, or 3number keys to select
the desired ringer tone.
4. Press FLASH/PROGRAM to confirm.
On the handset:
1. Make sure the phone is OFF (not in TALK mode).
2. Press FLASH/PROG two times.
SSEETTRRIINNGGEERRTTOONNEEshows on the screen.
3. Press CID ▲or ▼, or press the 1, 2, or 3number keys to select
the desired ringer tone.
4. Press FLASH/PROG to confirm.
Time setting
The time and date are programmed automatically when Caller ID
information is successfully received after setup.
1. Phone must be OFF (not in TALK mode).
2. Press FLASH/PROGRAM on the base five times.
SSEETTTTIIMMEEshows on the screen.
3. Enter the hour and minutes using the number keys (0 – 9).
4. Press CID ▲or ▼ key to select AM or PM.
5. Press FLASH/PROGRAM to confirm.
11
10
INITIAL PROGRAMMING
Before using this telephone 6 initial settings must be completed on the
base: Language, Screen contrast, Area code (This is required to use
Caller ID service from your telephone company), Ringer tone and
Time.
Note: The Language selection and Ringer tone setting must be done
separately for the handset and for the base.
Language setting
On the base:
1. Make sure the phone is OFF (not in TALK mode).
2. Press FLASH/PROGRAM on the base.
11EENNGGLLIISSHH22FFRRAA33EESSPPshows on screen.
3. Press CID ▲or ▼, or the number keys to select the desired
language.
4. Press FLASH/PROGRAM to confirm.
On the handset:
1. Make sure the phone is OFF (not in TALK mode).
2. Press FLASH/PROG on the handset.
11EENNGGLLIISSHH22FFRRAA33EESSPPshows on screen.
3. Press CID ▲or ▼, or the number keys to select the desired
language.
4. Press FLASH/PROG to confirm.
Screen contrast setting
To adjust the base screen only.
The handset screen is not adjustable.
1. Make sure the phone is OFF (not in TALK mode).
2. Press FLASH/PROGRAM twice.
SSEETTCCOONNTTRRAASSTTshows on screen.
3. Press CID ▲or ▼, or the 1or 2number key to select the desired
contrast.
4. Press FLASH/PROGRAM to confirm.
INITIAL PROGRAMMING
CLT-2419-2423E-NEW 3/14/03 3:32 PM Page 10
BASICS
Receiving a call
When an incoming call is received, both handset and base screens
light and show caller information*. The incoming call LED on the
handset and the SPEAKER key on the base flash.
* A subscription is required from your local phone company to receive
Caller ID information on your phone. See Caller ID Features, page 22.
Using handset:
1. Press TALK/CALL BACK to answer the call.
Note: If handset is in the base cradle, remove it from base before
pressing the TALK/CALL BACK key.
2. Press TALK/CALL BACK again to hang up.
Note: If you replace the handset to the base cradle, the handset
automatically hangs up.
Using base speakerphone:
1. Press SPEAKER to answer the call.
2. Press SPEAKER again to hang up.
Making a call
Using handset:
1. Press TALK/CALL BACK.
Note: If handset is in the base cradle, remove it from base before
pressing the TALK/CALL BACK key.
2. Dial the phone number.
The screen shows the number as you enter.
3. Press TALK/CALL BACK again to hang up.
13
Resetting to default
You can reset the phone programming to the initial factory default
settings.
The default settings are:
Language - EEnngglliisshh
Contrast - 2
Area Code - ______
Ringer Tone - RRiinnggeerrTToonnee11
Time Set - 1122::0000AAMM
Default Set - 22NNOO
1. Make sure the phone is OFF.
2. Press FLASH/PROGRAM on the base six times.
DDEEFFAAUULLTTSSEETTTTIINNGG11YYEESS22NNOOshows on screen.
3. Press CID ▲or ▼, or the 1or 2key to select your choice.
4. Press FLASH/PROGRAM to confirm.
12
Telephone number
Channel No. Call timer Volume level
INITIAL PROGRAMMING
CLT-2419-2423E-NEW 3/14/03 3:32 PM Page 12
Ringer switch and volume
Handset ringer:
The RINGER switch must be on for the handset to ring during
incoming calls.
Base ringer:
1. Make sure the speakerphone is OFF (SPEAKER key is not lit).
2. To increase the ringer volume to the highest level, press
VOLUME ▲.
3. To decrease the ringer volume level, press VOLUME ▼.
4. To turn off the ringer, press VOLUME ▼ until RRIINNGGEERROOFFFF
shows on screen.
Speakerphone use
For best speakerphone performance, avoid the following:
•Areas with high background noise. (The microphone might pick
up these sounds and prevent the speakerphone from going into
the receiving mode when you finish talking.)
•Surfaces affected by vibration.
•Recessed areas such as in a corner, under a cupboard, or next to a
cabinet, which can generate an echo effect.
Tips:
•The speakerphone works similar to a 2-way radio. You can only
listen or talk one at a time.
•Stay reasonably close to the phone so you can be heard clearly.
•The SPEAKER key lights up when the speakerphone is in use.
15
Using base speakerphone:
1. Press SPEAKER.
2. Dial the phone number.
The screen shows:
3. Press SPEAKER again to hang up.
Volume adjustment
The VOLUME keys on the handset adjusts the volume level of the
handset’s earpiece. The VOLUME keys on the base controls the base
speaker. There are four levels.
Speakerphone volume
1. Make sure the speakerphone is ON (SPEAKER key is lit).
2. Press VOLUME ▲or ▼, on the base. The volume level shows on
screen.
Handset volume
1. Make sure the handset is in TALK mode.
2. Press the VOLUME ▲or ▼key on the side of the handset.
The volume level shows on screen.
14
10: 04 AM
RINGER OFF
TIME
Telephone number
Call timer Volume level
BASICS BASICS
CLT-2419-2423E-NEW 3/14/03 3:32 PM Page 14
•Handset to speakerphone – When the handset is in talk mode press
HOLD to put the caller on hold, and then place the handset in the
base. You are automatically connected to the caller through the
speakerphone.
Intercom and room monitoring
The intercom feature of your cordless phone allows you to have a 2-
way conversation between the handset and the base unit without
tying up the telephone line. Since the telephone line is not being used,
you can still receive incoming calls. You can also use this feature for
room monitoring.
From the handset:
1. Make sure the phone is OFF (not in TALK mode).
2. Press INT on the handset. A paging tone sounds at the base and
from the handset. PPAAGGIINNGGshows on screen. (To cancel intercom,
press INT again.)
3. Wait for the person near the base to press PAGE/INTERCOM. If
no one presses the key from the base within 15 seconds, the base
enters intercom mode automatically.
3. When finished, press INT on the handset or PAGE/INTERCOM
on the base to stop using the intercom.
Note: The base must be within range of the handset for the
intercom to function. If the base is in use, BBAASSEEIINNUUSSEEshows
on the handset screen.
From the base:
1. Make sure the phone is OFF (not in TALK mode).
2. Press PAGE/INTERCOM. A paging tone sounds at the handset
and base. (To cancel intercom, press PAGE/INTERCOM again.)
PAGING shows on screen.
3. Wait for the person with the handset to press INT.
IINNTTEERRCCOOMMshows on screen
4. When finished, press PAGE/INTERCOM on the base (or INT on
the handset) to stop using the intercom.
Note: The handset must be within range of the base unit in order
for intercom to function. If the handset is in use, you will hear
3 soft beeps from the base unit.
17
Pre-dialing
1. Make sure the phone is OFF (not in TALK mode).
2. Enter the telephone number. The telephone number shows on
screen.
3. Press TALK/CALL BACK on the handset or press SPEAKER or
CALL BACK on the base. The telephone number shows on the
respective screen.
Note: You may enter up to 32 pre-dial digits.
Changing the pre-dial number
1. Make sure the phone is OFF (not in TALK mode).
2. Enter the telephone number.
3. Press REDIAL/DEL to delete digits one by one.
4. Re-enter the number.
Redialing
1. Make sure the phone is OFF (not in TALK mode).
2. Press TALK/CALL BACK on the handset or SPEAKER on the
base.
3. Press REDIAL/DEL to redial the last number (up to 32 digits).
Fast redialing
1. Press TALK/CALL BACK on the handset or SPEAKER on the
base.
2. Enter the telephone number you want to dial.
If the line is busy, press REDIAL/DEL. The phone will drop the
line for two seconds and redials the number.
Switching between speakerphone and handset
You can switch between speakerphone and handset after dialing a
number or anytime during a conversation.
•Speakerphone to handset – When the speakerphone is on press
HOLD to put the caller on hold, and then remove the handset
from the cradle on the base. You are automatically connected to
the caller.
Note: If the handset is already off the cradle when you put the call
on hold, press TALK/CALL BACK to connect to the caller.
16
BASICS BASICS
CLT-2419-2423E-NEW 3/14/03 3:32 PM Page 16
Conferencing from the handset:
1. Press TALK/CALL BACK.
2. Dial the number you want to call. The telephone number shows
on screen.
3. Press SPEAKER on the base. CCOONNFFEERREENNCCEEshows on the base
and handset screens.
4. When finished, press TALK/CALL BACK on the handset and
SPEAKER on the base.
Tip: If you want to hang up the speakerphone and continue talking
on the handset, press SPEAKER.
Conferencing after the intercom conversation
From the base:
1. Press SPEAKER to speak to the caller.
2. Press PAGE/INTERCOM on the base to put the caller on hold.
PPAAGGIINNGGand HHOOLLDDshows on screen.
3. Press INT on the handset.
IINNTTEERRCCOOMMshows on screen. You can have an intercom conver-
sation with the handset user.
4. Press TALK/CALL BACK on the handset.
CCOONNFFEERREENNCCEEshows on screen. Start 3-way conference conver-
sation.
From the handset:
1. Press TALK/CALL BACK to speak to the remote party.
2. Press INT on the handset to put the caller on hold.
PPAAGGIINNGGand HHOOLLDDshows on screen.
3. Press PAGE/INTERCOM on the base.
IINNTTEERRCCOOMMshows on screen.
4. Press SPEAKER.
CCOONNFFEERREENNCCEEshows on screen. Start 3-way conference conver-
sation.
FLASH key
Use the FLASH/PROGRAM key on the handset or base to activate
custom calling services such as Call Waiting or Call Transfer, which are
available through your local phone company.
19
Using the intercom while you are on a call
You may want to use the intercom feature while you are on a call.
From the handset (in TALK mode):
1. Press INT on the handset. The line is put on hold, and you will
hear a paging tone at the base and handset.
2. Press PAGE/INTERCOM on the base and IINNTTEERRCCOOMMshows in
the handset screen.
3. Press INT on the handset to return to TALK mode.
From the base (in speakerphone mode):
1. Press PAGE/INTERCOM on the base. The line is put on hold, and
you will hear a paging tone at the base and handset.
2. Press INT on the handset and IINNTTEERRCCOOMMshows in the base
screen.
3. Press PAGE/INTERCOM on the base to return to TALK mode.
Note: When the handset is holding a call on intercom, you may
transfer the call to the base by pressing TALK/CALL BACK on
the handset. When the base is holding a call in the intercom, you
may transfer the call to the handset by pressing SPEAKER on the
base.
Conference calling
You can use the speakerphone and handset at the same time for a
3-way conversation with a third party.
Conferencing from the base:
1. Press SPEAKER.
2. Dial the number you want to call. The number shows on screen.
3. Press TALK/CALL BACK on the handset.
CCOONNFFEERREENNCCEEshows on the base and handset screens.
4. When finished, press TALK/CALL BACK on the handset and
SPEAKER on the base.
Tip: If you want to hang up the handset and continue talking on
the speakerphone, press TALK/CALL BACK.
18
BASICS BASICS
CLT-2419-2423E-NEW 3/14/03 3:32 PM Page 18