Sanyo CLT-U12 User manual

1
Important
Charge the handset battery for 12 continuous hours prior to first use.
CLT-U20
CLT-U30
CLT-U12
CLT-U22
CLT-U32
2.4 GHz
Cordless Telephone
with Caller ID &
Visual Call Waiting
INSTRUCTION MANUAL
The picture depicts dual handset model
Dual Handset Models
SANYO Canada Inc.
www.sanyocanada.com

2
INTRODUCTION -------------------------------------------------------------------- 4
GETTING STARTED ---------------------------------------------------------------- 5
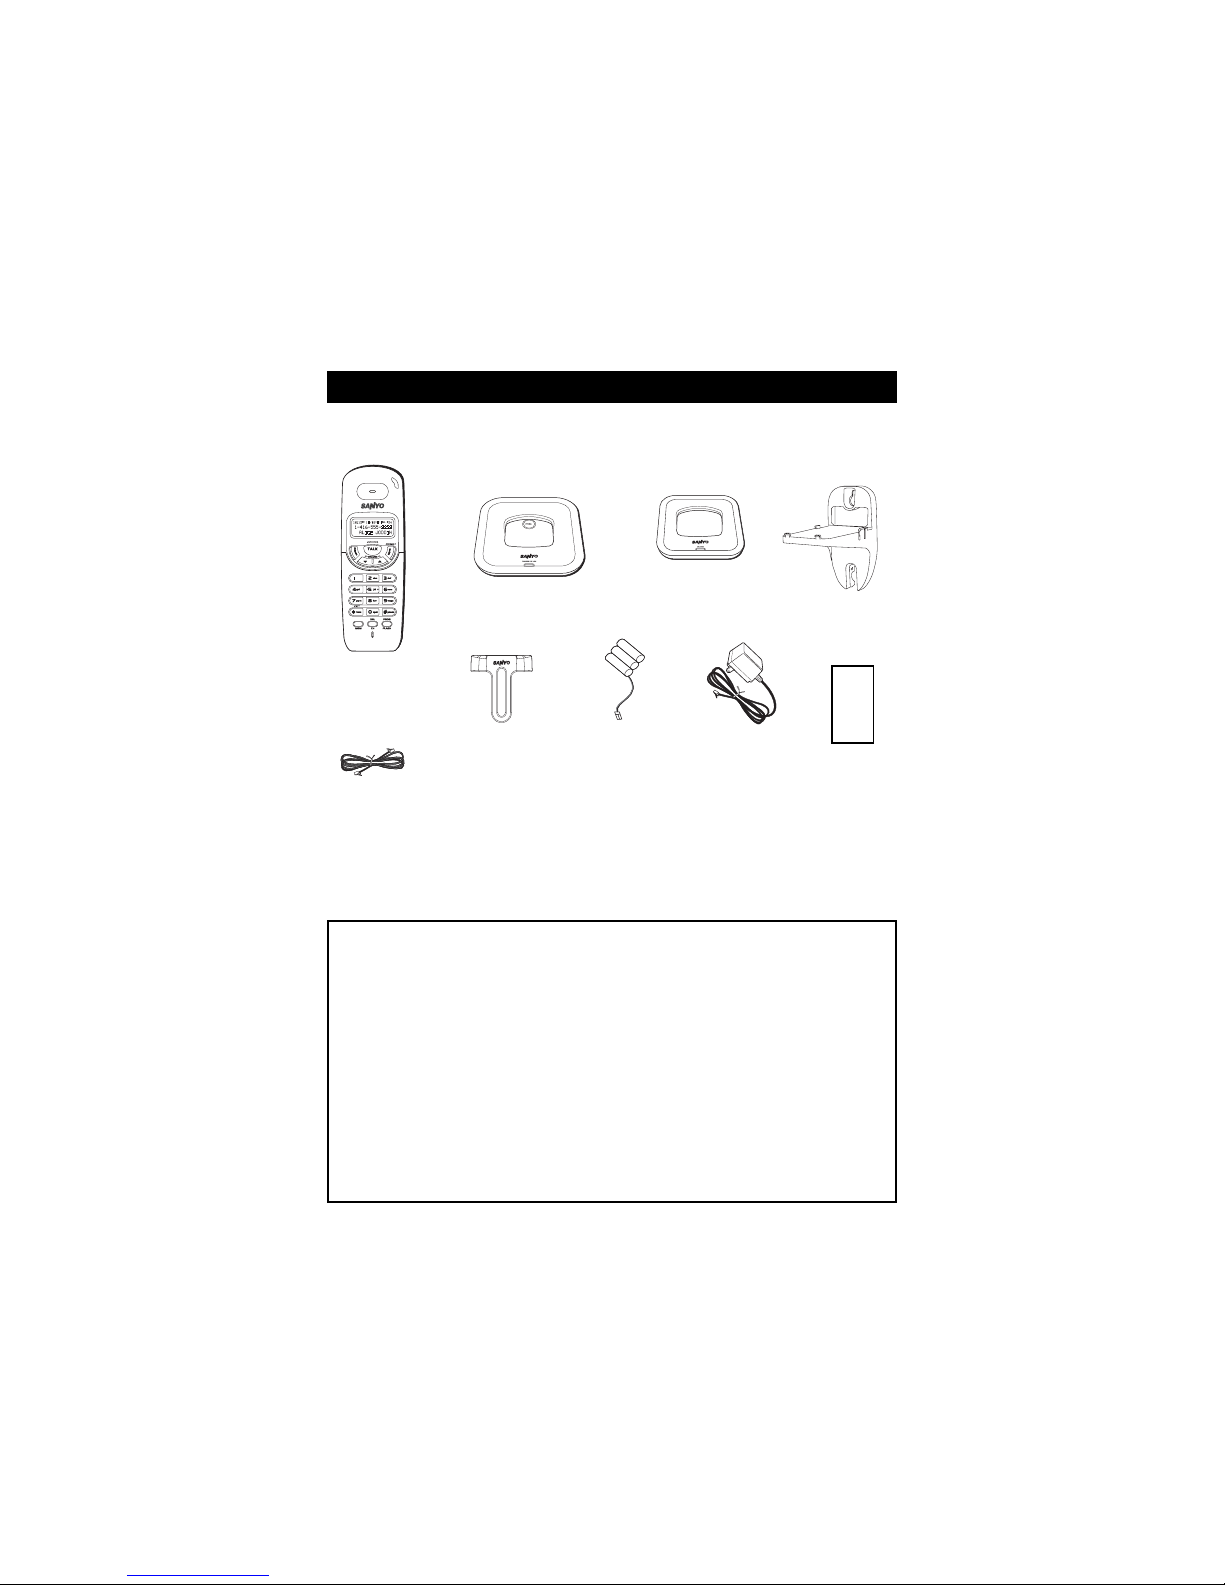
Checking package contents ------------------------------------------------ 5
Modular jack ------------------------------------------------------------------ 5
Installation tips ---------------------------------------------------------------- 5
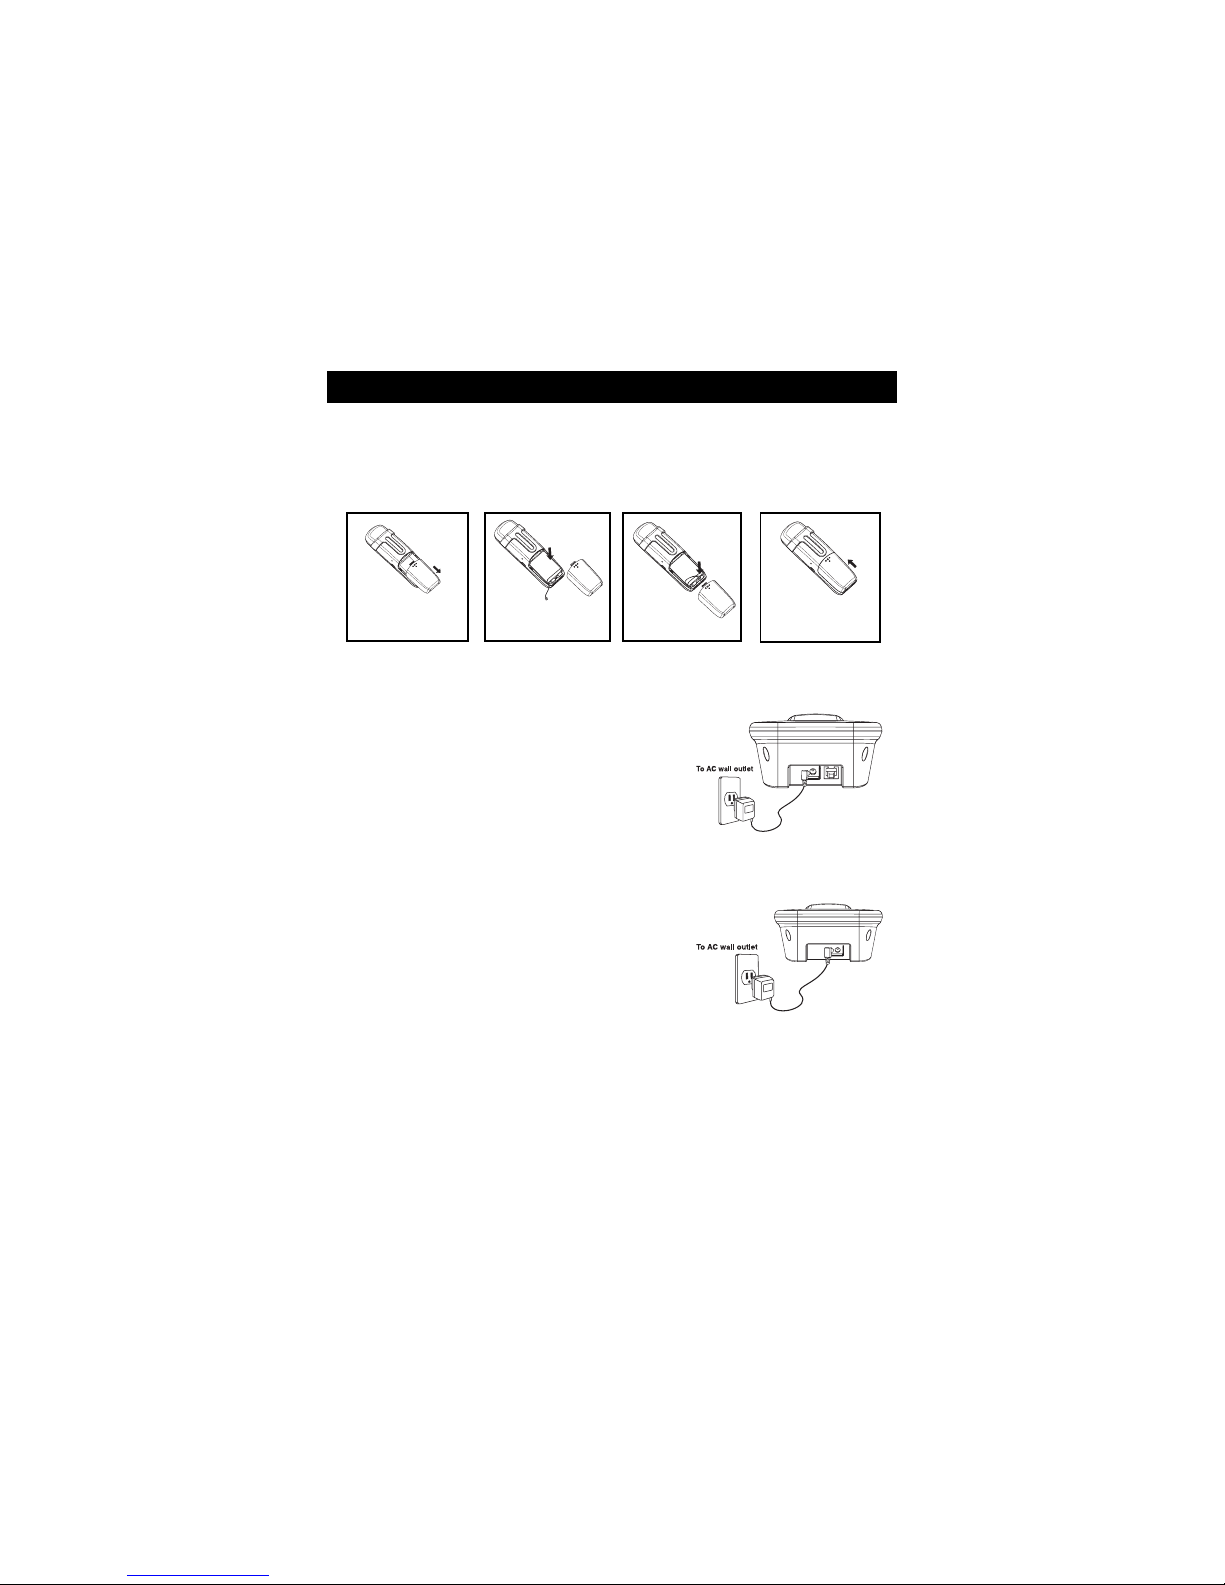
Battery setup ----------------------------------------------------------------- 6
Connecting the base unit and charging the handset -------------------- 6
Connectingthechargerandchargingthehandset
(For CLT-U12, CLT-U22 and CLT-U32) ------------------------------------- 6
Telephone line connection --------------------------------------------------- 7
Tone/pulse setting ------------------------------------------------------------ 7
Mounting on a wall ----------------------------------------------------------- 7
Register handsets to the main base before use ------------------------- 8
To register the second handset
(For CLT-U12, CLT-U22 and CLT-U32) ------------------------------------- 8
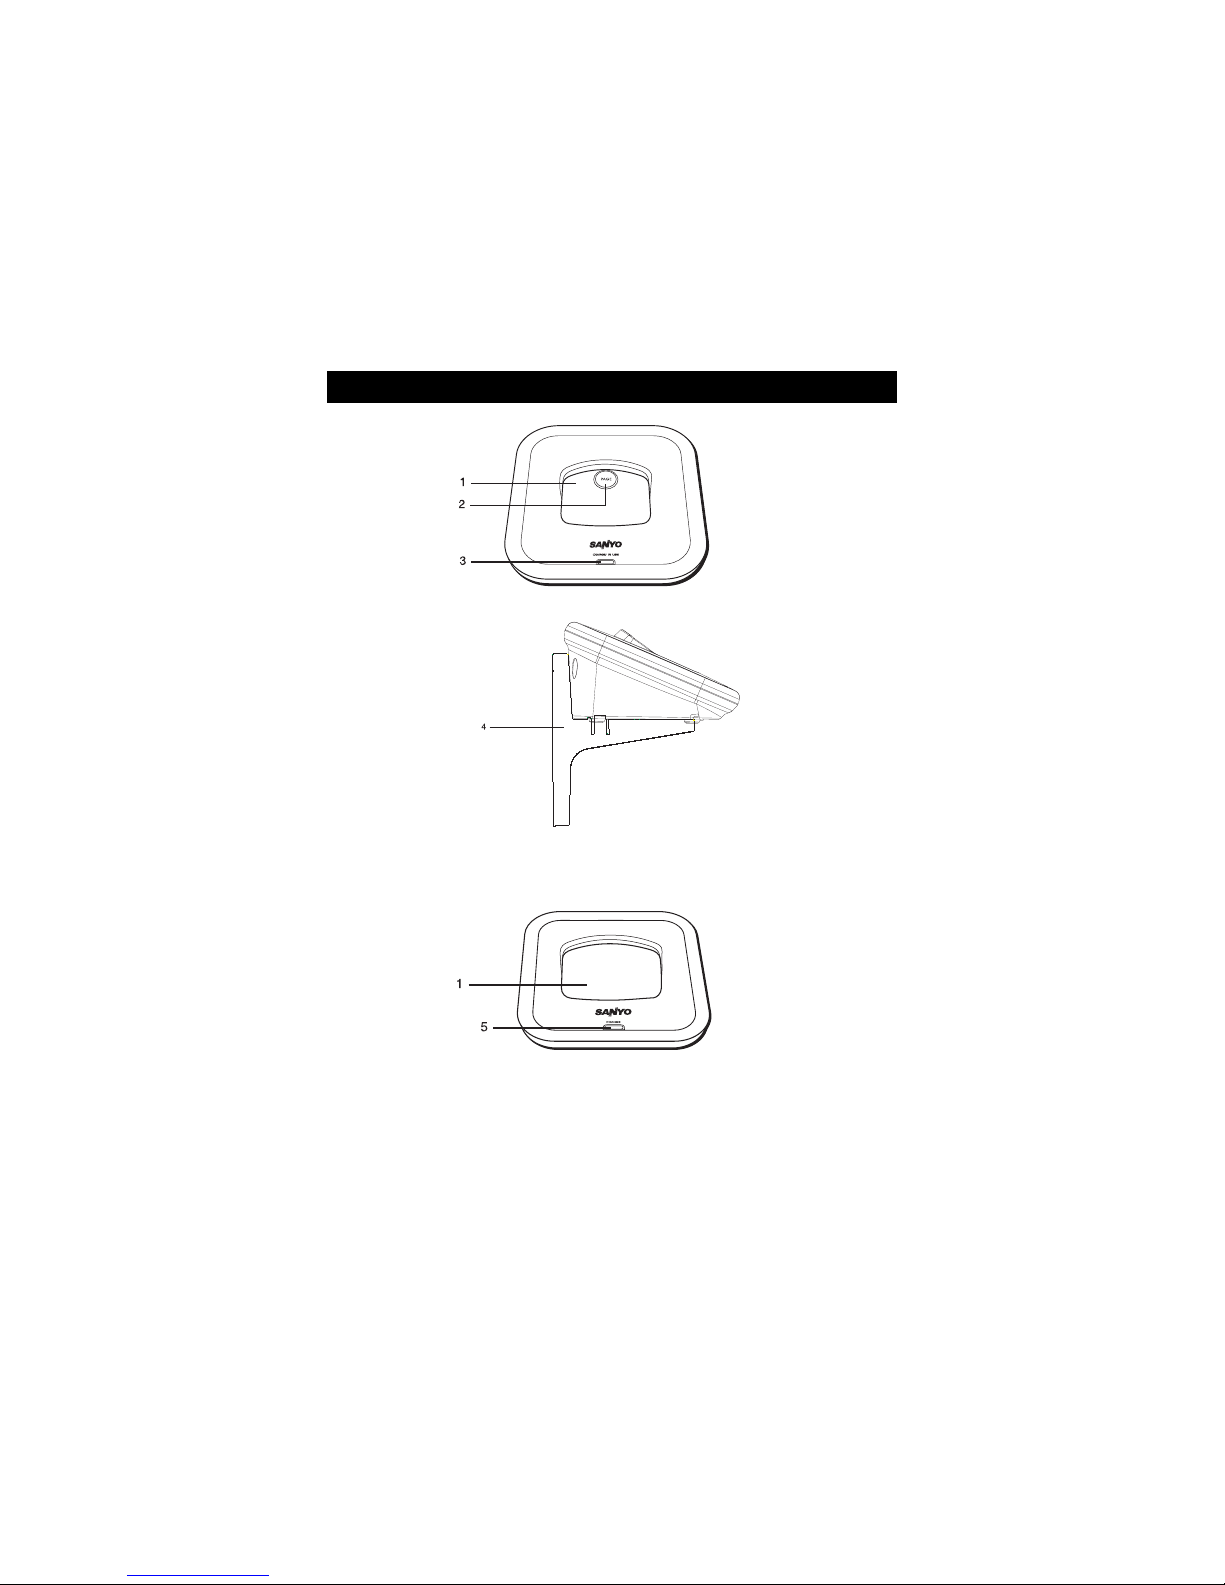
NAMES AND CONTROLS -------------------------------------------------------- 9
Handset --------------------------------------------------------------------------- 9
Base unit and Charger ------------------------------------------------------- 10
INITIAL PROGRAMMING --------------------------------------------------------- 11
Language setting ------------------------------------------------------------- 11
Area code setting ------------------------------------------------------------ 11
Ringer tone -------------------------------------------------------------------- 11
Tone/pulse setting ------------------------------------------------------------ 11
Resetting to default ---------------------------------------------------------- 12
BASICS ----------------------------------------------------------------------------- 12
Receiving a call -------------------------------------------------------------- 12
Making a call ------------------------------------------------------------------ 13
Volume adjustment ----------------------------------------------------------- 13
Transferringa call (For CLT-U12,CLT-U22and CLT-U32) -------------- 13
Ringer switch ----------------------------------------------------------------- 13
Pre-dialing --------------------------------------------------------------------- 14
Changing the pre-dial number ---------------------------------------------- 14
Redialing ----------------------------------------------------------------------- 14
Fast redialing ----------------------------------------------------------------- 14
FLASH key -------------------------------------------------------------------- 14
CH (Channel)/DEL key ------------------------------------------------------- 14
* TONE key -------------------------------------------------------------------- 15
TABLE OF CONTENTS

3
Handset locator (paging function) ----------------------------------------15
MUTE key ---------------------------------------------------------------------15
Low battery warning -------------------------------------------------------15
Voice mail indicator ----------------------------------------------------------16
CALLER ID FEATURES ---------------------------------------------------------- 16
Caller ID with Call Waiting --------------------------------------------------16
Caller ID list -------------------------------------------------------------------17
Reviewing Caller ID list -----------------------------------------------------17
Formatting Caller ID numbers ----------------------------------------------17
Storing Caller ID entries in the directory ----------------------------------18
Dialing a Caller ID number --------------------------------------------------18
Deleting entries from the Caller list --------------------------------------- 18
Deleting the displayed entry -----------------------------------------------18
Deleting all entries -----------------------------------------------------------19
DIRECTORY ----------------------------------------------------------------------- 19
Storing a number in the directory ------------------------------------------19
Replacing a directory entry with a Caller ID entry ---------------------- 20
Changing a stored number ------------------------------------------------ 20
Making calls from the directory ------------------------------------------- 20
Reviewing and deleting directory contents ----------------------------- 20
Chain dialing from the directory ------------------------------------------- 21
CHANGING THE BATTERY ----------------------------------------------------- 21
RECYCLINGNICKEL-CADMIUM BATTERIES ------------------------------- 22
POWER FAILURE ----------------------------------------------------------------- 22
HEADSET JACK AND BELT CLIP ---------------------------------------------- 23
LIGHT SIGNALS ----------------------------------------------------------------- 23
LCD SCREEN MESSAGES ------------------------------------------------------ 24
SOUND SIGNALS ---------------------------------------------------------------- 25
TROUBLESHOOTING ------------------------------------------------------------ 25
MAINTENANCE ------------------------------------------------------------------- 27
MAXIMIZEBATTERYPERFORMANCE --------------------------------------- 28
TECHNICAL INFORMATION ---------------------------------------------------- 29
SANYO COMFORT WARRANTY ----------------------------------------------- 31
SOS HELP LINE ------------------------------------------------------------------ 33
TABLE OF CONTENTS
The exclamation point within the triangle is a warning sign alerting
you of important instructions accompanying the product.

4
Congratulationsonyour purchase of this Sanyo cordless telephone.
YourSanyo2.4GHz cordless telephone is a fine-qualityhome communications
product. It is carefully designed and produced by a world leader of consumer and
industrialelectronicequipment. With proper maintenance and care, it will provide
you with years of enjoyment and convenience.
Main Features
2.4 GHz Technology
Superior Range – The use of 2.4 GHz frequency band for signal transmission
betweenbaseand handset means greater communication range compared to
conventional 43 - 49 MHz cordlesstelephones.
Ultra-Low Noise –Thehigh frequency communication alsohas significantly
reducednoiselevel.
40-Channel Auto Scan – Your new telephone uses one of 40 channels in the
2.4-GHzfrequencyband. It automatically selects a clear channel every time you
receive or place a call on the handset.
COMPANDERPLUSNoise Reduction
This fourth generation of Sanyo’s original noise reduction technology now filters
outmore background noise.
Other features
IMPORTANT: To use all of the features of this telephone, you must subscribe to
eitherthe standardName/NumberCaller ID Serviceor Caller IDwith Call Waiting
Service from your telephone company. To know who is calling while you are on
thephone,you must subscribe to Caller ID with Call Waiting Service.
• CallerID onhandset
• Compatiblewith CallerID and
VisualCall Waiting
• 40name/numberCallerIDlist:
name/number,timeanddate
• 3-linetrilingual display with backlight
LCDscreen
• Lightedhandset keypad
(CLT-U30&CLT-U32only)
• Dialback fromCallerID list
• 3ringer tones
• 10memory call log
• Tone&pulse dialingcompatible
• Callertransfer
(CLT-U12,CLT-U22& CLT-U32only)
INTRODUCTION

5
Modular jack
Youneedan RJ11 typemodular phone jack.If you do not have a modular jack,call
your local phone company to find out how to get one installed.
Checking package contents
Makesure your package includes the items shown here.
GETTING STARTED
Installation tips
Some cordless telephones operate at frequencies that may cause interference
to nearby TVs, microwave ovens, and VCRs. To minimize or prevent such
interference, the base of the cordless telephone should not be placed near or on
top of a TV, microwave oven, or VCR. If such interference continues, move the
cordless telephone farther away from these appliances.
Certain other communications devices may also use the 2.4 GHz frequency for
communication and if not set properly these devices may interfere with each
other and/or your new telephone. If you are concerned with interference, please
refer to the owner’s manual for these devices on how to properly set channels
to avoid interference. Typical devices that may use the 2.4 GHz frequency for
communication include wireless audio/video senders, wireless computer
networks, multi-handset cordless telephone systems, and some long-range
cordless telephone systems.
Base unit Charger
(For CLT-U12,
CLT-U22&
CLT-U32)
2XHandsets
(CLT-U20&
CLT-U30with
onehandset)
2XBatteries
(CLT-U20&
U30withone
battery)
Battery
ordersheet
2 X Belt clips
(CLT-U20&
CLT-U30with
one belt clip)
2XACAdaptors
(CLT-U20&CLT-
U30withone
adaptor)
KU28-9-250D
Wall mount
bracket
Telephone
linecord

6
Batterysetup
GETTING STARTED
1. Removethe battery compartment cover on the handset,insert the battery,
plug the cord intothe jack (inside the compartment) and replace the cover.
2. Set the handset RINGER switchtoON, and place handset inthebase.
Slide down the
battery cover Place the battery
in the slot Plug the wire
into the jack Slide up the
battery cover
Connecting the base unit and charging the handset
1. Plug the AC adaptor into the power DC 9V jack
on the back of the base. Plug the other end
into a wall outlet.
2. Set the base on a desk on tabletop and place
onehandsetinthe base unit.
3. Makesurethatthe CHARGE/INUSELED
illuminates.
Connecting the charger and charging the handset
(For CLT-U12, CLT-U22 , CLT-U32)
1. Plug the AC adaptor into the power DC 9V jack
on the back of the charger. Plug the other end
into a wall outlet.
2. Place anotherhandsetinthe charger and make
surethattheCHARGE LED illuminates.
Note: • Chargeyourhandset at least 12
hoursbeforeplugging into the phone line.
• Charge the handset for 12 continuous hours prior to first use. The
initialbattery charge is important for best performance.
• It is normal for the handset and base to get warm when the
handsetis charging in the base.
Caution: Use only the Sanyo AC adaptor that is supplied with this phone.
Usinganother AC adaptor maydamage the phone.

7
1. Remove the handset from the base and set aside.
2. Align the four slots on the bottom of the base with the four hook-tabs on the
bracket.
3. Insert the hook-tabs into the slots and push up until thebracket snaps
securely into place.
4. Turnthe base over and unplug the AC adaptor and telephonecords. Run the
cordsthroughthe square hole on the wall mount. Plug them back in to the
base.
Note: If you use Pulse (rotary) dial service, See Tone/pulse setting, page
11.
GETTING STARTED
Tone/pulse setting
1. If you have Pulse (rotary) service, you will need to set the dial mode to pulse.
If you have Touch-Tone service, do nothing as your phone has been set to
Tone prior to shipment. If you do not know which type of service you have,
contact your local telephonecompany.
2. To change to Pulse or Tone service, See Tone/pulse setting, page 11.
Telephone line connection
Once the handset battery is fully charged, connect the telephone line cord to the
TEL LINE jackontheback of the base. Plug the other end into a telephone outlet.
Mounting on a wall
Do not attempt towall mount the phone before initial12-hour charging is complete.

8
GETTING STARTED
To register the second handset
(ForCLT-U12,CLT-U22& CLT-U32)
The second handset (charge in the extra charging cradle) must also be registered
to the main base before use.
1. Be sure both handsets are fully charged.
2. Remove the handsetfromthechargingcradle, and place it in the main base.
3. Wait for at least 5 seconds before removing the handset from the main base.
4. After both handsets are registered, it doesn’t matter which handset is placed
inthe main baseor thecharger.
5. The charge/inuseLED lights on themainbase.
Note:
• After a power failure occurs or battery replacement, both handsets will need
to be re-registered. To re-register, follow the same registration process as
above.
• If the handset’s battery becomes very low, the handset must be recharged
for 12 hours and re-registered to the main base unit.
5. Slip the mounting holes over the wall plate posts and slide the unit down
firmlyinto place. (Wall plate not included.)
6. Place the handsetinthebase.
Note: If desired, gather the extra AC adaptor cord and telephone cord
together, fasten with a wire tie, and store inside the wall mounting bracket.
Register handsets to the main base before use
Your cordless phone uses a digital security system to provide protection
against false ringing, unauthorized access and charges to your phone
line. When you place the handset in the main base, the handset will
automatically register to the base.

9
Handset
NAMES AND CONTROLS
1. Beltclip
2. REDIALkey
3. Headsetjack
4. MEM(memory)key
5. CH(channel)/DELkey
6. FLASH/PROG(program)key
7. Charging contacts
8. Incomingcall/inuseLED
9. Earpiece
10. LCDscreen
11. TALK key (also used to end a call)
12. MUTE/FORMATkey
(MUTE/FORMAT/TRANSFERkey)
13. Ringer switch
14. CID/VOL(volume) up/down key
15. Keypad (0-9)
16. *TONE/EXITkey
17. #PAUSEkey
18. Microphone
For CLT-U20 & CLT-U30 For CLT-U12, CLT-U22 & CLT-U32

10
Base Unit
NAMES AND CONTROLS
1. Handsetcradle
2. PAGEkey
3. CHARGE/INUSELED
4. Wallmount
5. CHARGELED
Charger (For U12, U22 & U32)

11
Beforeusingthis telephone, 4 initial settings must be completed on the handset:
Language, Area code (this is required to use Caller ID service from your tele-
phonecompany),Ringer tone, andTone/Pulse setting.
Language setting
1. Makesure the phone is OFF(notin TALK mode).
2. Press FLASH/PROG until “ 1 ENG 2 FRA 3 ESP ”shows on screen.
3. Press CID/VOL or , or the number keys (1 – 3) to select the desired
language.
4. Press FLASH/PROG tostore selection. Youwillheara confirmation tone.
Area code setting
ForproperCaller ID operation, you must program your area code.
1. Makesure the phone is OFF(notin TALK mode).
2. Press FLASH/PROG repeatedlyuntil “AREA CODE - - - ” shows onscreen.
3. Enter your 3-digit area code using the number keys.To changea digit, press
CH/DEL andthenre-enter the number.
4. Press FLASH/PROG tostore selection. Youwillheara confirmation tone.
Ringer tone
1. Makesure the phone is OFF(notin TALK mode).
2. Press FLASH/PROG repeatedly until “RINGER TONE 1” shows on screen.
3. Press CID/VOL or , or press the number keys 1-3 to select the desired
ringertone.
4. Press FLASH/PROG tostore selection. Youwillheara confirmation tone.
Tone/pulse setting
1. Make sure the phone is off (not in TALK mode).
2. Press FLASH/PROG repeatedly until “ 1TONE 2 PULSE ” shows on
screen.
3. Press CID/VOL or , orpress the number keys 1-2 to selectTONE
orPULSE.
4. Press FLASH/PROG tostore selection. Youwillheara confirmation tone.
INITIAL PROGRAMMING

12
Resetting to default
You can reset the phone programming to the initial factory default settings. The
default settings are:
Language English
AreaCode - - -
RingerTone 1
Tone/PulseSetting Tone
1. Makesure the phone is OFF(notin TALK mode).
2. Press FLASH/PROG repeatedly until “DEFAULT 1 NO” shows on screen.
3. Press CID or , or the 1or 2keys to select your choice.
4. Press FLASH/PROG againto confirm. You will hearaconfirmationtone.
INITIAL PROGRAMMING
Receiving a call
Whenreceivingan incoming call, the LED on the handset flashes, and the handset
will show caller information. *
* Note: A subscription is required from your local phone company to receive
Caller ID information on your phone. See Caller ID Features, page 16.
1. Press TALK to answer the call.
Note: If handset is in the base cradle, remove it from base before pressing
the TALK key. Either handset 1 or handset 2 can answer the call at once.
(forCLT-U12,CLT-U22,andCLT-U32)
2. Press TALK to end your call.
Note: If you replace the handset to the base cradle or charger cradle (for
CLT-U12,CLT-U22,andCLT-U32), thehandsetautomatically hangsup.
BASICS

13
BASICS
Making a call
1. PressTALK.
Note: If handset is in the base cradle, remove it from base before pressing
theTALK key.
2. Dial the phone number. The screen shows the number as you enter it.
3. Press TALK to end your call.
Volume adjustment
The VOLUME keyadjuststhe volume level of the earpiece. There are 4 volume
levels.
1. Makesurethe phone is inTALK mode.
2. Press the CID/VOL or key on the handset.
Transfer a call (CLT-U12, CLT-U22, and CLT-U32 only)
The current conversation can be transferred to another handset. Only one
handset can talk with an outside caller at a time. The second handset cannot
listento the conversation or make an outgoing call while the other handset isin
use.
1. During acall,press andhold the MUTE/FORMAT/TRANS key,until
“TRANSFERRING”showson the screenand both handsetsbeep.
Note: To cancel the transfer and return to the caller, press TALK key on the
handset.
2. Press TALK on the other handset to get the call.
Note: During call transfer, if there is no further action within 2 minutes on both
handsets, the call will end.
Ringer switch
The RINGER switchmustbe on for the handset to ring during incomingcalls.
Channel No. Call Timer Volume Level
Telephone Number

14
BASICS
Pre-dialing (up to 32 digits)
1. Makesure the phone is OFF(notin TALK mode).
2. Enter the telephone number.The number is displayed as youenterit.
3. PressTALK.
Note: Pressing*TONE will exitpre-dialing.
Changing the pre-dial number
1. Makesure the phone is OFF.
2. Enterthetelephone number.
3. Press CH/DEL todelete digits one by one.
4. Re-enterthenumber.
Redialing
1. Makesure the phone is OFF.
2. PressTALK.
3. Press REDIAL to redial thelastnumber (up to 32 digits).
Fast redialing
1. Press TALK (not inTALKmode).
2. Enter the telephonenumberyouwantto dial.
3. If the line is busy, press REDIAL. The phone will drop the line for two
secondsandredial again.
FLASH key
UsetheFLASH/PROG keytoactivate custom calling services such as Call
Waiting.
Tip: Do not use TALK toactivate custom calling services such asCallWaiting,
or you will hang up the phone.
CH (Channel)/DEL key
Whiletalking,you might need to manually change the channel to get rid of static.
Press the CH/DEL key to switch to a clear channel.

15
BASICS
* TONE key
This feature enables Pulse service phone users to access touch-tone services
offered by banks, credit card companies, etc.
1. Callthebank’s informationline.
2. Press *TONE after your call is answered.
3. Follow the voice instructions to complete your transaction.
4. Hang up when finished. The phone returns to Pulse service.
Handset locator (Paging function)
Thisfeaturehelpstolocateamisplacedhandset.
1. Press PAGE on the base, the screen shows “PAGING”. The handsetbeeps
continuously for about 2 minutes or until you press any key on the handset.
2. To stop the paging, do one of the following:
• Press PAGE on the base.
• Press TALK, this will entertalk mode.
• Press any button on the handset.
Note: You can still page the handset with the ringer off.
MUTEkey
To have a private, off-lineconversation, use the MUTE feature.The caller on the
other end of the line cannot hear you, but you can still hear them.
Tomutethe microphone:
1. Press MUTE/FORMAT inTALKmode. The screen shows “MUTE”.
2. Press MUTE/FORMAT again to returntoyourphoneconversation.
Low battery warning
1. If the battery is low and the phone is in TALK mode, a warning tone
consisting of 2 short beeps will sound from the handset and the LED will
flash every 15 seconds. “LOWBATTERY” shows on screen.
2. If the battery is low andthe phone is in STANDBYmode,theLEDonhandset
will flash every 15 seconds, and “LOWBATTERY” shows on screen.

16
Thisphonereceivesand displays incoming call information transmitted by your
localphone company,providedyou subscribe to VoiceMail, Caller ID, and/or Call
Waitingservices. This information can include the phone numberand/orthe name,
date and time. The phone can store up to 40 calls for later review.
Caller ID with Call Waiting
When you subscribeto Caller ID withCall Waiting (VisualCall Waiting TM) service
from your phone company, you are able to see who is calling when you hear the
CallWaitingbeep. Caller identification information appears on screen after you
hearthebeep.
Press the FLASH/PROG keyto put the current call on holdso that you can
answer the incoming call. The following information will display.
1. Time
2. Date
3. Number of calls received
4. Phonenumber
5. Name
To return to the first call, press FLASH/PROG again.
IMPORTANT: To use these featuresyoumustsubscribetoCallerIDwithCall
WaitingService.
CALLER ID FEATURES
BASICS
Voice mail indicator
When you subscribe to a voice mail service offered by your phone company, the
phonealerts you when voicemailhas been received. MESSAGE WAITING
appears on screen for 60 seconds when a voice mail is received. The LED on the
base flashes to indicate there is a voice mail waiting. After the voice mail has
beenreviewed, MSG WAITING OFF appears on screen, andtheindicator stops
flashing.
Note: The indicator does not work with your answering machine. The phone will
only work with an FSK type of VMWI System. It will not work with the Stutter Dial
Tone typeofVMWI System.

17
Caller ID list
Theincoming caller information transmitted from the phonecompanyis received
by your phone between the first and second ring and stored in the Caller ID list. If
you answer a call before the second ring the caller information may not be stored.
WhentheCaller ID list memory is full, a new call automatically replaces theoldest
call in memory. NEW appearson screen forcalls received that have not been
reviewed.
Note: Checkwithyourlocalphonecompanyregardingnameservice
availability.
Reviewing Caller ID list
As calls are received and stored, the Caller ID list is updated to let you know how
manycallshavebeen received.
1. Press CID/VOL toscroll through the Caller ID list from the most recent to
theoldest.
2. Press CID/VOL toscroll through the Caller ID list from the oldest to the
mostrecent.
3. Press TONE/EXIT toreturnto StandbyModeanytime.
Note: 1. If area code isprogrammed (for example 416), the whole number
(416-2225555) including area code will be shown on the screen during a call
coming from this area. When reviewed later, the area code will not be shown
(i.e. LCDshows 2225555 only). 2. You may also transfer Caller IDentries to
thedirectory.
See Storing caller ID entries in directory below.
Format Caller ID numbers
The MUTE/FORMAT key lets you select how manydigits of the number are
displayed.
• Press MUTE/FORMAT oncetoaddthe area code (Note:The
programmedarea code must matchtheCaller ID area code).
• Press MUTE/FORMAT againtoadd1 plus the areacode.
• Press MUTE/FORMAT a third timeto go back to the7-digitnumber.
CALLER ID FEATURES

18
CALLER ID FEATURES
Storing Caller ID entries in the directory
Beforestoring a caller IDnumber,make sure the number appearsin proper digits
for your dialing area. If not, change it using the MUTE/FORMAT key. For example,
if the Caller IDnumber appears 1-416-222-5555 butit is not a long distance
number, press MUTE/FORMAT until it shows 416-222-5555 (without 1).
Note: If a specific memory entry is longer than 15 digits, the last 15 digits
show on the screen.
1. Use the CID/VOL or key to select desired Caller IDentry.
2. Press MEM key, “MEMO # --” shows on the top right corner of screen.
3. Select the desired memory location by pressing the number keys (0-9).
4. Ifthememory location already containsnameand number information,
“REPLACE MEMO?” will show on screen. Press MEM again if you want to
replace the informationand save. Press *TONE/EXIT buttontoreturn unit to
standby mode without saving.
5. If the selected memory location is empty, you will hear a confirmation tone
when the new memory record is saved.
Note: IftheselectedCIDrecordcontainsnon-digitcharacters,orthenumber
is more than 24 digits, the unit will not store the record.
Dialing a Caller ID number
1. Makesure the phone is OFF(notin TALK mode).
2. Use CID or toscroll to the desire Caller IDentry.
3. Use MUTE/FORMAT key to display thephonenumber in proper
digits if necessary.
4. Press TALK. The number dials automatically.
Deleting entries from the Caller list
Use CH/DEL to erase the entry currently shown on screen or all entries.
Deleting the displayed entry
1. Makesure the phone is OFF(notin TALK mode).
2. Use the CID/VOL or keys to find the entry you want to delete.
3. While the entryisdisplayed, press CH/DEL. “DELETE?”shows onscreen.
4. Press CH/DEL againto delete theentry. Confirmationtonesounds andLCD
shows“DELETED”for2 seconds.

19
CALLER ID FEATURES
Deleting all entries
1. Makesure the phone is OFF(notin TALK mode).
2. Use the CID/VOL or keys to display any entry.
3. Pressandhold CH/DEL, until “DELETE ALL?” shows on screen.
4. Press CH/DEL againtoconfirm.“NO CALLS” shows on screen.
You can store up to 10 names (up to 15 characters) and numbers (up to 24 digits)
in the directory for quick dialing. If a number exceeds 24 digits, you can program
itinparts,andthen chain dialthenumber.
Store a number in the directory
To programa number tomemory:
1. Makesure the phone is OFF(notin TALK Mode).
2. Press MEM keytostartthe Memory Programming Mode. “MEMO # --” shows
on the screen.
3. Select the desired memory location (0 – 9) or use the CID/VOL or
keystofind an empty memory location.
4. PresstheMEM keyagain. The screen shows “ENTER NAME”.
5. Use the digit keys to enter the name. The cursor advances 1 space after
each key press. Within 1 second, you can press the same key again to
selectanothercharacter. If you makea mistake,press CH/DEL to delete
previous characters one by one.
Key Press 1 2 3 4 5 6 7 8 9
1st – 5th press A D G J M P T W
2nd – 6th press –BEHKNQUX
3rd – 7th press * C F I L O R V Y
4th – 8th press ! ( ) $ ’ ; S ? Z
6. Press MEM again tosavethe name. “ENTER TEL NUMBR”showson screen.
DIRECTORY

20
7. Use the digit keys to enterthedesiredtelephone number.If you makea
mistake,pressCH/DEL todeleteprevious digits one by one, then enter the
correct digits. If you wish to add a pause, press PAUSE two times at the
desired location. Be sure to press it twice, or you will enter a # (number sign)
andnot a pause. Each pause counts as 1 digit in the dialing sequence. Or
you can storeredial number in thedirectory by pressing REDIAL (Note:If the
redialnumber is longer than24 digits, it cannotbe stored into the memory.).
8. Press MEM again to store the number to memory. If you are replacing a
number, “REPLACE MEMO?” shows onscreen. PressMEM againto confirm,
orpress*TONE/EXIT toreturntostandby mode.
To view your directory, press MEM and use CID/VOL or or the number
(0-9) to scroll.
Replacing a directory entry with a Caller ID entry
Use the same procedure as for storing Caller ID entries in the directory
Changing a stored number
Use the same procedure as for storing a number in the directory
Making calls from the directory
1. Makesure the phone is ONby pressing TALK.
2. Press MEM.
3. Press thenumber (0 - 9) for the desired memory location. The number dials
automatically.
Or:
1. Makesure the phone is OFF(notin TALK mode).
2. Press MEM.
3. Press the number (0-9) or use CID/VOL or to select the desired
number.
4. Press TALK, the number will bedialedautomatically.
Reviewing and deleting directory contents
1. Makesure the phone is OFF(notin TALK mode).
2. Press MEM.
3. Use CID/VOL or toscroll through the directory until the desired name/
DIRECTORY
Other manuals for CLT-U12
1
This manual suits for next models
4
Table of contents
Other Sanyo Cordless Telephone manuals

Sanyo
Sanyo CLT-5880AUS User manual

Sanyo
Sanyo CLT-D6620(WH) User manual

Sanyo
Sanyo CLA-1380AUS User manual

Sanyo
Sanyo CLT-186X User manual

Sanyo
Sanyo CAS-A900 User manual

Sanyo
Sanyo CLT-J30 User manual

Sanyo
Sanyo CLT-2419 User manual

Sanyo
Sanyo CLA-1380 User manual

Sanyo
Sanyo CLT-2425 User manual

Sanyo
Sanyo CLT-593 User manual

Sanyo
Sanyo LC-2430 User manual

Sanyo
Sanyo CLT-2402 User manual

Sanyo
Sanyo CLT-5810 User manual

Sanyo
Sanyo CLT-138X User manual

Sanyo
Sanyo CLT-D6220 User manual

Sanyo
Sanyo CLT-E22 User manual

Sanyo
Sanyo CLT-J70 User manual

Sanyo
Sanyo CLT-W10 User manual

Sanyo
Sanyo CLT-2402 User manual

Sanyo
Sanyo CLT-2415 User manual