Sanyo CLT-136 User manual

INSTRUCTION MANUAL
Cordless Telephone h
(3
elbo
000
000
000
000
CLT-136
Please read these instructions before use.
If you have aproblem with your cordless telephone, please see
“TROUBLESHOOTING” on the back cover before calling for
service.
CAUTION
THIS PRODUCT IS INTENDED FOR USE IN NEW ZEALAND ONLY.
SALE OR USE IN OTHER COUNTRIES MAY VIOLATE LOCAL LAWS.
IMPORTANT!
HANDSET BATTERY PACK
Charge the handset battery pack for afull 12 hours before using your
cordless phone for the first time.
(See page 6.)

INTRODUCTION ................................................................................... 2
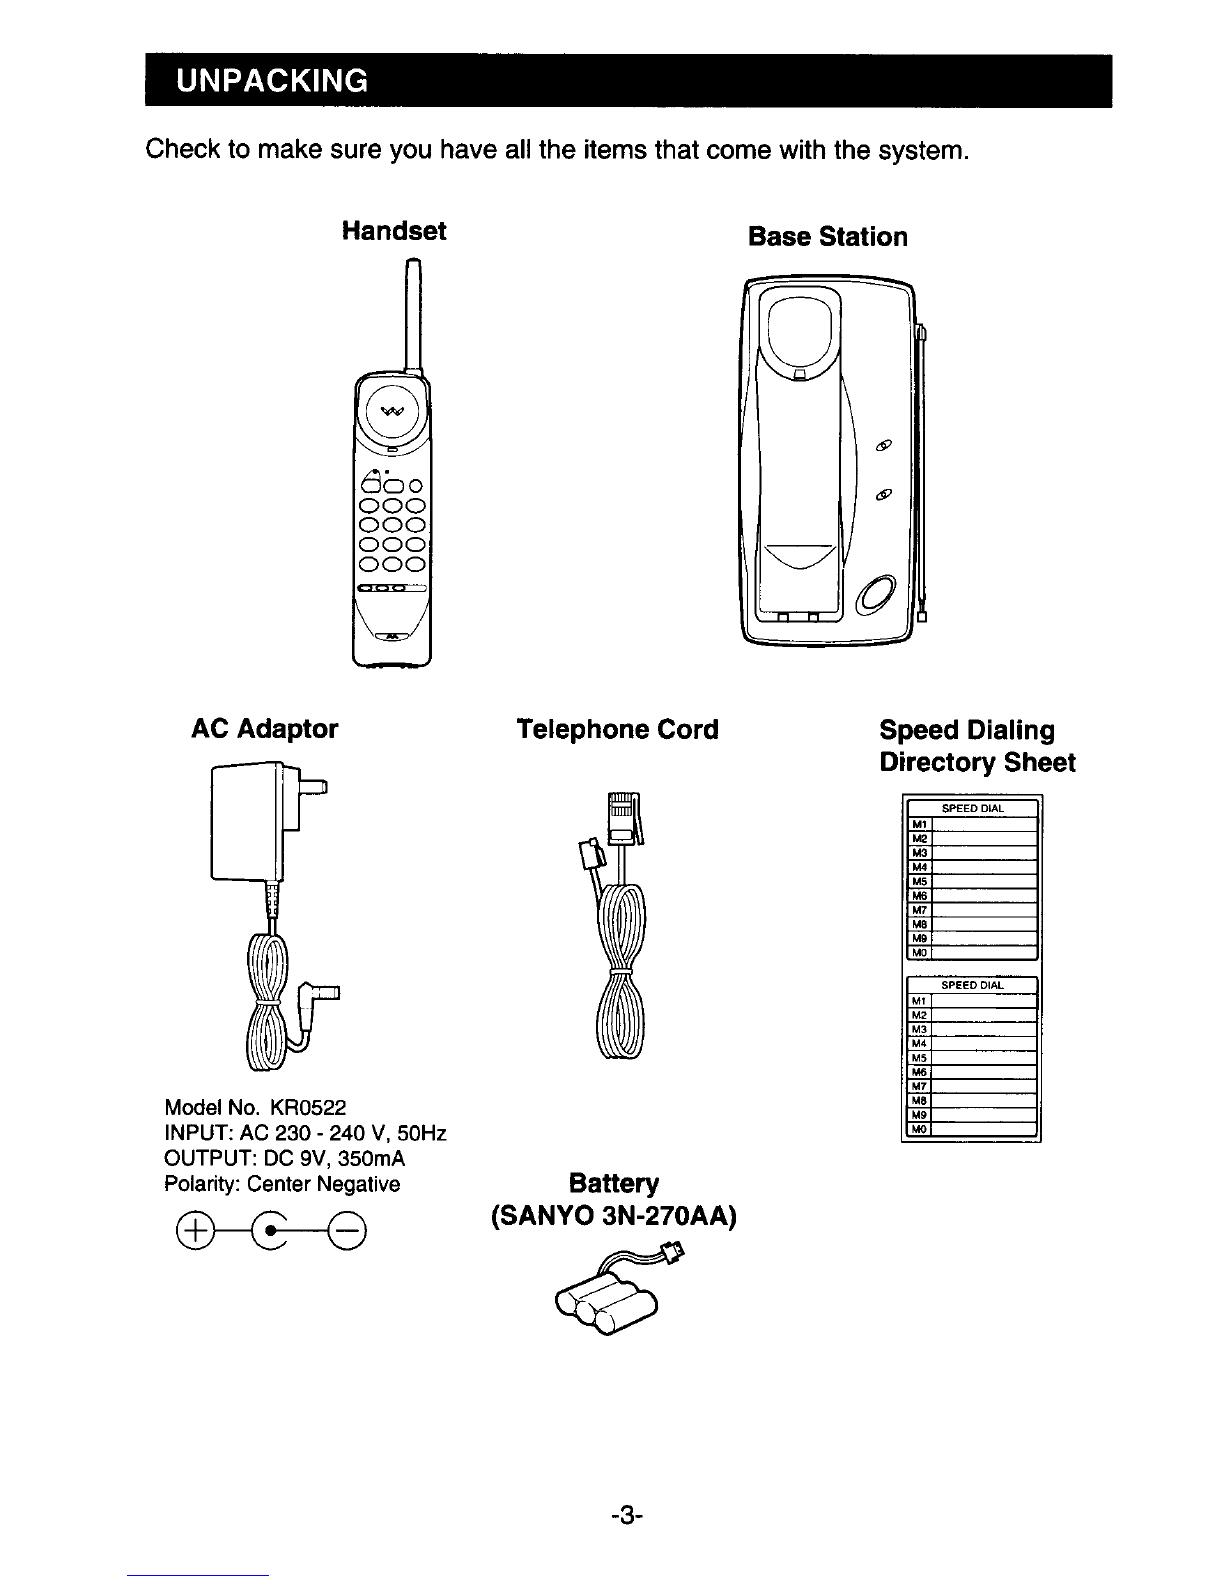
UNPACKING ........................................................................................ 3
TIPS FOR BEST PERFORMANCE
BASE STATION LOCATION ............................................................4
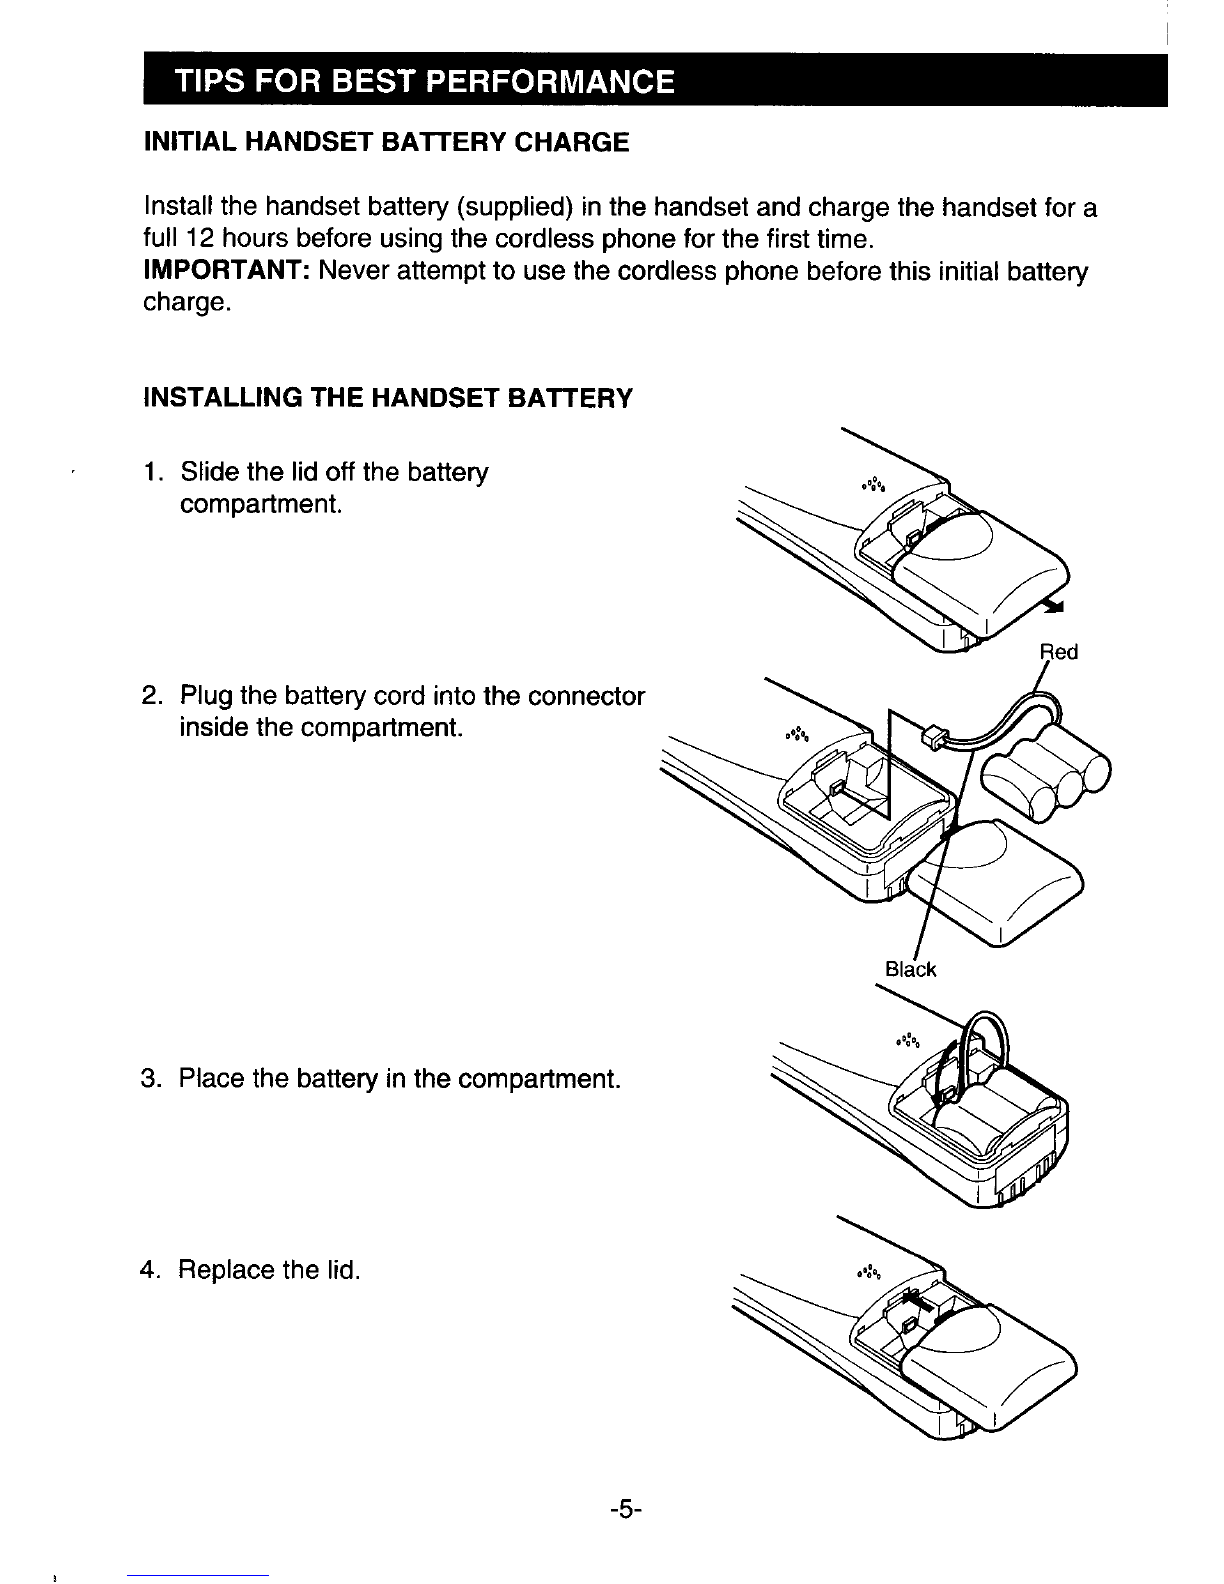
INITIAL HANDSET BATTERY CHARGE .........................................5
INSTALLING THE HANDSET BATTERY .........................................5
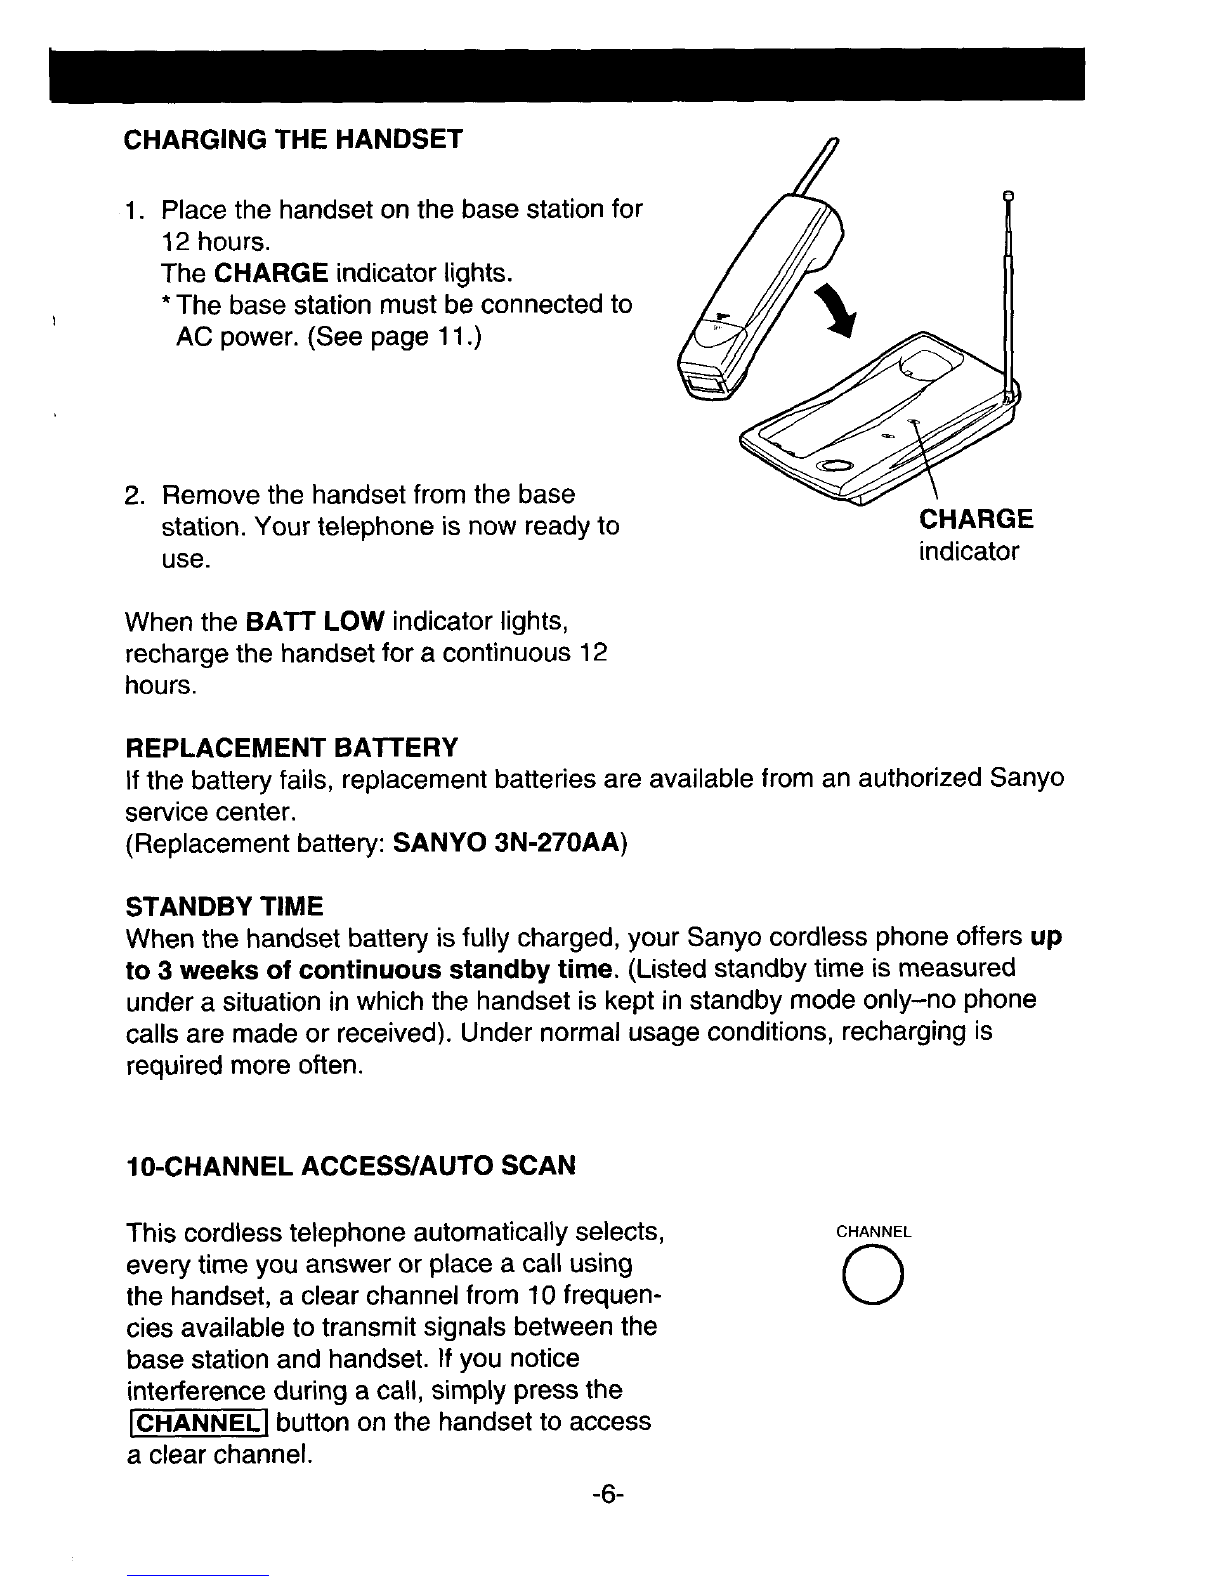
CHARGING THE HANDSET ............................................................6
1O-CHANNEL ACCESS/AUTO SCAN .............................................7
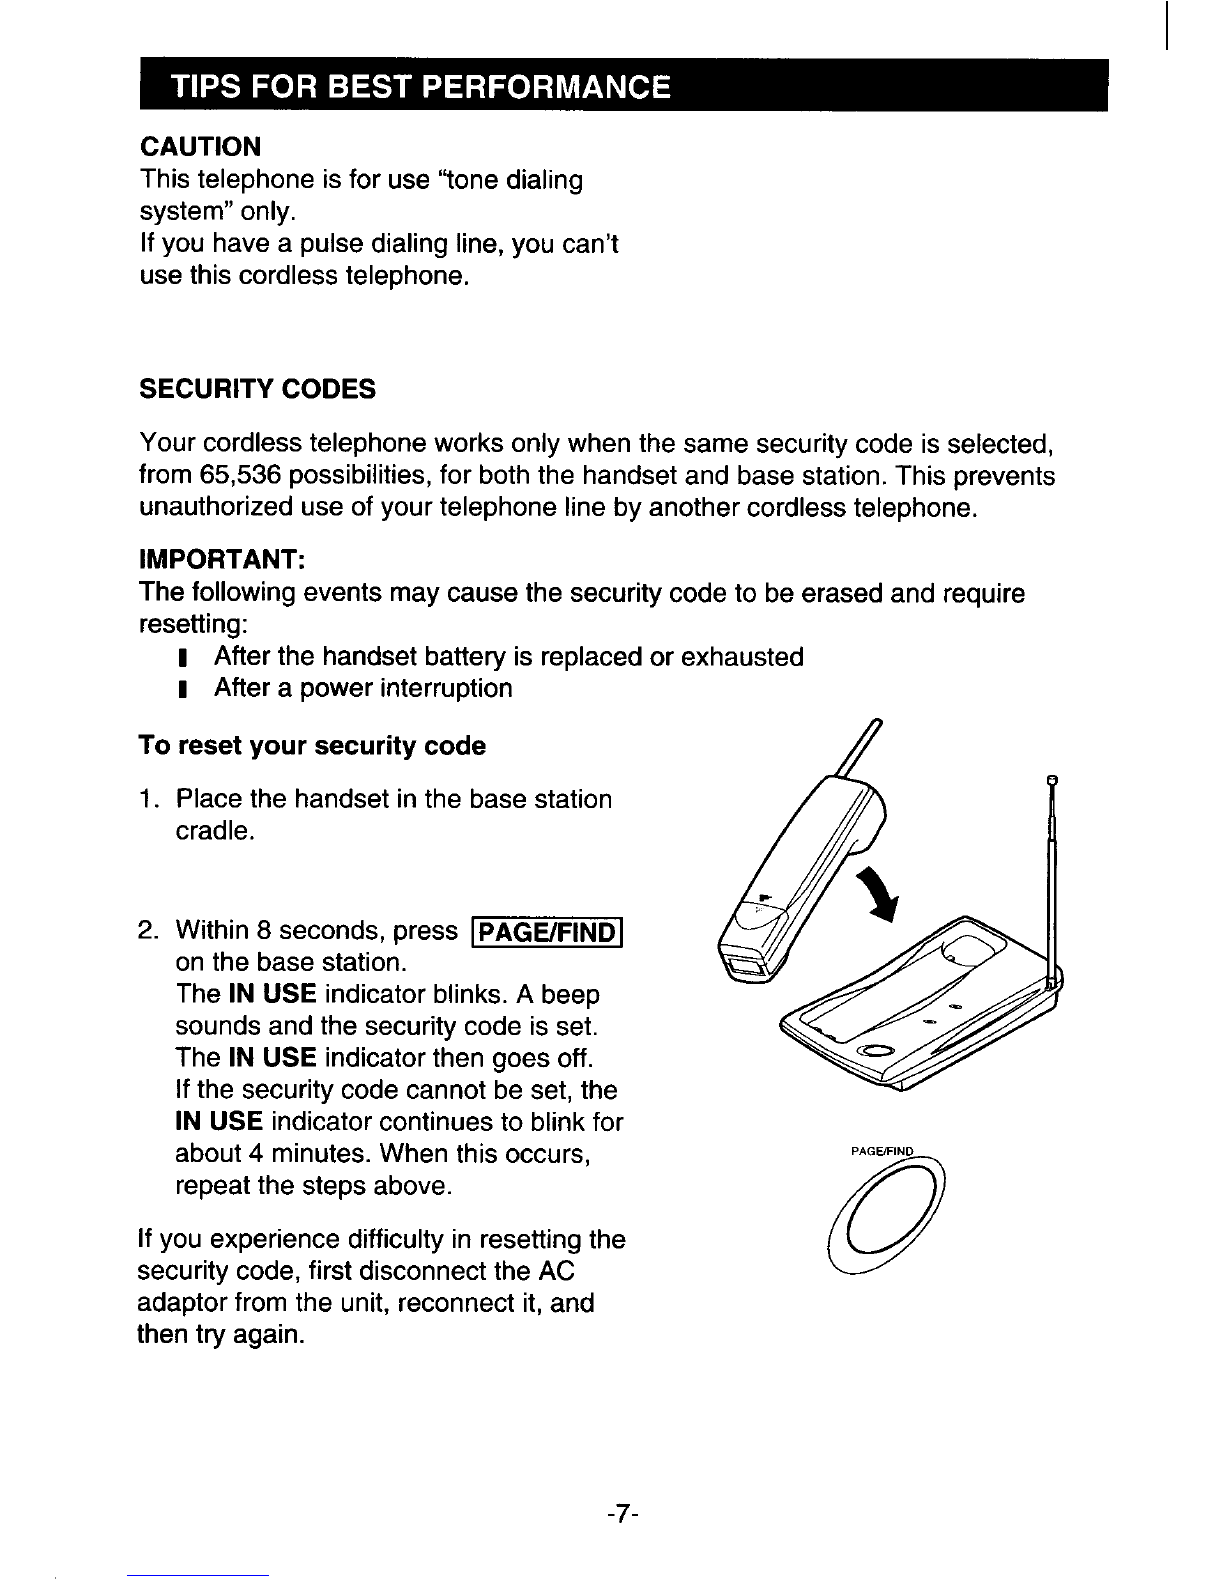
SECURITY CODES ......................................................................... 7
FEATURE CONTROLS
HANDsET ........................................................................................8
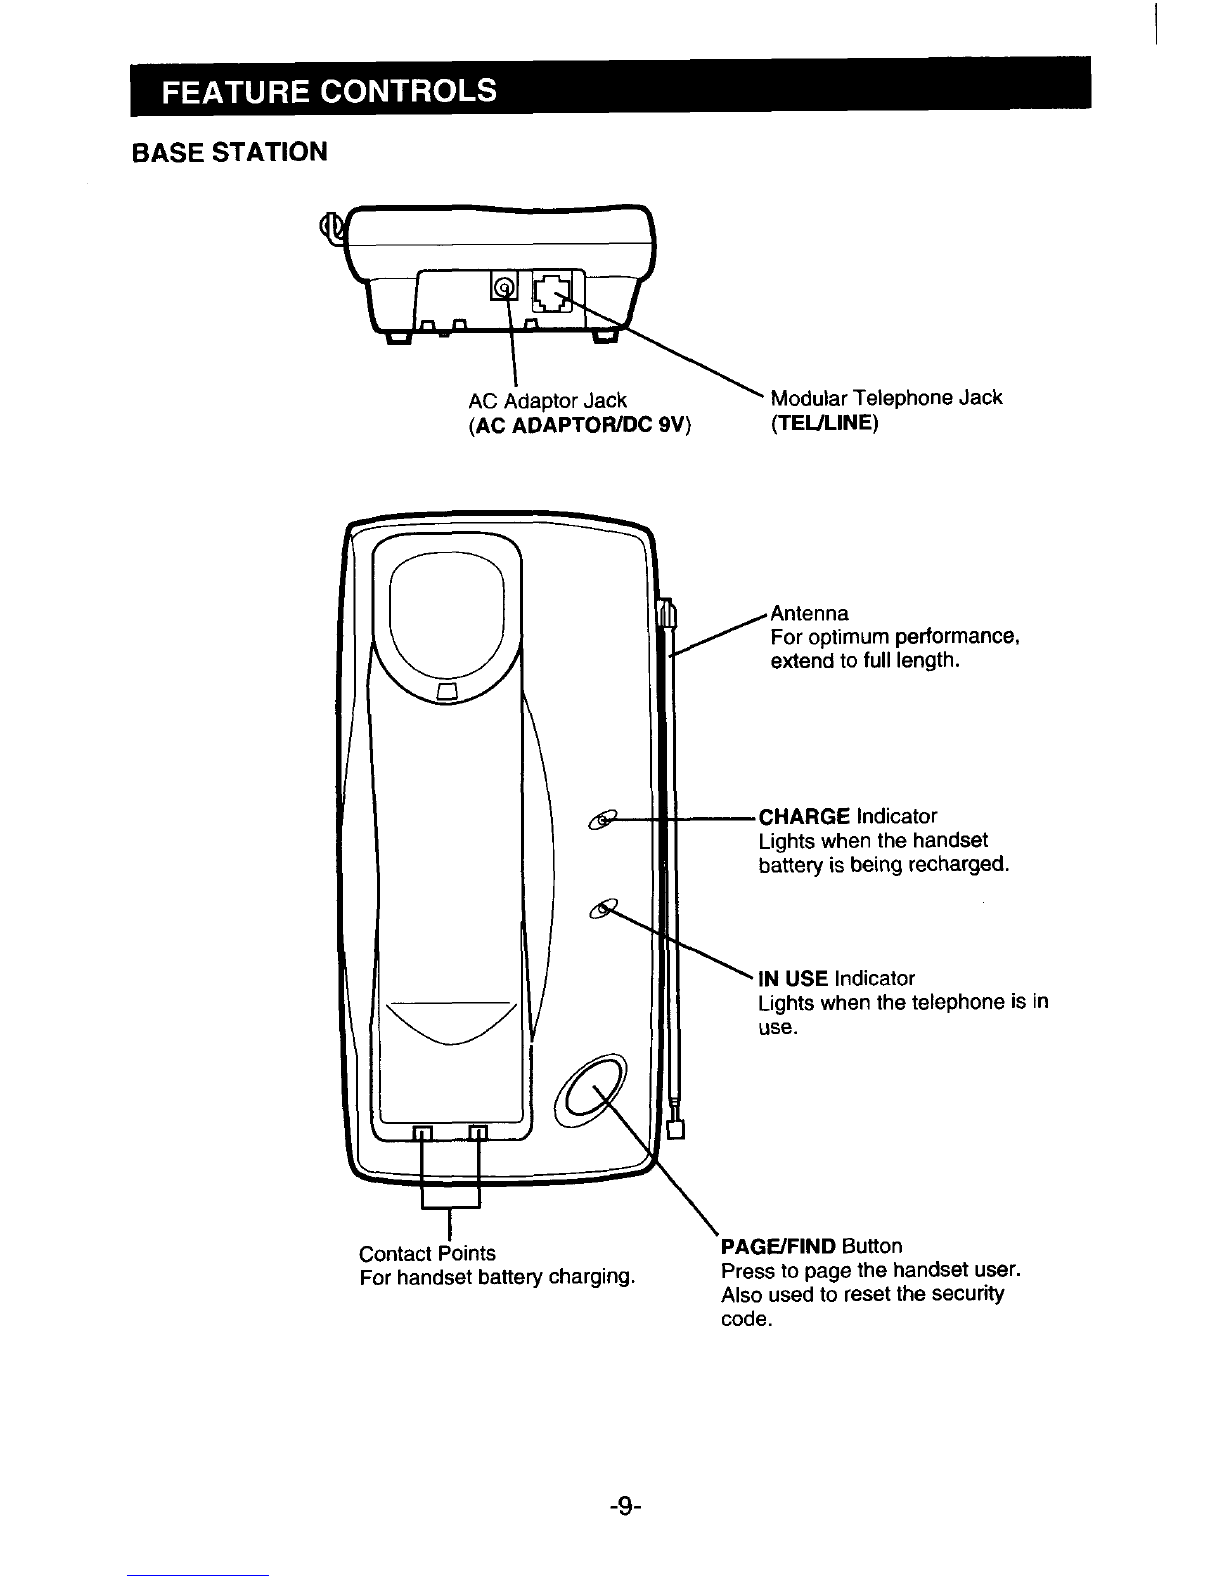
BASE STATION ............................................................................... 9
SET-UP ................................................................................................. 10
BASIC OPERATION
ANSWERING ACALL ...................................................................... 11
PLACING ACALL ............................................................................ 12
ADVANCED FEATURES
AUTODIAL ....................................................................................... 13-14
REDIAL ............................................................................................ 14
TEMPORARY TOUCH-TONE ACCESS .......................................... 14
FLASH BUTTON .............................................................................. 15
PAGE/FIND BUTTON ...................................................................... 15
MAINTENANCE
WALL MOUNTING ........................................................................... 16
RECHARGEABLE HANDSET BATTERY ........................................16-17
MALFUNCTIONS .................................................................................. 18
TROUBLESHOOTING .......................................................................... Back cover
-1-

You have just purchased one of the finest consumer electronics in the
world. To ensure that you get maximum use of all features of this Sanyo
product, please read this booklet carefully before you attempt to use it.
Main Features:
ISUPER COMPANDER noise reduction
I1O-channel auto scan
I65,536 digital security codes
I1O-number dialing memory
I Any key answer
1 3 weeks standby
IHearing aid compatible
IDesktop or wall mount
Notice:
This cordless telephone uses radio communication between the handset
and the base station and may not ensure privacy of communication.
Other devices, including other cordless telephones, may interfere with the
operation of this cordless telephone or cause noise during operation.
Cordless telephones must not cause interference to any licensed radio
service.
-2-

Check to make sure you have all the items that come with the system.
Handset
B
@
tho
000
000
000
000
AC Adaptor
Model No. KR0522
INPUT: AC 230-240 V, 50Hz
OUTPUT: DC 9V, 350mA
Polarity: Center Negative
Telephone Cord
Base Station
@~
o
@
@
v
Q
Battery
(SANYO 3N-270AA)
Speed Dialing
Directory Sheet
E
SPEEDDIAL
Ml
M2
w
M
M5
)46
M7
M8
MS
MO
El
spsw DIAL
M,
M2
M3
M4
M5
M6
M7
M8
M9
w
-3-

BASE STATION LOCATION
For maximum operating range, extend the
base station antenna to full length. In most
cases, the best location for the base station
is at the highest point in the house. Avoid
places near electrical appliances and metal
structures such as arefrigerator and filing
cabinets that can reduce operating range
and performance.
Caution
The cordless telephone operates at a
frequency that may cause interference to
nearby TVs and VCRs; the base station
should not be placed near or on top of aTV
or VCR; and, if interference is experienced,
moving the cordless telephone farther away
from the TV or VCR will often reduce or
eliminate the interference.
-4-

INITIAL HANDSET BAITERY CHARGE
Install the handset battery (supplied) in the handset and charge the handset for a
full 12 hours before using the cordless phone for the first time.
IMPORTANT: Never attempt to use the cordless phone before this initial battery
charge.
INSTALLING THE HANDSET BAITERY
1. Slide the lid off the battery
compartment.
2. Plug the battery cord into the connector
inside the compartment.
3. Place the battery in the compartment.
4. Replace the lid.
Bla’ck
-5-

CHARGING THE HANDSET
1. Place the handset on the base station for
12 hours.
The CHARGE indicator lights.
*The base station must be connected to
AC power. (See page 11.)
2. Remove the handset from the base
station. Your telephone is now ready to
use.
CHARGE
indicator
When the BATT LOW indicator lights,
recharge the handset for acontinuous 12
hours.
REPLACEMENT BATTERY
If the battery fails, replacement batteries are available from an authorized Sanyo
service center.
(Replacement battery: SANYO 3N-270AA)
STANDBY TIME
When the handset battery is fully charged, your Sanyo cordless phone offers up
to 3weeks of continuous standby time. (Listed standby time is measured
under asituation in which the handset is kept in standby mode only-no phone
calls are made or received). Under normal usage conditions, recharging is
required more often.
10-CHANNEL ACCESS/AUTO SCAN
This cordless telephone automatically selects,
every time you answer or place acall using
the handset, aclear channel from 10 frequen-
cies available to transmit signals between the
base station and handset. If you notice
interference during acall, simply press the
~button on the handset to access
aclear channel.
-6-
CHANNEL
0

CAUTION
This telephone is for use “tone dialing
system” only.
If you have apulse dialing line, you can’t
use this cordless telephone.
SECURITY CODES
Your cordless telephone works only when the same security code is selected,
from 65,536 possibilities, for both the handset and base station. This prevents
unauthorized use of your telephone line by another cordless telephone.
IMPORTANT:
The following events may cause the security code to be erased and require
resetting:
IAfter the handset battery is replaced or exhausted
IAfter apower interruption
To reset your security code /
1.
2.
Place the handset in the base station
cradle.
Within 8seconds, press ~
on the base station.
The IN USE indicator blinks. Abeep
sounds and the security code is set.
The IN USE indicator then goes off.
If the security code cannot be set, the
IN USE indicator continues to blink for
about 4minutes. When this occurs, PAGE/FIND
repeat the steps above.
If you experience difficulty in resetting the
security code, first disconnect the AC Q
adaptor from the unit, reconnect it, and
then try again.
-7-

HANDSET
Earpiece
\
TALK Indicator
Lights when the handset is in
talk mode.
\
TALK Button \
Press to answer or place acall.
\
FLASH Button
Works like atemporary hook
switch.
Also used to access special
services offered by your \
telephone company. (call
waiting, for example).
Battery Compartment /
v
Antenna
BAIT LOW Indicator
Lights when the battery needs
recharging. (If the battery is
completely exhausted, the
indicator does not light.)
END Button
Press to end acall.
CHANNEL Button
Press to change to aclear
channel if you hear noise or
interference.
l“
---------.
>
00~ DialingButtons
>00: Use just like the buttons on a
standard Touch-Tone phone.
}.
200; REDIAIJP (pause) Button
2-Q-O; dialed
Press to redial the last number
3Also used to inserf apause
between two digits.
\MEMORY Button
Press to store phone numbers
in memory or to recall astored
number.
Microphone
Contact Points
For handset battery
charging.
-8-

BASE STATION
w
‘Modular Telephone Jack
AC Adaptor Jack
(AC ADAPTOR/DC 9V) (TEL/LINE)
m
-r
Contact Points
For handset battery charging.
=~$%urnperforrnance,
extend to full length.
—CHARGE Indicator
Lights when the handset
battery is being recharged.
\IN USE Indicator
Lights when the telephone is in
use.
\‘PAGE/FIND Button
Press to page the handset user.
Also used to reset the security
code.
-9-

1.
2.
3.
4.
To
Inserl the small plug of the AC adaptor cord into the DC 9V jack on the back of
the base station.
Secure the AC adaptor cord under the hook located below the jack, as shown.
Plug the AC adaptor into an AC wall outlet.
Plug one end of the telephone cord into atelephone wall jack, and the other
into the TEL LINE jack on the back of the base station.
t
NOTE:
USE ONLY SANYO AC
Q92103).
Telephone cord -TEL LINE jack
ADAPTOR MODEL NO. KR0522 (APPROVAL NO.
-1o-

ANSWERING ACALL
When acall comes in, the TALK indicator k
flashes. (’-’l
TALK
1.
2.
3.
NOTE:
I
Press ~[. o
TALK
or
Lift the handset from the base station.
ANY KEY ANSWER
You can also answer acall by pressing
any key except ~.
Talk.
Press ~to hang up. o
END
If the handset is too far awa from the
d
base station, pressing END may not
hang up a call. If this happens, come
closer to the base station and then mess
Em.
REMEMBER:
Your handset battery needs recharging when you hear a beep every 3seconds
during phone use. (The BATT LOW indicator also lights.)
-11-

PLACING ACALL
1. Press ~J. o
TALK
or
Lift the handset from
then press ~. the base station,
The TALK indicator lights.
(3
●
TALK
2. Dial the number you want to call. O-G-G
If you make an error in dialing the
number, press ~and then ~] Q@a
to get anew dial tone. B@@
‘e:o:o --
3. Press ~to hang up. o
END
REMEMBER:
Your handset battery needs recharging when you hear a beep every 3seconds
during phone use. (The BAIT LOW indicator also lights.)
-12-

AUTODIAL
The handset can store up to 10 phone numbers in its memory. You can dial a
stored number simply by pressing the ~button and the assigned 1-digit
memory location number.
To store numbers: b~+
1. Press ~[.
The TALK indicator flashes.
MEMORY
6TALK
2. Dial the phone number you want to
store using the handset keypad. o-@-Gn
@a@
3. Press ~1.
4. Press anumber button (~-~) to
assign alocation number to the phone
number.
Abeep sounds and the TALK indicator
goes off. The phone number is now
stored in the memory.
MEMORY
Cxmi
G?(M3
:o@@
‘@@o
----1
5. Write the stored number on the number
index sheet (included).
6. Repeat steps 1-5 to store other
numbers or to change previously stored
numbers.
To insert apause:
Stored phone numbers can include a2-second pause between two digits (after 1
to get an outside line in aPBX system, for example). Press 1~[ after the
first digit.
Astored phone number can have up to 16 digits. (A pause counts as one digit.)
-13-

To dial anumber stored in the memory:
1. Press ~[. o
TALK
2. Press ~].
13. Press the memory location number
(m-~) using the handset keypad,
The autodial memory maybe erased if the
handset battery is replaced or exhausted.
MEMORY
REDIAL
You can automatically redial the last number called using the [~[ button
on the handset. Anumber of up to 32 digits can be redialed.REDIAUP
NOTE: To redial after hearing abusy signal, press ~, then -[ and then
~
-14-

FLASH BUTTON
You can use the _button to access special services offered by your phone
company (call waiting and PBX, for example).
If you subscribe to call waiting...
1.
2.
3.
If acall comes in when you are already
on the phone, a beep sounds.
Press -{. FLASH
The first call is placed on hold, and you
can talk to the second caller.
Press -] again.
The second caller is placed on
you can talk to the first caller. hold, and FLASH
NOTE: The -button may also be used to get anew dial tone without
pressing ~or replacing the handset in the base station cradle. However, if
your telephone line has special service features (like call waiting), the -[
button may not operate in this way.
PAGE/FIND BUITON
You can page the handset user from the base station. The paging feature can
also be used as ahandset locator.
1.
2.
PAGE/F!ND
Press the ~button on the
base station.
The handset produces an audible tone. Q
-15-

WALL MOUNTING
To mount the base station on a wall
1.
2.
Connect the cord.
Mount the base station on the wall.
To socket
owall
RECHARGEABLE HANDSET BATTERY
Recharge handset in the base station cradle for acontinuous 12 hours when the
BAIT LOW indicator lights. (See page 6).
Repeated recharging for shorter periods may reduce battery capacity.
Battery Refresh
If your battery seems to need recharging more often than usual, it may have lost
part of its charging capacity because of premature recharging. To return the
battery to its full capacity, try the battery refresh procedure.
IDischarge the battery by leaving the handset in talk mode until the BATT LOW
indicator lights. (First, disconnect base station from phone line.)
1Charge the handset for 12 hours.
IRepeat this procedure once more.
If performance still doesn’t improve, it’s time to replace the battery.
-16-

REMEMBER: Reset security code after abattery refresh (page 8).
REMEMBER:
Your handset battery needs recharging when you hear a beep every 3seconds
during phone use. (The BAIT LOW indicator also lights.)
Cleaning the contact points
To ensure that the handset battery charges properly, clean the contact points on
the handset and the base station once amonth with asoft cloth.
Handset Base station
I
eoo
000
000
000
000
I
Contact points Contact points
CAUTION
During alightning storm, or when the cordless telephone will not be in use for an
extended period, you should disconnect it from the telephone line, unplug it from
the AC outlet and remove batteries.
-17-

Although it is unlikely that the base
station will malfunction, if it does, dis-
connect it from the telephone line until
proper repairs are completed.
The cordless telephone uses radio fre-
quencies for transmission and recep-
tion, and is subject to certain operating
conditions. The following conditions are
normal and could affect the operation of
your system.
1. NOISE
Electrical pulse noise is present in most
homes at one time or another. This is
most intense during electrical storms.
Certain kinds of electrical equipment
such as light dimmers, fluorescent bulbs,
motors, fans, etc., also generate these
noise pulses. Because radio frequency
transmissions are susceptible to these
pulses, on occasion you may hear them
in your handset. Generally they are a
minor annoyance and should not be
interpreted as adefect in your system.
2. RANGE
Because radio frequencies are used,
the location of the base station can
affect the operation range. Try several
locations in your home or business and
pick the one that gives you the clearest
signal to the handset. Turning around
while holding the handset may help you
find the best position.
3. INTERFERENCE
Electronic circuits activate arelay to
connect the cordless telephone to your
telephone line. These electronic circuits
operate in the radio frequency spec-
trum. While several protection circuits
are used to prevent unwanted signals,
there may be periods when these un-
wanted signals enter the base station.
You may hear clicks or hear the relay
activate while you are not using the
cordless handset. Ifthis starts occurring
frequently, it can be minimized or elimi-
nated by lowering the height of your
base station antenna, or relocating the
base station. Check for interference be-
fore selecting your final base station
location by plugging it in and monitoring
it for clicks.
Two cordless systems should not be
operated too close to each other be-
cause of interference. This interference
can be reduced by lowering your base
station antenna, thereby reducing its
range.
-18-

Most cordless phone problems can be corrected quickly and easily —without
service. If you experience difficulties, try the suggestions below before taking your
phone in for service.
If the phone doesn’t work at all
ISecurity code may have been cancelled. To reset, see page 7.
IAC adaptor may not be plugged into awall outlet or to the base station.
ITelephone line may not be connected.
IHandset battery maybe extremely low. If BATT LOW indicator lights in talk
mode, recharge battery. (See page 16.)
I Handset may be too far from base station. Move closer.
The operating range seems shorter
ICheck the base station location for interfering objects. (See page 4.)
1Extend base station antenna to full length.
Handset battery life or standby time seems shorter
IBatteries may not be fully charged, due to dirty contact points. Wipe with asoft
cloth.
I Handset batteries may have been repeatedly recharged before being fully
exhausted. Try Battery Refresh (See page 16).
1Battery may need replacing (See page 16.)
Incoming calls do not ring on handset
1Handset may be too far from base station. Move closer.
Reception is noisy (interference, humor static)
ISwitch to clearer channel. (See page 7.)
1Base station may be too close to electrical equipment. Try another location.
1Handset may be too close to large metal object(s). Move to another location,
or change direction while using handset.
ILower base station antenna.
If phone still does not work
1Reset base station and handset as follows:
1. Disconnect AC adaptor, and then reconnect AC adaptor to reset base
station.
2. Disconnect then reconnect the handset battery.
3. Reset security code. (See page 7.)
1AD6P1 P041 8-G
(NZ) SANYO Electric Co., Ltd.
Printed in Malaysia
Other manuals for CLT-136
2
Table of contents
Other Sanyo Cordless Telephone manuals

Sanyo
Sanyo CAS-A900 User manual

Sanyo
Sanyo CLT-9901 User manual

Sanyo
Sanyo CLT-9655 User manual

Sanyo
Sanyo CLT-2419 User manual

Sanyo
Sanyo CLA-837X User manual

Sanyo
Sanyo CLT-2403 User manual

Sanyo
Sanyo CLT-D14 User manual

Sanyo
Sanyo CLT-U12 User manual

Sanyo
Sanyo CLT-136 User manual

Sanyo
Sanyo CLT-186X User manual

Sanyo
Sanyo CLT-9920 User manual

Sanyo
Sanyo CLT-E30 User manual

Sanyo
Sanyo CLT-5200AUS User manual

Sanyo
Sanyo CLT-586X User manual

Sanyo
Sanyo CLT-D6620 User manual

Sanyo
Sanyo CLT-2410 User manual

Sanyo
Sanyo CLT-5800AUS User manual

Sanyo
Sanyo CLT-D6614 User manual

Sanyo
Sanyo CLT-656 User manual

Sanyo
Sanyo CLT-2430 User manual