Sanyo CLT-D5880 User manual

CLT-D5880
CLT-D5882
CLT-D5883
INSTRUCTION MANUAL
5.8-GHz Cordless Telephone
with Caller ID & Visual Call Waiting
IMPORTANT
Charge the handset battery pack for a full 15-20 hours before using your
cordless handset for the first time.
SANYO Canada Inc.
www.sanyo.ca
UP800DH(CLT-D5880) OM 1/24/06 3:37 PM Page i

Congratulations on your purchase of the CLT-D5880/CLT-D5882/CLT-D5883
cordless telephone from SANYO.
This phone is designed for reliability, long life, and outstanding performance
utilizing the latest in 5.8 GHz technology.
●5.8GHz Digital Expandable
●Hands-Free Duplex Speakerphone in the Handset
●Caller ID/Call Waiting Deluxe (subscribe through local telephone company)
●100 programmable Memory Locations
●Trilingual Display Options (English, French and Spanish)
●Intercom/Call Transfer Between Handsets (for multi handsets)
●20 Distinctive Ring Options (10 ringer tones and 10 melody ringers)
●Mute and Hold Features
●Walkie-Talkie Mode (for multi handsets)
●Room/Baby Monitoring (for multi handsets)
●Battery Level Indicator
●Clock Display
●Animation Displays
Your SANYO 5.8-GHz cordless telephone is a fine quality home communications product.
It is carefully designed and produced by a world leader of consumer and industrial
electronics equipment. With proper maintenance and care, it will provide you with years
of enjoyment and convenience.
5.8-GHz Technology
The clearest channel is automatically selected for each transmission. The phone selects
one of over 10,000,000 digital security codes for the handset and base.
These features enhance your phone's security and also prevent unauthorized calls as a
result of your phone being activated by other equipment.
Introduction
Features
Some illustrations in this manual may differ from the actual unit for explanation purposes.
Note:
UP800DH(CLT-D5880) OM 1/24/06 3:37 PM Page ii

E1
CONTENTS Getting Started
Using the
Interface
Basics
Directory
Caller ID
Features
Multi-handset
Features
Additional
Information
Introduction...................inside front cover
Features.........................inside front cover
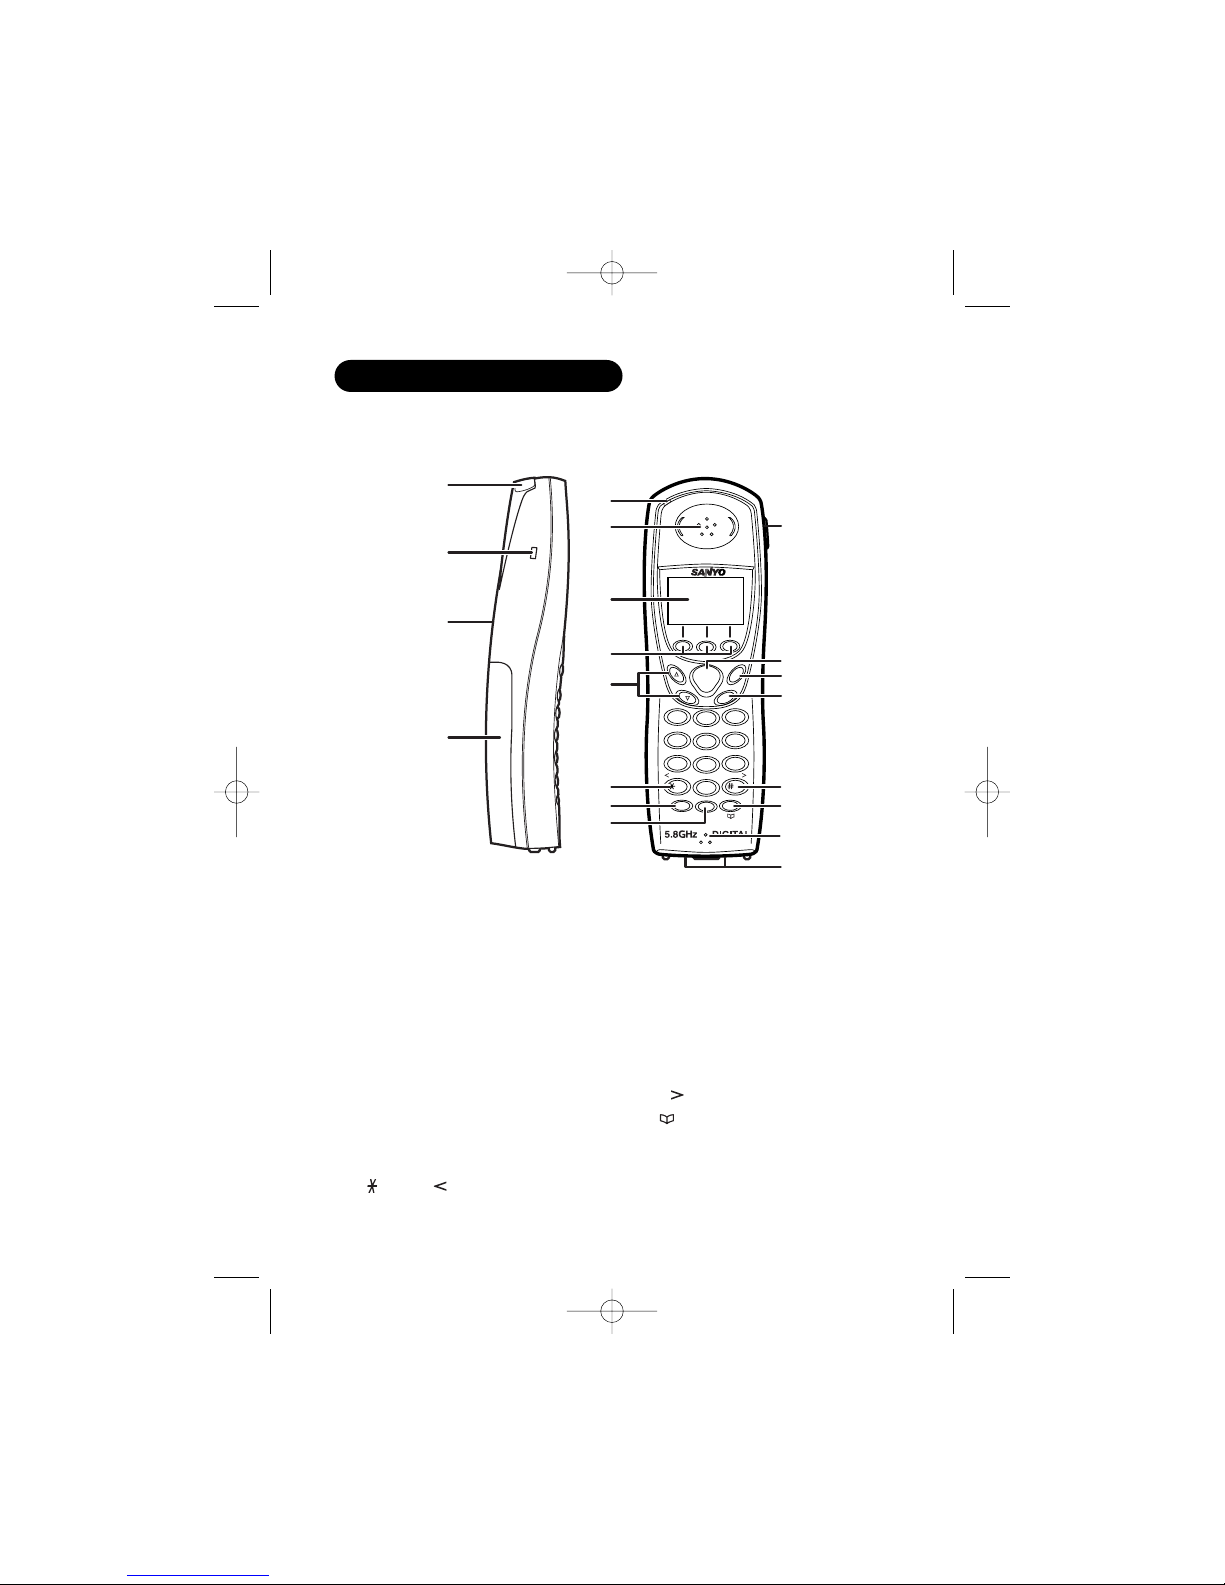
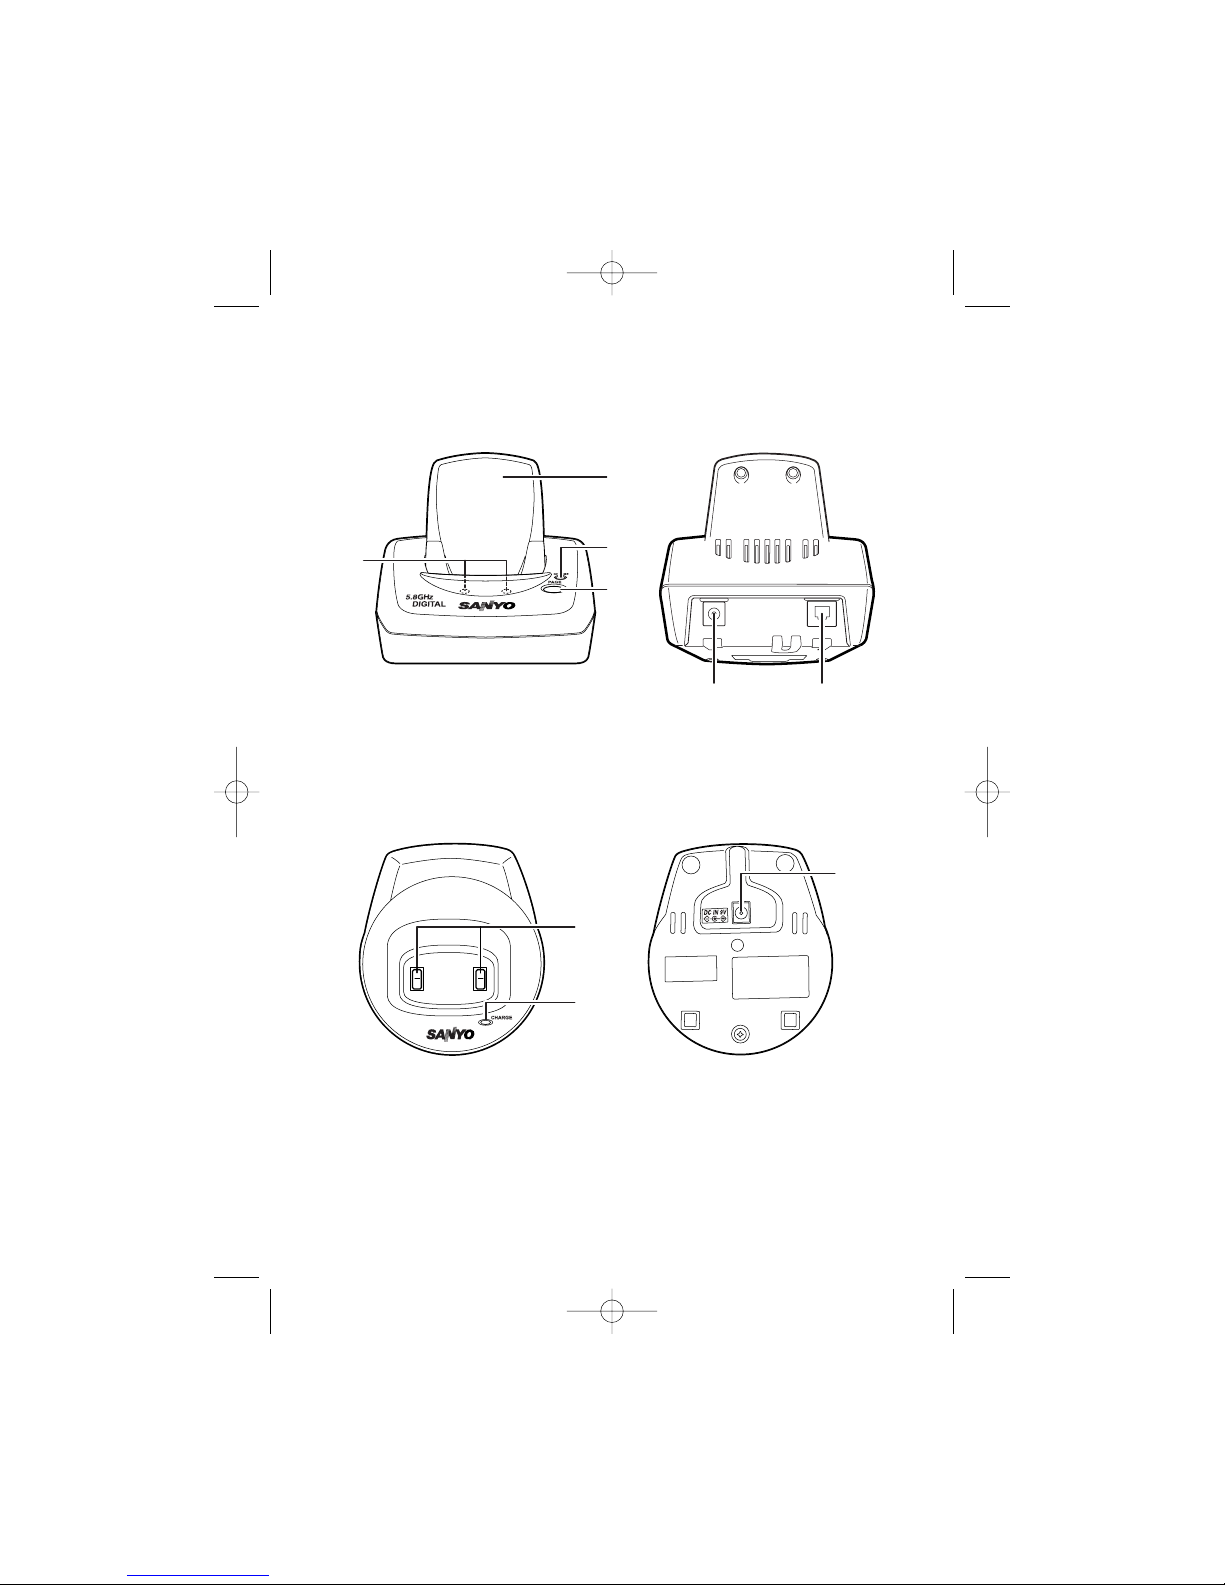
Controls and Functions...........................E2
GETTING STARTED
Checking the Package Contents...........E4
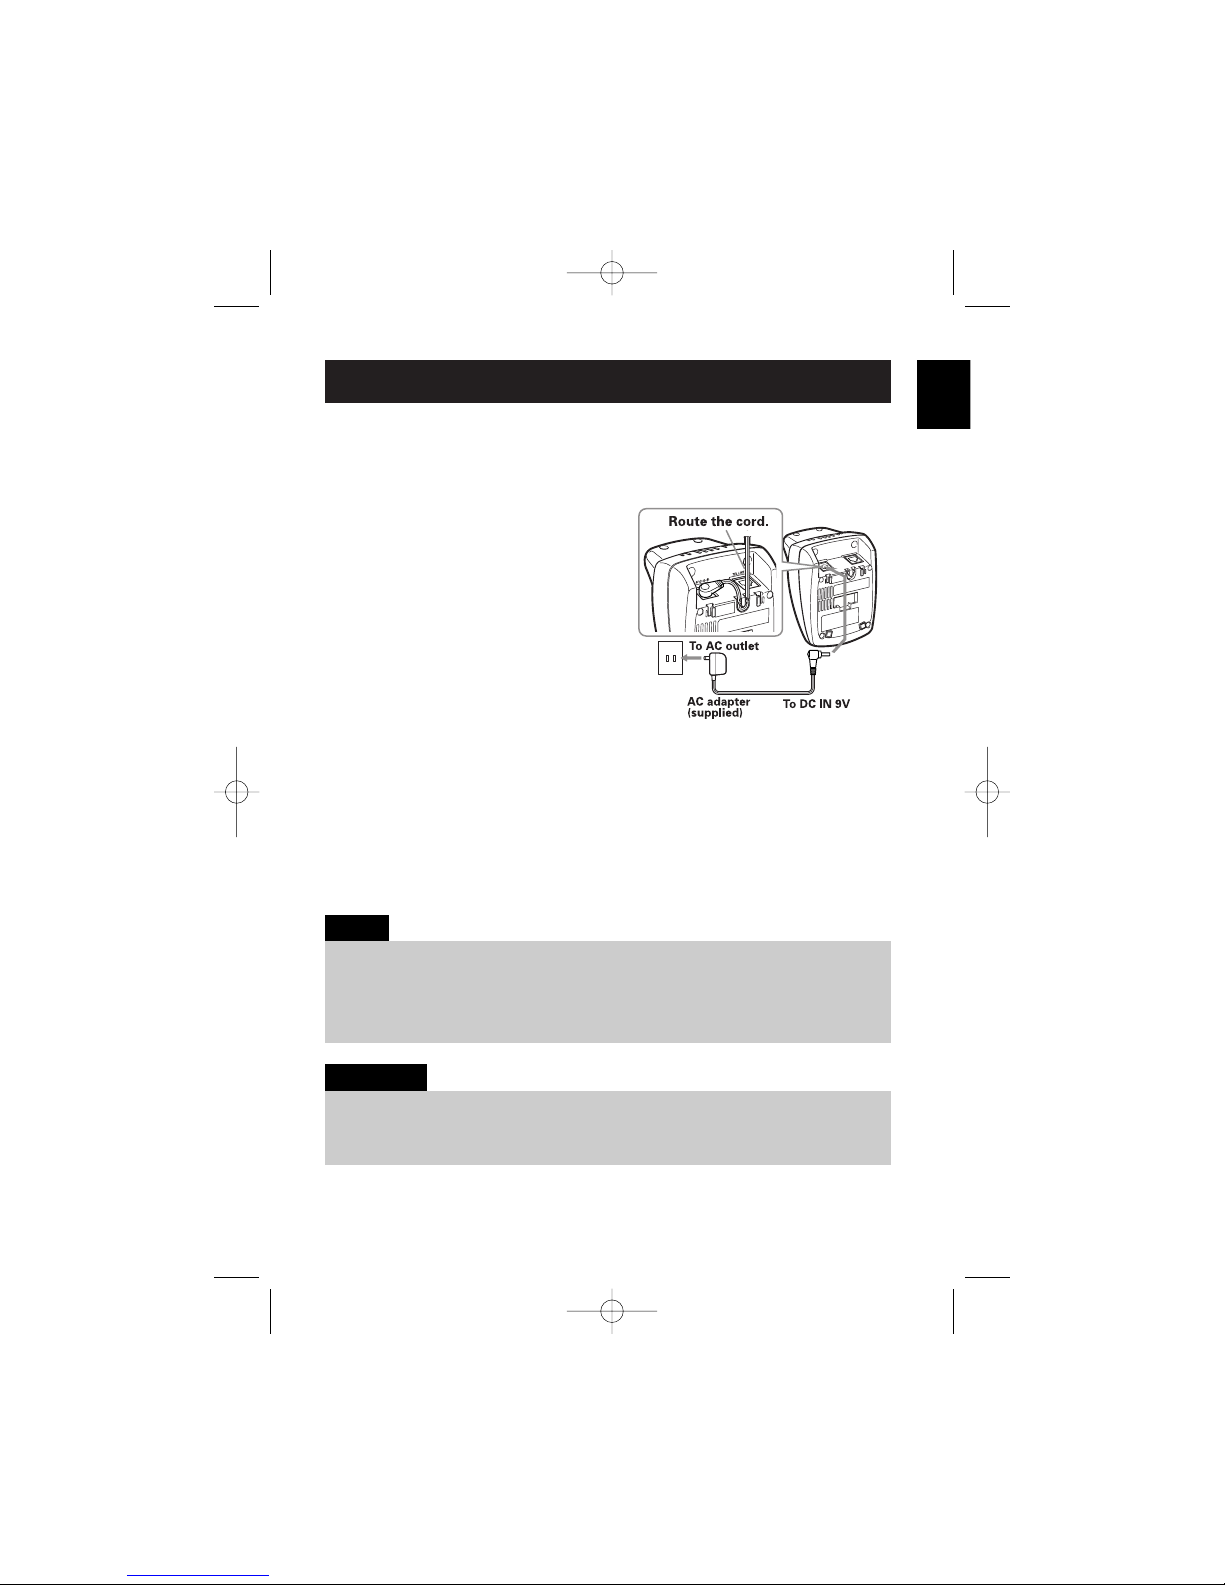
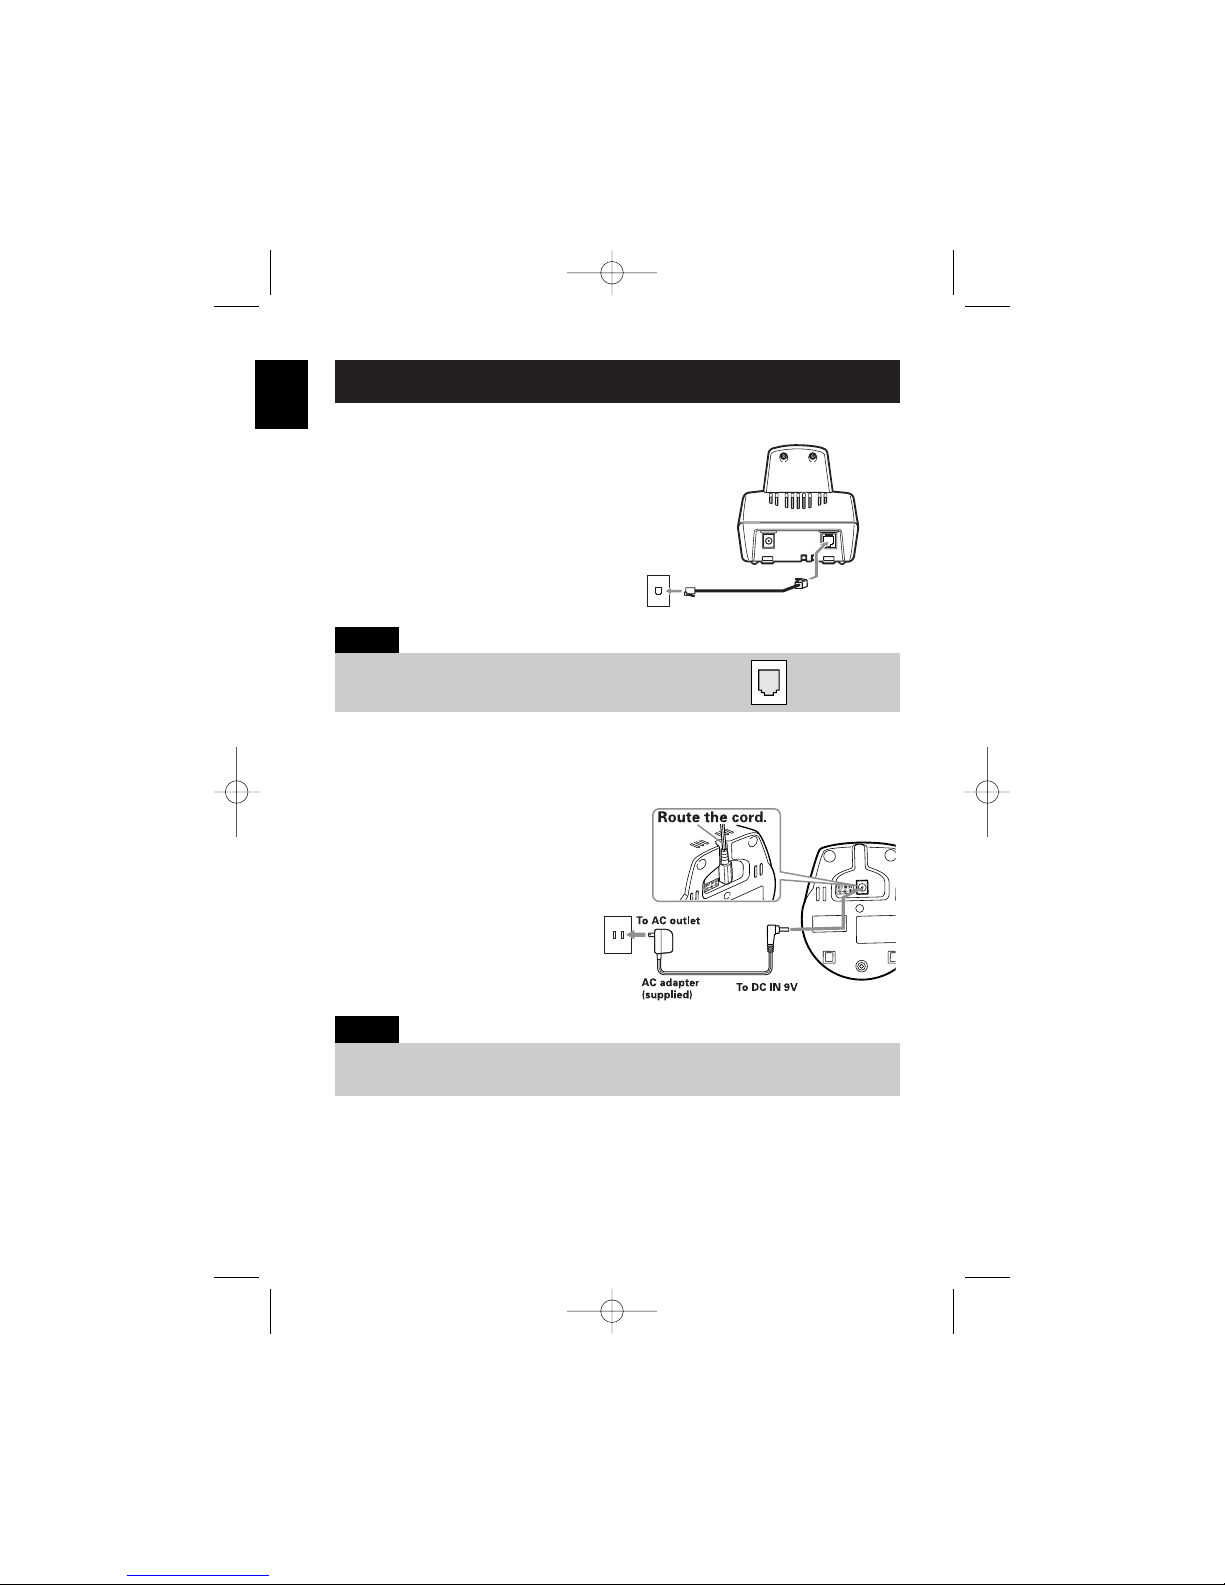
Setting Up the Phone..............................E4
Mounting the Base Unit On a Wall.......E9
USING THE INTERFACE
Display and Icons..................................E11
Soft Key Function ..................................E13
Main Menu Options...............................E14
Setting Menu Options...........................E15
BASICS
Making and Receiving Calls ................E24
Call Waiting ............................................E26
Placing a Call on Hold...........................E26
Redialing a Call ......................................E27
Adjusting the Ringer, and
Earpiece and Speaker Volume............E28
Temporarily Muting the Ringer ...........E28
Mute Microphone..................................E28
Tone Dialing Switch-over.....................E29
Traveling Out of Range .........................E29
Privacy Mode .........................................E29
Using One Touch
Voice Mail Access ................................E30
DIRECTORY
Phonebook (Storing Phone Numbers,
Names, Distinctive Rings and
Speed Dial) .............................................E31
Chain Dialing ..........................................E32
Steps for Entering Names and
Special Characters................................E33
Viewing the Phonebook........................E35
Making Calls Using the Phonebook ...E36
Speed Dialing .........................................E36
Editing or Erasing a Stored Name,
Phone Number, Distinctive Ring and
Speed Dial...............................................E37
Copying Phonebook Locations
(CLT-D5882/CLT-D5883 only) .................E38
CALLER ID FEATURES
Caller ID and CIDCW
(Caller ID on Call Waiting)....................E39
Viewing the Caller ID List.....................E41
Deleting a Caller ID Message .............E42
Using the Caller ID Message List .......E43
Call Waiting Deluxe Features..............E45
MULTI-HANDSET FEATURES
Using the Walkie-Talkie Mode
(CLT-D5882/CLT-D5883 only) .................E46
3-Way Conferencing .............................E47
Intercom/Call Transfer Feature ...........E47
ADDITIONAL INFORMATION
Changing the Digital Security Code ...E49
Find Handset...........................................E49
Installing the Beltclip............................E50
Optional Headset ...................................E50
Note on Power Sources.......................E51
Troubleshooting .....................................E52
Technical Information ...........................E54
THE SANYO
COMFORT WARRANTY . . . . . . . . .E55
MAIN MENU FLOW CHART . . . . .E57
UP800DH(CLT-D5880) OM 1/24/06 3:37 PM Page 1

E2
1. Handset Antenna
2. Beltclip Hole
3. Speakerphone Speaker and
Ringer
4. Handset Battery Compartment
5. New Message LED
6. Handset Earpiece
7. LCD Display
8. Soft Keys
9. VOL ▲/ ▼(volume up/down)
10. /TONE/ (left cursor)
11. SPEAKER
12. INTCM (intercom) /HOLD
13. Headset Jack Cover
14. TALK/FLASH
15. END
16. CID (Caller ID)
17. #/ (right cursor)
18. (phonebook)
19. Handset Microphone
20. Handset Charging Contacts
Controls and Functions
ABC
TALK
FLASH
CID
VOL
SPEAKER INTCM
/HOLD
END
DEF
GHI MNO
PQRS WXYZ
TONE OPER
JKL
TUV
123
45
789
0
2
1
4
3
5
6
7
8
9
10
11
12 19
20
14
17
18
15
16
13
UP800DH(CLT-D5880) OM 1/24/06 3:37 PM Page 2

E3
22
23
24
25 26
21
21. Base Charging Contacts
22. Base Antenna
23. Base CHARGE LED
24. PAGE
25. DC IN 9V Jack
26. TEL LINE Jack
28
27
29
For multi-handset packs only
27. Charging Contacts
28. Charger CHARGE LED
29. DC IN 9V Jack
UP800DH(CLT-D5880) OM 1/24/06 3:37 PM Page 3

Make sure you have received the following items in the package.
E4
GETTING STARTED
Checking the Package Contents
Setting Up the Phone
• If your home has specially wired alarm equipment connected to the telephone line,
be sure that installing the system does not disable your alarm equipment.
If you have questions about what will disable your alarm equipment, contact your
telephone company or a qualified installer.
Note:
Do the following steps:
A. Choose the best location
B. Install the rechargeable battery pack into the handset
C. Connect the base unit and charge the handset
A. Choose the best location
Here are some important guidelines you should consider:
• The location should be close to both a phone jack and a continuous power
outlet that is not switchable.
• Keep the base and handset away from sources of electrical noise such as
motors, microwave ovens, and fluorescent lighting.
• The base should be placed in an open area for optimum range
and reception.
• The base can be placed on a desk, tabletop, or mounted on a standard wall
plate.
For CLT-D5880
• Base unit (1)
• AC adapter (1)
• Telephone cord (1)
• Handset (1)
•
Rechargeable battery
(1)
•
This instruction manual (1)
• Belt clip (1)
• Wall mount bracket (1)
• Battery order sheet (1)
For CLT-D5882
• Base unit (1)
• AC adapters (2)
• Telephone cord (1)
• Handsets (2)
•
Rechargeable batteries (2)
•
This instruction manual (1)
• Belt clips (2)
• Charger (1)
• Wall mount bracket (1)
• Battery order sheet (1)
For CLT-D5883
• Base unit (1)
• AC adapters (3)
• Telephone cord (1)
• Handsets (3)
•
Rechargeable batteries (3)
•
This instruction manual (1)
• Belt clips (3)
• Chargers (2)
• Wall mount bracket (1)
• Battery order sheet (1)
UP800DH(CLT-D5880) OM 1/24/06 3:37 PM Page 4

B. Install the rechargeable battery pack into the handset
The handset is powered by a rechargeable battery pack.
The battery recharges automatically when the handset is placed in the base
unit or charging cradle.
Charge the handset battery pack for at least 15-20 hours before using your
new cordless telephone for the first time! To maximize the charge capacity of
your battery pack, DO NOT plug the telephone cord into the base unit and
wall jack until the battery is fully charged.
1Press down on the handset battery case cover
(use the finger indention for a better grip) and
slide the cover downward to remove.
2Plug the battery pack connector (red & black
wires) into the jack inside the battery
compartment. (The connector notches fit into the
grooves of the jack only one way.) Match the
wire colors to the polarity label in the battery
compartment, connect the battery and listen for
a click to ensure connection.
3Make sure you have a good connection by
pulling slightly on the battery wires. If the
connection is secure, the battery jack will remain
in place.
4Place the battery case cover back on the handset
by sliding it upwards until it clicks into place.
E5
GETTING STARTED
Use only the SANYO rechargeable battery pack supplied with your cordless telephone.
IMPORTANT
UP800DH(CLT-D5880) OM 1/24/06 3:37 PM Page 5

E6
GETTING STARTED
Low Battery Alert
When the battery pack is very low and needs to be charged, the phone is
programmed to eliminate functions in order to save power. If the phone is not
in use, ¨
Low Battery
¨ appears on the LCD and none of the keys will operate.
If the phone is in use, ¨
Low Battery
¨ flashes and the handset beeps. Complete
your conversation as quickly as possible and return the handset to the base
unit for charging.
Cleaning the Battery Charging Contacts
To maintain a good charge, it is important
to clean the charging contacts on both the
handset and the base unit once a month.
Use a clean pencil eraser or superfine steel
wool. Avoid touching the cabinet area of
the phone or scratches may occur.
Caution: Do not use paint thinner, benzene,
alcohol, or other chemical products. Doing
so may discolor the surface of the
telephone and damage the finish.
Terminology
• Talk Mode -
The handset is off the base and the TALK/FLASH key has been pressed,
enabling a dial tone.
• Standby Mode -
The handset is not in use, off the base, and the TALK/FLASH key has not
been pressed. A dial tone is not present.
• Even when the battery pack is not being used, it will gradually discharge over a long
period of time.
Note:
contacts
contacts
UP800DH(CLT-D5880) OM 1/24/06 3:37 PM Page 6

E7
GETTING STARTED
C. Connect the base unit and charge the handset
1Connect the AC adapter to the
DC IN 9V jack and to a standard
120V AC wall outlet.
2Set the base on a desk or tabletop.
3Place the handset in the base unit
for 15-20 hours without interruption.
The base unit’s LED light (labeled
CHARGE) illuminates once the
handset is placed in the base. The
LED light will illuminate whether the
battery pack is connected or not.
If the base CHARGE LED light does not illuminate:
• Check to see if the AC adapter is plugged into the base unit and the
electrical wall outlet properly.
• Check to see if the handset is sitting correctly in the base and making
good contact with the base unit’s charging contacts.
• Connect the AC adapter to a continuous power supply.
• Place the base unit close to the AC outlet so that you can unplug the AC adapter easily.
• It is normal for the handset and base to get warm, when the handset is charging in the
base unit.
Notes:
•Use only the supplied SANYO AC adapter. Do not use any other AC adapter.
• Do not place the power cord so that it creates a trip hazard or where it could become
damaged and create a fire or electrical hazard.
IMPORTANT
UP800DH(CLT-D5880) OM 1/24/06 3:38 PM Page 7

4Once the handset battery pack is
fully charged, connect the telephone
line cord to the TEL LINE jack and to
a telephone outlet.
Connecting the Charger (for CLT-D5882/CLT-D5883)
1Connect the AC adapter to the
DC IN 9V jack and to a standard
120V AC wall outlet.
2Set the charger on a desk or
tabletop, and place the handset
in the charger with the keypad
facing forward. (See "B. Install
the rechargeable battery pack
into the handset" on page E5.)
Register the 2nd and 3rd units.
E8
GETTING STARTED
• Charge the handset battery pack for at least 15-20 hours before using your new cordless
telephone for the first time.
Note:
If your telephone outlet isn't modular, contact your telephone
company for assistance.
Tip:
Modular
To TEL LINE
Telephone line cord (supplied)
To telephone
line outlet
UP800DH(CLT-D5880) OM 1/24/06 3:38 PM Page 8

E9
GETTING STARTED
Mounting the Base Unit On a Wall
DO NOT use an AC outlet controlled by a wall switch.
IMPORTANT
Standard Wall Plate Mounting
This phone can be mounted on any standard wall plate.
1Put the AC adapter and the
telephone line cord through the
hole on the wall mount adapter.
2Plug the AC adapter into the
DC IN 9V jack.
3Plug the telephone line cord into
the TEL LINE jack.
4Slide the wall mount adapter into
the notches on the base.
5Plug the AC adapter into a
standard 120V AC wall outlet.
Hook the cord on the notch of the
wall mount adapter.
6Plug the telephone line cord into
the telephone outlet. Hook the
cord on the notch of the wall
mount adapter.
7Align the mounting slots on the
base with the mounting posts on
the wall. Then push in and down
until the phone is firmly seated.
To remove, push up
the tab on the wall
mount adapter as
shown.
UP800DH(CLT-D5880) OM 1/24/06 3:38 PM Page 9

E10
GETTING STARTED
Direct Wall Mounting
If you don't have a standard wall plate, you can mount your phone directly to
the wall. Before doing this, consider the following:
• Avoid electrical cables, pipes, or other items behind the mounting location
that could cause a hazard when inserting screws into the wall.
• Try to mount your phone within 5 feet of a working phone jack to avoid
excessive cable lengths.
• Make sure the wall material is capable of supporting the weight of the base
and handset.
• Use #10 screws (minimum length of 1-3/8 inches) with anchoring devices
suitable for the wall material where the base unit will be placed.
1Insert two mounting screws into the wall, (with their
appropriate anchoring device), 3-15/16 inches apart.
Allow about 1/8 of an inch between the wall and
screw heads for mounting the phone.
2Refer to steps 1 through 7 on page E9 to mount the
telephone.
UP800DH(CLT-D5880) OM 1/24/06 3:38 PM Page 10

E11
USING THE INTERFACE
Example of the standby mode display
Display and Icons
REDIAL MENU
Ringer off icon (when the ringer is off) / day of the week and time / battery icon
Handset ID
Number of new Caller ID calls received
(If there are no new Caller ID messages, the Handset ID appears here.)
SUN 12:00A
Handset #1
New CID: 5
Standby/Talk
Battery icons indicate the handset battery
status. This icon changes depending on
the battery status (empty, low, medium
and full).
Icon Appears During Description
Standby The Ringer off icon indicates that ringer is
turned off.
Talk The Mute icon appears when you mute
the handset.
Talk The Speaker icon appears when the
handset speaker phone is used.
Talk The Privacy icon appears when the
Privacy Mode is turned on.
UP800DH(CLT-D5880) OM 1/24/06 3:38 PM Page 11

E12
USING THE INTERFACE
Animation Displays
The handsets have a variety of animation displays. Below are examples of the
animation screens and what they mean:
Welcome!
Please Wait...
Turning on the phone
1:5
End
REDIAL MENU
Hanging up the phone
Done!
Confirmation (Done!)
Deleted!
Deleting (Deleted!)
Talk
1:54
MUTE CWDX
PRIVACY
Making a call
Paging
Find Handset/
Paging the Handset
Also, the animation display changes depending on the ringer volume setting.
Ringer Volume
REDIAL MENU
Ringer Volume
REDIAL MENU
]
Ringer Volume
REDIAL MENU
Out Of Range
REDIAL MENU
Out of Range
Unavailable
REDIAL MENU
Unavailable
Low Battery
Low Battery
UP800DH(CLT-D5880) OM 1/24/06 3:38 PM Page 12

E13
USING THE INTERFACE
"Soft" keys are keys that change function during the operation of the phone.
There are three soft keys on each handset. Soft Keys allow you to:
- Access the main menu
- Access stored Caller ID messages
- Set up CIDCW options (Caller ID on Call Waiting)
- Redial one of the last three numbers dialed from the handset
- Store or edit phone numbers
- Access Voice mail waiting
Note: The soft keys will not appear while the handset is charging.
The function of each soft key is determined by the icon that appears directly
above it. For example, when the handset is in standby mode, pressing soft
key 1 will redial the last dialed number. When the handset is in talk mode,
pressing soft key 1 will mute the microphone.
Complete information on the features controlled by the soft keys can be found
under each feature.
Soft Key Function
SUN 12:00A
Handset #1
New CID: 5
REDIAL MENU
Soft key 1 Soft key 2 Soft key 3
In standby mode
Talk
0:00
MUTE CWDX
Soft key 1 Soft key 2 Soft key 3
PRIVACY
In talk mode
UP800DH(CLT-D5880) OM 1/24/06 3:38 PM Page 13

E14
USING THE INTERFACE
Your phone has five main menu options: Walkie-Talkie Mode, Room/Baby
Monitor, Handset Setup, Global Setup and Deregister HS.
Default Settings
The default settings set from the factory match the features that most people
use. You may not need to change them. However, there are a number of
options you must set and entries you must make in memory to take full
advantage of all the phone features. The table below lists the default settings.
USING THE INTERFACE
Main Menu Options
Edit Voice Mail None
Ringer Tone Flicker
Distinctive Ring On
Automatic Talk (Auto Talk) Off
Anykey Answer Off
Banner " "
Language English
Contrast level 5
Key Touch Tone On
Animation Screen On
Day & Time SUN 12:00 AM
CIDCW CW on/CWDX off
Area Code None
Dial Mode Tone
Voice Mail Tone On
Function Default Settings
• For Global Setup and Deregister HS menu options, make sure the line is not in use and
the handsets are within range of the base.
• Main menu flow chart is provided on page E57.
Notes:
UP800DH(CLT-D5880) OM 1/24/06 3:38 PM Page 14

E15
USING THE INTERFACE
Below are some tips for using the software interface on your phone.
• Press the MENU soft key to access the main menu.
• Use VOL/▲and VOL/▼to scroll through options.
• Press the OK soft key to make a selection.
• Press the BACK soft key to return to the previous
screen.
• Press END to exit the menu.
Walkie-Talkie Mode
In Walkie-Talkie mode, a pair of handsets can function as two-way radios.
Walkie-Talkie mode allows two handsets to communicate with each other
without the base unit or a telephone line. Use them at sporting events or
while shopping to stay in contact with family members or friends. You must
set both handsets to Walkie-Talkie mode to activate this feature.
Using Walkie-Talkie Mode (for CLT-D5882/CLT-D5883)
1Press the MENU soft key and select the DirectLink
Mode menu.
To enter DirectLink mode ress
[ENTER]
appears.
2Press the ENTER soft key to enter Walkie-Talkie mode. You will hear a
confirmation tone, and
DirectLink Mode Com lete
appears.
3To return to normal mode, press the CANCEL soft key and then the OK soft
key, or return the handset to the cradle.
Setting Menu Options
DirectLink Mode
Room Monitor
Handset Setup
BACK BACK OK
To enter
DirectLink mode
press [ENTER]
BACK BACK ENTER
• You must have at least two handsets to use Walkie-Talkie mode.
Note:
UP800DH(CLT-D5880) OM 1/24/06 3:38 PM Page 15

E16
USING THE INTERFACE
Room/Baby Monitor
This feature allows you to monitor
sounds in another room. Place a
handset in the room you wish to
monitor; it will function as a
microphone. A second handset
can be set to function as a remote
speaker, allowing you to monitor
sounds in the room.
Using Room/Baby Monitor
1Press the MENU soft key and select the Room Monitor menu.
To Room Monitor
appears.
2Select the handset you want to monitor by using VOL/▲or VOL/▼.
3Press the OK soft key.
RoomMonitor
appears, and you hear sounds in the
room where the handset is installed.
4To turn off the Room Monitor, press the END soft key, or END.
During room monitor, if you receive a call, you will hear beeps from the
earpiece or speaker. Press TALK/FLASH to answer the call.
RoomMonitor
Handset #2
END
• This feature only works when the handset(s) is within the range of the base.
• You must have at least two handsets to use Room/Baby Monitor.
Notes:
UP800DH(CLT-D5880) OM 1/24/06 3:38 PM Page 16

E17
USING THE INTERFACE
Handset Setup
The following submenu options must be set separately for each handset.
Programming your Voice Mail Access Number
1Press the MENU soft key. Select the Handset Setup
menu, and then the Edit Voice Mail submenu.
Edit V_mail No.
appears.
2Enter your personal access number using the number keypad (0-9),
/TONE/ , #/ , the DELETE soft key, or the PAUSE soft key (up to
20 digits).
3Press the OK soft key. You will hear the confirmation tone.
To delete the current Voice Mail Access Number, delete all numbers in step 2
using the DELETE soft key and the OK soft key.
Selecting a Ringer Tone
Ringer Tone lets you choose from 10 ringer tones or 10 melodies:
- Ringers (Flicker, Clatter, Soft Alert, Wake Up, Light Bug, Beep Boop,
Tone Board, Chip Chop, Party Clap, Reminder)
- Melodies (Beethoven's Symphony #9 [Beethoven9], For Elise [Elise], We
Wish You A Merry Christmas [Merry- Xmas], Home Sweet Home [Hm
Swt Hm], Lorri Song #6 [Lorri Song], When Irish Eyes Are Smiling [Irish
Eyes], Aura Lee, Let Me Call You Sweet Heart [Sweetheart], Star
Spangled Banner [Star Spngl], Old MacDonald [Old MacDld])
You must set the separate ringer tone on each handset.
1Press the MENU soft key. Select the Handset Setup menu, and then the
Ringer Tone submenu.
2Press VOL/▲or VOL/▼to move the pointer. You will
hear the ringer or melody as you scroll through the
options.
3When you reach the ringer tone you want, press the OK soft key.
You will hear a confirmation tone.
Edit V_mail No.
12 4567890
DELETE PAUSE OK
Ringer Tones
Flicker
Clatter
BACK DELETE OK
UP800DH(CLT-D5880) OM 1/24/06 3:38 PM Page 17

E18
USING THE INTERFACE
Distinctive Ringer Setup
Distinctive Ringer allows you to assign a designated ring tone to a stored
phonebook number (100 stored locations available). When a call is received
and the Caller ID information matches the information in one of the
phonebook memory locations, the phone uses the distinctive ring assigned to
that particular caller. You can assign distinctive rings to multiple phonebook
memory locations. Switching the setting to Distinctive Off disables distinctive
ringing: all incoming calls will have a normal ring tone. Switching to
Distinctive On activates all programmed distinctive ring memory locations.
1Press the MENU soft key. Select the Handset Setup
menu, and then the Distinctive Ring submenu.
2Press VOL/▲or VOL/▼to select
On
or
Off
.
3Press the OK soft key. You will hear a confirmation tone.
Setting the Automatic Talk (Auto Talk)
Automatic Talk (Auto Talk) allows you to answer the phone simply by
removing the handset from the cradle. You do not have to press any buttons
to answer the call.
1Press the MENU soft key. Select the Handset Setup
menu and then the Automatic Talk submenu.
2Press VOL/▲or VOL/▼to select
On
or
Off
.
3Press the OK soft key. You will hear a confirmation tone.
Setting the Anykey Answer
Anykey Answer allows you to answer the phone by pressing any number key,
/TONE/ , or #/ on the handset.
1Press the MENU soft key. Select the Handset Setup
menu, and then the Anykey Answer submenu.
2Press VOL/▲or VOL/▼to select
On
or
Off
.
3Press the OK soft key. You will hear a confirmation tone.
Distinctive Ring
On
Off
BACK DELETE OK
Auto Talk
On
Off
BACK DELETE OK
Anykey Answer
On
Off
BACK DELETE OK
UP800DH(CLT-D5880) OM 1/24/06 3:38 PM Page 18
This manual suits for next models
2
Table of contents
Other Sanyo Cordless Telephone manuals

Sanyo
Sanyo CLT-2402 User manual

Sanyo
Sanyo CLT-5800AUS User manual

Sanyo
Sanyo CLT-A5832 User manual

Sanyo
Sanyo CLT-136 User manual

Sanyo
Sanyo CLT-W20 User manual

Sanyo
Sanyo CLT-J40 Mounting instructions

Sanyo
Sanyo CLT-9965 User manual

Sanyo
Sanyo CLT-2410 User manual

Sanyo
Sanyo CLT-9920 User manual

Sanyo
Sanyo CLT-9840 User manual

Sanyo
Sanyo CLT-538 User manual

Sanyo
Sanyo CLT-99 User manual

Sanyo
Sanyo CLT-138X User manual

Sanyo
Sanyo CLT-136 User manual

Sanyo
Sanyo CLT-2410 User manual

Sanyo
Sanyo CLT-D6220 User manual

Sanyo
Sanyo CLT-2415 User manual

Sanyo
Sanyo CLT-9922 User manual

Sanyo
Sanyo CLT-D6614 User manual

Sanyo
Sanyo CLT-E22 User manual