Sanyo CLT-9901 User manual

CLT-9902
CLT-9901
INSTRUCTION MANUAL
900-MHz
Cordless Telephone
IMPORTANT
Charge the handset battery pack for a full 15 hours before using your
cordless handset for the first time.
NOISE REDUCTION
Français au verso
CLT9902 #4 (SANYO) 8/11/00 4:14 PM Page 1

Your Sanyo 900-MHz COMPANDER PLUS cordless
tele hone is a fine-quality home communications
roduct. It is carefully designed and roduced by a
world leader of consumer and industrial electronics
equi ment. With ro er maintenance and care, it will
rovide you with years of enjoyment and
convenience.
900- Hz Technology
Superior Range - The use of 900-MHz frequency
band for signal transmission between base and
handset means greater communication range
com ared to conventional 43—49 MHz cordless
tele hones. In normal situations, a roximately
4 times greater distance can be achieved.
Ultra-Low Noise - The high frequency communication
has also significantly reduced noise level.
40-Channel Auto Scan - Your new tele hone uses
one of 40 channels in the 900-MHz frequency band. It
automatically selects a clear channel every time you
receive or lace a call on the handset. Should you
wish to switch channels during a call, the handset
rovides a SCAN button.
CO PANDER PLUS Noise Reduction
This fourth generation of the Sanyo’s original noise
reduction technology now filters out more
background noise.
Other Features
●Moonglow Key ad (CLT-9902 only)
●Digital Security Codes
●10-Number Memory dialing
●Page/Handset Locator
●AutoTalk and AutoStandby
●Handset Volume Control
●14-Day Standby/7-Hour Talk Time
●Last-Number Redial
●Mute
●Tone/Pulse Dialing
●Hearing Aid Com atible
●Wall-Mountable
●Belt Cli and Headset Jack (CLT-9902 only)
To get the most from your hone, lease read these
instructions thoroughly.
Also included:
• This owner’s manual
• Index card
E1
Base Handset
AC adapter (AD-210)
Rechargeable battery
(Sanyo 3KR-600AAL)
Telephone line cord (1), long
COMPANDER
NOISE REDUCTION
PLUS
Bottom bracket
for desktop use and
wall-mounting
Belt clip
(CLT-9902 only)
Introduction
Included with Your Phone
• Battery order sheet
CLT9902 #4 (SANYO) 8/11/00 4:14 PM Page 2

E2
1. TALK/END - Answers or laces calls. Also used to
hang u a call.
2. ✱/TONE - Switches to tone dialing in ulse dialing
mode.
3. REDIAL - Redials the last number.
4. PAUSE - Adds a timed ause in a memory dialing
sequence.
5. TALK/BATT LOW indicator - Lights when hone is in
use and flashes when the battery is low.
6. FLASH - Accesses s ecial services such as call waiting
(A subscri tion required from local tele hone
com any.)
7. MEMORY - Enters or retrieves numbers in memory.
8. RINGER - Sets the ringer volume.
9. MUTE - Turns off the handset micro hone while you
are using the hone.
10. SCAN - Selects another channel for clearer rece tion.
11. VOLUME - Sets the ear iece volume.
12. Handset retainer - Holds handset in lace when it is
charged on the wall-mounted base.
13. CHARGE IN/USE indicator - Lights when the hone is
in use or the handset is charging.
14. PAGE/FIND - Pages or locates the handset.
COMPANDER
NOISE REDUCTION
PLUS
12
13
14
Controls and Functions
CLT9902 #4 (SANYO) 8/11/00 4:14 PM Page 3

Selecting a Location
Before choosing a location for your new hone, there
are some im ortant guidelines you should consider:
• The location should be close to both a hone jack
and continuous ower outlet.
A continuous power outlet is an AC
outlet which does not have a switch
to interrupt its power.
• Kee the base unit and handset
away from sources of electrical
noise such as motors or
fluorescent lighting.
• Be sure there is sufficient s ace
to rotate the base unit antenna
to a fully vertical osition.
Important: Do not place the power
cord in an area where it may create a
trip hazard or become chafed and
create a fire or electrical hazard.
Setting the Dialing Mode Switch
Place the switch in the
TONE osition for tone
dialing, or the PULSE
osition for ulse dialing.
E3
Charging the Battery Pack
The rechargeable Nickel-Cadmium battery ack must
be fully charged before using your hone for the first
time. Before plugging the phone line into your new
phone, you must charge the battery for at least
15 hours without interruption.
1
Remove the handset battery cover.
2
Plug the battery’s
cable into the
handset and lace
the battery ack
inside the battery
com artment.
3
Re lace the battery cover.
The connectors will fit together only one
way. Make sure the battery’s connector is
property aligned.
▼ Charging the Handset
Place the handset on the base
to charge. (The handset can
charge in either the face-u or
face-down osition.)
▼ Low Battery Indicator
When the battery ack in the
handset is low and needs to be
charged, the TALK/BATT LOW
indicator flashes every 3 seconds.
If this occurs while you are on the
hone, you will hear an alert tone.
Com lete your call as quickly as
ossible, and return the handset
to the base for charging.
▼ Cleaning the Battery Contacts
To maintain a good
charge, it is im ortant to
clean all battery contacts
on the handset and base
about once a month.
Use a dry cloth or other
contact cleaner.
Do not use any liquids
or solvents.
Rechargeable batteries have a memory
effect that reduces standby and talk time.
To avoid this memory effect, on a
monthly basis use the phone until the
low battery indicator appears. Then
charge the battery for 15 hours.
Repeated short chargings may cause
memory effect in the handset battery. It
is recommended not to replace the
handset to the base after each call.
PULSE
TONE
BLACK
RED
COMPANDER
NOISEREDUCTION
PLUS
Installation
RECYCLING NICKEL-CADMIUM BATTERIES
NICKEL-CADMIUM
BATTERIES MUST BE
DISPOSED OF
PROPERLY.
Ni-Cd
Nickel-cadmium cells are used in the battery
pack. Please take your used nickel-cadmium
battery packs to a store that recycles nickel-
cadmium batteries.
Replacement Battery Packs: Sanyo 3KR-600AAL or
Sanyo-GE GES-PCF01. Use only specified battery packs.
CLT9902 #4 (SANYO) 8/11/00 4:14 PM Page 4

E4
To telephone outlet
To TEL LINE
To DC IN 9V
AC adapter
(supplied)
Telephone line cord
(supplied)
2
3
To AC outlet
When connecting the power cord, make sure it does not create
a trip or fire/electrical hazard. Avoid places where it could
become chafed.
1
Sna the bottom bracket into the notches on the base.
2
Connect the AC ada ter to the
DC IN 9V
jack and to a standard 120-V
AC wall outlet. Then raise the base antenna to a vertical osition.
3
Connect the tele hone line cord to the
TEL LINE
jack and to a tele hone
outlet.
1
Sna the bottom bracket into the notches on
the base.
2
Plug the tele hone line cord to the
TEL LINE
jack and the AC ada ter to the DC IN 9V jack.
3
Plug the tele hone line cord into the tele hone
outlet.
4
Fit the AC ada ter cord into the molded channel.
Then wra the cord around the strain relief
notch.
5
Plug the AC ada ter into a standard 120-V AC
wall outlet.
6
Raise the antenna to a vertical osition.
7
Align the mounting holes on the base with the
mounting osts on the wall late. Push in and
down until the hone is firmly seated.
1
2 - 7
Use only the AC adaptor that is supplied
with your phone.
Mounting the base unit on a wall
▼ Standard wall plate mounting
This hone can be mounted on any standard
tele hone wall late.
1
Connections
▼ Connect the base unit
CLT9902 #4 (SANYO) 8/11/00 4:14 PM Page 5

Raising the Antenna
Before using your hone, be sure to raise the base
antenna fully to the vertical osition.
Adjusting Ringer/Volume Controls
▼ Ringer Tone and Volume
1
While the hone is not in use, ress
RINGER
.
2
The hone has two ringer tones, each with two
volume levels. Press
RINGER
again until you hear
the ringer tone and volume level you want.
E5
▼ Setting the Handset Earpiece Volume
1
While you are on a call, ress
VOLUME
or .
2
The hone has three receiver volume levels,
Normal, High, and Loud. Press
VOLUME
or
re eatedly until you hear the volume level
you want.
When you hang u , the hone kee s the last
volume setting selected.
▼ Direct wall plate mounting
If you do not have a standard wall late, you can
mount your hone directly to the wall. Before doing
this, consider the following:
• Avoid electrical cables, i es or other items behind
the mounting location, that could cause a hazard
when inserting screws into the wall.
• Try to mount your hone within 10 –15 feet of a
working hone jack to avoid excessive cord
lengths.
• Make sure the wall material is ca able of
su orting the weight of the base and handset.
• Use #10 screws with anchoring devices suitable
for the wall material where the base unit will be
laced.
1
Insert two mounting
screws with a minimum
length of 1-3/8 inches
(35.5 mm) into the wall,
3-15/16 inches (100 mm)
a art. Allow about 3/16 of
an inch (4.8 mm) between
the wall and screwheads
for mounting the hone.
2
Refer to ste s 1 through 9
on age 4 and 5 to mount
the tele hone.
TOP
3/16 in.
3-15/16 in.
8
On the base unit, ull the handset retainer out of
the slot. Rotate it clockwise 180 degrees.
9
Fli it over. Slide it back into the slot so that the li
of the retainer is u and the oints down. The
retainer holds the handset in lace.
COMPANDER
NOISE REDUCTION
PLUS
Handset retainer
When the beltclip is attached onto the
handset, you can hang the handset on
the wall-mounted base with the
keypad facing inside only.
Setting Up Your Phone
(4.8 mm)
(100 mm)
CLT9902 #4 (SANYO) 8/11/00 4:14 PM Page 6

To answer a call Press any key.
To make a call Press TALK/END.
The TALK/BATT LOW indicator lights.
Listen for the dial tone.
Dial the number.
To hang up a call Press TALK/END.
To redial last number Press TALK/END.
Listen for the dial tone.
Press REDIAL to dial the number.
E6
Making and Receiving Calls (when the handset is not in the base)
Using Your Phone
AutoTalk and Auto Standby
When the handset is in the base, the AutoTalk
feature allows you to answer a call by just icking it
u from the base. There is no need to ress any
buttons.
The Auto Standby feature allows you to hang u the
hone by sim ly returning the handset to the base.
Temporary Tone Dialing
Even if your hone line is ulse dialing, you can still
access to s ecial tele hone services that are
available to tone dialing lines only.
After the line is connected, ress ✱/TONE. The
subsequent numbers dialed will be sent as tone
dialing.
Storing a Number in Memory
Your CLT-9901/9902 hone has 10 memory
locations for storing im ortant tele hone numbers.
Memory storing can be done only when
the handset is out of the base and not
in use.
1
Press
MEMORY
. The
TALK/BATT LOW
indicator
flashes.
2
Enter the hone number you want to store
(u to 16 digits) within 20 seconds.
If no key is ressed for 20 seconds after ste 1,
o eration is cancelled and a bee sounds.
3
Press
MEMORY
and enter a number (0–9) for the
memory location you want to use.
You hear a long bee and the
TALK/BATT LOW
indicator goes out. The number has been stored
successfully.
If you select any keys other than 0–9, the handset
will bee ra idly and no number will be stored.
Entering a Pause in Memory
Dialing
When storing a tele hone number with an access
code (an overseas number or an access number to a
voice mail service, for exam le), you may need to
store a ause in the hone number sequence.
To use this function, follow ste s 1 and 2 in Storing
a Number in Memory, then ress the PAUSE
button to insert a ause in the hone number
sequence.
The maximum length of a stored phone
number is up to 16 digits including the
pause. (A pause counts as one digit.)
Storing Mixed Tone/Pulse Numbers
If you have a ulse dialing line and use tem orary
tone dialing feature to a s ecial service, you can store
a ulse/tone mixed number (u to 16 digits) in the
memory.
1
Press
MEMORY
.
The
TALK/BATT LOW
indicator flashes.
2
Enter the number to be dialed in ulse mode.
3
Press the
✱/TONE
button. The
✱/TONE
button
counts as one digit.
4
Enter the number to be dialed in tone mode.
5
Press
MEMORY
and a number (0–9) for the
memory location you wish to use. You hear a long
bee and the
TALK/BATT LOW
indicator goes out.
The number has been stored successfully.
CLT9902 #4 (SANYO) 8/11/00 4:14 PM Page 7

E7
Dialing a Stored Number
To dial a hone number stored in memory, ress
TALK/END, then ress MEMORY and the memory
location (0–9) number. Your hone will dial the stored
number.
If you select a memory location that
does not have a stored number, the
handset will beep rapidly and the phone
will not dial.
Mute
You can turn off the handset micro hone while you
are on the hone, so that your calling arty cannot
hear you.
1
Press
MUTE
during a tele hone call.
The micro hone is turned off.
2
To cancel mute, ress
MUTE
or
TALK/END
.
Chain Dialing
You can store a s ecial access code, a number to
access banking transaction, for exam le, and then
use chain-dialing to facilitate your o eration.
1
Store the access code into one of the memory
location (0–9).
2
Dial the main number.
3
Press
MEMORY
and the memory location of the
access code at the a ro riate time.
Erasing a Stored Number
1
Remove the handset from the base.
2
Press
MEMORY
twice.
3
Press the memory location number (0–9) you
want to clear. You hear a long bee confirming
that you have erased the number.
Replacing a Stored Number
Your hone has 10 memory locations, re resented by
the numbers 0–9 on the key ad. If you store a hone
number in one of these locations and attem t to
store a different number in the same location later,
the new number will re lace the revious one.
Selecting a Different Channel
If you encounter interference while using your hone,
you can manually change the channel for clearer
communication. Interference can come from
a liances or other hones in your home.
The SCAN button on the handset allows you to
choose from 40 factory-set channels. During the
course of a conversation, if you hear static or noise
which makes it difficult to hear, ress SCAN. The
TALK/BATT LOW indicator flashes while the hone is
changing to another channel.
This function works only when the hone is in use.
Using the Flash Button
Use FLASH for accessing s ecial services* offered by
your tele hone com any such as Call Waiting. If you
receive a call during your conversation, you hear a
bee . Press the FLASH button on the handset to
answer the new call. Press FLASH again to return to
the revious call.
*Subscri tion required.
Using the Page/Find Feature
The Page/Find feature sends a signal from the base
to the handset causing it to bee . This is useful for
locating the handset when it is away from the base.
To use this feature, ress PAGE/FIND on the base.
The handset bee s for 60 seconds. (Press and hold
the PAGE/FIND button to get a continuous bee .)
The paging feature does not work when
the phone is in use.
On the handset, ress any key exce t TALK/END to
end the age. If you want to end the age and make
a call, ress TALK/END.
Press TALK/END again if you do not wish to make a
call.
Travelling Out of Range
When you begin to move too far from the base, you
will first hear a clicking sound. As you travel further
out of range, the voice transmission will begin to
break u .
If you ass the range limits of the base, your call will
terminate.
CLT9902 #4 (SANYO) 8/11/00 4:14 PM Page 8

Suggestion
• Make sure the AC ada ter is lugged into the base and wall outlet.
• Make sure the handset is ro erly seated in the base.
• Make sure the rechargeable battery ack is ro erly connected in the
handset.
• Make sure that the charging contacts on the handset and on the base
are clean.
• Make sure that the base antenna is in the vertical osition.
• Interference by other electronics equi ments such as TVs, com uters,
microwaves, fluorescent lighting, etc.
• You may have gone too far from the base.
• Press SCAN to search clearer rece tion.
• Check both ends of the tele hone line cord.
• Make sure the AC ada ter is lugged into the base and a wall outlet.
• Disconnect the AC ada ter for a few minutes, then reconnect it.
• Reset security code by lacing the handset back on the base for a few
seconds. The CHARGE/IN USE indicator will blink when the hone has
been reset.
• The Nickel-Cadmium battery ack may be weak. Charge the battery for
a full 15 hours.
• The handset may be too far away from the base.
• Place the base away from a liances or metal objects.
• Reset security code by lacing the handset back on the charging cradle
for a few seconds. The CHARGE/IN USE indicator will blink when the
hone has been reset.
E8
headset
jack
Installing the belt
clip (CLT-9902
only)
▼ To attach the belt clip
Insert the belt cli into the
holes on each side of the
handset. Press down until it
clicks.
Headset installation
(CLT-9902 only)
Your hone may be used with an o tional headset for
handsfree o eration. To use this feature, sim ly lug
any standard shielded headset with a 2.5-mm lug
into the headset jack.
▼ To remove the belt clip
Pull both sides of the belt cli
to release the tabs from the
holes.
If you have wall-mounted the base, you
must remove the belt clip to charge the
handset with the keypad facing forward.
Belt Clip and Headset Jack
(Available on CLT-9902 only)
Problem
CHARGE/IN USE won’t come on
when handset is laced in base.
Weak and/or scratchy sound
Can’t make or receive calls.
Handset doesn’t ring or receive
a age.
If your cordless tele hone is not erforming to your ex ectations, lease try these sim le ste s. If you
are still unable to resolve the roblems, contact your lace of urchase or call SANYO SOS Hel line.
Caution: Do not attempt to service this unit yourself. Servicing must be performed by
qualified personnel.
Troubleshooting
CLT9902 #4 (SANYO) 8/11/00 4:14 PM Page 9

E9
Ren Number: 0.4
The Ringer Equivalence Number (REN) assigned to
each terminal device rovides an indication of the
maximum number of terminals allowed to be
connected to a tele hone interface. The termination
on an interface may consist of any combination of
devices subject only to the requirement that the sum
of the Ringer Equivalence Numbers of all the devices
does not exceed 5.
CAUTION
This Product is intended for use in CANADA only.
Sale or use in other countries may violate local laws.
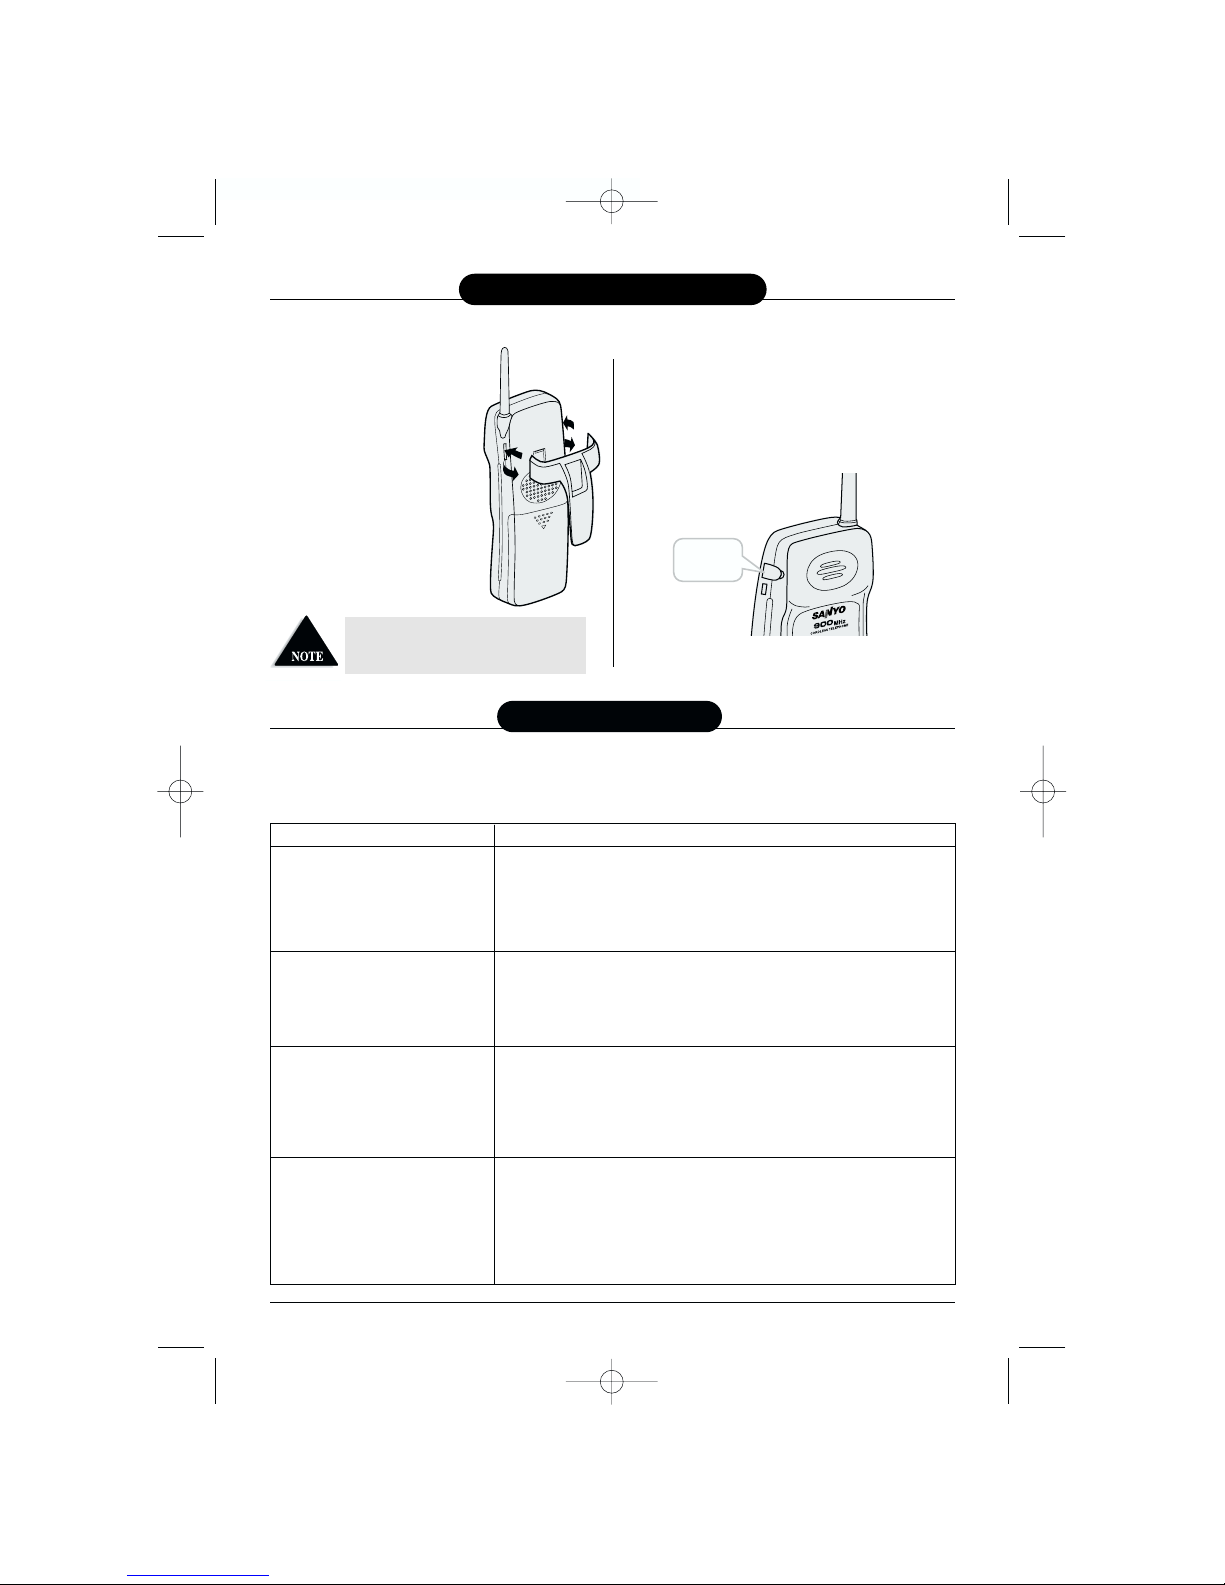
Cordless tele hones use radio frequencies to allow
mobility. This affects the erformance of your unit.
1. NOISE
Electrical ulse noise is resent in most homes at one
time or another. This is most intense during electrical
storms. Certain kinds of electrical equi ment, such as
light dimmers, fluorescent bulbs, motors, fans, etc.,
also generate ulse noise.
Because radio frequencies are susce tible to this, you
may on occasion hear ulse noise through the
handset. This is usually only a minor annoyance and
should not be inter reted as a defect of the unit.
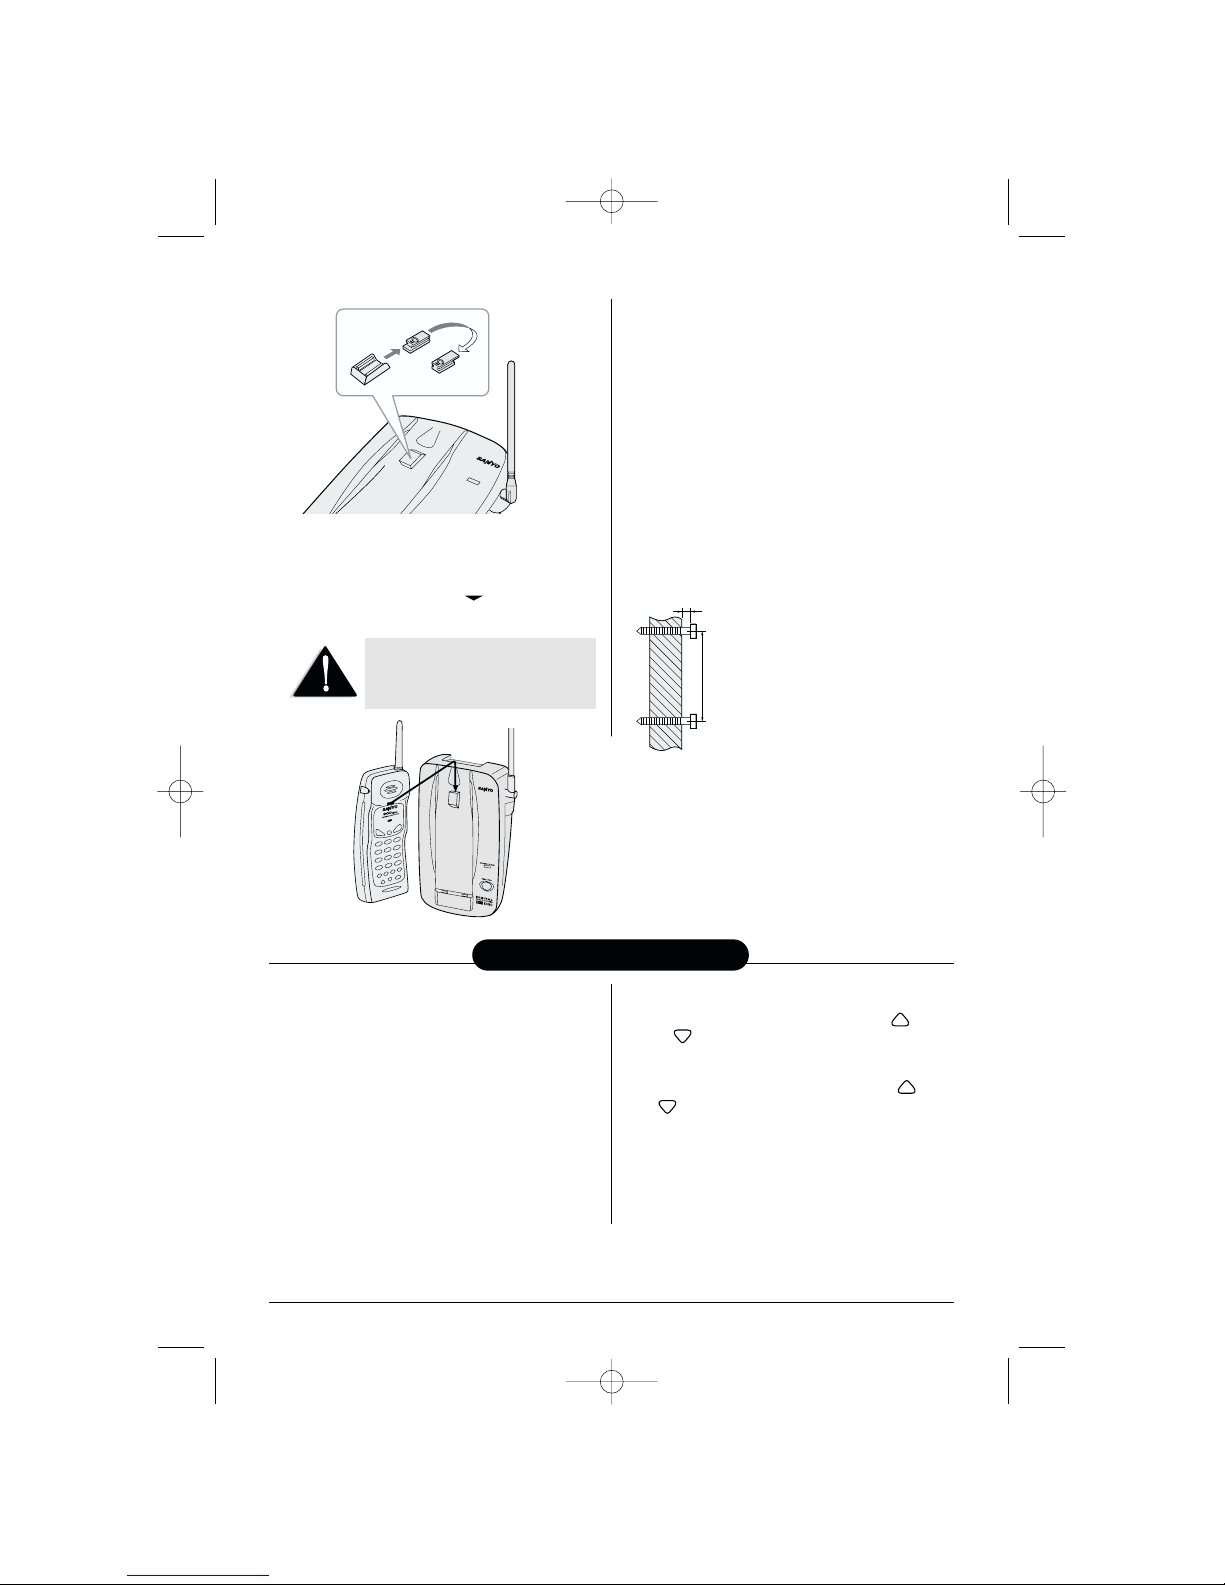
2. RANGE
Because radio frequencies are used, the location of
the base station can affect the o erating range of the
unit. Try several locations and choose the one that
gives the clearest signal to the handset. (Turning in a
circle while holding the handset may also increase
the o erating range.)
3. INTERFERENCE
Electronic circuits activate a relay to connect the unit
to your tele hone line. These electronic circuits
o erate in the radio frequency s ectrum. While
several rotection circuits are used to revent
unwanted signals, there may be eriods when these
unwanted signals enter the base station. You may
hear click or hear the relay activate when you are not
using the cordless handset. If this occurs frequently,
you can minimize or eliminate the roblem by
lowering the height of the base station or relocating
the base station. It may also be hel ful to change the
o erating channel and/or the security code setting.
O eration is subject to the following two conditions:
(1) this device may not cause interference, and (2)
this device must acce t any interference, including
interference that may cause undesired o eration of
the device.
NOTICE:
Privacy of communications may not be ensured
when using this tele hone. Other devices, including
other cordless tele hone tele hones, may interfere
with the o eration of this cordless tele hone or cause
noise during o eration. Units without coded access
may be accessed by other radio communication
systems. Cordless tele hones must not cause
interference to any licensed radio service.
The Industry Canada Label identifies certified
equi ment. This certification means that the
equi ment meets certain telecommunications
network rotective, o erational and safety
requirements. The ministry does not guarantee that
the equi ment will o erate to the user’s satisfaction.
Before installing this equi ment, users should ensure
that it is ermissible to be connected to the facilities
of the local telecommunications com any. The
equi ment must also be installed using an acce table
method of construction.
In some cases, the com any’s inside wiring
associated with single-line individual service may be
extended by means of a certified connector assembly
(tele hone extension cord). The customer should be
aware that com liance with the above conditions
may not revent degradation of service in some
situations.
Re airs to certified equi ment should be made by an
authorized Canadian maintenance facility designated
buy the su lier. Any re airs or alterations made by
the user to this equi ment, or equi ment
malfunctions, may give the telecommunications
com any cause to request that the user disconnect
the equi ment.
The user should ensure for his own rotection that
the electrical ground connections of the ower utility,
tele hone lines and internal metallic water i e
system, if resent, are connected together. This
recaution may be articularly im ortant in rural
areas.
CAUTION
Users should not attem t to make such connections
themselves, but should contact the a ro riate
electrical ins ection authority, or electrician, as
a ro riate.
The exclamation oint within an
equilateral triangle is intended to alert
the user to the resence of im ortant
o erating and maintenance (servicing)
instructions in the literature
accom anying the roduct.
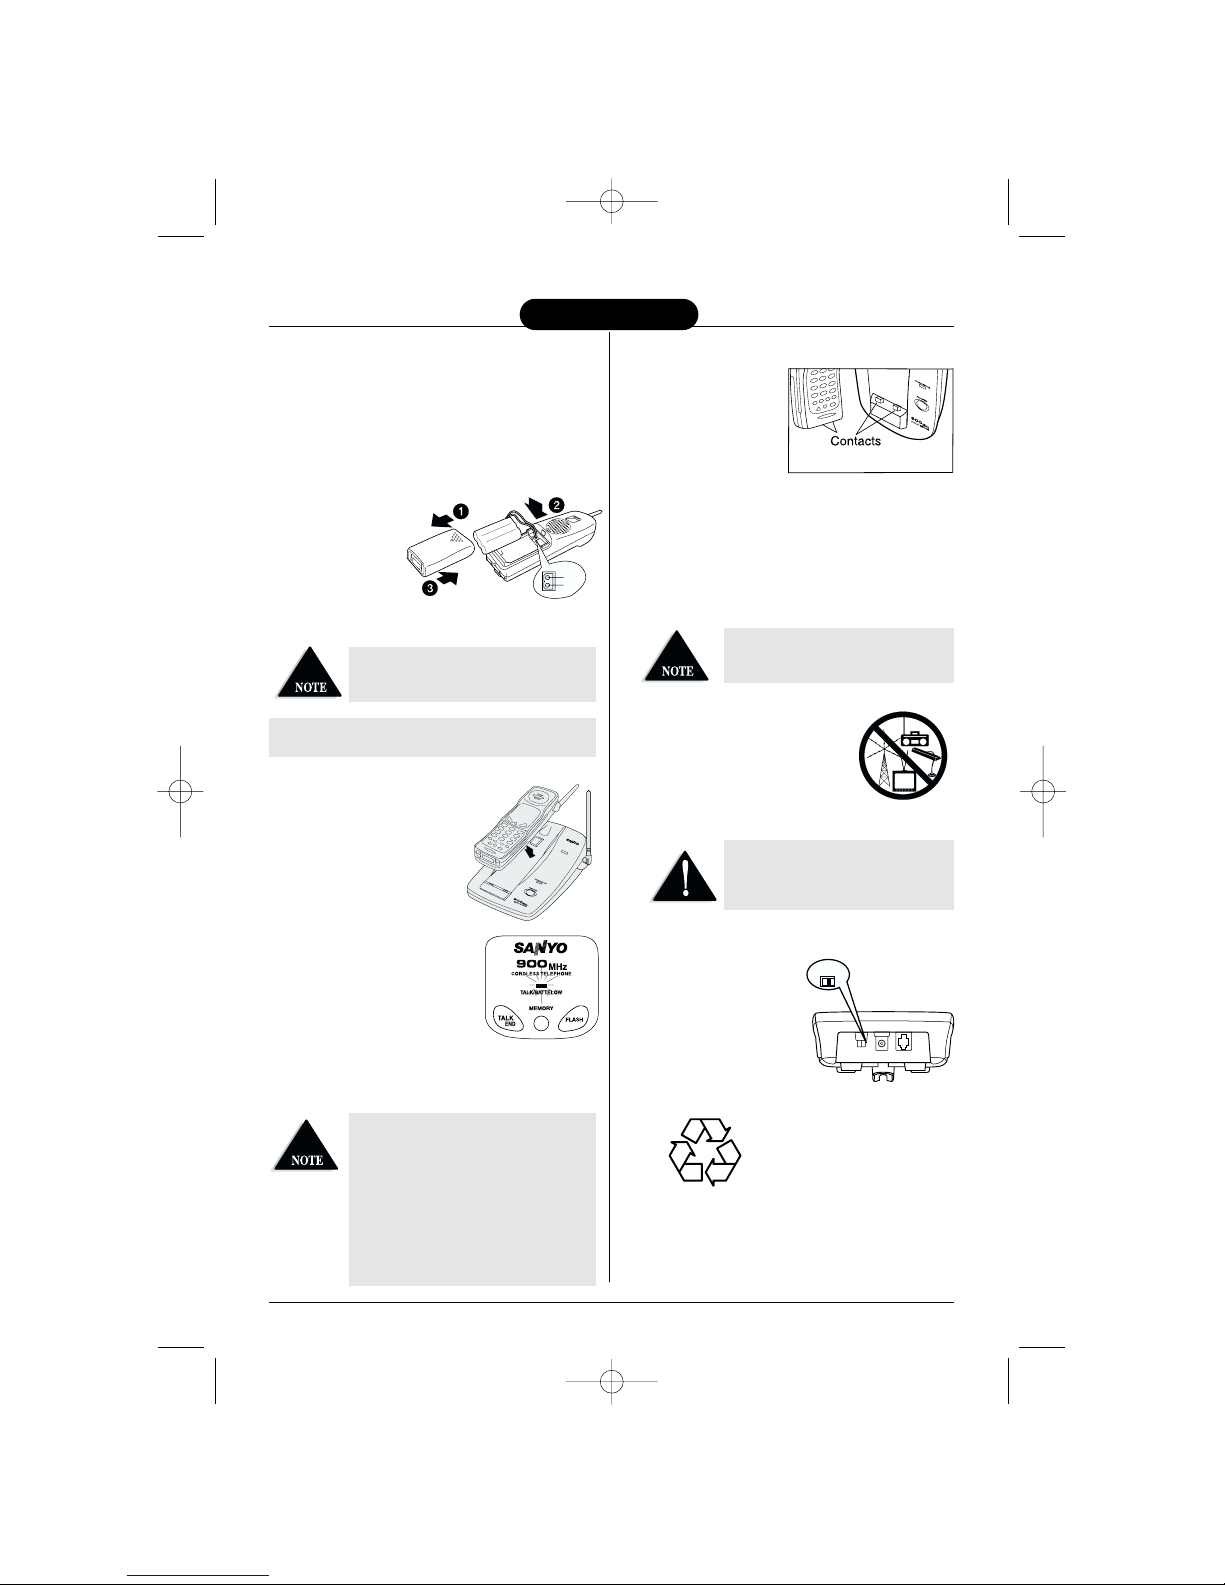
This symbol on the roduct is used to identify the
following im ortant information. Use only with
s ecified SANYO ower ada tor.
Technical Information
CLT9902 #4 (SANYO) 8/11/00 4:14 PM Page 10

E10
At Sanyo, fulfilling the needs of our customers is a priority That’s why we created our Sanyo On Site (SOS)
customer service program that guarantees satisfaction We’re so confident about the quality of our products that
we’re expanding our warranty to include the following exceptional, new level of service
SOS guarantees you:
Nationwide Customer Support
SOS is there to help you Our friendly and knowledgeable product specialists will quickly answer your questions
about setup and use of Sanyo telephone products Simply call toll free from anywhere in Canada to connect to
our no-charge, SOS support and service network
1-800-263-2244 between 10:00 AM – 7:00 PM EST
Stay-At-Home Convenience
It’s a nuisance making another trip to the store when you’re stuck Now with SOS,
all that’s necessary is a quick call from your home for product assistance
or exchange SOS – it’s the ultimate in convenience
Hassle-Free Exchange
Should your Sanyo telephone/telephone with answering system require servicing during the warranty period,
SOS will have a free replacement unit at your door within 48 hours * For security reasons, you will be asked to
give us your credit card number (VISA or MasterCard)
Guaranteed Quality
All SOS replacement sets are checked and serviced by factory-authorized technicians before being sent out SOS
means you never have to worry
With SOS,
we’ve got you
covered!
* Two bus ness days requ red
CLT9902 #4 (SANYO) 8/11/00 4:14 PM Page 11

Covered under one or more of the following U.S. patents:
4,511,761 4,523,058 4,595,795 4,597,104 4,797,916 5,426,690
All rights reserved * UCZZ01276DZ
Printed in China
The SANYO Comfort Warranty
WARRANTY APPLICATION
Sanyo Communications roducts urchased new, unused
in Canada through a Sanyo Authorized Dealer are
warranted against manufacturing defects in materials and
workmanshi for ONE YEAR covering arts and labour,
from the date of urchase by the original retail urchaser.
This warranty only a lies in favour of the original retail
urchaser of the warranted roduct.
SANYO CANADA INC.’S RESPONSIBILITY
During the warranty eriod, SANYO Canada Inc. will re air,
or at our o tion, re lace a Communications roduct which
shows evidence of a manufacturing defect in materials or
workmanshi . Re lacement PARTS are warranted for the
remaining ortion of the warranty eriod.
WHAT IS NOT COVERED
(a) Communications roducts urchased outside Canada.
(b) Communications roducts urchased in a used
condition.
(c) Communications roducts urchased from non Sanyo-
authorized dealer.
(d) Communications roducts not intended for Canadian
usage or roducts without a ro riate Canadian
regulatory a rovals.
(e) Problems due to roduct set-u and installation.
(f) Adjustments that are outlined in the O erating Manual.
(g) Accessory items including antenna, and batteries,
(h) Damage in or due to trans ortation.
(i) Damage due to im ro er maintenance, accident,
abuse, misuse or negligence.
(j) Damage caused by lightning and ower surges.
ORIGINAL RETAIL PURCHASER’S RESPONSIBILITY
You, the original retail urchaser, must resent your original,
dated bill-of-sale together with this warranty to SANYO
Canada Inc. or to an authorized Sanyo Service De ot when
you make a claim under this warranty.
You, the original retail urchaser, are res onsible for any
costs of TRANSPORTING the roduct to and from SANYO
Canada Inc. or an authorized Sanyo Service De ot. You also
are res onsible for the cost of any MAINTENANCE
necessary in res ect of the roduct.
WARRANTY BECO ES VOID
This warranty becomes void if the roduct’s serial numbers
are altered or removed or if any re air to the roduct is
made other than by SANYO Canada Inc. or by an authorized
Sanyo Service De ot.
LI ITATIONS
(a). SANYO Canada Inc. reserves the right to change or
im rove the design of the model of the roduct
warranted hereunder without incurring any obligation
to make any modifications to or to install any
im rovement in or on the roduct.
(b). In no event shall SANYO Canada Inc. or any of its
Authorized Dealers be liable for s ecial or
consequential damage arising from the use of this
roduct.
STATUTORY WARRANTIES
The above rovisions do not reclude the o eration of any
a licable rovincial statute which in certain circumstances
may not allow some of the limitations and exclusions
described in this Warranty. Where any terms of this
Warranty are rohibited by such a statute, they shall be
deemed null and void but the remainder of this warranty
shall remain in effect.
HOW TO OBTAIN WARRANTY SERVICE
Please contact the Sanyo Authorized Dealer from whom the
roduct was urchased, or contact us directly at:
SANYO Canada Inc.
300 Applewood Cres.
Concord, Ont. L4K 5C7
(905) 760-9944
1-800-263-2244
CLT9902 #4 (SANYO) 8/11/00 4:14 PM Page 12
This manual suits for next models
1
Table of contents
Other Sanyo Cordless Telephone manuals

Sanyo
Sanyo CLT-2419 User manual

Sanyo
Sanyo CLT-D14 User manual

Sanyo
Sanyo CLT-9660 User manual

Sanyo
Sanyo CLT-9950 User manual

Sanyo
Sanyo CLT-9910 User manual

Sanyo
Sanyo CLT-2418 User manual

Sanyo
Sanyo CLT-9950 User manual

Sanyo
Sanyo CLT-586X User manual

Sanyo
Sanyo CLT-9960 User manual

Sanyo
Sanyo CLT-9903 User manual

Sanyo
Sanyo CLT-J30 User manual

Sanyo
Sanyo CLT-9960 User manual

Sanyo
Sanyo CLT-2403 User manual

Sanyo
Sanyo CLT-J40 Mounting instructions

Sanyo
Sanyo CLT-937A User manual

Sanyo
Sanyo CLT-2422 User manual

Sanyo
Sanyo CLT-85KM User manual

Sanyo
Sanyo CLT-9840 User manual

Sanyo
Sanyo CLT-538X User manual

Sanyo
Sanyo CAS-D6320 User manual