.,, . .. ......<..~+..,+> :.........,..... ,.., i. ,, : ;.:.. .. -., .:::: :.. ,. ... :.::+.: .:::..,. .::..’- .’::;;:,;. :“
..::::-:.....:...;:. .: ;:.:.: .. .. ~.--.” ............
.. :..::. :>...’.. :.. . ,. ,.. .,. ,. ’.’.’ ..’...’.’?. .. -.,,
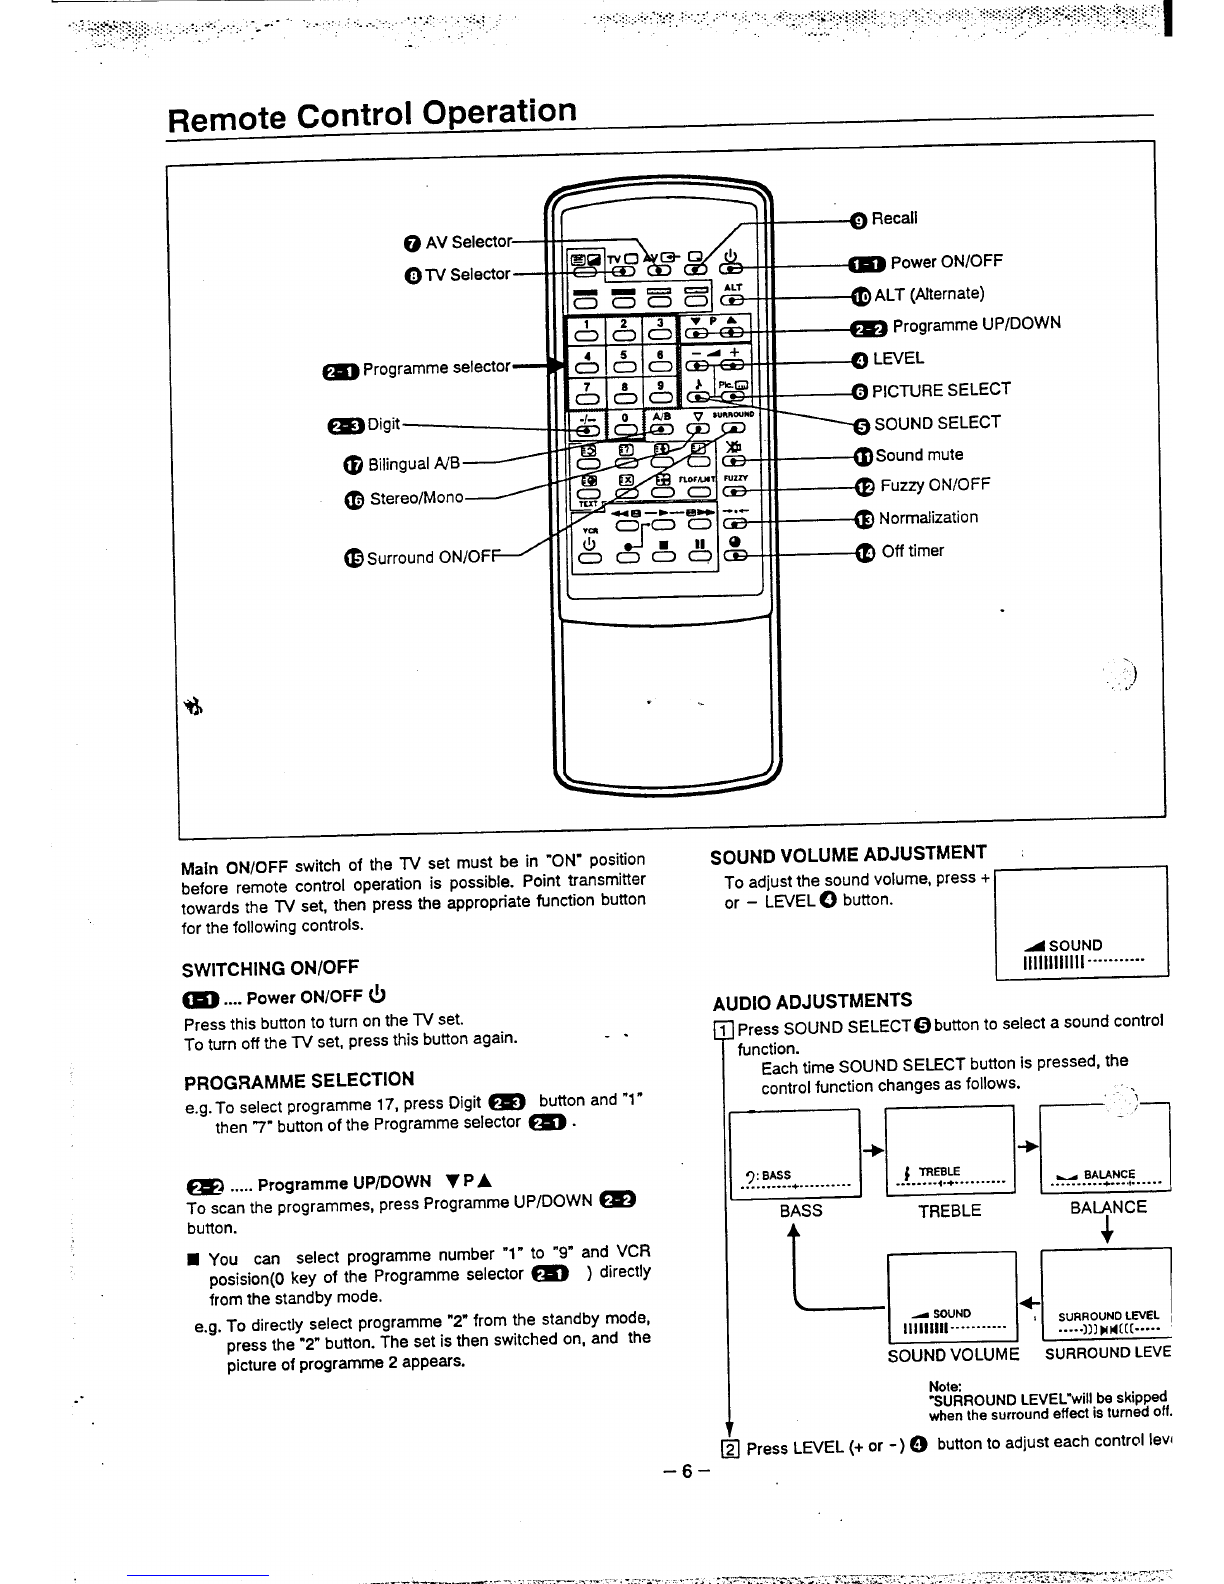
Remote Control Operation
@.... Sound mute ~
Should you wish to mute the sound (e.g. While talking on the
telephone), press this button once.
To switch the sound back on, press’this button again.
n
ASOUND MUTE
111111111111--””---”---
@.... Stereo/Mono V
When receiving the stereo broadcast, “STEREO” is displayed.
If the sound of astereo broadcast is not clear due to
interference or poor reception, select the MONO position by
pressing this button,
In the AV mode, select either STEREO or MONO to match the
stereo or monaural condition of the audio signal coming from an
external source, e.g. aVCR, AV equipment, or other component
by pressing Stereo/Mono button.
@....Normalization -*+
Press this button to recall the picture and sound settings which
you stored using the Memory bunon @of theTV set.
n
NORMAL
--- +4---
@....Off timer Q
After aset time has elapsed, the power of the TV receiver is
switched off automatically.
Each time off timer button @is pressed, the set time changes
as follows:
El”El”El‘
L
30 minutes
I120 minutes
60 minutes
4
–90
4-
With the off timer being set and the channel display reset, the
90 minutes
remaining time is displayed by pressing the off timer bunon
again. When the bunon is pressed again within three seconds
after the button was first pressed in above manner, the time is
set to an upper time which is most close to the remaining time.
Just one minute before switching off, “- 01” and programme -
number you are watching are displayed on the screen.
The timer sening will be cancelled if the power is switched off.
@....Surround ON/OFF
To enjoy the surround effect, press the Surround ON/OFF@
bunon.
To cancel the surround effect, press this bunon again.
Surround OFF Surround ON
l)Plt4[[
STEREO ~MONO
@.... Biiinguai A/B
When receiving the bilingual broadcast, MAIN(A) is displayed.
You can select the main or sub language with this button.
~~ MAIN(A) ~SUB(B)
~in the AV mode, each time Bilingual A/B bunon is pressed, thl
audio channel changes as follows:
~. -. —---- -------- .—------ .-. -. —.- .—------ ------- —..
](Model CZP2530 and CZP2930)
I
[@..”. Stereo/Mono V
i(This bunon is used only in the AV mode.)
,
~In the AV mode, select either STEREO or MONO to match
!the stereo or monaural condition of the audio signal
Icoming from an external source, e.g. aVCR, AV
jequipment, or other component by pressing Stereo/Mono
Ibunon.
i@..”. Bilingual A/B
i
i(This bunon is used only in the AV mode.)
iIn the AV mode, each time Bilingual AfB bunon is
~pressed, the audio channel changes as follows:
!
I
~
j
7
LEH(A) ~RIGHT(B)
!
I
~
I
k---------- -------------------- ---------- ------
-8-
—. —... ---... .. ......... ....- .-.............-..-. .