saro ZOKA 1 User manual

ZOKA 2 (213-4110)
Aufbauanleitung Transport- / Servierwagen
Modell ZOKA 1 / ZOKA 2
Best.-Nr.: 213-4115 / 213-4110
Installation instructions for trolley
Model ZOKA 1 / ZOKA 2
Order-No.: 213-4115 / 213-4110
English Translation of
the original
Deutsch - Original

2Stand 09/18 TM
INHALT / CONTENT
Einleitung / Introduction � � � � � � � � � � � � � � � � � � � � � � � � � � � � � � � � � � � � � � � � � � � � � � � � � � � � � � � � � � � � � � � � � � � � � � � � � � � � � � � � � � � � � � � � � � � � � � � � � � �3
Lieferumfang / scope of delivery � � � � � � � � � � � � � � � � � � � � � � � � � � � � � � � � � � � � � � � � � � � � � � � � � � � � � � � � � � � � � � � � � � � � � � � � � � � � � � � � � � � � � � � � � � �3
Normen und Richtlinien / standards and directives � � � � � � � � � � � � � � � � � � � � � � � � � � � � � � � � � � � � � � � � � � � � � � � � � � � � � � � � � � � � � � � � � � � � � � � � �3
Technische Übersicht / technical overview � � � � � � � � � � � � � � � � � � � � � � � � � � � � � � � � � � � � � � � � � � � � � � � � � � � � � � � � � � � � � � � � � � � � � � � � � � � � � � � � � �4
Allgemeine Hinweise / general information � � � � � � � � � � � � � � � � � � � � � � � � � � � � � � � � � � � � � � � � � � � � � � � � � � � � � � � � � � � � � � � � � � � � � � � � � � � � � � � �4
Aufbauanleitung / assembly instructions � � � � � � � � � � � � � � � � � � � � � � � � � � � � � � � � � � � � � � � � � � � � � � � � � � � � � � � � � � � � � � � � � � � � � � � � � � � � � � � � � � �5
Geräte-Entsorgung / packaging disposal� � � � � � � � � � � � � � � � � � � � � � � � � � � � � � � � � � � � � � � � � � � � � � � � � � � � � � � � � � � � � � � � � � � � � � � � � � � � � � � � � � � �8

3
Stand 09/18 TM
EINLEITUNG
Bevor Sie dieses Gerät in Betrieb nehmen, lesen Sie diese
Pege- und Aufbauanleitung sorgfältig und aufmerksam
durch und beachten Sie die darin gegebenen Hinweise�
In dieser Anleitung erhalten Sie Informationen zum Aufbau,
zur Einrichtung, zum Betrieb, zur Wartung, zur Reinigung und
zur etwaigen Entsorgung dieses Gerätes�
Diese Anleitung ist Bestandteil des Gerätes und sollte, für alle
Personen, die mit der Installation, dem Betrieb, der Reinigung
oder der Wartung dieses Gerätes zu tun haben, jederzeit
zugänglich, in der Nähe des Gerätes, aufbewahrt werden�
Bei der Weitergabe des Gerätes an Dritte, muss diese
Bedienungsanleitung mitgegeben werden�
Abbildungen in dieser Anleitung können vom Original Artikel
abweichen� Technische Änderungen am Gerät behalten wir
uns vor�
Bei Nichtbeachtung dieser Anleitung ist die Sicherheit des
Gerätes nicht mehr gewährleistet�
Der Hersteller/Händler kann nicht verantwortlich gemacht
werden für Schäden, die durch die Nichtbeachtung dieser
Anleitung entstehen�
INTRODUCTION
Before putting this device into operation, read these Care
and Installation Instructions carefully and attentively and
observe the instructions given therein�
This manual contains information on the installation, setup,
operation, maintenance, cleaning and possible disposal of
this device�
This manual is an integral part of the device and should be
kept accessible at all times, near the device, for all persons
involved in the installation, operation, cleaning or main-
tenance of this device�
If the device is passed on to third parties, these operating
instructions must be given with it�
Illustrations in this manual may dier from the original
article� We reserve the right to make technical changes to
the device�
If these instructions are not followed, the safety of the
device can no longer be guaranteed�
The manufacturer/dealer cannot be held responsible for
damage caused by non-observance of these instructions�
instructions�
3
• 2 Grie
• 1 obere Ablage
• 8 Aluminiumstangen
• 1 mittlere Ablage
• 1 untere Ablage
• 4 Räder ( 2 mit Feststeller)
• 1 Betriebsanleitung
• 2 handles
• 1 top shelf
• 8 aluminium rod
• 1 middle shelf
• 1 bottom shelf
• 4 caster ( 2 with brakes)
• 1 Instruction manual
NORMEN UND RICHTLINIEN
Das Gerät entspricht den aktuellen Normen und Richtlinien
der EU�
Bei Bedarf lassen wir Ihnen die entsprechende
Konformitätserklärung zukommen�
STANDARDS AND DIRECTIVES
The device complies with the current EU standards and
directives�
If required, we will send you the corresponding declaration
of conformity�
LIEFERUMFANG SCOPE OF DELIVERY

4Stand 09/18 TM
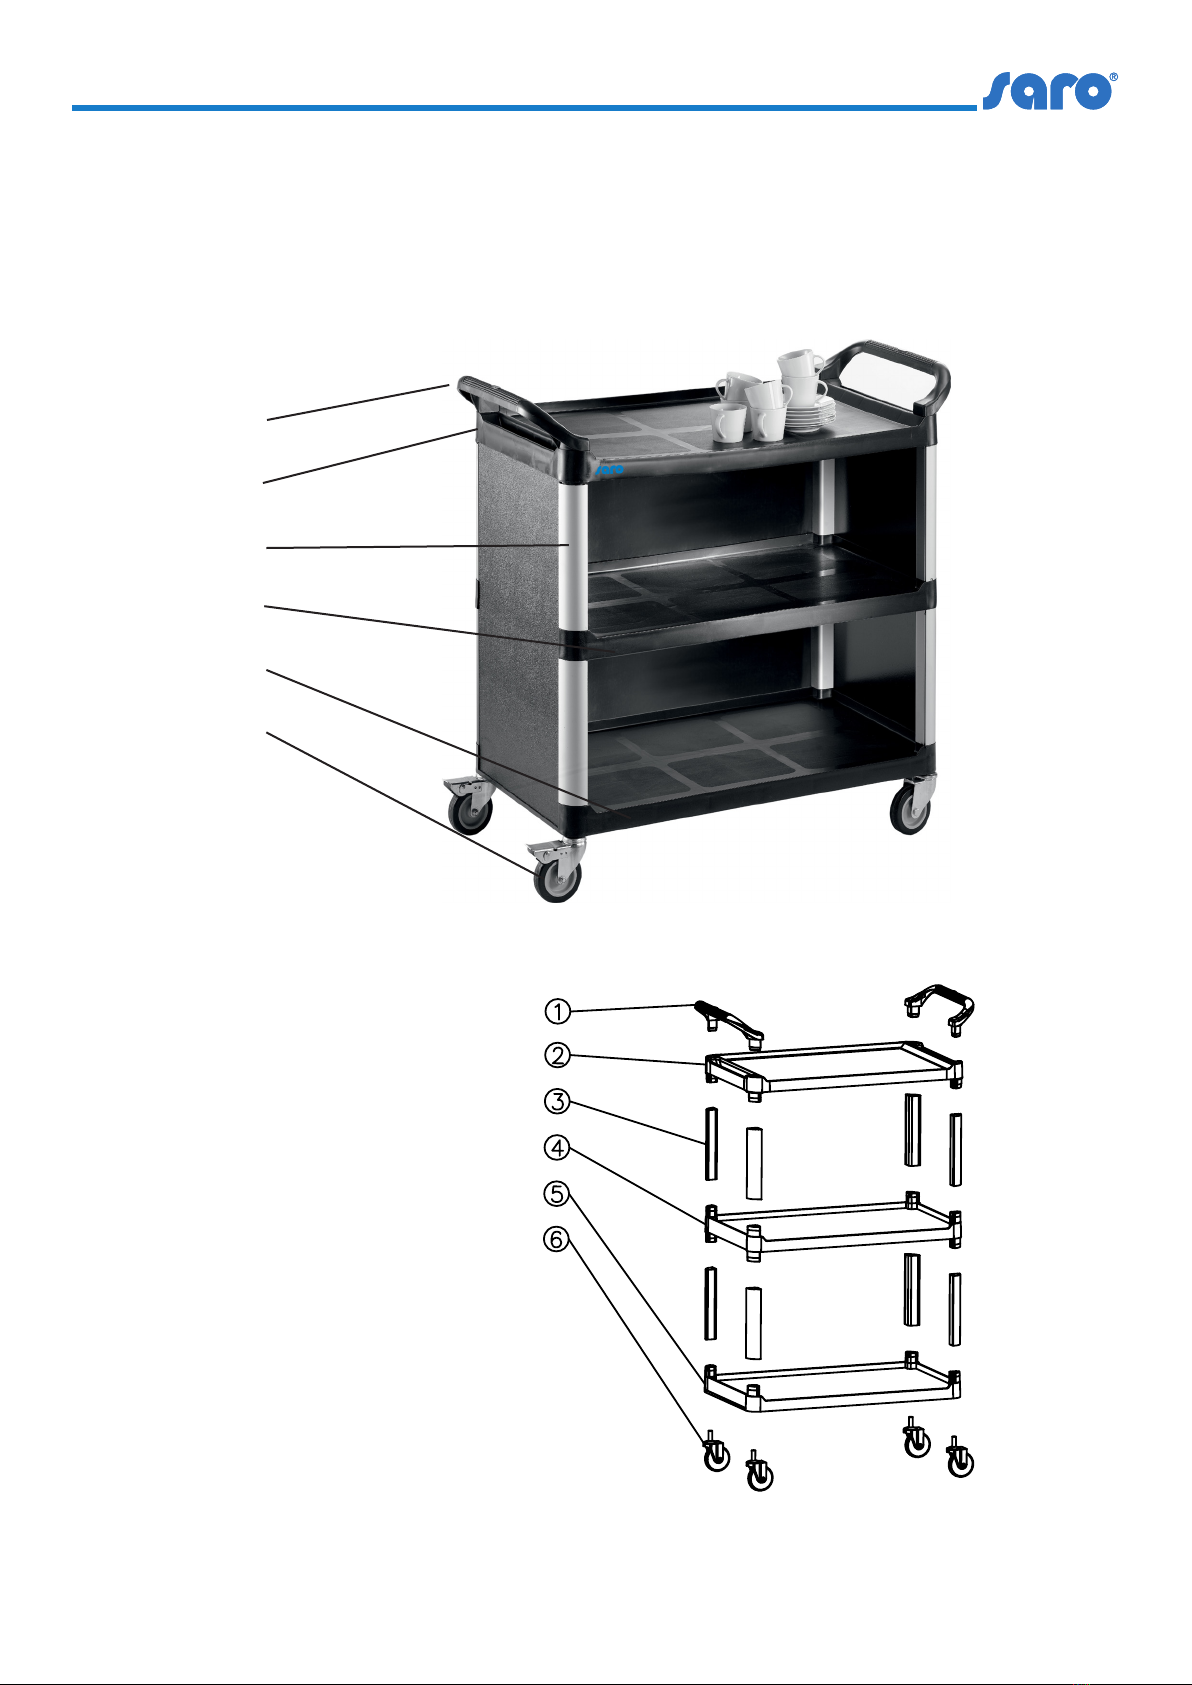
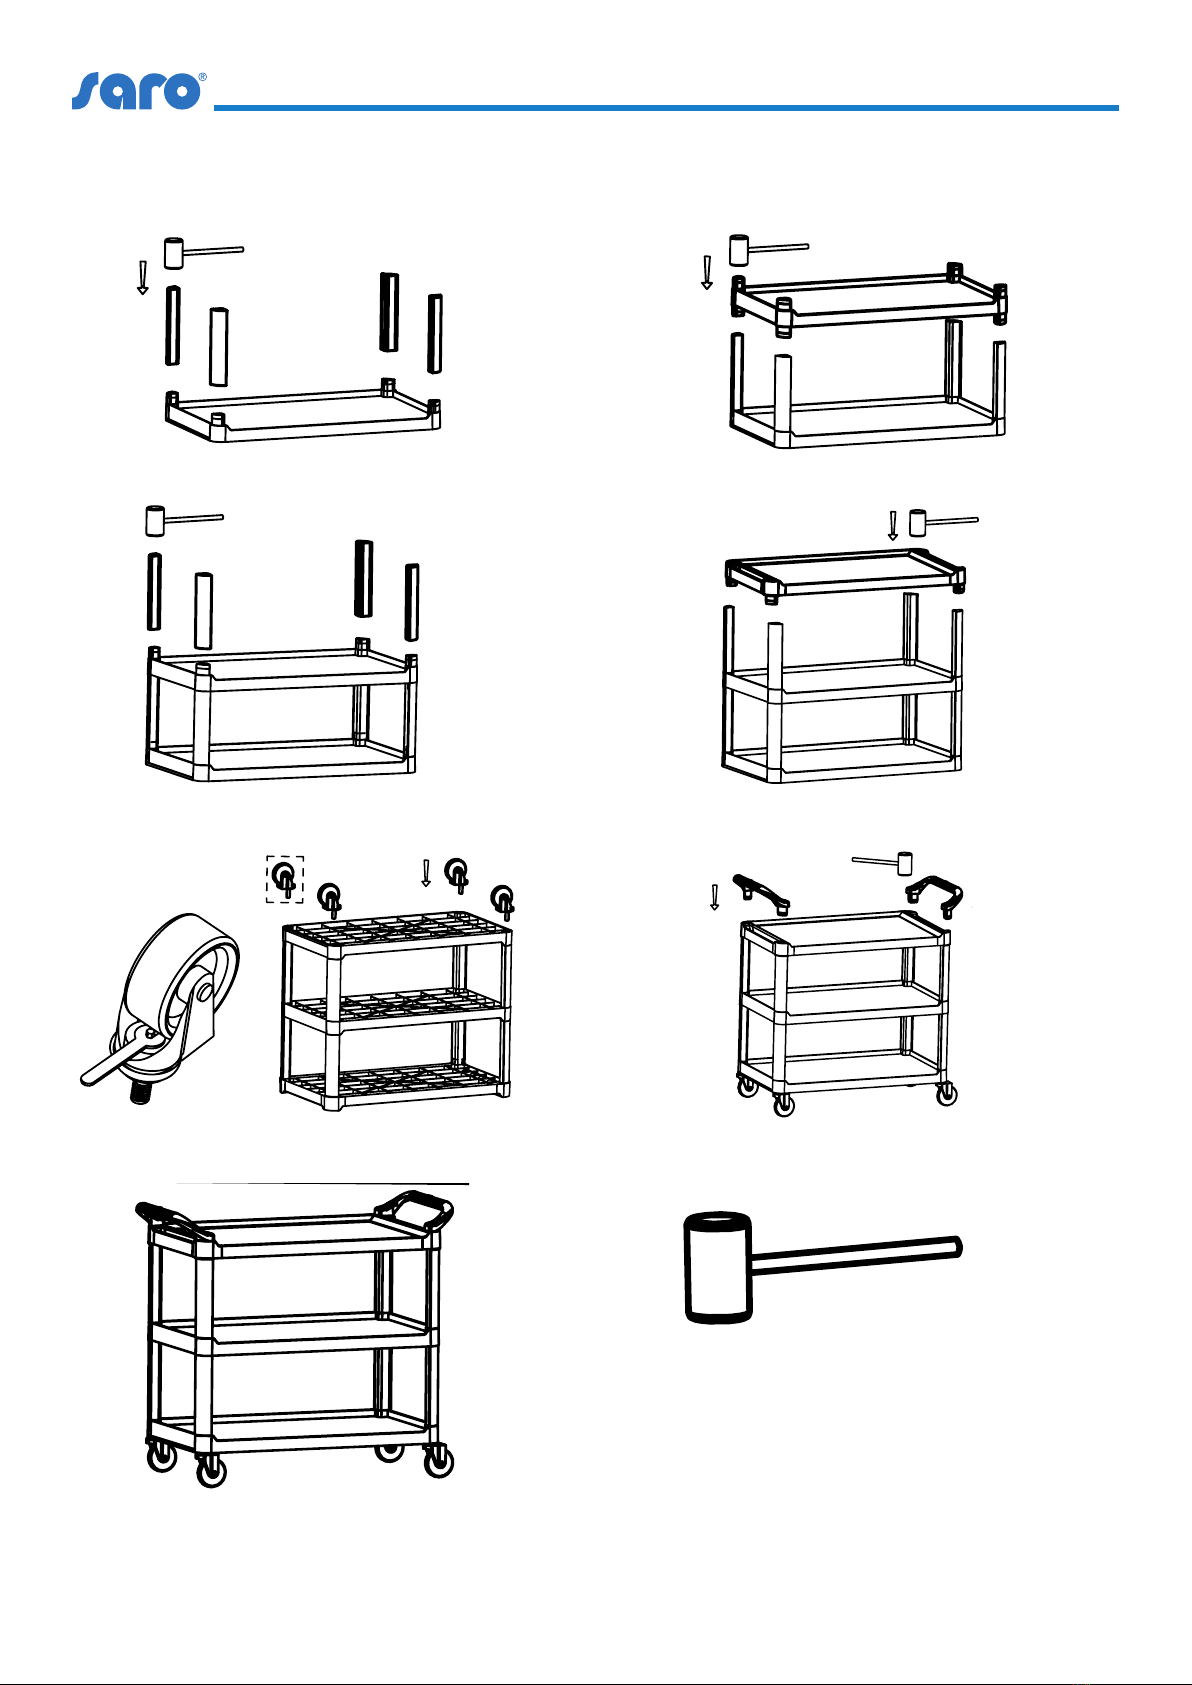
TECHNISCHE ÜBERSICHT / TECHNICAL OVERVIEW
Abbildungen in dieser Anleitung können vom original Artikel abweichen�
Illustrations in this manual may dier from the original article.
Technische Änderungen vorbehalten! Technical changes reserved!
ALLGEMEINE HINWEISE / GENERAL INFOMRATION
• Lesen Sie diese Bedienungsanweisung sorgfältig durch,
weil sie wichtige Informationen enthält für sicheres und
sachgerechtes Arbeiten mit dem Gerät�
• Es ist ratsam, die Bedienungsanweisung dort
aufzubewahren, wo man sie immer schnell zur Hand hat�
• Bei Weitergabe des Gerätes an Dritte, geben Sie bitte auch
diese Bedienungsanleitung mit�
• Sobald Sie das Gerät ausgepackt haben, prüfen Sie,
ob alles in einwandfreiem Zustand ist� Sollte etwas
beschädigt sein, benachrichtigen Sie Ihren Händler�
• Bewahren Sie die Verpackung des Gerätes auf� Nur in der
Originalverpackung kann das Gerät sicher transportiert
werden, z� B� zu Reparaturzwecken, bei einem Umzug
etc� Falls eine Aufbewahrung nicht möglich ist, trennen
Sie die verschiedenen Verpackungsmaterialien und
liefern Sie diese bei der nächstgelegenen Sammelstelle
zur sachgemäßen Entsorgung ab� Beachten Sie, dass
alle Bestandteile der Verpackung (Plastikbeutel, Karton,
Styroporteile, usw�) Kinder gefährden können und deshalb
nicht in deren Nähe gelagert werden dürfen�
• Das Gerät darf nur zum Servieren oder Abräumen
verwendet werden� Missbräuchlicher Einsatz kann
Schäden verursachen und führt zum Verlust der Garantie�
• Beachten Sie die für den Einsatzbereich geltenden
Unfallverhütungsvorschriften und die allgemeinen
Sicherheitsbestimmungen�
• Der Hersteller/Händler kann nicht verantwortlich gemacht
werden für Schäden, die durch Nichtbeachtung dieser
Bedienungsanweisung entstehen� Außerdem ist dann die
Sicherheit des Gerätes nicht mehr gewährleistet�
• Please read these operating instructions carefully, as
they contain important information for safe and proper
operation of the device�
• It is advisable to keep the operating instructions in a
place where they are always quickly at hand�
• If the device is passed on to third parties, please also
include these operating instructions�
• As soon as you have unpacked the device, check
that everything is in perfect condition� If anything is
damaged, contact your dealer�
• Keep the packaging of the device in a safe place� The
device can only be transported safely in its original
packaging, e�g� for repair purposes, when moving house,
etc� If storage is not possible, separate the various
packaging materials and return them to the nearest
collection point for proper disposal� Please note that all
components of the packaging (plastic bags, cardboard,
polystyrene parts, etc�) can endanger children and must
therefore not be stored near them�
• The appliance may only be used for serving or clearing�
Misuse may cause damage and will void the warranty�
• Observe the accident prevention regulations and general
safety regulations applicable to the area of use�
• The manufacturer/dealer cannot be held responsible
for damage resulting from non-compliance with these
operating instructions� In addition, the safety of the
device is then no longer guaranteed�
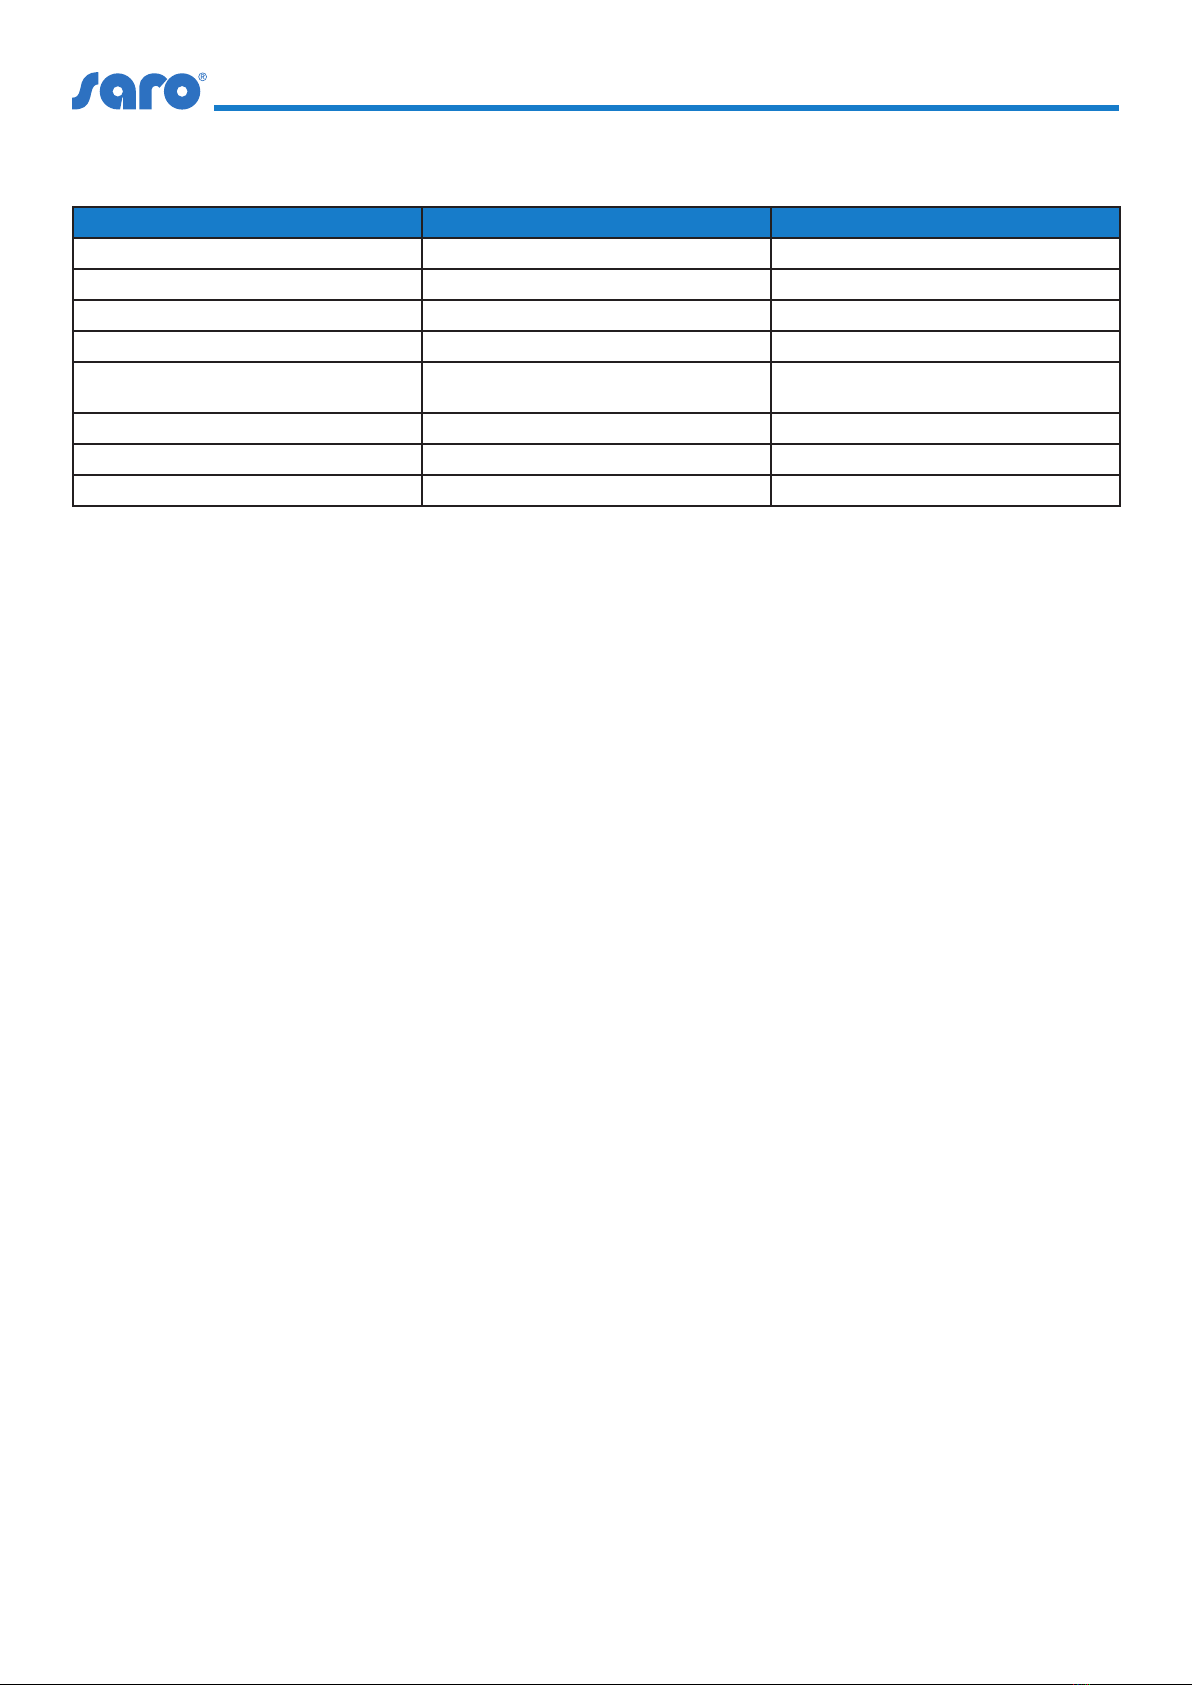
MODELL / MODEL ZOKA 1 ZOKA 2
Art�-Nr� / Order No. 231-4115 213-4110
Material / material Kunststo, Leichtmetal Kunststo, Leichtmetal
Maße (mm) / dimensions (mm) B 845 x T 430 x H 950 B 1020 x T 500 x H 960
Borde / shelves 3 3
Tragfähigkeit Borde / load capacity of
shelves 100 150
Räder / wheels 4 (2 mit Feststellbremse) 4 (2 mit Feststellbremse)
Gewicht / weight 21 28
EAN-Code 4017337 213962 4017337 213955

5
Stand 09/18 TM
AUFBAUANLEITUNG / ASSEMBLY INSTRUCTIONS
1� Gri
2� oberer Boden
3� Aluminiumstange
4� Zwischenboden
5� Boden unten
6� Rad
1. handle
2. top shelf
3. aluminium rod
4. middle shelf
5. bottom shelf
6. caster
BESTANDTEILE / COMPONENTS
1
2
3
4
5
6

6Stand 09/18 TM
AUFBAUANLEITUNG / ASSEMBLY INSTRUCTIONS
Abb� H / Fig. H
1.
3.
2.
4.
5. 6.
7.

7
Stand 09/18 TM
AUFBAUANLEITUNG / ASSEMBLY INSTRUCTIONS
• Sie benötigen einen Gummihammer (Abb. H)
und einen Maulschlüssel der Größe 7 für die Radmontage�
• Alle Teile vorsichtig aus dem Karton entnehmen und
Verpackungsmaterial entfernen�
• Boden oben mit der Oberseite auf den Boden legen, auf eine
Decke / Tuch um Kratzer zu vermeiden�
• 4 Zwischenstücke (Aluminiumstangen) jeweils in die
Aufnahme des Bodens einstecken (1), andrücken und mit
dem Gummihammer etwas nacharbeiten� Bitte vorsichtig
hämmern und auf geraden Sitz der Zwischenstücke achten�
• Den Zwischenboden (Oberseite nach unten) auf die
befestigten Zwischenstücke aufsetzen, andrücken und
mit dem Gummihammer nacharbeiten (2)� Bitte vorsichtig
hämmern�
• Zwischenstücke jeweils in die Aufnahme des
Zwischenbodens einstecken, andrücken und mit dem
Gummihammer etwas nacharbeiten (3)� Bitte vorsichtig
hämmern und auf geraden Sitz der Zwischenstücke achten�
• Den unteren Boden (Oberseite nach unten) auf die
befestigten Zwischenstücke aufsetzen, andrücken und
mit dem Gummihammer nacharbeiten (4)� Bitte vorsichtig
hämmern�
• Jeweils die Bolzen der Räder, in die Gewinde auf der (5)
Unterseite des Bodens erst per Hand eindrehen, davon die 2
Räder mit Feststeller nebeneinander an einer kurzen Seite�
• Mittels passenden Maulschlüsseles die Räder an den
Sechskantschrauben nun fest-drehen� (5)
• Drehen Sie den Wagen nun um (Räder nach unten), stellen
die Feststeller fest, dass der Wagen nicht wegrollt und
setzen Sie die Grie links und rechts in den oberen Boden
ein, andrücken und mit dem Gummihammer etwas
nacharbeiten� (6) Bitte vorsichtig hämmern!
• Vor Gebrauch säubern Sie den Wagen mit einem milden
Reinigungsmittel, Wasser und einem weichen Tuch;
entfernen mit klarem, warmen Wasser die
Reinigungsmittelreste und wischen den Tisch mit einem
weichen Tuch trocken� (7)
• You need a rubber hammer (Fig. H) and a size 7 spanner
for wheel assembly�
• Carefully remove all parts from the box and remove
packing material�
• Place the oor on top with the top on the oor, on a
blanket / cloth to avoid scratches�
• Insert 4 intermediate pieces (aluminium rod) into
the bottom receptacle, press them against the oor
and rework them slightly with the rubber hammer
(1)� Please hammer carefully and ensure that the
intermediate pieces are seated straight�
• Place the intermediate oor (upper side down) on the
xed intermediate pieces press down and nish with
the rubber hammer (2)� Please hammer carefully�
• Insert the intermediate pieces into the receptacle of the
intermediate bottom), press them down and rework
slightly with the rubber hammer (3)� Please hammer
carefully and ensure that the intermediate pieces are
seated straight�
• Place the lower bottom (upper side down) on the xed
spacers, press down and nish with the rubber hammer�
(4) Please hammer carefully�
• First screw the bolts of the wheels into the threads on
the underside of the oor by hand, of which the 2
wheels with brakes next to each other on a short side�
(5)
• Now tighten the wheels on the hexagon screws using a
suitable open-end wrench� (5)
• Turn the trolley over (wheels down), check that the
trolley does not roll away and insert the handles left
and right into the upper oor, press them down and
nish with the rubber mallet� (6) Please hammer
carefully!
• Before use, clean the trolley with a mild detergent, water
and a soft cloth; Remove the cleaning agent residues
with clear, warm water and wipe the table dry with a
soft cloth� (7)

8Stand 09/18 TM
Hergestellt in P�R�C / made in P�R�C
Händler / Dealer:
SARO Gastro-Products GmbH
Sandbahn 6, 46446 Emmerich am Rhein, Deutschland
Tel� +49(0)2822 9258-0
Fax +49(0)2822 18192
E-Mail info@saro�de
Web: www�saro�de
VERPACKUNGS-ENTSORGUNG PACKAGING-DISPOSAL
Die Verpackungsmaterialien bitte
entsprechend trennen und den zuständigen
Sammelstellen zur Wiederverwertung und zur
Umweltschohnung zuführen�
Please separate the packaging materials accordingly and
return them to the responsible collection points for recycling
and for environmental housing�
This manual suits for next models
3
Table of contents