SATO KEIRYOKI TM-35 User manual

1
Instruction Manual
Multifunctional Timer Model TM-35
Thank you for purchasing the Multifunctional timer model TM-35.
Read this manual thoroughly before using and keep it in a safe place for your future references.
Features
. Four timers are displayed at the same time
. Repeat function that can repeatedly display the set time
. Timer and Clock is switchable in T1 display section
Names of Components
How to Use
⚫Switching clock and timer.
Press the Clock/Timer switch button on the back of the unit to switch the clock display and timer display in T1
display section.
* When clock is displayed, press "T1" key to switch the display to timer.
⚫Adjusting the clock time
①Press the Clock/Timer switch button on the back of the body to display the clock in the T1 display section
②Hold the Clock/Timer switch button for approx. 2 sec. and "12hr" is blinking. If the 24-hour display is
required, select "24hr" by pressing the Hour/Minute▲key or the Minute/Second▲key. Select "12hr"
for the 12-hour display.
* When the 12-hour display is selected, "AM" or "PM" lights.
③Press the Clock/Timer switch button. Then hour and minute displays are blinking. Set hour by pressing
the Hour/Minute▲key and also set minute by pressing the Minute/Second▲key.
. Holding down the key will quickly change numbers.
. If no button is pressed for 30 seconds, automatically the setting is completed and it returns to the Clock
display.
④Press the Clock/Timer switch button to complete the setting and it returns to the Clock display
Stand
Clock/Timer
switch button
Magnet
Hole for mount
Battery compartment lid
T2
T3
T4
T1/Clock
display
section
Setting keys
Display
Hour/Minute▲ key
Minute/Second▲ key
Reset key
Start/Stop key

2
⚫Setting the alarm
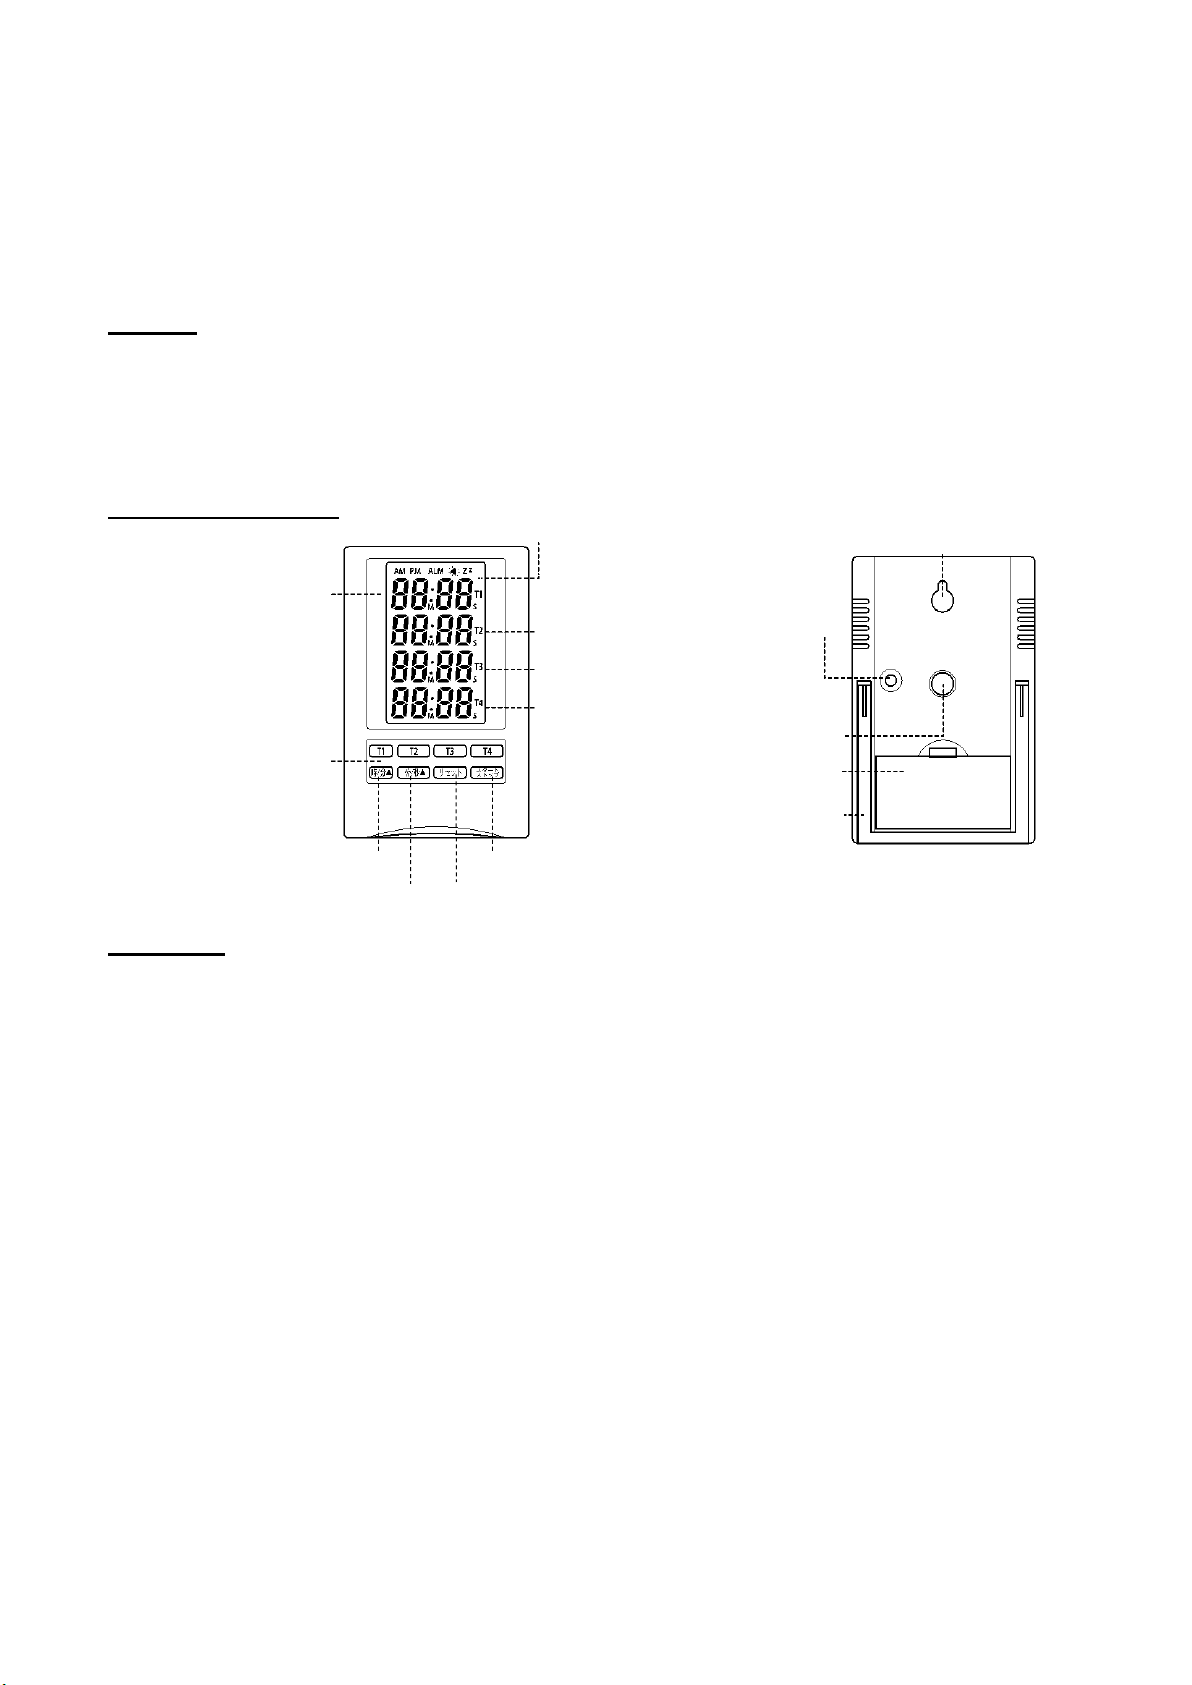
①Press the Clock/Timer switch button on the back of the unit to display the clock in the T1 display section
②Press the Clock/Timer switch button again and "ALM" is blinking
③Hold the Clock/Timer switch button for approx. 2 sec. Hour and minute are blinking and " " lights.
Press the Hour/Minute▲key to set the hour and press the Minute/Second▲key to set the minute.
. If blinking is left for 30 sec., the setting is completed automatically and returns to the Clock display.
④Press the Clock/Timer switch button to complete the setting and it returns to the Clock display
⚫Alarm ON/OFF
. When alarm function is active, " " lights. Press the Start/Stop key in alarm setting display to cancel
the alarm function and " " disappears. Press the Start/Stop key in alarm setting display to turn on
the alarm function again. " " lights.
. When the time reaches to the alarm setting time, the electric sound beeps for 1 min. Press any key other
than the Start/Stop key to stop the sound. If the Start/Stop key is pressed, the snooze function becomes
active and "Zz" displays. In this case, the sound stops once, but the sound begins to beep again after 5 min.
. If any key other than the Start/Stop key is pressed during the snooze function is active, the snooze function
is released and "Zz" disappears.
⚫Setting the countdown time
* This is an example in T1 display section. For T2, T3 or T4, read T1 as T2, T3 or T4.
①Press T1 key and "T1" is blinking. Press the Reset key to display 00 min. 00sec.
②Press the Hour/Minute▲key and/or the Minute/Second ▲key to set your required time.
. Holding down the key will quickly change numbers.
③Press the Start/Stop key to start counting down every second.
. When the Start/Stop key is pressed during the "T1" is blinking, countdown stops temporarily.
. If the Start/Stop key is pressed during the countdown is suspended, countdown starts again.
. If the Reset key is pressed during countdown is suspended, the countdown is canceled and the display
returns to 00 min. 00 sec.
. When "T1" is not blinking, press T1 key.
④When the display of the countdown time reaches "00M00S", alarm sounds for approx. 60 sec.
. Press any key to stop the alarm sound. The display returns to the set time by the repeat function.
* Even if the clock is displayed by pressing the Clock/Timer switch button during the countdown, the
countdown continues actively.
* It is available to use the timers No. T1, T2, T3 and T4 at the same time and the sound of each timer is
"Beep", "Beep, Beep", "Beep, Beep, Beep" and "Beep, Beep, Beep, Beep" respectively.
If the next alarm begins to sound while the first alarm is beeping, the first alarm stops and the display
returns to the set time.

3
⚫Setting the count-up time
* This is an example in T1 display section. For T2, T3 or T4, read T1 as T2, T3 or T4
①Press T1 key and "T1" is blinking. Press the Reset key to display 00 min. 00sec.
②Press the Start/Stop key to start counting up every second.
. When the Start/Stop key is pressed during the "T1" is blinking, the count stops temporarily.
. If the Start/Stop key is pressed during count is suspended, count starts again.
. If the Reset key is pressed during the count is suspended, the count is canceled and the display returns
to 00 min. 00sec.
. When"T1"is not blinking, press T1 key.
③When the count reaches to 99 min. 59 sec., the counting-up stops but alarm does not sound at this time.
. Even if the Clock/Timer switch button is pressed to display the clock during counting, the counting-up
continues.
. It is available to use the timers No. T1, T2, T3 and T4 at the same time.
Replacing Batteries
When the battery is insufficient, the display may dim or timers may not work correctly.
Replace the battery immediately.
(1) Remove the battery compartment lid on the back of
the unit by pushing up to the direction of the arrow.
(2) Remove the used battery and load new battery with
the right polarities (+ and -).
(3) Reinstall the battery lid.
*The battery life of the one set in the unit may be shorter because it sets for monitoring purpose.
*For environmental conservation, dispose of used battery in compliance with local rules and
regulations.
Warnings
Do not solder, short-circuit, disassemble, heat or fire a battery to avoid an exothermic heat, a leakage of
battery fluid or an explosion.
If the leaked fluid is spilt on your clothes or your skin, wash it off with water and if it gets into your eyes,
wash it off with clean water and seek a medical attention immediately.
Battery poses a danger of suffocation or poisoning if swallowed. Keep batteries out of reach of children.
When disposing or storing a battery, seal the battery terminals with a tape. If the battery terminals
directly contact with metals and other batteries, it might cause an explosion or damage.
Cations in operation
When the battery is exhausted, be sure to replace the battery to new one. Otherwise improper operation
may be produced.
Never disassemble or modify this unit. Doing so may result in failure
If the unit becomes dirty, wipe it with a dry soft cloth
Battery compartment lid

4
Specifications
Cat. No. : 1708-02
Name : Multifunctional Timer
Model : TM-35
Timer : Countdown time : Between 1 sec. to 99 min. 59 sec.
Count-up time : Between 1 sec. to 99 min. 59 sec.
Clock : 12-hour display/24-hour-display (instrumental error: ±30 sec. per month)
Power Requirements : "AAA" size battery x 1 pc.
Battery life : Approx. one year (in use of 30 sec.-alarm once a day)
Material (Body) : ABS resin
Dimensions : 69 (W) ×110 (H) × 16.5 (D) mm
Weight : approx. 77 g (including battery)
Accessories : one AAA size battery, instruction manual
Warranty Policy
Our products are warranted to be free from defects in materials and workmanship for a period of one year
from date of delivery. If repair or adjustment is necessary and has not been the result of abuse or misuse
within the one-year-period, please return the units on - Freight Prepaid –basis and correction of the defect
will be made without charges. We alone will determine if the product problem is due to deviations or
customer misuse.
Out-of-warranty products will be repaired on charge basis.
Warranty during transportation
The warranty during transportation only applies to the products that we arrange the shipment. The case
that the products had been purchased in domestic and were sent to overseas by the purchaser is out of
warranty.
Return of items
Authorization must be obtained from us before returning items for any reason. When applying for
authorization, please include data regarding the reasons the items are to be returned.
Please note that we reserve the right to make improvements in design, construction and appearance of our
products without notice.
3-4, Kanda-kajicho, Chiyoda-ku, Tokyo 101-0045 Japan
URL: http://www.sksato.co.jp/english/
Table of contents
Other SATO KEIRYOKI Timer manuals