manuals.online logo
Brands
  1. Home
  2. •
  3. Brands
  4. •
  5. Saxby Lighting
  6. •
  7. Landscape Lighting
  8. •
  9. Saxby Lighting Dax CCT Bollard User manual

Saxby Lighting Dax CCT Bollard User manual

www.saxbylighting.com
Instruction manual
92310
Dax CCT Bollard
Saxby Lighting. BH17 7BY
V2 05/06/2020
We recommend cleaning with a soft dry cloth. Do not use solvents or abrasive cleaners as these could damage the finish.
For your safety, always switch off the power supply before cleaning.
Care and Safety
Technical data
240 V~, 50 Hz
Supply
Voltage:
Bulb
Type: 20W LED module (SMD) CCT, 3000/4200/6000K
The light source of this luminaire is not replaceable; when the light source reaches its end of life the whole
luminaire shall be replaced.
Conformity with all relevant EC Directive requirements.
This is a Class 1 product and must be earthed.
Waste electrical products should not be disposed of with household waste. Please recycle where facilities
exist. Check with your Local Authority or local store for recycling advice.
This product is rated at IP65.
IP
65
You have correctly identified the wires.
The connections are tight.
No loose strands have been left out of the connection block.
Check that...
Having correctly identified the wiring from your existing light fitting, pull the mains wire through the hole and connect to the
terminal block(not supplied) in the following way:
Wiring
SUPPLY LIGHT FITTING
BLUE (N)
NEUTRAL
EARTH
SWITCHED LIVE BROWN (L)
GREEN / YELLOW
This product is not suitable for dimming.
Warning
This is a Class 1 product and must be earthed.
Please read these instructions carefully before commencing any work.
This unit must be fitted by a competent and qualified electrician.
Install in accordance with the IEE Wiring regulations and current Building Regulations.
Check the pack and make sure you have all the parts listed.
To prevent electrocution switch off at the mains supply before installing or maintaining this fitting. Ensure other persons cannot
restore the electrical supply without your knowledge.
This light fitting should be connected to a circuit with a 30mA RCD fitted.
If replacing an existing fitting, make a careful note of the connections.
This product is not suitable for location in or near a marine environment.
This system contains non-replaceable parts and cannot be serviced. If damage occurs the part should be scrapped.
Waste electrical products should not be disposed of with household waste. Please recycle where facilities exist. Check with
your local authority or retailer for recycling advice.
Thank you for purchasing this light fitting. Please read the instructions carefully before use to ensure safe and satisfactory
operation of this product. Please retain these instructions for future reference.
Layout
Plan the desired layout of these fittings carefully, ensuring the cables will reach the distances between connector and
the light fitting.
Avoid locating any cables in positions that would cause a hazard. Position cables and junction boxes
(not supplied) away from areas where they may be at risk from being cut, trapped or damaged.
The mains supply cable must have a minimum cross section area of 1.0mm2
Cables must be protected using suitable conduit or plastic trunking.
This product has special protection against the ingress of moisture and is IP65 rated.
Installation
Existing fittings must be completely removed before installation of a new product. Before removing the existing fitting, carefully
note the position of each set of wires.
Note that the switch is turned off before installation.
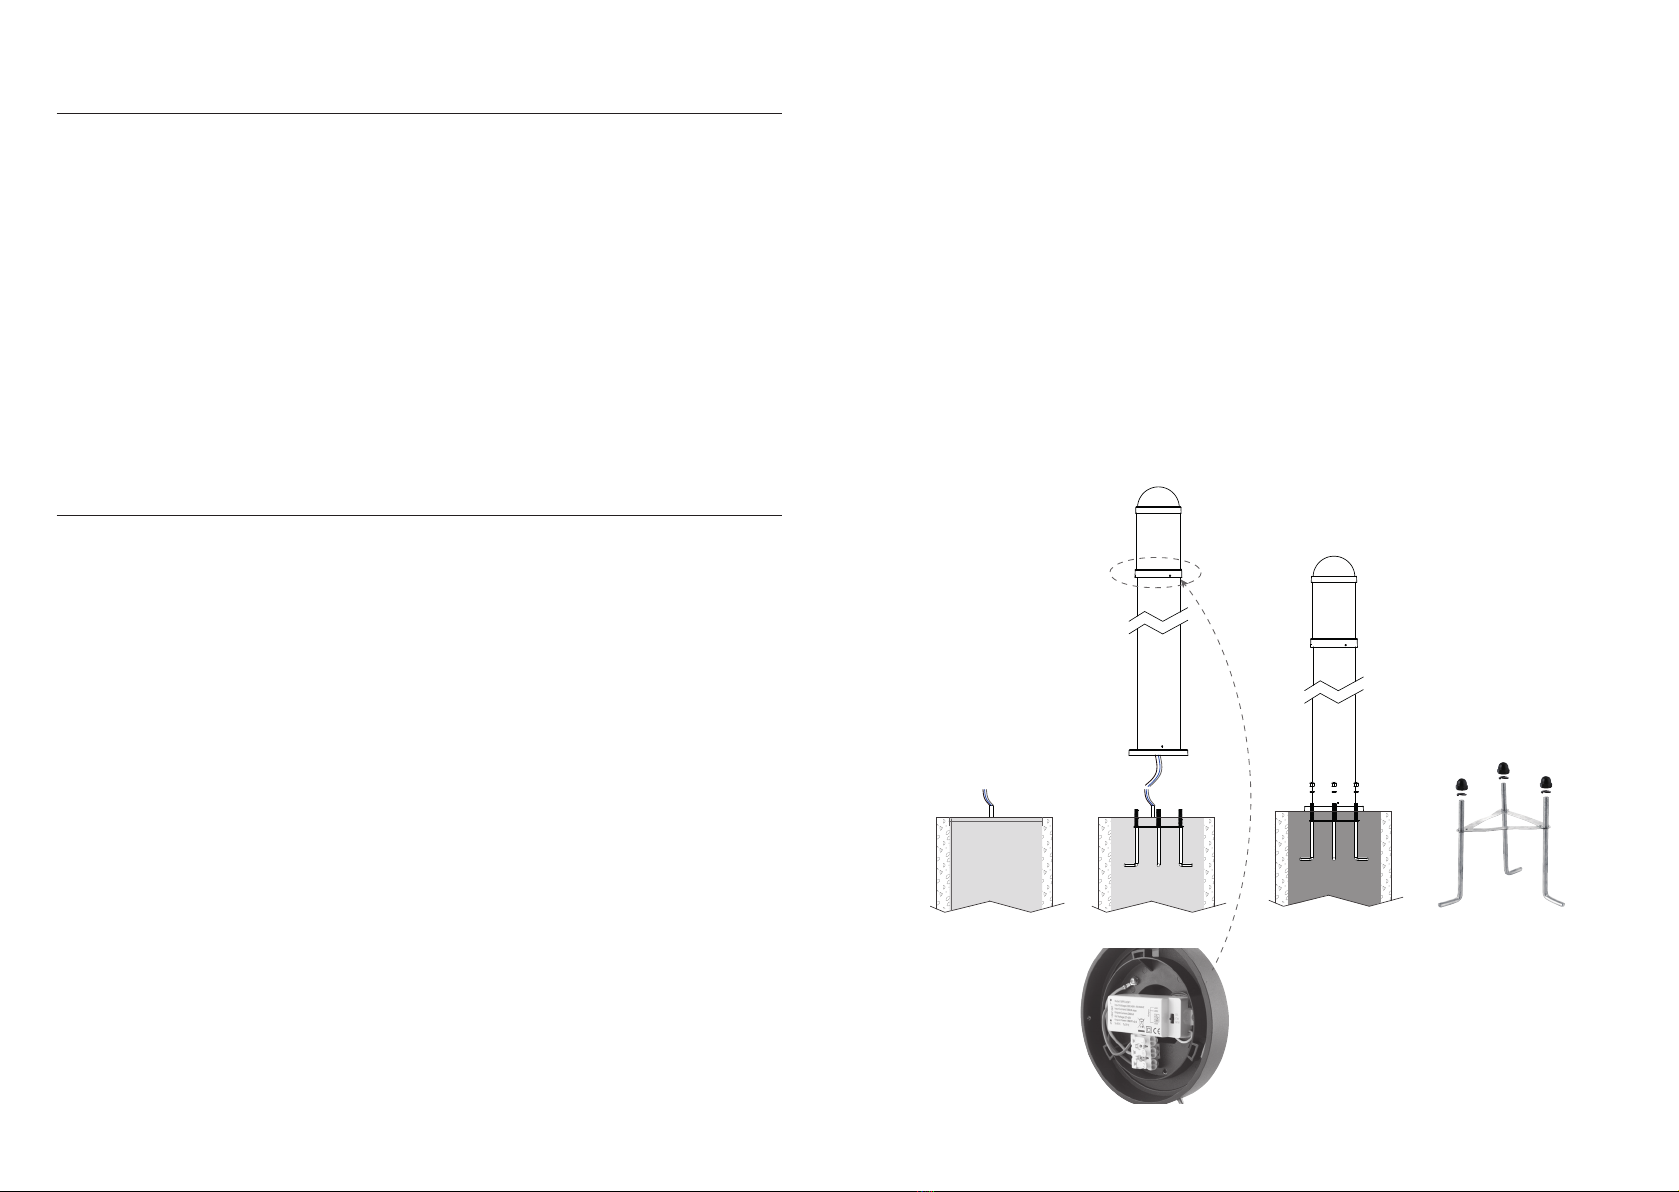
This product must be mounted onto a concrete base or paving slab. It should be not directly installed in the soil.
• Prepare the hole for the root kit. The foundation should be a minimum of 175mm diameter with a minimum depth 150mm.
• Pour cement into the hole, ensuring the cement is finished level and smooth.
• Ensure a suitable amount of supply cable is exposed so the fitting can be correctly wired after the foundation has been
prepared. Insert the anchor bolts into the wet cement ensure the top plate is resting level on top of cement with the
threads exposed.
• Wire as detailed wiring.
• Locate the base of the bollard over the anchor bolts and secure in place using the supplied spring washers.
• Ensure that the cable is not snagged.
• Replace fuse or circuit breaker and switch on. Your light ready now for use.
root kit
Min.Ø175mm
Min.150mm
This product is colour changing and can be either warm white (3000K) or cool white (4200K) or
daylight white (6000K), the default setting is cool white (4200K).
Before installing, need unscrew 3 screws to find out the switch located on head of the lamp body then choose your
preferred colour by using the switch.
This product is colour changing and can be either
warm white (3000K) or cool white (4200K) or
daylight white (6000K), the default setting is
cool white (4200K).
Before installing, need unscrew 3 screws to find out the
switch located on head of the lamp body then choose your
preferred colour by using the switch.

This manual suits for next models

1

Other Saxby Lighting Landscape Lighting manuals

Saxby Lighting EL-40104 User manual

Saxby Lighting

Saxby Lighting EL-40104 User manual

Saxby Lighting Islay 68784 Manual

Saxby Lighting

Saxby Lighting Islay 68784 Manual

Saxby Lighting PYRAMID User manual

Saxby Lighting

Saxby Lighting PYRAMID User manual

Saxby Lighting Hades 91954 User manual

Saxby Lighting

Saxby Lighting Hades 91954 User manual

Saxby Lighting Bodenn 78646 User manual

Saxby Lighting

Saxby Lighting Bodenn 78646 User manual

Saxby Lighting Canillo 67699 User manual

Saxby Lighting

Saxby Lighting Canillo 67699 User manual

Popular Landscape Lighting manuals by other brands

LIGMAN VIENNA 1 installation manual

LIGMAN

LIGMAN VIENNA 1 installation manual

VIBIA Boxes 4600 Assembly instructions

VIBIA

VIBIA Boxes 4600 Assembly instructions

B-K lighting Precision2 HP2 Series quick start guide

B-K lighting

B-K lighting Precision2 HP2 Series quick start guide

Griven Dune MC MK3 user manual

Griven

Griven Dune MC MK3 user manual

Malibu Boats LZ11101P instructions

Malibu Boats

Malibu Boats LZ11101P instructions

PondMAX 24PL694 instruction manual

PondMAX

PondMAX 24PL694 instruction manual

LUG URBANO LED Installation instruction

LUG

LUG URBANO LED Installation instruction

LightPro Castor 8 user manual

LightPro

LightPro Castor 8 user manual

XanLite BOFE40WNW manual

XanLite

XanLite BOFE40WNW manual

LIGMAN NYB-30237 installation manual

LIGMAN

LIGMAN NYB-30237 installation manual

Paradise Datacom GL28220 quick start guide

Paradise Datacom

Paradise Datacom GL28220 quick start guide

AMP Lighting AggregatePro AAL-1013 B-BZ Series Installation & maintenance guide

AMP Lighting

AMP Lighting AggregatePro AAL-1013 B-BZ Series Installation & maintenance guide

Faro Barcelona GARTEN 73103 instructions

Faro Barcelona

Faro Barcelona GARTEN 73103 instructions

UMENA AlvaLED MR16 TWIN instructions

UMENA

UMENA AlvaLED MR16 TWIN instructions

AMP Lighting ASAL-1025-B-BZ Installation & maintenance guide

AMP Lighting

AMP Lighting ASAL-1025-B-BZ Installation & maintenance guide

Malibu Boats LZ313 instructions

Malibu Boats

Malibu Boats LZ313 instructions

Vista 4260 Landscape series installation instructions

Vista

Vista 4260 Landscape series installation instructions

Malibu Boats CL191SM quick start guide

Malibu Boats

Malibu Boats CL191SM quick start guide

manuals.online logo
manuals.online logoBrands
  • About & Mission
  • Contact us
  • Privacy Policy
  • Terms and Conditions

Copyright 2025 Manuals.Online. All Rights Reserved.