SB SB-SP7200-GSM User manual

INSTRUCTION MANUAL
Revised: August 28, 2014
All-In-One GSM Home Alarm System
SB-SP7200-GSM

Page 2
All-In-One GSM Home Alarm & Video System Product Manual : SB-SP7200-GSM
www.SafetyBasement.com Phone: 877-345-2336 Fax: 888-236-2524
PRODUCT REFERENCE
REMOTE
CONROL
USB CABLE
(2) DOOR /
WINDOW
UNITS
MOUNTING
ACCESSORIES
MOUNTING
ACCESSORIES
PIR / MOTION
DETECTION
UNIT
MAIN UNIT POWER
ADAPTER

Page 3
All-In-One GSM Home Alarm & Video System Product Manual : SB-SP7200-GSM
www.SafetyBasement.com Phone: 877-345-2336 Fax: 888-236-2524
PRODUCT REFERENCE
CAMERA LENS
IR LIGHTS
STATUS LIGHT
MOTION
SENSOR
LIVE LISTENING
MICROPHONE SIREN SPEAKER
SLOW BLINK Device is searching for cellular signal
FLASHES 3 TIMES EVERY
2.5 SECONDS
Connected to cellular signal
LED FLASHES QUICKLY During setup of sensors, unit has connected successfully
STATUS LIGHT
e status light will also blink in other ways depending on the mode you are in. ese three
status blinks are the most important.
SOLAR PANEL
Your alarm system will automatically switch to IR “Night-Vision” when necessary.

Page 4
All-In-One GSM Home Alarm & Video System Product Manual : SB-SP7200-GSM
www.SafetyBasement.com Phone: 877-345-2336 Fax: 888-236-2524
PRODUCT REFERENCE
MICRO SD CARD
SLOT
SIM CARD SLOT
LEARN BUTTON
BACK OF
MAIN UNIT
(BACK COVER
REMOVED)
BOTTOM OF
MAIN UNIT
(BACK COVER
REMOVED)
ON/OFF
SWITCH
CHARGING STATUS
RED - CHARGING
GREEN / OFF - CHARGED
ADAPTER
CONNECTION

Page 5
All-In-One GSM Home Alarm & Video System Product Manual : SB-SP7200-GSM
www.SafetyBasement.com Phone: 877-345-2336 Fax: 888-236-2524
Your GSM Alarm System uses text messages to communicate with you. is requires sending
the unit particular codes. We have put together a list of codes at the end of this manual, but for
now, please follow the instructions in order so that you may best understand how the system
works.
REQUIREMENTS:
You should have the following for proper operation of your GSM Alarm System.
1) Your GSM Alarm System, with the Main Unit, Remote Control, Sensors, a Power Adapter,
USB Cable and mounting accessories.
2) A micro SD Card, up to 32GB. You can order a compatible card from SafetyBasement.com.
Should you already have an SD card, please be sure it has been erased.
3) A cellular SIM card. A compatible card is available from SafetyBasement.com. Please check
with SafetyBasement for SIM card requirement before using another card. ANY SIM card will
require a monthly fee.
4) A small Phillips head screwdriver.
5) 3 AAA batteries for wireless PIR unit.
INTRODUCTION

Page 6
All-In-One GSM Home Alarm & Video System Product Manual : SB-SP7200-GSM
www.SafetyBasement.com Phone: 877-345-2336 Fax: 888-236-2524
INSTALL THE SD CARD
Slide LEFT to UNLOCK
1. Use your Phillips head screwdriver to remove the screw from the
bottom of the main unit.
2. Remove the back of the main unit.
3. With a ngernail, carefully push the silver SD Card slot lock to the
LEFT. It will click into the OPEN position.
4. Raise the silver lock to expose the SD card connection.
5. Place the SD card in the slot as shown, with the gold connectors
down.
6. Lower the silver lock and slide to the RIGHT to lock the SD in
place. It will click into the LOCKED position.
Slide RIGHT to LOCK

Page 7
All-In-One GSM Home Alarm & Video System Product Manual : SB-SP7200-GSM
www.SafetyBasement.com Phone: 877-345-2336 Fax: 888-236-2524
INSTALL THE SIM CARD
Slide UP to
UNLOCK
1. Use your ngernail to slide the lock gate UP. It will click into place
when UNLOCKED.
2. Raise the lock gate.
3. Insert your SIM Card into the lock gate as shown, with the gold
connector facing you, and towards the bottom. e slanted part of
the SIM Card will be on the UPPER RIGHT.
4. Close the lock gate.
5. Slide the lock gate DOWN to lock your SIM Card in place.
6. Do not replace the back of the unit yet...
Slide DOWN to
LOCK

Page 8
All-In-One GSM Home Alarm & Video System Product Manual : SB-SP7200-GSM
www.SafetyBasement.com Phone: 877-345-2336 Fax: 888-236-2524
POWER & CELLULAR SIGNAL
Insert the power adapter plug into the Main Unit.
e Charging Light should be RED. It will remain red for some
time until the backup battery is fully charged.
Turn the Main Unit ON.
Look at the Status Light under the Camera Lense.
Shortly, the Status Light will blink 3 times, every 2.5 seconds.
is means that the Main Unit has found a cellular signal and is
working properly.
If the status light does not blink like this within 2 minutes,
turn o the unit and check the installation of your SD and SIM
Cards.
Try again. If the unit does not blink 3 times, every 2.5 seconds,
try moving the unit to an area where there may be a better
signal.
Try moving on to the next step of this setup to see if you are
connected.
If you are unable to connect, you should check to make
sure your SIM Card has been properly activated. Contact
SafetyBasement or your cellular provider.
STATUS LIGHT

Page 9
All-In-One GSM Home Alarm & Video System Product Manual : SB-SP7200-GSM
www.SafetyBasement.com Phone: 877-345-2336 Fax: 888-236-2524
Your SIM Card has a phone number. You will need this phone number to text or call your GSM
Alarm System. Please write this number down. When using the phone number, you will enter
an 11 digit number, such as 12345551234. at’s 1, followed by your Area Code, then phone
number with NO spaces.
CHECK THE TIME
DEFAULT PASSWORD IS
258000
We will be using standard text messages to communicate with the GSM Alarm system. Use your
standard text app as you would when texting anyone. TIP! Once you know how to work your
GSM Alarm System, use your text app and keyboard shortcuts to making talking to your system
as easy as possible. Refer to your phone and text app instructions for shortcuts.
A list of codes is at the end of this manual.
ALARM NUMBER IS
MY PASSWORD IS
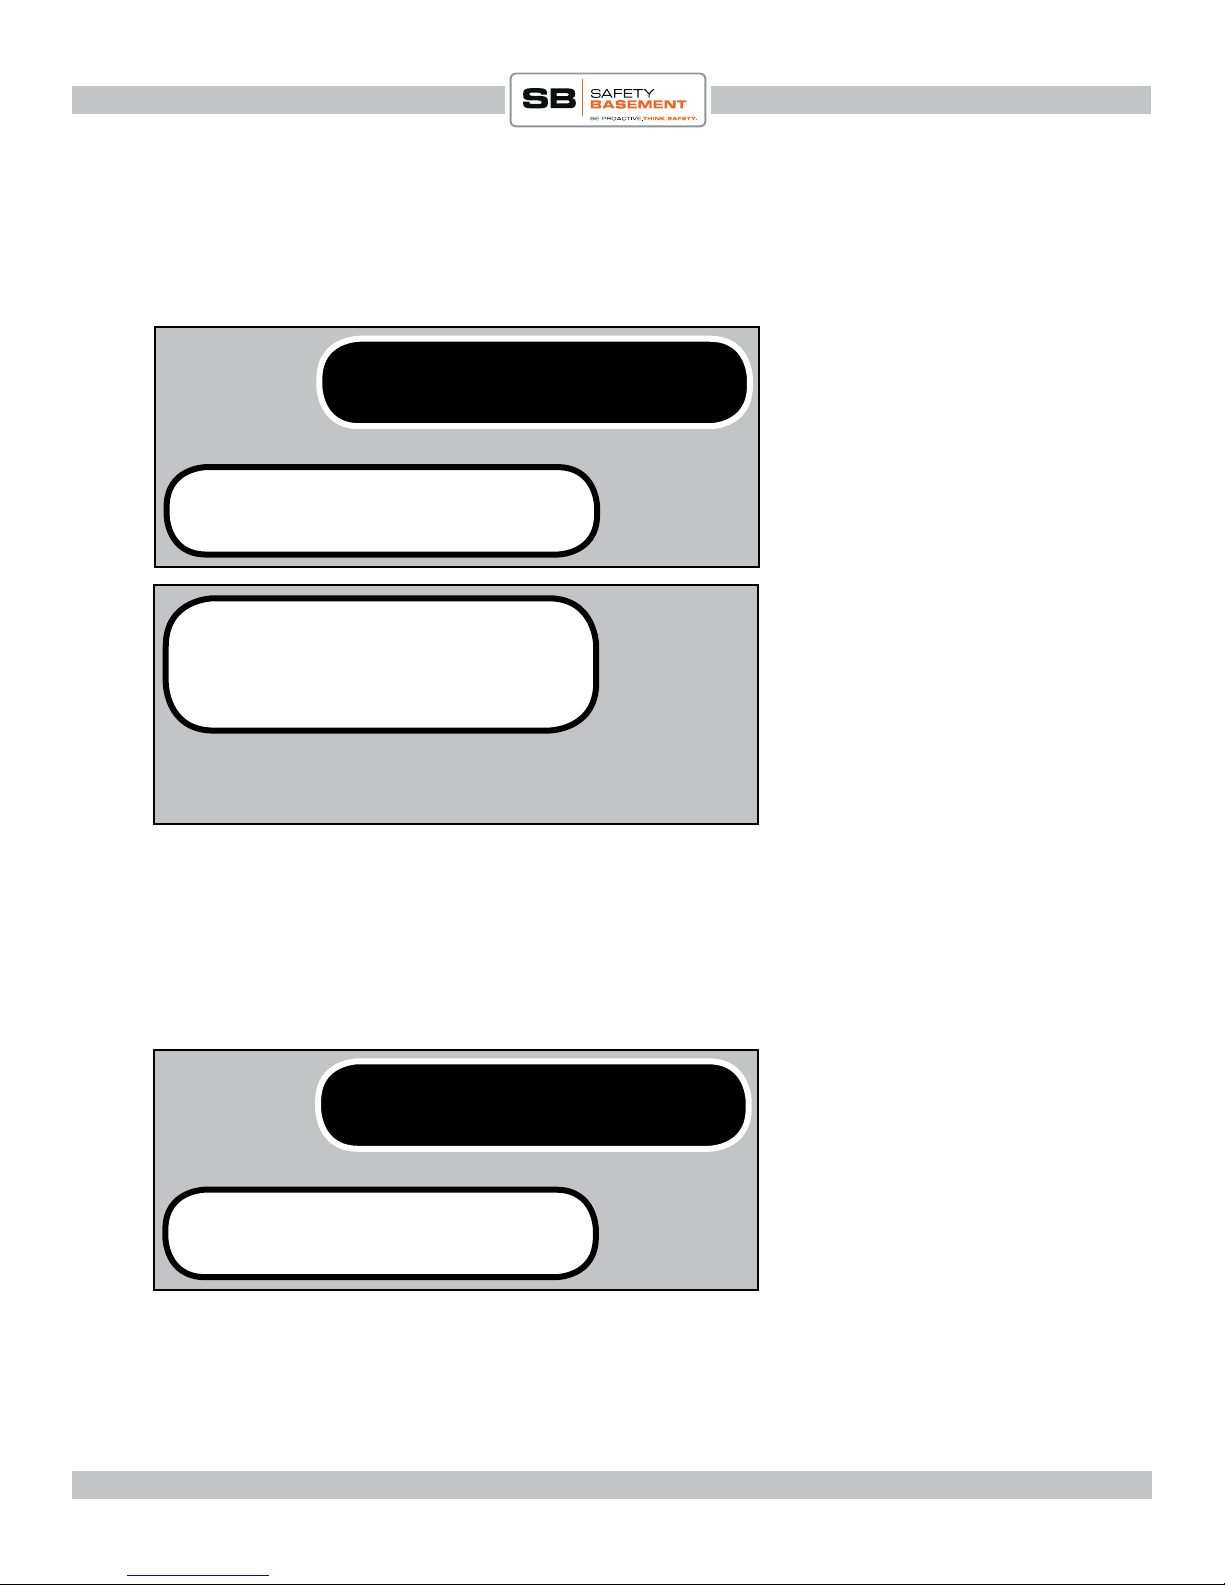
258000#200# Send this text to the phone
number of your SIM card.
>>System time: 16:47 Your alarm should reply within
a few seconds with the system
time. e time is always on a
24 hour clock / military time.
If the system is not responding,
check the format of your text.
Make sure you are sending to
the complete phone number,
11 digits, no spaces.
Your text should also have NO
spaces.

Page 10
All-In-One GSM Home Alarm & Video System Product Manual : SB-SP7200-GSM
www.SafetyBasement.com Phone: 877-345-2336 Fax: 888-236-2524
SET THE TIME
258000#03*1700# Send this text to the phone
number of your SIM card. In
this example, we are setting the
clock to 5pm, 1700.
>>Ok, setting successfully
If you enter the wrong
password, the system will not
respond as a security feature.
If you enter the correct
password, but something is
wrong with the format of your
command, the system will tell
you.
We may need to set the time of day. Remember, the alarm uses a 24 hour clock, military time.
>>Format error, please
input the right command!
SET THE LANGUAGE
258000#00*0# Send this text to the phone
number of your SIM card. In
this example, we are setting the
language to English.
>>Ok, setting successfully
is system can respond in English or Chinese. Choose 00*0 for English. 00*1 for Chinese.

Page 11
All-In-One GSM Home Alarm & Video System Product Manual : SB-SP7200-GSM
www.SafetyBasement.com Phone: 877-345-2336 Fax: 888-236-2524
WHO GETS THE ALERTS?
258000#30*1*13215559987#
Device # 1-5. In this example, we are setting the phone
number for Device #1.
>>Ok, setting successfully
e system can send alert texts to 1-5 numbers. Let’s set up your rst number now. You can go
back later to set up additional numbers. Remember to enter your full 11 digit phone number.
CHANGE THE PASSWORD
258000#01*123456# In this example, we are setting
the passcode to 123456.
>>Ok, setting successfully
So far, so good. So it’s a good time to set the password that you’ll be using from now on. Choose
a password, enter it into the manual for reference later.
Note the full 11 digit phone
number. Remember, this must
be a number that accepts text
messages.
NOTE! From now on, we’ll
be using “PASS” rather than a
number in the examples. Use
your new password here.
PASS#200# Test the new password. Request
the current time.
>>System time: 17:27

Page 12
All-In-One GSM Home Alarm & Video System Product Manual : SB-SP7200-GSM
www.SafetyBasement.com Phone: 877-345-2336 Fax: 888-236-2524
CONNECT A WINDOW SENSOR
We’re going to connect a sensor, then name it. You will follow this guide for each sensor device
you want to add. e system can accept up to 8 sensors. You can give each sensor a name, such
as “Garage” or “Kids Room.”
We’ll start with a Door / Window Sensor. ese work by detecting when the magnet has been
pulled out of range of the sensor.
LEARN BUTTON PULL BATTERY TAB
MAGNET
SENSOR
1. Pull the battery tab from the bottom of the Window Sensor. e red status light should blink
briey.
2. Place the magnet next to the sensor.
3. On the Main Unit, press the LEARN BUTTON. e unit will beep.
4. Now, remove the magnet from the sensor.
5. e Main Unit will beep. e status lights on the Main Unit and Window Sensor will blink.
6. e Window Sensor is now connected wirelessly to the Main Unit.

Page 13
All-In-One GSM Home Alarm & Video System Product Manual : SB-SP7200-GSM
www.SafetyBasement.com Phone: 877-345-2336 Fax: 888-236-2524
MAGNET
SENSOR
NAME A SENSOR
PASS#81*01*Side Door#
Device # 01-08. In this example, we are setting
the name for Device #01.
>>Ok, setting successfully
Each sensor can have a name. We are going to name this Window Sensor “Side Door.” It’s Sensor
#1 out of 8 possible sensors.
Your Sensor Name CAN
include spaces, but your total
text message should be less
than 48 characters.
Sensor #’s are determined by the order they are connected to the Main Unit. Keep track!
You can repeat this setup for the next Window Sensor at another time. Let’s connect the PIR /
Motion Detector Sensor.

Page 14
All-In-One GSM Home Alarm & Video System Product Manual : SB-SP7200-GSM
www.SafetyBasement.com Phone: 877-345-2336 Fax: 888-236-2524
CONNECT THE PIR SENSOR
LEARN BUTTON ON / OFF SWITCH
1. Be sure the On/ O Switch is in the OFF position.
2. Remove the battery cover from the back of the PIR Sensor.
3. Insert 3 AAA batteries into the Sensor. Note the placement of the + and - ends of the
batteries.
4. Put the battery cover back on.
5. On the Main Unit, press the LEARN BUTTON. e Main Unit will beep.
6. Turn on the PIR sensor.
7. Press the LEARN BUTTON on the back of the PIR sensor. e Main Unit will beep.
8. Your PIR Sensor now connected.

Page 15
All-In-One GSM Home Alarm & Video System Product Manual : SB-SP7200-GSM
www.SafetyBasement.com Phone: 877-345-2336 Fax: 888-236-2524
PASS#81*02*Garage#
Device # 01-08. In this example, we are setting the
name for Device #02.
>>Ok, setting successfully
In the setup we’ve been following, the PIR Sensor was added as the 2nd device, #2. We are
going to name Device #2. We’re going to place this sensor in the garage, so let’s name the device
“Garage.”
Your Sensor Name CAN
include spaces, but your total
text message should be less
than 48 characters.
NAME THE PIR SENSOR
Now, following the previous steps, continue to add up to 8 devices to your system, until
complete.

Page 16
All-In-One GSM Home Alarm & Video System Product Manual : SB-SP7200-GSM
www.SafetyBasement.com Phone: 877-345-2336 Fax: 888-236-2524
PASS#80*Alarm At Home!#
>>Ok, setting successfully
e main unit will send you a default message “N2 Emergency Alarm!” You can change this
message. Make sure the total number of characters in your text is under 48. Note that the Main
Unit is #80.
We are changing our alert
message to “Alarm At Home!”
Spaces are allowed in the
message.
MAIN UNIT MESSAGE
PASS#06*1#
>>Ok, setting successfully
You can receive texts about the power status of the System and the wireless sensors. You’ll want
to know when a unit is low on power.
Use 1 to turn on power
messages. Use 0 to turn o
power messages.
POWER REMINDERS

Page 17
All-In-One GSM Home Alarm & Video System Product Manual : SB-SP7200-GSM
www.SafetyBasement.com Phone: 877-345-2336 Fax: 888-236-2524
PASS#07*01#
>>Ok, setting successfully
e siren on the Main Unit can run for 1 to 30 minutes. It can also be set to Silent Alarm. You
will want to test your Siren at least once, so let’s set it for 1 minute.
We have set the siren to run for
01 minute.
THE SIREN
PASS#07*00#
>>Ok, setting successfully
Later, when you know the siren is working properly, you can set it to the length of time you
want. Or, set it for Silent Alarm. A Silent Alarm will NOT use the siren, but will send you text
alerts and record video.
Use 00 to set the Silent Alarm.
SILENT ALARM

Page 18
All-In-One GSM Home Alarm & Video System Product Manual : SB-SP7200-GSM
www.SafetyBasement.com Phone: 877-345-2336 Fax: 888-236-2524
99113377#
>>System reset
If you need to start over, are moving the system to a new location, or any other reason you need
to reset all the settings in your system, use this command. It does NOT require the password.
You will lost ALL settings with
this command.
RESET - IF YOU NEED IT
DO NOT RESET NOW! Use
only if needed.
PASS#21*0#
>>OK, setting successfully
You can quickly delete the Wireless Sensors from the Main Unit, should you need to reset their
locations, or start over.
You will lost ALL wireless
sensor settings with this
command.
DELETE WIRESS SENSORS
DO NOT USE NOW! Use only
if needed.

Page 19
All-In-One GSM Home Alarm & Video System Product Manual : SB-SP7200-GSM
www.SafetyBasement.com Phone: 877-345-2336 Fax: 888-236-2524
e Remote Control activates your Alarm System (ARM) and turns it o (CLR). We are going
to turn the system on, and set o the alarm as a test.
e siren is quite loud! Protect your hearing during this test! Be prepared to press CLR on the
Remote Control to turn o the siren as quickly as possible.
ARM BY REMOTE
Press ARM to Arm your alarm
system.
Press CLR to shut o the siren
and disarm the system.
Press the ARM button, and the system will arm itself in 30 seconds. Normally, you will have
30 seconds to leave the area. For this test, remain near the unit, protect your hearing and be
prepared to CLR the alarm.
1. Press ARM.
2. e Main Unit will beep. e status light will blink during the 30 second countdown.
3. e status light will be Steady aer 30 seconds. e system is now armed.
4. For your test, wave your hand across the sensor of the main unit, or your PIR wireless
sensor, or pull the maget away from the Window sensor.
5. e main unit will beep once, then a few seconds later, the alarm siren will sound.
6. Press CLR on the remote control to stop the siren and deactivate the alarm.
Alarm at home!
We received 2 messages from
our system during the test.
Note that the Garage alarm was
set o in this test.
Garage

Page 20
All-In-One GSM Home Alarm & Video System Product Manual : SB-SP7200-GSM
www.SafetyBasement.com Phone: 877-345-2336 Fax: 888-236-2524
PASS#101#
>>OK, system armed.
A reminder, if you’re satised with the siren, you might want to turn on SILENT ALARM for
the remainder of testing and during your installation of your devices. en, set the siren length
for your desired time once the system is in place.
Send the 101 command to turn
the system ON.
ARM VIA TEXT MESSAGE
PASS#102#
>>OK, system disarmed.
A reminder, if you’re satised with the siren, you might want to turn on SILENT ALARM for
the remainder of testing and during your installation of your devices. en, set the siren length
for your desired time once the system is in place.
Send the 102 command to turn
the system OFF.
DISMARM VIA TEXT MESSAGE
As with the remote control, the system will countdown 30 seconds, then arm.
Table of contents