manuals.online logo
Brands
  1. Home
  2. •
  3. Brands
  4. •
  5. SCA
  6. •
  7. Construction Equipment
  8. •
  9. SCA PLU 214468 User manual

SCA PLU 214468 User manual

1 2
SPECIFICATIONS
RAM CAPACITY: 12,000kg
PIPE BENDING DIAMETER RANGE: 1/2”, 3/4”, 1”, 1-1/4”, 1-1/2”, 2”
MAXIMUM BEND: 90 Degrees
SAVE THIS MANUAL
Retain the manual for the safety warnings and precautions, assembly instructions,
operating and maintenance procedures, parts list and diagram. Keep your invoice with this
manual. Write the invoice number on the inside of the front cover. Keep the manual and
invoice in a safe and dry place for future reference.
SAFETY WARNINGS AND PRECAUTIONS
WARNING: When using tool, basic safety precautions should always be followed to reduce
the risk of personal injury and damage to equipment.
Read all instructions before using this tool!
1. Keep work area clean. Cluttered areas invite injuries.
2. Observe work area conditions. Do not use machines in damp or wet
locations. Don’t expose to rain. Keep work area well lighted.
3. Keep children away. Children must never be allowed in the work area. Do not let them
handle machines, tools, or extension cords.
4. Store idle equipment. When not in use, tools must be stored in a dry location to inhibit
rust. Always lock up tools and keep out of reach of children.
5. Do not force tool. It will do the job better and more safely at the rate for which it was
intended. Do not use inappropriate attachments in an attempt to exceed the tool capacity.
6. Use the right tool for the job. Do not attempt to force a small tool or attachment to do
the work of a larger industrial tool. There are certain applications for which this tool was
designed. Do not modify this tool and do not use this tool for a purpose for which it was
not intended.
7. Dress properly. Do not wear loose clothing or jewelry as they can be caught in moving
parts. Protective, electrically non-conductive clothes and non-skid footwear are
recommended when working. Wear restrictive hair covering to contain long hair.
8. Use eye and ear protection. Always wear AS/NZS approved impact safety goggles.
Wear a full face shield if you are producing metal filings or wood chips. Wear an AS/NZS
approved dust mask or respirator when working around metal, wood, and chemical
dusts and mists.
9. Do not over reach. Keep proper footing and balance at all times. Do not reach over or
across machines.
10. Maintain tools with care. Keep tools clean for better and safer performance. Follow
instructions for lubricating and changing accessories.
WARRANTY
This product is guaranteed against defects for a period of 12 months from date of
purchase. This warranty is provided by Super Cheap Auto Pty Ltd ACN 085 395 124
(Supercheap Auto) of 751 Gympie Rd Lawnton QLD 4501 Ph (07) 3482 7500. Supercheap
Auto will offer a repair, replacement product or store credit if the product is assessed as
being defective during the warranty period.
To claim under this warranty, take this product to the Front Service Desk of your nearest
Supercheap Auto store. For store locations, visit www.supercheapauto.com.au (AUS)
or www.supercheapauto.co.nz (NZ). You will need your receipt or proof of purchase.
Additional information may be requested of you to process your claim. Should you not
be able to provide proof of purchase with a receipt or a bank statement, identification
showing your name, address and signature may be required to process your claim.
This product may need to be sent to the manufacturer to assess the defect before
determining any claim. Faults or defects caused by product modification, misuse and
abuse, normal wear and tear or failure to follow user instructions are not covered under
this warranty.
Our goods come with guarantees that cannot be excluded under the Australian Consumer
Law. You are entitled to a replacement or refund for a major failure and for compensation
for any other reasonably foreseeable loss or damage. You are also entitled to have the
goods repaired or replaced if the goods fail to be of acceptable quality and the failure
does not amount to a major failure.
Any expenses incurred relating to the return of this product to store will normally have to
be paid by you. For more information contact your nearest Supercheap Auto store.
The benefits to the consumer given by this warranty are in addition to other rights and
remedies of the Australian Consumer Law in relation to the goods and services to which
this warranty relates.
11. Stay alert. Watch what you are doing, use common sense. Do not operate any tool
when you are tired.
12. Check for damaged parts. Before using any tool, any part that appears damaged
should be carefully checked to determine that it will operate properly and perform its
intended function. Check for alignment and binding of moving parts; any broken parts
or mounting fixtures; and any other condition that may affect proper operation. Any
part that is damaged should be properly repaired or replaced by a qualified technician.
13. Replacement parts and accessories. When servicing, use only identical replacement
parts. Use of any other parts will void the warranty. Only use accessories intended for
use with this tool.
14. Do not operate tool if under the influence of alcohol or drugs. Read warning labels on
prescriptions to determine if your judgment or reflexes are impaired while taking drugs.
If there is any doubt, do not operate the tool.
15. For your safety, maintenance should be performed regularly by a qualified technician.
16. Never exceed 12,000kg limit of ram; ram may be damaged or fail.
WARNING: The warnings, cautions, and instructions discussed in this instruction manual
cannot cover all possible conditions and situations that may occur. It must be understood
by the operator that common sense and caution are factors which cannot be built into this
product, but must be supplied by the operator.
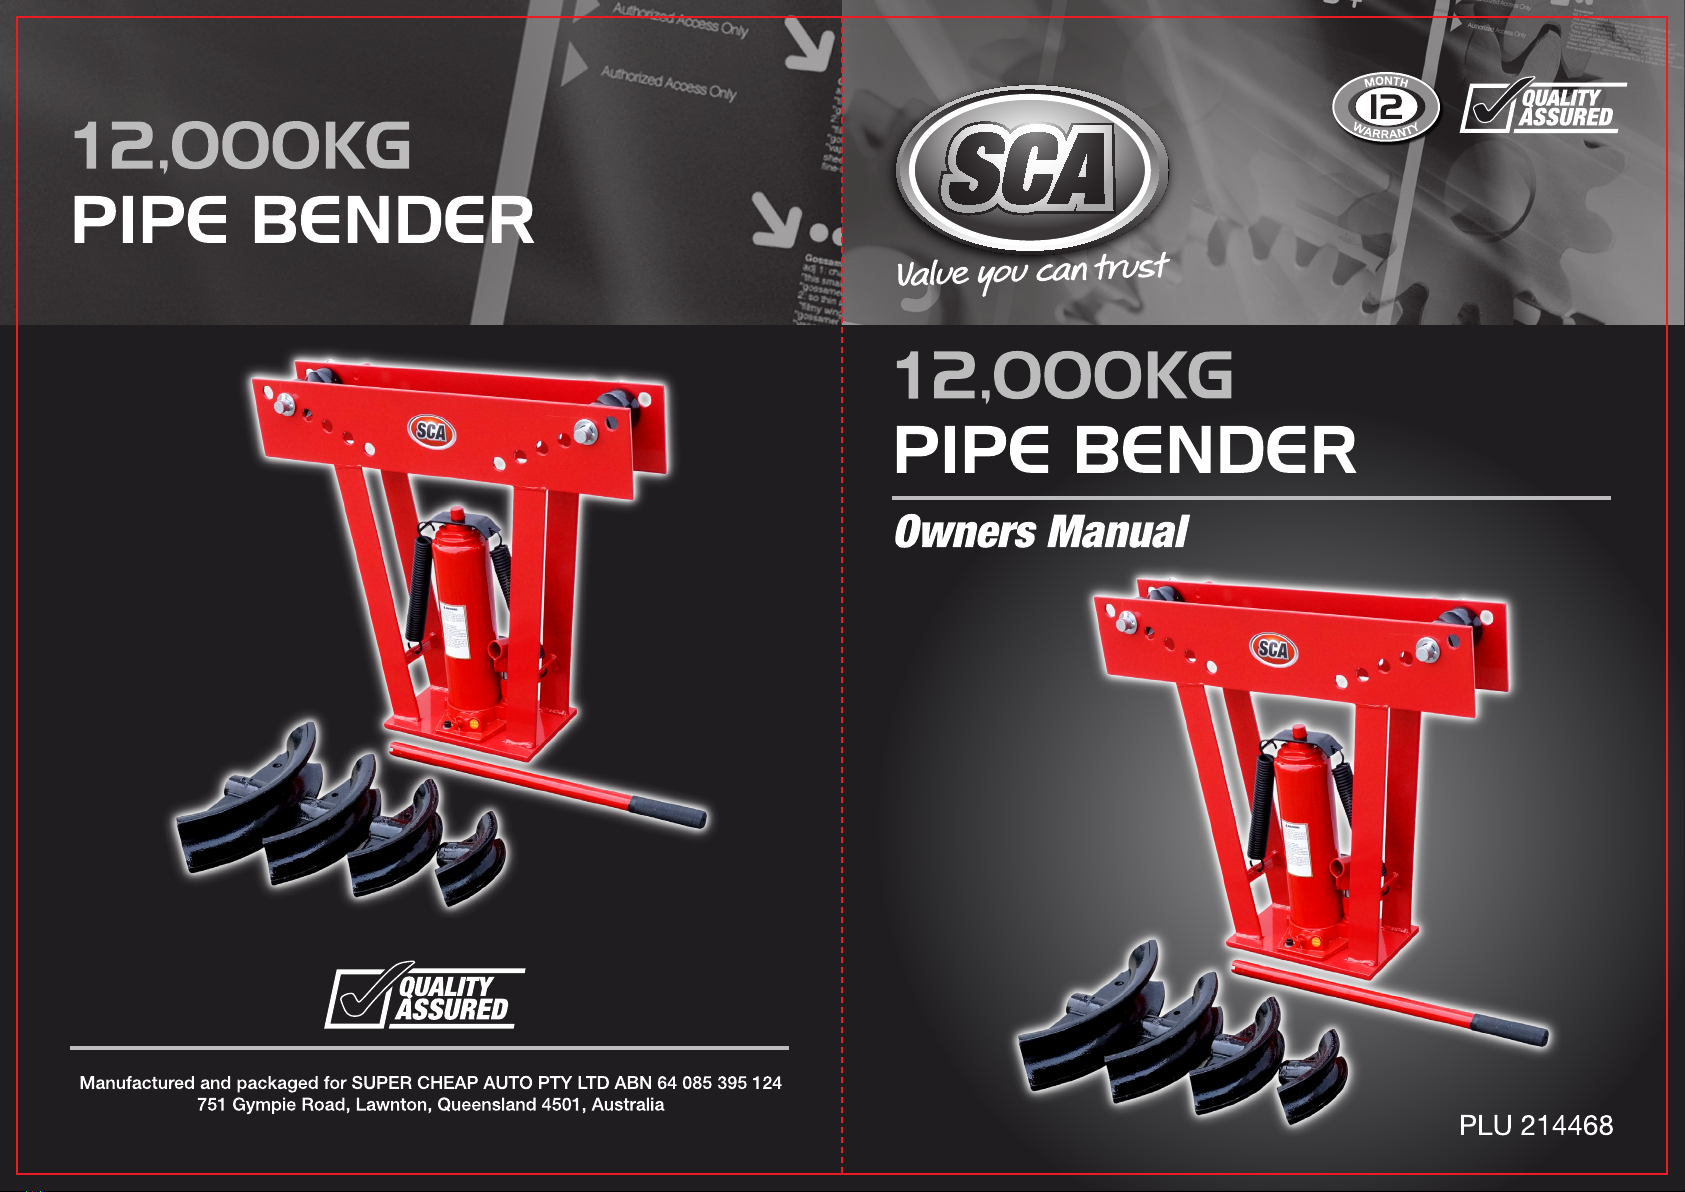
UNPACKING
When unpacking, check to make sure all the parts listed are included. If any parts are
missing or broken, please return to your local store.
NOTE: Some parts are listed and shown for illustration purposes only and are not available
individually as replacement parts.
OPERATION
Note: The Pipe Bender is designed to bend water pipe and heavy gauge galvanized pipe
used in commercial applications. When bending conduit or thin walled pipe, you may
experience problems with kinks or creases. To help limit the problem, fill the pipe with
sand and cap both ends, before bending.
Set Up.
1. Place the Pipe Bender on a solid, flat, level surface. Pipe Bender must always be
clamped or bolted down to a workbench.
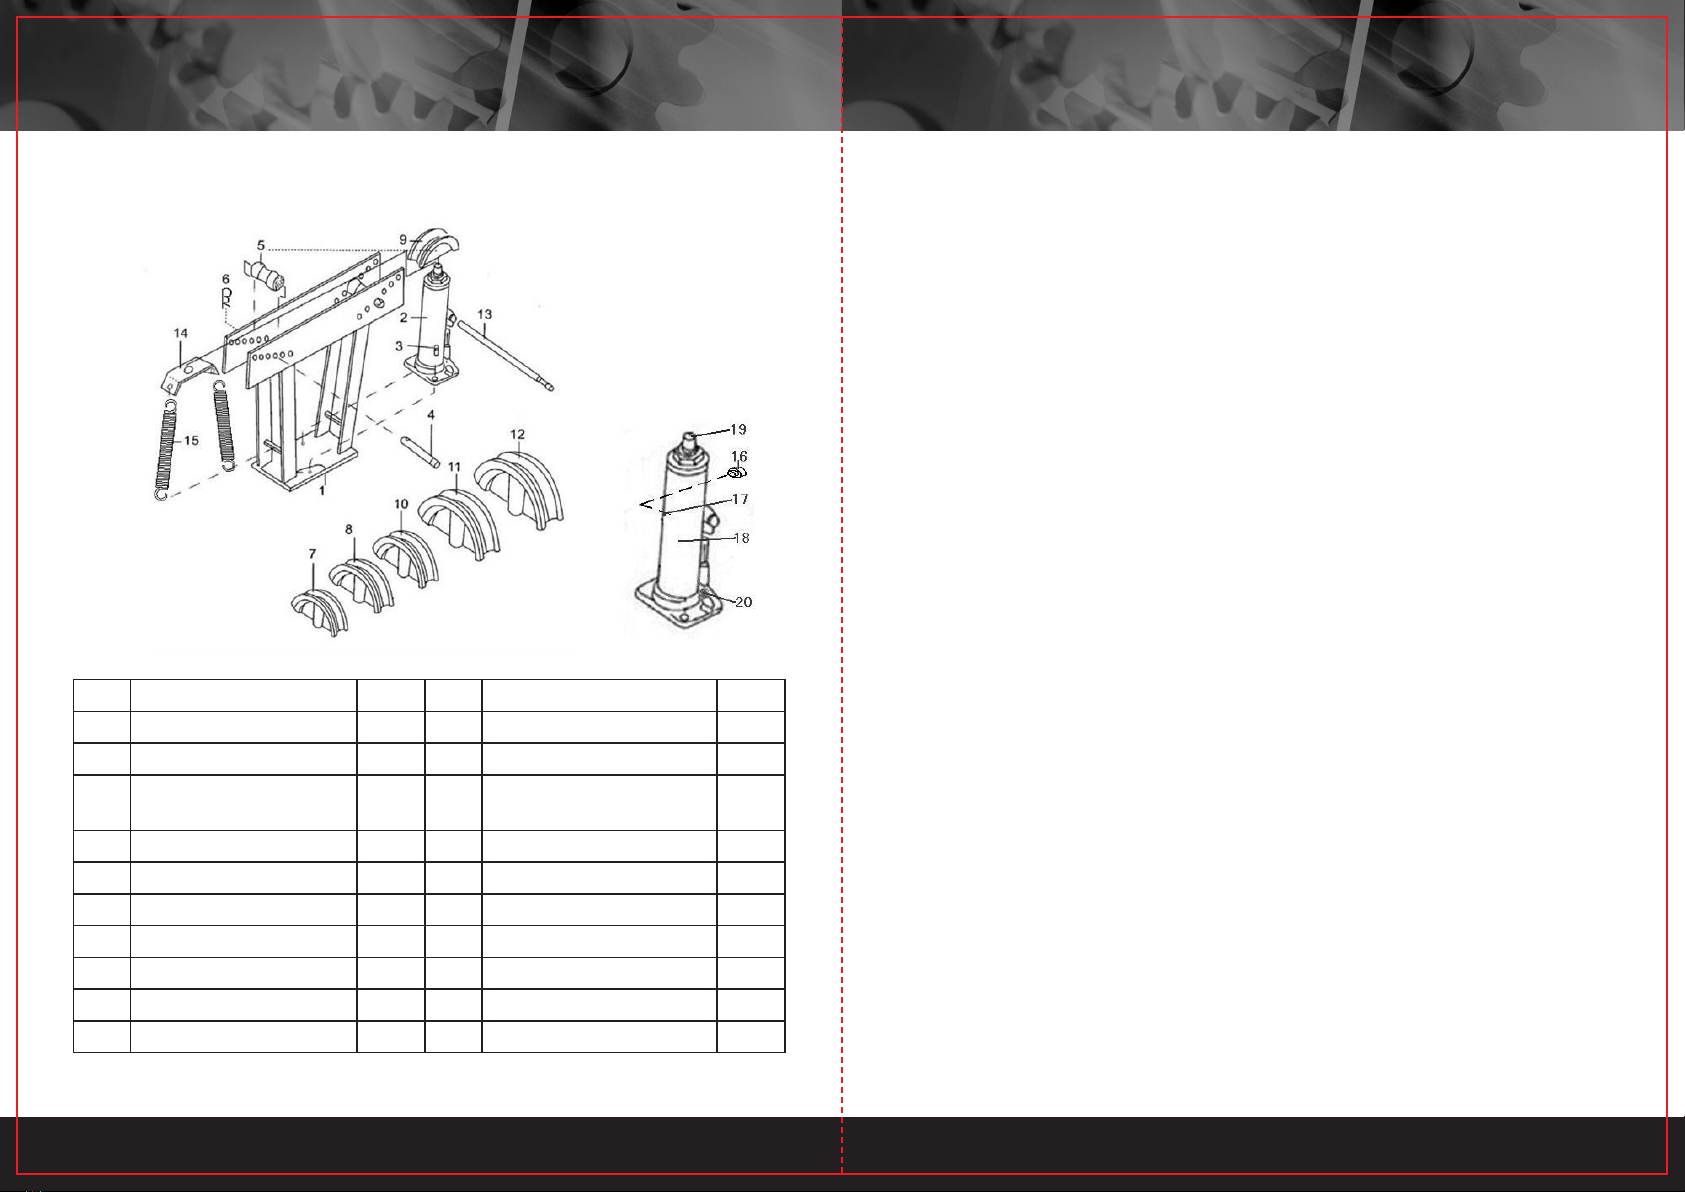
2. Select the Bending Die that matches the size of pipe you want to bend. Each Die is
stamped with the size.
3. Place the Bending Die onto the 12,000kg Ram.
3 4
4. Depending on the size of the pipe you wish to bend, the Rollers might need adjustment
so that the top of the pipe to be bent rests against the bottom of the rollers.
A. Remove both Hitch Pins. Set Aside.
B. Individually, remove a Roller Shaft and move the Rollers to the desired hole in the
Frame. Repeat on other side.
C. One at a time, fully slide the Roller Shaft through the holes in the Frame and the Rollers.
Repeat on other side.
D. Insert both of the Hitch Pins through the Roller Shafts.
5. Slide the pipe you want to bend, through the Pipe Bender on top of the Bending Die.
Make sure the top of the pipe rests against the bottom of the Rollers.
6. Using the slotted end of the Handle, tighten (clockwise) the Ram Relief Valve
7. Insert the Handle into the 12,000kg Ram. Crank it up and down to raise the Ram and
bend the pipe.
8. After bending pipe to desired angle, remove the Handle from the Ram and loosen the
Relief Valve (counterclockwise). The ram will lower. The pipe will release from the Pipe
Bender. Carefully remove the pipe.
HOW TO BLEED RAM/HOW TO FILL RAM WITH HYDRAULIC OIL
IMPORTANT! Before first use, check for proper hydraulic oil level in the Ram. Then
thoroughly test the Ram for proper operation prior to its actual use. If the Ram does not
work properly, bleed excess air from its hydraulic system as follows:
1. Open the Ram Relief Valve.
2. Remove the Oil Filler Plug and fill the Ram with hydraulic fluid to full level.
3. Apply pressure to the Saddle, and pump the Handle quickly several times.
4. Check the Oil Fill Hole and, if necessary, top off the Oil Fill Hole with hydraulic oil.
5. Replace the Oil Fill Plug and close the Ram Relief Valve.
6. Test the Ram several times for proper operation before putting into use. If, after
bleeding, the Ram still does not appear to be working properly, do not use the Ram until
it has been repaired by a qualified service technician.
NO. DESCRIPTION QTY NO. DESCRIPTION QTY
1 FRAME 1 11 1-1/2” BENDING DIE 1
2 12,000kg RAM 1 12 2” BENDING DIE 1
3HEX BOLT 2 13 HANDLE FOR
HYDRAULIC RAM 1
4 ROLLER SHAFT 2 14 SPRING PLATE 1
5 ROLLER 2 15 SPRING 2
6 HITCH PIN 2 16 OIL FILLER PLUG 1
7 1/2” BENDING DIE 1 17 OIL FILL HOLE 1
8 3/4” BENDING DIE 1 18 RAM 1
9 1” BENDING DIE 1 19 SADDLE 1
10 1-1/4” BENDING DIE 1 20 RAM RELIEF VALVE 1
PARTS LIST
5 6



Popular Construction Equipment manuals by other brands

Toro 323 Operator's manual

Toro

Toro 323 Operator's manual

Wacker Neuson DT10 Operator's manual

Wacker Neuson

Wacker Neuson DT10 Operator's manual

Manitowoc GROVE GMK Safety manual

Manitowoc

Manitowoc GROVE GMK Safety manual

Altrad MOSTOSTAL Plus Assembly manual

Altrad

Altrad MOSTOSTAL Plus Assembly manual

Surtek 137024 User manual and warranty

Surtek

Surtek 137024 User manual and warranty

Auto Crane 6006EH owner's manual

Auto Crane

Auto Crane 6006EH owner's manual

PROPOINT 8708067 user manual

PROPOINT

PROPOINT 8708067 user manual

Sam VENDING CRANES G-10 instructions

Sam

Sam VENDING CRANES G-10 instructions

red roo HT912 Operation, Safety & Maintenance Instructions

red roo

red roo HT912 Operation, Safety & Maintenance Instructions

UTIFORM V2 Instruction book

UTIFORM

UTIFORM V2 Instruction book

Toro PT-36PP Original instructions

Toro

Toro PT-36PP Original instructions

Hailo 1-2-3 500 Assembly instructions

Hailo

Hailo 1-2-3 500 Assembly instructions

Generac Mobile CTF10 owner's manual

Generac Mobile

Generac Mobile CTF10 owner's manual

Siemens SIMOTION D4x5-2 operating instructions

Siemens

Siemens SIMOTION D4x5-2 operating instructions

GSi VersaLoop 8 Installation and operation manual

GSi

GSi VersaLoop 8 Installation and operation manual

Innova IN-8012 Instruction and safety manual

Innova

Innova IN-8012 Instruction and safety manual

Sakai 544 Troubleshooting and Diagnostics Information

Sakai

Sakai 544 Troubleshooting and Diagnostics Information

Reece DURA BOOT 9503545 Installation instruction

Reece

Reece DURA BOOT 9503545 Installation instruction

manuals.online logo
manuals.online logoBrands
  • About & Mission
  • Contact us
  • Privacy Policy
  • Terms and Conditions

Copyright 2025 Manuals.Online. All Rights Reserved.