manuals.online logo
Brands
  1. Home
  2. •
  3. Brands
  4. •
  5. SCALE-PARKFLYER
  6. •
  7. Toy
  8. •
  9. SCALE-PARKFLYER Zero Fatty Instruction Manual

SCALE-PARKFLYER Zero Fatty Instruction Manual

Other SCALE-PARKFLYER Toy manuals

SCALE-PARKFLYER Mustang B Fatty Instruction Manual

SCALE-PARKFLYER

SCALE-PARKFLYER Mustang B Fatty Instruction Manual

SCALE-PARKFLYER Beriev Be200 Instructions for use

SCALE-PARKFLYER

SCALE-PARKFLYER Beriev Be200 Instructions for use

SCALE-PARKFLYER DC 3 Fatty Instruction Manual

SCALE-PARKFLYER

SCALE-PARKFLYER DC 3 Fatty Instruction Manual

SCALE-PARKFLYER BF 109 FATTY User manual

SCALE-PARKFLYER

SCALE-PARKFLYER BF 109 FATTY User manual

Popular Toy manuals by other brands

FUTABA GY470 instruction manual

FUTABA

FUTABA GY470 instruction manual

LEGO 41116 manual

LEGO

LEGO 41116 manual

Fisher-Price ColorMe Flowerz Bouquet Maker P9692 instruction sheet

Fisher-Price

Fisher-Price ColorMe Flowerz Bouquet Maker P9692 instruction sheet

Little Tikes LITTLE HANDIWORKER 0920 Assembly instructions

Little Tikes

Little Tikes LITTLE HANDIWORKER 0920 Assembly instructions

Eduard EF-2000 Two-seater exterior Assembly instructions

Eduard

Eduard EF-2000 Two-seater exterior Assembly instructions

USA Trains EXTENDED VISION CABOOSE instructions

USA Trains

USA Trains EXTENDED VISION CABOOSE instructions

Modellbau Laffont Z1601 Assembly instructions

Modellbau Laffont

Modellbau Laffont Z1601 Assembly instructions

NOCH 12905 instruction manual

NOCH

NOCH 12905 instruction manual

Eduard Ki-61-Id quick start guide

Eduard

Eduard Ki-61-Id quick start guide

Viessmann Vollmer 45616 Mounting instruction

Viessmann

Viessmann Vollmer 45616 Mounting instruction

Vollmer 42004 Mounting instruction

Vollmer

Vollmer 42004 Mounting instruction

Phoenix Model CLASSIC-EP instruction manual

Phoenix Model

Phoenix Model CLASSIC-EP instruction manual

H-KING Sopwith Camel British WW1 Fighter instruction manual

H-KING

H-KING Sopwith Camel British WW1 Fighter instruction manual

MODSTER Predator 4x4 Crawler user manual

MODSTER

MODSTER Predator 4x4 Crawler user manual

DHK Hobby 8136 User instruction manual

DHK Hobby

DHK Hobby 8136 User instruction manual

THUNDER TIGER Raptor 50 V2 kit manual

THUNDER TIGER

THUNDER TIGER Raptor 50 V2 kit manual

Timberkits Skateboarder instructions

Timberkits

Timberkits Skateboarder instructions

Hangar 9 Funtana 125 Assembly manual

Hangar 9

Hangar 9 Funtana 125 Assembly manual

manuals.online logo
manuals.online logoBrands
  • About & Mission
  • Contact us
  • Privacy Policy
  • Terms and Conditions

Copyright 2025 Manuals.Online. All Rights Reserved.

Zero
„Fatty“
From the Fatty Season:
building instructions
The model of the Zero as a "cartoon variant" is part of the Fatty
Season, which is available here in the shop. The models are simple
in construction and allow a quic construction progress. The wing
for example. consists of only a few components. The selected "KF"
profile thus facilitates the construction. The P40 can be started
well from the hand. It can also be installed a retractable landing
gear.
Technical specifications:
• Span: 800 mm
• Hull length: 680 mm
• Weight: about 800 grams (depending on engine, EZFW and
battery selection)
• Motorization: BL: DT 750
• Controller: 25A
• Propeller: 12 - 13 inches
• Battery selection: 3 S - 1300 mAh
• RC function: Elevator / Rudder / Aileron and Throttle
Note on the instructions:
Unfortunately, not all detailed pictures of all stages of construction
exist. Nevertheless, the construction is simple, since the structure
is self-explanatory.
The missing pictures will be added later, some of them will be
used by other models.
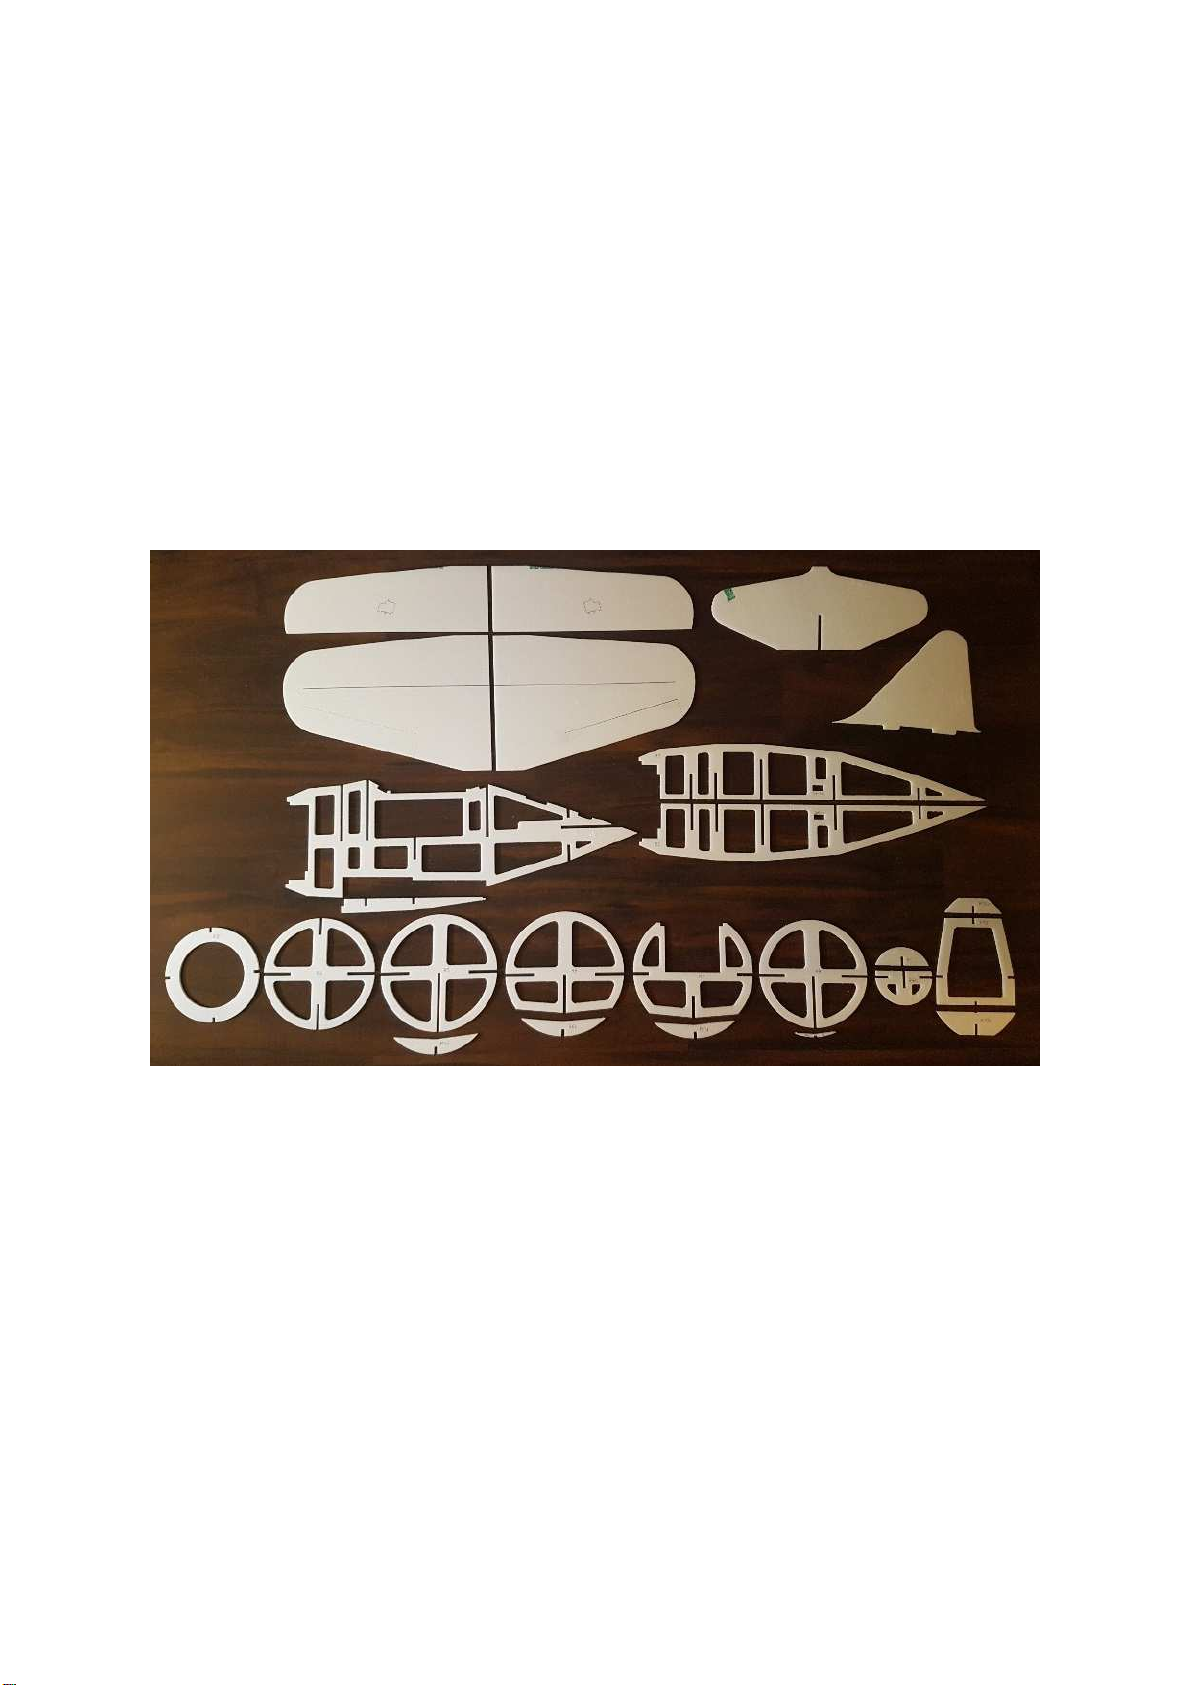
The Depron components are precisely cut using a CNC machine.
Positions of all adjacent components were also mar ed CNC and
labeled. This ensures that all adjacent components can be easily
adhered to the exact fit.
Please note: PVC Canopy you must order separate in the Shop.
The manufacture of all components and the completeness of the
its were carried out by hand and conscientiously. If you notice
any inaccuracies or missing parts, please contact me to be able to
offer the most satisfactory product to you and the following
customers. info@scale-par flyer.de
General:
The building material DEPRON is a very light building material that
is normally used in house construction. In DIY stores it can be
found in wallpaper departments under the name " Wallpaper
isolation" as insulation layer under the wallpaper. Due to its low
weight (for example 10X10 cm of 6 mm Depron weighs 2 grams)
and its stability ma es it ideal for the construction of "slow flyers"
up to weight classes of well over 3 g.
For example, Depron has achieved a justified place on the model
airliner for several years.
Depron can be cold-formed over a table edge with the palm of
your hand. The grinding of corners and protruding edges wor s
well with fine smeared paper. When cutting Depron you should
use a sharp nife with a narrow blade. When bonding Depron-
Depron is very good UHU-Por, unless it is under tension during
bonding, or in conjunction with other materials, or the bonding is
a higher load. Since you ta e the proven epoxy resin. To fill gaps
and unevenness is excellent "modeling putty" of "Moldofil" from
the hardware store. The toothpaste-li e paste can be very well
trowel into the Depron gap and after curing hardly harder than
Depron.
necessary building materials:
In Depronteilesatz all necessary Depron components are to be
found. All additional necessary building materials such as
stiffening materials (CFRP, wood ect) or adhesives or RC
components are not included!
The parts list:
Building instructions:
Structure of the wing:
1. Cut out the slot for the stiffening ( x0.5 mm CFK rod, better
8X0.5 mm CFK) from the lower wing with a cutter knife according
to the marking. Glue the CFRP rods with oversize, see picture flush
with the underside. The overhang serves to ensure that both CFRP
rods can be adequately glued together.
2. Put the heling together.
3. Put on the lower wing halves and grind the connection joint
until they fit neatly and the protruding CFRP lies against each
other.
4. Align both wing halves on the heling and glue them
together. Make sure that both CFRP rods are glued together.
5. Prepare aileron servos including cable extension. A notch in
both wing parts serves as a cable duct. Notch both wing parts until
the cables pass through without pressure.
For example ( P38 )
. If a CFRP wider than mm was used, also cut the slot in the
upper half of the wing. Put on the upper wing half and grind the
connection joint until they fit together. Now glue the upper wing
parts onto the underside of the heling.
7. Sand the leading edge as follows:
Fuselage assembly: