Scansonic PA4600 User manual

PA4600
1
PA4600
Portable DAB+/DAB/FM Radio With
Bluetooth Function
UK User Manual
DK Brugervejledning
DE Bedienungsanleitung
FR Guide d’instructions
Brand
Portable DAB+/DAB/FM Radio
With Bluetooth Function
MODEL NO.: MW-1471

2
PA4600
IMPORTANT SAFETY INSTRUCTIONS
When used in the correct manner, this unit has been designed and manufactured
to ensure your personal safety.
However, improper use can result in potential electrical shock or re hazards.
Please read all safety and operating instructions carefully before installation and
use, and keep these instructions handy for future reference. Take special note of
all warnings listed in these instructions and on the unit.
Water and Moisture
The unit should not be used near water. For example: near a bathtub, washbowl,
kitchen sink, laundry tub, swimming pool or in a set basement.
Ventilation
The unit should be situated so that its location or position does not interfere with
its proper ventilation. For example, it should not be situated on a bed, sofa, rug
or similar surface that may block the ventilation openings. Also, it should not be
placed in a built-in installation, such as a bookcase or cabinet, which may impede
the ow of air through the ventilation openings.
Heat
The unit should be situated away from heat sources such as radiators, heat
registers, stoves or other appliances (including ampliers) that produce heat.
Power Source
The unit should be connected to a power supply only of the type described in the
operating instructions or as marked on the appliance.
Cleaning
The unit should be cleaned only as recommended.
Care should be taken so that objects do not fall and liquids are not spilled into any
openings or vents located on the product.
Lightning and Power Surge Protection
Unplug the unit from the wall outlet. This will prevent damage to the product due
to lightning and power-line surges.
Overloading
Do not overload wall outlets, extension cords, or integral convenience receptacles
as this can result in a risk of re of electric shock.

PA4600
3
Damage Requiring Service
This unit should be serviced by qualied service personnel when:
Objects have fallen into or liquid has been spilled into the enclosure.
The unit has been exposed to rain.
The unit has been dropped or the enclosure damaged.
The unit exhibits a marked change in performance or does not operate normally.
Periods of Non-use
If the unit is to be left unused for an intended period of time, such as a week or
longer, the power adaptor should be unplugged from the unit to prevent damage
or corrosion.
Servicing
The user should not attempt to service the unit beyond those methods described
in the user’s operating instructions.
Service methods not covered in the operating instructions should be referred to
qualied service personnel.
WARNING:
1) The mains plug of adapter is used as disconnect device, the adapter shall
remain readily operable.
2) Batteries shall not be exposed to excessive heat such as sunshine, re or the
like.
3) To reduce the risk of re or electric shock, do not expose this apparatus to
rain or moisture. The apparatus shall not be exposed to dripping or splashing
and that objects lled with liquids, such as vases, shall not be placed on
apparatus.

4
PA4600
LOCATION OF CONTROLS
FRONT VIEW
3
LOCATIONS OF CONTROLS
TOP VIEW
3
LOCATIONS OF CONTROLS
1. POWER ON/OFF Switch
2. BACK-LIGHT ON/OFF Switch
3. FUNCTION Selector
4. VOLUME Knob
5. Battery charging indicator
6. LCD Display
7. ►||/OK/STANDBY Button

PA4600
5
- During power on, press and hold this button for 3 seconds to switch the unit to
Standby mode.
- In Standby mode, press and hold this button for 3 seconds to switch the unit
on.
- To select current option or enter current menu/submenu.
• In Bluetooth mode:
- To play/pause current playback.
- When receiving an incoming call on your cell phone, tap this button once to
answer the phone, tap this button again to end the call.
8. < Button
- To scroll through a Menu or DAB station list.
• In FM mode:
- Short press this button to manually search through the station from current
frequency toward the lower frequency.
- Press and hold this button to search through the lower station frequency with
strong signal and stop on the rst station signal it nds automatically.
• In Bluetooth mode: to return to the beginning of current track or skip to the
previous track
9. > Button
- To scroll through a Menu or DAB station list.
• In FM mode:
- Short press this button to manually search through the station from current
frequency toward the higher frequency.
- Press and hold this button to search through the higher station frequency with
strong signal and stop on the rst station signal it nds automatically.
• In Bluetooth mode: to skip to the next track
10. MENU Button
- Press this button to show menu for the current mode, press it again to show
Now Playing screen.
11. INFO Button
• In DAB/FM mode: Cycle through further information screens.
12. PRESET/PAIR Button
• In DAB/FM mode:
- Short press this button to enter the radio station presets recalling mode.
- Press and hold this button to enter the radio station storing mode.
• In Bluetooth mode:
- Press and hold this button for 3 seconds to break the current connection and
initiate pairing.
13. ALARM/SNOOZE/DIM Button
- Press & hold this button during any operating mode to set the alarms.

6
PA4600
- To activate the snooze function when the alarm is activated.
- When the back-light is on, short press this button to adjust the brightness level
(Bright or Dim).
14. Built-in Microphone
BACK VIEW
4
15. Telescopic Antenna
16. DC 5V Jack
17. 3.5mm AUX-IN Jack
BOTTOM VIEW
4

PA4600
7
18. Battery Cover
19. Battery locking screw
=Unlocked
=Locked
BATTERY INSTALLATION
1. Use a coin to rotate the battery locking screw 90 degrees to unlock the battery
cover.
2. Remove the battery cover with your ngers.
3. Follow the polarity to install the accompanied 3.7V lithium ion battery
4. Replace the battery compartment door and rotate the locking screw to lock
the battery cover.
WARNING:
- Be sure that the battery is installed correctly.
- Only batteries of the same or equivalent type as recommend are to be used.
- If the unit is not to be used for an extended period of time, remove the battery
to prevent damage or injury from possible battery leakage.
- Do not dispose of the battery in re, the battery may explode or leak.
POWER SUPPLY
1. Connect the supplied AC-DC adapter to the DC 5V Jack on the back of
the device through the attached USB cable, and insert the grid plug into a
properly installed AC socket.
2. Make sure the grid voltage corresponds to the gures on the rating plate.
Caution
1. Only use the supplied power adaptor for this device.
Do not use for other devices.
2. Only use the original AC adapter. This adapter has been specially designed
for the accompanied battery in order to gradually charge the battery. Any other
adapter may shorten the battery life or can damage it or the device.
Note:
Disconnect from mains power supply during longer periods of non-use.
Charging the battery installed
The installed battery can also be charged by using the accompanied AC-DC
adapter that you plug into the wall socket and the other end into the DC 5V jack,
the battery charging indicator will light up in Yellow, once it is fully charged, the
light turns to Green.

8
PA4600
Note:
1. The duration of the charging process depends on the state of charge of the
battery.
2. Remember to take out the battery during longer periods of non-use.
GENERAL OPERATION
- Rotate the Power ON/OFF Switch to “ON” position to turn on the unit, the
display on the unit will light up and display the time digits “00:00” and the
current operating mode.
- Rotate the Function Selector to select different operating mode: DAB, FM,
AUX-IN, Bluetooth.
- Press and hold ►||/OK/STANDBY button for 3 seconds to enter into standby
mode, it will display “00:00:00” and “Time is not set” to prompt you to set the
clock time.
- In Standby mode, press and hold ►||/OK/STANDBY button for 3 seconds to
switch the unit on.
- To completely switch off the unit, rotate the Power ON/OFF switch to OFF
position.
Notes:
1. The time and date can be updated automatically. With auto-update, the time
and date are automatically synchronized with national time signals broadcast
over DAB and FM (when available). It also can be set manually by pressing
the MENU button during any operating mode, and then enter the submenu of
“Set Time/Date” from “System > Time”, press “>” or “<” button to select &
press ►||/OK button to conrm the setting.
2. ECO design: The unit turns to Standby mode automatically if it is not providing
the main functions or inappropriate for the intended use for 60 minutes during
any operating mode (except for FM mode).
OPERATING THE UNIT IN DAB MODE
DAB radio mode receives DAB/DAB+ digital radio and displays information about
the station.
Auto Scan
1. Fully extend the telescopic antenna.
2. Switch the unit on by rotating the Power ON/OFF switch
to ON position to turn on the unit.
3. Rotate the Function Selector to DAB position to enter
DAB mode.

PA4600
9
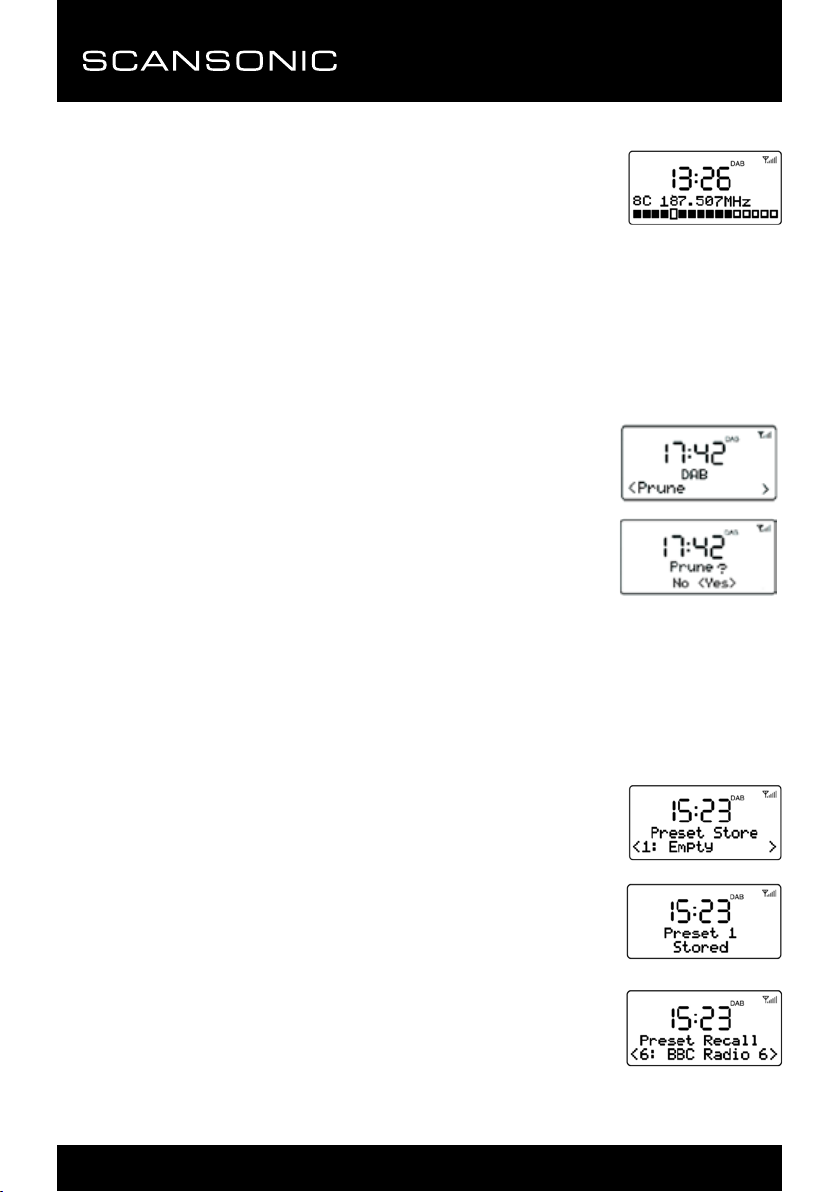
For the rst time use or if the station list is empty, the radio automatically performs
a full scan to see what stations are available, the display shows the scan progress
and the total channel number during the scanning.
4. When the scan progress is completed, it will then set the time and start
playing the rst station on the station list it nds.
5. To change the station, press “<” or “>” button to scroll through the list of
stations and press ►||/OK button to tune to the displayed station. The Playing
screen is displayed with the new station details.
6. If no stations are detected during the scan the display will show “Service not
available”.
Notes:
1. Just like Digital TV there are some areas where it may still be difcult to get a
good DAB signal. The broadcasters are constantly improving DAB coverage,
so in some cases it may be necessary to wait before some or all DAB
services become available. You can check coverage for your area.
2. You may also need to start a scan manually to update the list of stations for
one of the following reasons:
-New stations may become available from time to time.
-Stations close or can no longer be received (In the station list, invalid stations
are indicated with a question mark “?” in front of their name).
-If reception was not good for the original scan (for example the antenna was
not up), this may result in an empty or incomplete list of available stations.
-If you have poor reception of some stations causing the audio to break up,
you may wish to list only stations with good signal strength.
How to re-do a full scan
To re-do a full scan, you may short press the MENU button
to show the menu and then press ►||/OK button to select
Full Scan
Manual Tune
As well as the normal method of scanning, you can also manually tune to a
particular channel/frequency. This can be useful for adjusting your antenna to
achieve the best possible reception and scanning a particular channel to update
the station list.
1. Press MENU button and then press “>” to show the submenu: Manual tune,
press the OK button to enter.

10
PA4600
2. Press “<” or “>” to display a particular channel/frequency,
press OK button to tune to that channel/frequency. The
display shows a live indication of the received signal
strength on the selected frequency. Adjustments to your
antenna will be manifested in the received signal strength
displayed.
Note:
The slightly larger rectangle indicates the audio quality threshold – if the signal
strength, as indicated by the solid rectangles, falls below this threshold the audio
quality will deteriorate.
To remove stations that are listed but unavailable
1. Press MENU button and then press “>” or “<” to show the
submenu: Prune, press the OK button to enter the Prune
option.
2. Press “>” to select “Yes” and then press OK button to
conrm to prune.
Note:
This removes all invalid stations indicated in the station list with a ‘?’ in front of the
station name.
Station Presets
The unit allows you to store up to 20 DAB stations for easy recall at any time.
To save a station
1. If you have found the desired station, press and hold the
PRESET button until the display shows Preset Store.
2. Press “<” or “>” button to choose the preset memory
position, press the ►||/OK button to conrm the settings.
To recall a station
1. Short press the PRESET button during DAB mode to enter
the preset memory selecting mode.
2. Press “>” or “<” button to select the preset station
3. Press ►||/OK button to choose and play the displayed
station.

PA4600
11
Now playing information
While a station is playing, the screen shows its name and DLS
(Dynamic Label Segment) information broadcast by the station
such as programme name, track title and contact details. Long
DLS info, over 16 characters scrolls across the display.
To view further information
Each time you press INFO button, the next set of information is
displayed, cycling through: DLS text, DL Plus information (this
is only displayed if broadcast by the station), signal strength,
programme type, ensemble name, channel number/frequency,
signal error rate, bit rate, codec/DAB variant, time and date.
Note:
DL Plus presents additional information that can be broadcast by stations and
stored temporarily on your radio.
Dynamic range compression (DRC)
This function reduces the difference between the loudest and quietest audio being
broadcast. Effectively, this makes quiet sounds comparatively louder, and loud
sounds comparatively quieter.
Note:
DRC only works if it is enabled by the broadcaster for a specic station.
To change the DRC setting
Select Menu > DRC, then press ►||/OK button to enter the
DRC submenu.
Press “>” or “<” to select the available
options: DRC off, high, low.
DRC off: DRC is switched off.
DRC high: DRC is switched on; the default setting recommended for noisy
environment.
DRC low: DRC is set to half normal level.
OPERATING THE UNIT IN FM MODE
FM radio mode receives analogue radio from the FM band (87.5-108MHz) and

12
PA4600
display RDS (Radio Data System) information about the station.
1. Fully extend the telescopic antenna.
2. Rotate the FUNCTION Selector to FM position to enter FM mode.
3. Press and hold the “<”/“>” button to search the station, it
will then stop automatically at the rst station it nds.
4. Short press “<” or “>” button to tune the radio down or up
in 50KHz steps for ne tuning.
Note:
If the reception is too weak and there is noise on the received station, try to
improve the reception by changing the position of the telescopic antenna.
Station presets
The unit allows you to store up to 20 FM stations which work in the same way as
described in DAB mode.
Now playing information
While FM radio is playing, the screen shows its frequency, or
if RDS information is available, station name and any further
‘RadioText’ information.
If no information is available, just the frequency and a No Radio
Text message is shown.
To view further information about the broadcast
Each time you press INFO button, the next set of information is
displayed, cycling through: RDS RadioText, programme type,
frequency, time and date.
OPERATING THE UNIT IN AUX-IN MODE
Aux In mode plays audio from an external source such as an MP3 player.
1. Plug one end of the 3.5mm audio cable (included) into the headphone or line
out jack on your player, plug the other end of cable into the unit AUX-IN jack
on the back of the unit.
2. Rotate the FUNCTION Selector to AUX position to enter AUX mode.
3. Turn on the external audio source and play your device.
4. The volume level can now be controlled through the main unit. Operate all
other functions on the external device as usual.

PA4600
13
Notes:
1) If you're connected to the Line out Jack of your external device, then you
only need to adjust the volume control of this unit. If you're connected to the
Headphone Jack of your external device, then you may need to adjust both
the volume control of your external device and the volume control of this unit
to nd the most desirable volume setting.
2) Press and hold the ►||/OK button to switch the unit to Standby mode or
switch the unit off by rotating the Power ON/OFF switch to OFF position when
you nish listening.
Don't forget to switch off the power of your external device as well.
OPERATING THE UNIT IN BLUETOOTH MODE
This device offers you the possibility to use a Bluetooth enabled device. The
functional radius is limited to approx.10 metres depending on the surroundings
and the unit used.
Due to the different device manufacturers, models, and software versions, a full
functionality cannot be guaranteed.
Logging on devices (Pairing)
Before using your speaker with a compatible device, such as a mobile phone, for
the rst time, you must pair and connect it to the device.
1. Switch the unit on by rotating the Power ON/OFF switch to “ON” position.
2. Ensure that the Bluetooth function is activated in your player (e.g. mobile
phone). For this, refer to the operation manual of your player.
3. Rotate the FUNCTION selector to BT position to enter Bluetooth mode,
“Bluetooth Disconnected” is shown & ashed on the display. It shows that
this unit is available to pair with other devices.
Pair the Speaker
1. If you haven’t paired this unit with a device or the paired devices list is empty,
pairing mode is activated.
2. Activate Bluetooth on the compatible device, and set it to search for
compatible devices.
3. Select the speaker name “PA4600” from the list of found devices.
Tips: Only one playback unit can be connected to the speaker. If the speaker is
already connected to another playback unit, the speaker will not appear in the BT
selection list.
If your device asks for a passkey (depending on the device manufacturers, model,
and software version), then enter digits “0000” (four zeros) and press OK.

14
PA4600
If pairing has been carried out successfully, “Connected” will be shown on the
display, meanwhile, a voice prompt “Connecting” will be heard. After connected
completely, you can listen to music wirelessly through Bluetooth and select music
in Bluetooth device.
4. Short press ►||/OK button to pause or resume playback.
5. Press “>” button to skip to next track, or press “<” button to the beginning of
current track or previous track.
6. To stop the unit, press and hold the ►||/OK button to turn into standby mode
or switch the unit on by rotating the Power ON/OFF switch on the left of the
unit to OFF position.
NOTES:
• The Bluetooth compatibility cannot be ensured for devices (e.g. mobile
phones) getting released in the future.
• To be able to transfer audio data, Bluetooth needs to stay activated in your
player, observe the operation manual of your player.
• If a mobile phone on which you are playing music receives a call, the music
will be interrupted. The sound however is not played back via the speaker.
After you have ended the call, the devices are connected to each other again
and playback continues.
• If there is an existing connection, press and hold the PRESET/PAIR button for
3 seconds to break the current connection and initiate pairing mode.
• The player will be disconnected when your device is moved beyond the
operational range. If you want to reconnect your device to this player, place it
within the operational range.
• If the device is moved beyond the operational range, when it is brought back,
please check if the device is still connected to the player.
• If the connection is lost, follow the instructions above to pair your device to the
player again.
Using the Unit as a Hands-free Bluetooth Speakerphone
1. Link your cell phone to the radio via Bluetooth as described above.
2. When receiving an incoming call on your cell phone, short tap the ►||/OK
button on the unit to switch the incoming call from cell phone to the speaker.
Complete your call using the built-in microphone and speaker.
3. Adjust the volume control of your cell phone to obtain the desired sound level.
4. To end the call, just tap the ►||/OK button again, the call will end. If you were
playing music from your cell phone to the speaker before answering the call,
the music will automatically resume playing when you hang up.

PA4600
15
SYSTEM LIBRARY
You may set sleep timer, clock time, alarms and other system settings in the
System library.
HOW TO ENTER & SELECT THE SUBMENU OF SYSTEM LIBRARY
1. Press MENU button during any operating mode.
2. Press “>” or “<” button to select “System”.
3. Press ►||/OK button to enter the submenu of system library.
4. Press “>” or “<” button to select & press ►||/OK button to conrm the
setting.
SLEEP TIMER SETUP
- Press “>” or “<” button to select “Sleep” option in the
submenu of system library.
- Press ►||/OK button to enter into Sleep timer setting, “Set
sleep time” shown on the display and the sleep icon “ ”
ashes on the display.
- Press “>” or “<” button to adjust the sleep delay time in
minutes from: Sleep off/15/30/45/60/90.
,n.u 3oAS
1u·,
D
< SYsteM
In. us"'
IU· 1
System
<Sleep
Set sleep time
Sleep off
,nus"'
I U· 1
System
<Time
>
- The setting conrms automatically after 10 seconds, the sleep icon “ ” stops
ashing on the display.
- Select “Sleep off” to cancel the sleep mode, the sleep icon “ ” disappears
simultaneously.
SETTING THE CLOCK TIME MANUALLY
The clock time can also be set manually in the submenu of system library.
- Press “>” or “<” button to select “Time” option in the
submenu of system library.
- Press ►||/OK button to enter the subdirectory of Time
setting, “Set Time/Date” shown on the display, press
►||/OK button again to conrm and enter into clock time
setting.

16
PA4600
- Select a value for each parameter in turn by using “>” or
“<” button and then press ►||/OK button to conrm and
move on to the next parameter.
- It shows “Time Saved” on the display once the date is set.
SETTING AND USING THE ALARMS
As well as a clock/calendar, there are two versatile wake-up alarms with snooze
facility. Each alarm can use a buzzer or a selection from any of the audio sources
for the alarm sound, an active alarm is indicated by a bell icon “ ” in the left of
the LCD display.
Note:
The alarm parameters can only be set during any operating mode after time set.
Set the Alarm 1
1. During any operating mode, press and hold the ALARM/
SNOOZE button, “Alarm1 Setup” is shown on the display.
2. Short press ►||/OK button to set the Alarm1 parameters. The
hour digits ashes on the display.
3. Short press “>” or “<” button to adjust the hour, then press OK button
conrm the hour, the hour digit will stop ashing and the minute digit will start
ashing.
4. The Alarm1 Time Set prompts you for the following parameters. Select a
value for each parameter in turn by using “>” or “<” button and then press
►||/OK button to conrm and move on to the next parameter.
Alarm Parameters:
• On time – hours and minutes
• Duration – 15 | 30 | 45 | 60 | 90 minutes, if the alarm is not cancelled the unit
will return to standby after this time period.
• Alarm Type (Source) – Buzzer | DAB | FM. If DAB or FM is chosen as the
audio source you will also be prompted to select the last listened station or
one of the preset stations (if set).
• Alarm Mode – Daily | Once | Weekends | Weekdays, choose the days on
which the alarm is active.
• Alarm – Off | On

PA4600
17
After Alarm on is selected, the alarm1 will be armed
automatically, the alarm1 alert icon stops ashing.
Set the Alarm 2
1. During any operating mode, press and hold the ALARM/SNOOZE button until
the “Alarm 1 Setup” is shown on the display.
2. Press “>” or “<” button to select “Alarm 2 Setup” & press
►||/OK button to set the Alarm 2 parameters
3. The other setting of Alarm 2 refers to Alarm 1 setting
described above.
Notes:
-To ensure the alarm function works properly, make sure that the volume level
is set at a proper position before turning off the unit.
-Please do not switch off the power by the left side of power ON/OFF selector
after alarm setting, otherwise, the alarm sound cannot work.
-At the set time, the alarm will sound, quietly at rst, then gradually building up
to the set volume. When an alarm sounds, the bell icon in the display ashes.
-Press and hold ALARM/SNOOZE button for 3 seconds to cancel the Alarm
when it is activated.
Snooze
• When the alarm is activated (waking you), short press the
ALARM/SNOOZE button will stop the alarm one time. The
Snooze icon “ ” will show on the display.
19
• The alarm will sound again after 10 minutes (default nap time).
OTHER SYSTEM SETTINGS
Language Set
- Press “>” or “<” button to select “Language” option in the
submenu of system library.
- Press ►||/OK button to enter the subdirectory of Language
setting. The language used for display messages can be
selected from: English / Francais / Deutsch / Italiano / Español
19
- Press “>” or “<” button to select & press ►||/OK button to conrm the
setting.

18
PA4600
Factory Reset
A factory reset clears all user dened settings, replacing them with the original
default values, so time/date, DAB/FM station list and preset stations are all lost.
- Press “>” or “<” button to select “Factory Reset” option
in the submenu of system library.
- Press ►||/OK button to enter the subdirectory of Factory
Reset.
19
If you select “Yes”, you are asked to conrm by pressing
►||/OK button.
19
SW Version
Press “>” or “<” button to select “SW version” option in the submenu of system
library, then press/OK button to display the current software version.
19
19

PA4600
19
TROULBSHOOTING AND ERROR MESSAGES
1. Error Messages
Message Description
DAB mode
No DAB Station No DAB reception
No DAB stations are available - check aerial.
Not available The listed station cannot be found.
Signal error The DAB signal has been interrupted.
(No name) The current station does not broadcast an identity
name.
? List Invalid
Signal error The DAB signal has been interrupted.
FM mode
No Radio Text No RDS text information is available on this station.
No PTY No RDS programme type information is available.
No Name No RDS station name is being broadcast.

20
PA4600
2. Troubleshooting
Problem Cause Solutions
No sound Volume is too low Increase the volume
Poor sound quality in
Radio mode
Radio signal too weak Try to adjust the antenna
position.
FM: Hiss
DAB: intermittent cut-
out DAB: "No stations
available” message
Low signal strength Check/move antenna
Move radio
Rescan local
No audio signal
via the Bluetooth
connection
No audio signal via the
Bluetooth connection
Check whether a
connection exists. If
necessary, pair the
speaker again to the
audio source.
Volume too low Increase the volume on
the speaker
Increase the volume on
the audio source.
Bluetooth can not be
connected
Pairing does not work Check whether the audio
source supports the
A2DP protocol.
Audio source is switched off Switch on the audio
source
Bluetooth is switched off at
the audio source.
Switch on the Bluetooth
function in the audio
source.
Bluetooth version is not
supported.
Use a different playback
unit.
Poor sound quality
from a Bluetooth®
device
Bluetooth device is almost
out of range of the PA4600
Move your Bluetooth
device closer to the
PA4600
Table of contents
Languages:
Other Scansonic Portable Radio manuals