manuals.online logo
Brands
  1. Home
  2. •
  3. Brands
  4. •
  5. Schenker Storen
  6. •
  7. Accessories
  8. •
  9. Schenker Storen KGM 6 User manual

Schenker Storen KGM 6 User manual

KGM 6
Instructions de montage
Montageanleitung
Istruzioni di montaggio
Installation instructions
1Fixation de la marquise/ Befestigung Markise/
Fissaggio della tenda / Attaching the awning
FR a. Définir la zone de montage. En cas de fixation à une
dalle de balcon, la barre à toile de la marquise rentrée
doit se trouver environ 50 mm derrière le bord avant
du balcon.
b. Retirer prudemment l’emballage au niveau des paliers
de la marquise. Positionner la marquise, marquer les
trous, les percer et poser des chevilles.
c. Monter les plaques de base (les plaques de base af-
fleurent les paliers combinés de la marquise à gauche
et à droite)
d. Accrocher la marquise
Attention! Fixer immédiatement la marquise avec
des vis M10 ×30 (marquées en rouge)!
Attention! En cas de montage sur de la maçonnerie,
écartement de console entre deux marquises
250 mm min.
DE a. Montagebereich festlegen. Bei Befestigung an
Balkondecke muss Stoffstab der eingefahrenen
Markise ca. 50 mm hinter Balkonvorderkante liegen.
b. Verpackung im Bereich der Markisenlager vorsichtig
entfernen. Markise positionieren, Löcher anzeichnen,
bohren und Dübel setzen.
c. Grundplatten montieren (Grundplatten sind links und
rechts bündig mit Kombilagern von Markise)
d. Markise einhängen
Achtung! Markise sofort mit M10 ×30 Schrauben
(rot markiert) sichern!
Achtung! Bei Montage auf Mauerwerk,
Konsolenabstand zwischen zwei Markisen
min. 250 mm.
IT a. Stabilire la zona di montaggio. In caso di fissaggio al
soffitto del balcone, la barra finale della tenda chiusa
deve trovarsi ca. 50 mm dietro al bordo anteriore del
balcone.
b. Rimuovere con cautela l’imballaggio nella zona dei
cuscinetti della tenda. Posizionare la tenda, segnare i
fori, forare e mettere i tasselli.
c. Montare le piastre di base (a sinistra e a destra le
piastre di base sono a filo con i cuscinetti combinati
della tenda)
d. Attaccare la tenda
Attenzione! Fissare subito la tenda con 30 viti M10
(segnate in rosso)!
Attenzione! In caso di montaggio su muratura,
distanza dei supporti tra due tende
min. 250 mm.
EN a. Determine the area where it is to be assembled.
When attaching to a balcony overhang, the
fabric rod of the retracted awning must be
approx. 50mm behind the front edge of the
balcony.
b. Carefully remove the packaging in the area of the
awning mounting. Position the awning, mark out and
drill the holes, then insert the dowels.
c. Fit the base plates (the base plates lie to the left and
right, flush with the combination mounting brackets of
the awning)
d. Mount the awning
Caution! Secure the awning immediately with
M10 ×30 screws (marked in red)!
Caution! For installations on brickwork,
distance of brackets between two awnings
min. 250mm.
87
88 67
50
d. e.
c.
a.
b.
53
18 18
bk
53
1Fixation de la marquise/ Befestigung Markise/
Fissaggio della tenda / Attaching the awning
2Ajustement de la marquise / Markise justieren /
Regolazione della tenda / Align the awning
FR a. Rentrer et sortir la marquise de manière contrôlée puis effectuer les ajustements
suivants:
b. Parallélisme des bras
rentrer la marquise jusqu’à 50 – 100 mm.
Desserrer légèrement la vis Allen M10 (marquée en bleu) sur la fixation du bras au
niveau de la barre à toile puis régler les bras pour qu’ils soient parallèles.
Les bras articulés doivent reposer sur le profil de la barre à toile dans cette
position. Serrer à nouveau la vis Allen.
DE a. Markise kontrolliert aus- und einfahren und folgende Justierungen vornehmen:
b. Parallelität der Arme
Markise bis auf 50– 100 mm einfahren. Inbusschraube M10 (blau markiert) zur Arm-
befestigung am Stoffstab leicht lösen und Arme parallel stellen. Knickarme sollen in
dieser Position am Stoffstabprofil anliegen. Inbusschraube wieder fest anziehen.
IT a. Far uscire e rientrare la tenda in modo controllato ed eseguire le seguenti regolazioni:
b. Parallelismo dei bracci
Far rientrare la tenda fino a 50 – 100 mm.
Allentare leggermente la vite a brugola M10 (segnata in blu) per il fissaggio dei
bracci sulla barra finale e posizionare i bracci in parallelo.
In questa posizione i bracci ripieghevoli devono trovarsi sul profilo della barra finale.
Stringere nuovamente la vite a brugola.
EN a. Extend and retract the awning in a controlled manner and make the following
adjustments:
b. Parallelism of the arms
Retract the awning up to 50 – 100 mm.
Slightly loosen the Allen screw 10 (marked in blue) for attaching the arm on the
fabric rod and adjust the arms so they are parallel.
Hinged arms in this position should abut onto the fabric rod profile.
Tighten the Allen screw again.
Béton / Beton / Calcestruzzo /
Concrete
Bois / Holz / Legno / WoodBrique / Backstein / Mattoni / Brick
✖✔
3Position horizontale des bras / Horizontlage der Arme /
Posizione orizzontale dei bracci / Horizontal position of the arms
FR Desserrer légèrement la vis de la fourche pivotante (marquée en bleu).
Régler la position horizontale des bras en tournant les goujons filetés (marqués
en rouge) à l’aide d’une clé hexagonale de 5 mm.
Les deux goujons filetés (en rouge) doivent à nouveau reposer sur la tige de
la vis après le réglage. Serrer à nouveau la vis.
DE Schraube zur Schwenkgabel (blau markiert) leicht lösen. Mit Drehen der
Gewindestifte (rot markiert), mithilfe eines 5mm Sechskant, die
Horizontallage der Arme einstellen. Beide Gewindestifte (rot) müssen nach der
Einstellung wieder am Schaft der Schraube anliegen. Schraube wieder anziehen.
IT Allentare leggermente la vite della forcella girevole (segnata in blu).
Ruotando i perni filettati (segnati in rosso), con l’aiuto di una brugola da 5 mm,
regolare la posizione orizzontale dei bracci.
Dopo la regolazione i due i perni filettati (rosso) devono trovarsi nuovamente sul
gambo della vite. Stringere nuovamente la vite.
EN Slightly loosen the nut on the pivoting fork (marked in blue).
Adjust the horizontal position of the arm by turning the threaded pin
(marked in red) with a 5mm Allen key.
Both threaded pins must abut on the shaft of the screws again after being adjusted.
Tighten the screws again. Tighten the Allen screw again.
✖✔
4Réglage de la chute des bras/ Falleinstellung der Arme /
Regolazione dell’inclinazione dei bracci / Drop adjustment of the arms
FR a. Sortir la marquise b. Desserrer l’écrou (marqué en bleu)
c. Régler la chute avec la vie de réglage (marquée en rouge).
d. Bien serrer à nouveau l’écrou.
Attention! La barre à toile doit reposer horizontalement par rapport au tube.
DE a. Markise ausfahren
b. Mutter (blau markiert) lösen
c. Mit Stellschraube (rot markiert) den Fall einstellen.
d. Mutter wieder fest anziehen.
Achtung! Stoffstab muss horizontal zur Walze liegen.
IT a. Far fuoriuscire la tenda
b. Allentare il dado (segnato in blu).
c. Regolare l’inclinazione con la vite di regolazione (segnata in rosso).
d. Stringere nuovamente il dado.
Attenzione! La barra finale deve essere orizzontale rispetto al rullo.
EN a. Extend the awning
b. Loosen the nut
c. Adjust the drop using the set screw
d. Tighten the nut again.
Caution! The fabric rod must lie horizontal to the roller.
✖
✔
Avec radio / Mit Funk/
Con radiocomando / With
radio
Sans radio / Ohne Funk /
Senza radiocomando /
Without radio
Sunea* OREA WT*
* Point 7 / Punkt 7 / Punto 7 / Point 7
FR Réglage du moteur
Pour les marquises à moteur radio, suivez les instructions au point 7.
Pour les marquises sans moteur radio, suivez les instructions au point 7.
Contrôles finaux
– Position finale supérieure et inférieure du moteur (réglée en haut et en bas)
– Déroulement droit de la toile
– Position horizontale du tube et de la barre à toile
– Toutes les vis et tous les écrous sont serrés
– Positions des bras parallèles et horizontales
Attention! Ne jamais brancher deux (ou plus) de moteurs sans relais sur un bouton.
DE Motor einstellen
Für Markisen mit Funkmotoren, befolgen Sie die Anleitung unter Punkt 7.
Für Markisen ohne Funkmotoren, befolgen Sie die Anleitung unter Punkt 7.
Schlusskontrolle
– Motoren-Endstellung oben und unten (oben und unten eingestellt)
– Gerader Lauf des Stoffes
– Horizontale Lage von Walze/Stoffstab
– Alle Schrauben und Muttern angezogen
– Armstellungen parallel und horizontal
Achtung! Nie zwei oder mehr Motoren ohne Relais auf einen Schalter anschliessen.
IT Regolare il motore
Per tende con motori radiocomandati, seguire le istruzioni al punto 7.
Per tende senza motori radiocomandati, seguire le istruzioni al punto 7.
Controllo finale
– Posizione finale del motore superiore e inferiore (regolazione superiore e inferiore)
– Movimento dritto del tessuto
– Posizione orizzontale del rullo/della barra finale
– Tutte le viti e i dadi sono stretti
– Bracci in posizione parallela e orizzontale
Attenzione! Non collegare mai due o più motori senza relè a un interruttore.
EN Set the motor
Follow instructions in Point 7 for awnings with radio motors.
Follow instructions in Point 7 for awnings without radio motors.
Final checks
– Final upper and lower position for motors (set at top and bottom)
– Fabric runs straight
– Horizontal position of the roller / fabric rod
– All the screws and nuts are tightened
– Parallel and horizontal position of the arm
Caution! Never connect two or more motors on one switch without a relay.
5Réglages du moteur et contrôles naux / Motor Einstellungen und Schlusskontrolle /
Regolazioni del motore e controllo nale / Motor settings and nal checks
FR En cas de réparations, la marquise doit être mise hors tension en débranchant la fiche du moteur.
Le démontage de la marquise a lieu dans l’ordre inverse de celui du montage.
DE Bei Reparatur ist die Markise stromlos zu schalten indem der Motorstecker ausgezogen wird.
Die Demontage der Markise erfolgt in umgekehrter Reihenfolge der Montage.
IT In caso di riparazione, la tenda da sole deve essere scollegata dall’alimentazione elettrica staccando la
spina del motore.
Lo smontaggio della tenda avviene nella sequenza opposta al montaggio.
EN During repairs, the awning must be disconnected from the power supply by unplugging the motor.
The awning is dismantled in the reverse order it was assembled in.
6Réparations / Reparatur /
Riparazione / Repairs
7Réglage du moteur / Motor einstellen /
Regolazione del motore / Set the motor
Somfy Sunea io
1Faire raccorder le moteur au secteur par le monteur / Motor durch Monteur an Stromnetz anschliessen /
Far collegare il motore alla rete elettrica dall’installatore / Fitter to connect the motor to the mains
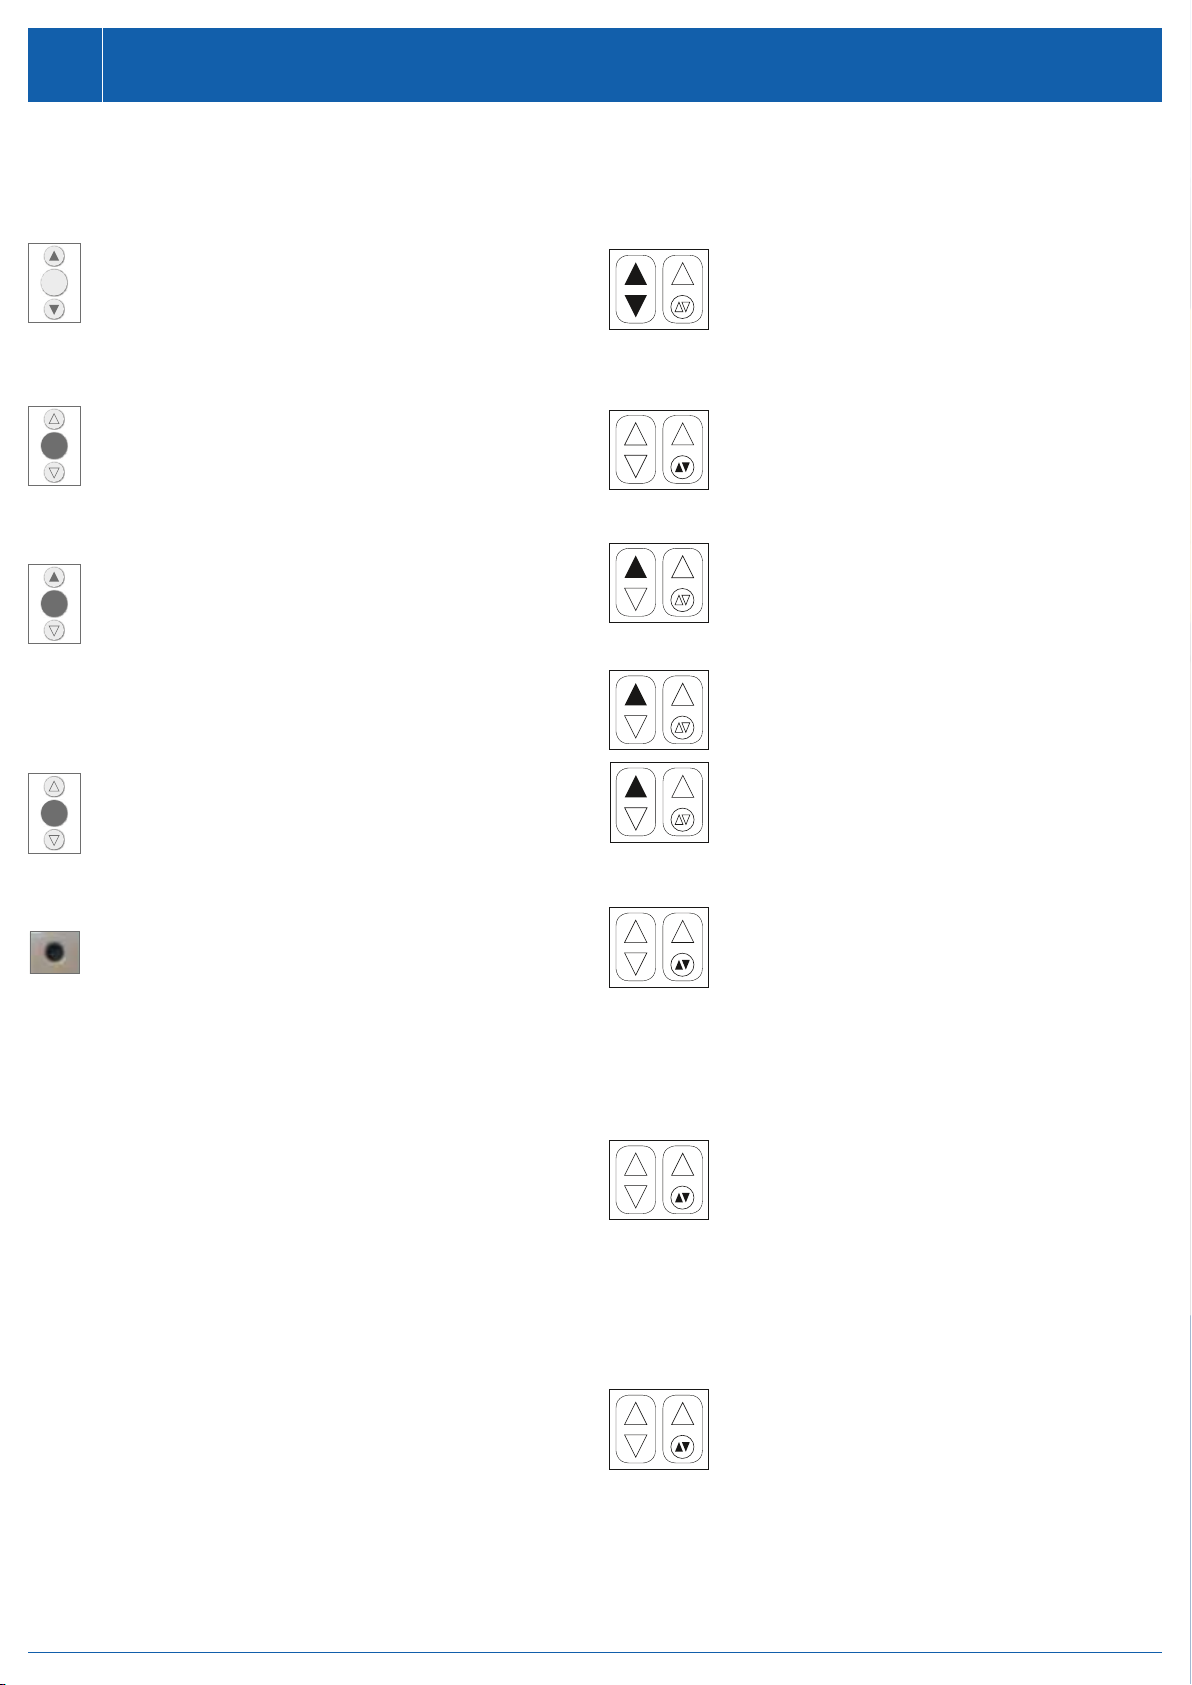
2Activer le mode programmation / Programmierungsmodus aktivieren /
Attivare la modalità di programmazione / Activate the programming mode
FR Appuyer simultanément sur les touches MONTER/BAISSER jusqu’à ce qu’un mouvement
MONTER/BAISSER s’effectue.
DE Die AUF- und AB-Taste gleichzeitig gedrückt halten, bis eine AUF/AB-Bewegung erfolgt.
IT Tenere premuti contemporaneamente i tasti SU/GIÙ fino a quando si verifica un movimento
verso l’ALTO/verso il BASSO.
EN Press the UP and DOWN buttons at the same time until there is an
UP/DOWN movement.
3Vérifier le sens de la marche / Laufrichtung überprüfen /
Verificare la direzione di movimento / Check the direction of travel
FR Si le sens de la marche est incorrect, appuyez sur la touche my jusqu’à ce qu’un mouvement
MONTER/BAISSER s’effectue.
DE Stimmt die Laufrichtung nicht, die my-Taste gedrückt halten, bis eine AUF/AB-Bewegung
erfolgt.
IT Se la direzione di movimento non è corretta, tenere premuto il tasto my fino a quando si
verifica un movimento verso l’ALTO/verso il BASSO.
EN If the direction of travel is wrong, press the my button until there is an UP/DOWN
movement.
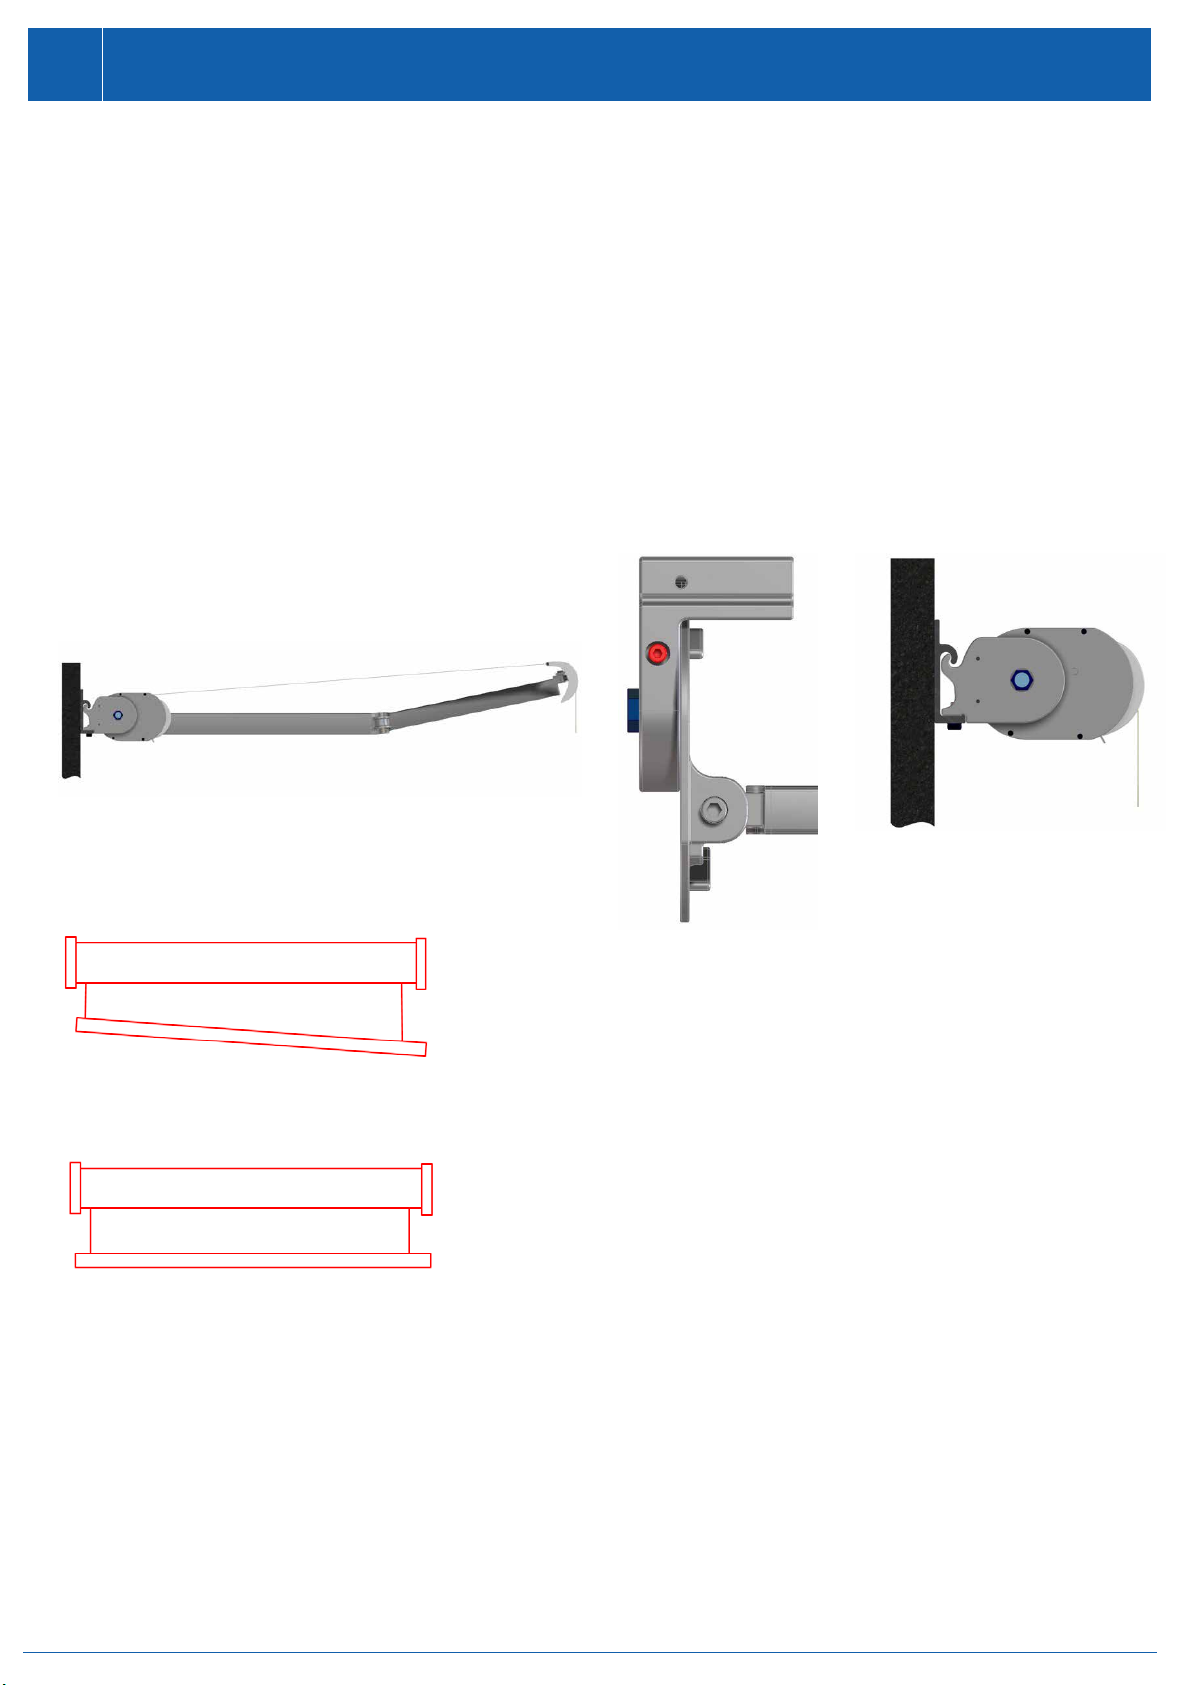
4Programmer la position finale inférieure / Untere Endlage programmieren /
Programmare la posizione finale inferiore / Program the lower end position
FR a.
Descendre dans la position finale inférieure souhaitée. La barre à toile ne doit pas se lever!
b. Appuyer sur les touches MONTER et my jusqu’à ce l’entraînement démarre de lui-même.
c. Laisser monter jusqu’à la butée finale supérieure.
DE a. In die gewünschte untere Endlage fahren. Stoffstab darf nicht aufstehen!
b. Die AUF- und my-Taste gedrückt halten, bis der Antrieb selbstständig losfährt.
c. Antrieb in den oberen Endanschlag fahren lassen.
IT a. Portarsi nella posizione finale inferiore desiderata. La barra finale non deve sporgere!
b. Tenere premuti i tasti SU e my fino a quando il motore parte automaticamente.
c. Far spostare il motore nella posizione finale superiore.
EN a. Move it to the end position you want, the fabric rod must not move up.
b. Press the UP and my button until the (motor) drive sets off by itself.
c. Let the (motor) drive move into the upper end stop.
5Sauvegarder la programmation / Programmierung abspeichern / Salvare la programmazione / Save the programming
FR Maintenir enfoncée la touche my jusqu’à ce qu’un mouvement MONTER/BAISSER s’effectue.
DE Die my-Taste gedrückt halten, bis eine AUF/AB-Bewegung erfolgt.
IT Tenere premuto il tasto my fino a quando si verifica un movimento verso
l’ALTO/verso il BASSO.
EN Press the my button until there is an UP/DOWN movement.
6Désactiver le mode de programmation (au verso de l’émetteur) / Programmierungsmodus deaktivieren
(Sender-Rückseite) / Disattivare la modalità di programmazione (retro del trasmettitore) / Disable the programming
mode (rear side of the transmitter)
FR Maintenir enfoncée la touche Progr. jusqu’à ce qu’un mouvement MONTER/BAISSER
s’effectue
DE Prog.-Taste gedrückt halten, bis eine AUF/AB-Bewegung erfolgt.
IT Tenere premuto il tasto di programmazione fino a quando si verifica un movimento verso
l’ALTO/verso il BASSO.
EN Press the Prog. button until there is an UP/DOWN movement.
my
my
my
my
Somfy Orea WT
1Faire raccorder le câble de contrôle au moteur par le monteur / Motor durch Monteur an Prüfkabel anschliessen /
Far collegare il motore al cavo di prova dall’installatore / Fitter to connect the motor to the test cable
2Vérifier le sens de rotation / Laufrichtung überprüfen /
Verificare la direzione di movimento / Check the direction of travel
FR Si le sens de rotation est incorrect, vous devez permuter les connexions de câble noires et
brunes.
DE Stimmt die Laufrichtung nicht, müssen die Kabelanschlüsse schwarz und braun getauscht
werden.
IT Se la direzione di movimento non è corretta, è necessario scambiare gli allacciamenti
dei cavi nero e marrone.
EN If the direction of travel is wrong, the black and brown cable connections must
be switched.
3Activer le mode programmation / Programmierungsmodus aktivieren /
Attivare la modalità di programmazione / Activate the programming mode
FR Maintenir enfoncée la touche MONTER/BAISSER jusqu’à ce qu’un mouvement MONTER/
BAISSER s’effectue.
DE Die AUF/AB-Taste gedrückt halten, bis eine AUF/AB-Bewegung erfolgt.
IT Tenere premuto il tasto SU/GIÙ fino a quando si verifica un movimento verso
l’ALTO/verso il BASSO.
EN Press the UP/DOWN button until there is an UP/DOWN movement.
4Programmer le sens Monter / AUF-Richtung programmieren /
Programmare la direzione verso l’ALTO / Program the UP direction
FR Maintenir enfoncée la touche Monter jusqu’à ce qu’un mouvement Monter s’effectue.
DE Die AUF-Taste gedrückt halten, bis eine AUF/AB-Bewegung erfolgt.
IT Tenere premuto il tasto SU fino a quando si verifica un movimento verso
l’ALTO/verso il BASSO.
EN Press the UP button until there is an UP/DOWN movement.
5Programmer la position finale inférieure / Untere Endlage programmieren /
Programmare la posizione finale inferiore / Program the lower end position
FR a.
Descendre dans la position finale inférieure souhaitée. La barre à toile ne doit pas se lever!
b. Presser la touche MONTER 1 seconde, relâcher et presser de nouveau 3 secondes jusqu’à
ce qu’un mouvement MONTER/BAISSER s’effectue.
DE a. In die gewünschte untere Endlage fahren, Stoffstab darf nicht aufstehen!
b. Die AUF-Taste 1 s drücken, loslassen und erneut 3 s gedrückt halten, bis eine AUF/
AB-Bewegung erfolgt.
IT a. Portarsi nella posizione finale inferiore desiderata. La barra finale non deve sporgere!
b. Premere per 1 s il tasto SU, rilasciarlo e tenerlo premuto nuovamente per 3 s fino a
quando avviene un movimento verso l’ALTO/verso il BASSO.
EN a. Move into the lower end position you want, the fabric rod must not move up.
b. Press the UP button for 1 s, release and press it again for 3 s until
there is an UP/DOWN movement.
6Programmierungsmodus deaktivieren / Désactiver le mode de programmation /
Disattivare la modalità di programmazione / Disable the programming mode
FR Remonter depuis la position finale inférieure. Maintenir pressé la touche MONTER/BAISSER
jusqu’à ce qu’un mouvement MONTER/BAISSER s’effectue.
DE Aus der unteren Endlage herausfahren. Die AUF/AB-Taste gedrückt halten, bis eine AUF/
AB-Bewegung erfolgt.
IT Spostarsi dalla posizione finale inferiore. Tenere premuto il tasto SU/GIÙ fino a quando si
verifica un movimento verso l’ALTO/verso il BASSO.
EN Move out of the lower limit position. Press the UP/DOWN button until there is an UP/DOWN
movement.
7Activer la fonction Back-release / Back-Release-Funktion aktivieren /
Attivare la funzione back-release / Activate the back-release function
FR a. Monter jusqu’à la position finale supérieure jusqu’à ce que le moteur s’arrête de lui-même.
b. Maintenir enfoncée la touche MONTER/BAISSER jusqu’à ce qu’un mouvement
MONTER/BAISSER s’effectue.
c. Baisser environ de 400 mm.
d. Contrôler que le mouvement Baisser s’effectue de la position finale supérieure.
DE a. In die obere Endlage fahren, bis Motor selbstständig stoppt.
b. Nochmals die AUF/AB-Taste gedrückt halten, bis eine AUF/AB-Bewegung erfolgt.
c. Ca. 400 mm AB-Richtung fahren.
d. Kontrollieren, ob aus der oberen Endlage AB gefahren wird.
IT a. Portarsi nella posizione finale superiore fino a quando il motore si arresta
automaticamente.
b. Tenere nuovamente premuto il tasto SU/GIÙ fino a quando si verifica un movimento verso
l’ALTO/verso il BASSO.
c. Portarsi di ca. 400 mm verso il BASSO.
d. Controllare se ci si sposta in BASSO dalla posizione finale superiore.
EN a. Move it to the upper end position until the motor stops by itself.
b. Press the UP/DOWN button again until there is an UP/DOWN movement.
c. Move approx. 400 mm in the DOWN direction.
d. Check that it moves DOWN from the upper end position.
8Suppression de la programmation / Programmierung löschen /
Cancellazione della programmazione / Delete the programming
FR Maintenir enfoncée la touche MONTER/BAISSER jusqu’à ce que 2 mouvements
MONTER/BAISSER s’effectuent.
DE Die AUF/AB-Taste gedrückt halten, bis 2 × eine AUF/AB-Bewegung erfolgt.
IT Tenere premuto il tasto SU/GIÙ fino a quando si verifica 2 volte un movimento verso
l’ALTO/verso il BASSO.
EN Press the UP/DOWN button until there are 2 UP/DOWN movements.

Other Schenker Storen Accessories manuals

Schenker Storen NGM 20 User manual

Schenker Storen

Schenker Storen NGM 20 User manual

Schenker Storen BGM 6 User manual

Schenker Storen

Schenker Storen BGM 6 User manual

Popular Accessories manuals by other brands

Poweriss 12000mAh user manual

Poweriss

Poweriss 12000mAh user manual

Serioux SRX-560P instruction manual

Serioux

Serioux SRX-560P instruction manual

Omron ZW Series user manual

Omron

Omron ZW Series user manual

ATEN VS92A quick start guide

ATEN

ATEN VS92A quick start guide

wtw visoturb 700 iq operating manual

wtw

wtw visoturb 700 iq operating manual

Simply Automated UPB URD manual

Simply Automated

Simply Automated UPB URD manual

netvox Z311C user manual

netvox

netvox Z311C user manual

Honeywell RPW317 Instruction leaflet

Honeywell

Honeywell RPW317 Instruction leaflet

Jupiter Avionics JA72-006 Installation and operating manual

Jupiter Avionics

Jupiter Avionics JA72-006 Installation and operating manual

Burkert GENERIC 8400 operating instructions

Burkert

Burkert GENERIC 8400 operating instructions

ThermalStrike Heated Luggage user manual

ThermalStrike

ThermalStrike Heated Luggage user manual

Ives 25 installation instructions

Ives

Ives 25 installation instructions

HoMedics COMFORT PRO TRANSFORM HCM-T210GYQVC-GB instruction manual

HoMedics

HoMedics COMFORT PRO TRANSFORM HCM-T210GYQVC-GB instruction manual

IFM Electronic EFECTOR200 OC Series installation instructions

IFM Electronic

IFM Electronic EFECTOR200 OC Series installation instructions

Honeywell CAMIR-F1 Quick installation guide

Honeywell

Honeywell CAMIR-F1 Quick installation guide

LEGRAND Wattstopper FD-301 installation instructions

LEGRAND

LEGRAND Wattstopper FD-301 installation instructions

Masimo M-LNCS Series Instructions for use

Masimo

Masimo M-LNCS Series Instructions for use

Global Cache GC-SC1 quick start guide

Global Cache

Global Cache GC-SC1 quick start guide

manuals.online logo
manuals.online logoBrands
  • About & Mission
  • Contact us
  • Privacy Policy
  • Terms and Conditions

Copyright 2025 Manuals.Online. All Rights Reserved.