10 Motor einstellen / Réglage du moteur /
Regolazione del motore / Setting the motor
Somfy Sunea io
1Faire raccorder le moteur au secteur par le monteur / Motor durch Monteur an Stromnetz anschliessen /
Far collegare il motore alla rete elettrica dall’installatore / Have the installer connect the motor to the mains
2Activer le mode programmation / Programmierungsmodus aktivieren /
Attivare la modalità di programmazione / Activating the programming mode
FR Presser simultanément les touches MONTER/BAISSER jusqu’à ce qu’un mouvement
MONTER/BAISSER s’effectue.
DE Die AUF- und AB-Taste gleichzeitig gedrückt halten, bis eine AUF/AB-Bewegung erfolgt.
IT Tenere premuti contemporaneamente i tasti SU/GIÙ fino a quando si verifica un movimento
verso L’ALTO/verso il BASSO.
EN Press the UP and DOWN buttons at the same time and hold down until there is an
UP/DOWN movement.
3Vérifier la direction / Laufrichtung überprüfen /
Verificare la direzione di movimento / Checking the running direction
FR Si la direction est incorrecte, presser la touche my jusqu’à ce qu’un mouvement
MONTER/BAISSER s’effectue.
DE Stimmt die Laufrichtung nicht, die my-Taste gedrückt halten, bis eine AUF/AB-Bewegung
erfolgt.
IT Se la direzione di movimento non è corretta, tenere premuto il tasto my fino a quando si
verifica un movimento verso L’ALTO/verso il BASSO.
EN If the running direction is not correct, press the my button down until there is an UP/DOWN
movement.
4Programmer la position finale inférieure / Untere Endlage programmieren /
Programmare la posizione finale inferiore / Programming the lower limit position
FR a.
Descendre dans la position finale inférieure souhaitée. La barre à toile ne doit pas se lever!
b. Presser les touches MONTER et my jusqu’à ce l’entraînement démarre de lui-même.
c. Laisser monter jusqu’à la butée finale supérieure.
DE a. In die gewünschte untere Endlage fahren. Stoffstab darf nicht aufstehen!
b. Die AUF- und my-Taste gedrückt halten, bis der Antrieb selbstständig losfährt.
c. Antrieb in den oberen Endanschlag fahren lassen.
IT a. Portarsi nella posizione finale desiderata. La barra finale non deve sporgere!
b. Tenere premuti i tasti SU e my fino a quando il motore parte automaticamente.
c. Far spostare il motore nella posizione finale superiore.
EN a. Move it to the desired lower limit. End rail may not protrude!
b. Press the UP and my button and hold until the drive moves independently.
c. Let the drive move to the upper limit stop.
5Sauvegarder la programmation / Programmierung abspeichern / Salvare la programmazione / Save the programming
FR Maintenir pressé la touche my jusqu’à ce qu’un mouvement MONTER/BAISSER s’effectue.
DE Die my-Taste gedrückt halten, bis eine AUF/AB-Bewegung erfolgt.
IT Tenere premuto il tasto my fino a quando si verifica un movimento verso
L’ALTO/verso il BASSO.
EN Press and hold down the my button until there is an UP/DOWN movement.
6Désactiver le mode de programmation (au verso de l’émetteur) / Programmierungsmodus deaktivieren (Sender-Rücksei
te) /
Disattivare la modalità di programmazione (retro del trasmettitore) / Deactivating the programming mode
(rear side of the transmitter)
FR Maintenir pressé la touche Progr. jusqu’à ce qu’un mouvement MONTER/BAISSER
s’effectue.
DE Prog.-Taste gedrückt halten, bis eine AUF/AB-Bewegung erfolgt.
IT Tenere premuto il tasto di programmazione fino a quando si verifica un movimento verso
L’ALTO/verso il BASSO.
EN Press and hold down the Prog. button until there is an UP/DOWN movement.
my
my
my
my
ASA DA VINCI 50 ST
1
FR Ne pas brancher plusieurs moteurs sur le même bouton.
DE Es sollen nicht mehrere Motoren an dieselbe Drucktaste angeschlossen werden.
IT Non collegare più motori allo stesso pulsante.
EN Do not connect two or more motors to the same button.
2
FR Ne pas brancher deux boutons sur le même moteur.
DE Auf demselben Motor dürfen keinesfalls zwei Tasten angeschlossen werden.
IT Non collegare due pulsanti allo stesso motore.
EN Do not connect two buttons to the same motor.
3
FR Ne jamais utiliser une commande de type stable.
DE Keinesfalls sollte eine stabile Steuerung verwendet werden.
IT Non utilizzare mai un comando di tipo stabile.
EN Never use a stable type command.
4
FR Ne pas utiliser de boutons, où il serait possible de connecter
les dispositifs de montée et descente simultanément.
DE Es sollten keine Tasten benutzt werden, auf denen die Hochfahrt und
die Abfahrt gleichzeitig eingestellt werden kann.
IT Non utilizzare pulsanti dove possano essere inseriti salita e discesa contemporaneamente.
EN Do not use buttons where ascent and descent can be cut in at the same time.
5
FR Vérifier le câblage.
DE Die Verkabelung überprüfen.
IT Verificare il cablaggio.
EN Check the wiring.
6
FR S’assurer que le câble n’interfère pas avec les parties en mouvement.
DE Sicherstellen, dass das Kabel nicht mit in Bewegung befindlichen Teilen kollidiert.
IT Accertarsi che il cavo non interferisca con parti in movimento.
EN Make sure wires do not get In the way of moving parts.
INOTE PER LA GARANZIA - NOTES ON THE WARRANTY - FNOTES POUR LA GARANTIE
DHINWEISE ZUR GARANTIE - ENOTAS PARA LA GARANTÍA - PNOTAS SOBRE A GARANTIA
PRZYPISY DOTYCZĄCE GWARANCJI - HMEGJEGYZÉSEK A GARANCIÁHOZ - OPMERKINGEN VOOR
DE GARANTIE - SANMÄRKNINGAR OM GARANTIN - ΣΗΜΕΙΩΣΕΙΣ ΓΙΑ ΤΗΝ ΕΓΓΥΗΣΗ
POZNÁMKY O ZÁRUCE - GARANTİ NOTLARI -ﻥﲈﻀﻠﻟ ﺕﺎﻈﺣﻼﻣ
5
3
6
4
OK
Dichiarazione di conformità disponibile sul sito internet - The Declaration of conformity is available on the website - Déclaration de conformité disponible sur
le site Internet - Konformitätserklärung einsehbar auf der Internet-Seite - Declaración de conformidad disponible en la página Web - A Declaração de
conformidade pode ser consultada no site Web - Deklaracja zgodności dostępna na stronie web - A weboldalon található a megfelelőségi nyilatkozat
Conformiteitsverklaring beschikbaar op de internetsite - Försäkran om överensstämmelse finns på webbplatsen -Δήλωση συμφωνίας είναι διαθέσιμη στην
ιστοσελίδα - Prohlášení o shodě je k dispozici na webových stránkách - Uygunluk beyannamesi internet sitesinde mevcuttur - ﺖﻧﱰﻧﻻﺍ ﻊﻗﻮﻣ ﲆﻋ ﺡﺎﺘﻣ ﺔﻘﺑﺎﻄﳌﺍ ﻥﻼﻋﺇ
www.asamotor.com
C
B
A
D
Ø50 - Ø60 ST
Ø40 ST Ø50 - Ø60 MO
IREGOLAZIONE DEI PUNTI DI ARRESTO - ADJUSTING THE STOP POINTS - F REGLAGE DES POINTS D'ARRET
DEINSTELLUNG DER ENDLAGEN - EREGULACIÓN DE LOS PUNTOS DE PARADA -PREGULAÇÃO DOS PONTOS DE
PARAGEM - REGULOWANIE PUNKTÓW ZATRZYMYWANIA -H A LEÁLLÁSI PONTOK BEÁLLÍTÁSA
DE EINDSTANDEN AFSTELLEN - S REGLERING AV ÄNDLÄGENA - ΡΥΘΜΙΣΗ ΤΩΝ ΣΗΜΕΙΩΝ ΣΥΛΛΗΨΗΣ
NASTAVENÍ KONCOVÝCH POLOH - STOP NOKTALARININ AYARLANMASI - ﻒﻗﻮﺘﻟﺍ ﻁﺎﻘﻧ ﻂﺒﺿ
I Tutti i motori escono dalla fabbrica con il finecorsa regolato in modo tale da consentire un giro completo in entrambi i sensi di rotazione. Dopo
aver inserito il motore nel tubo avvolgitore e fissato a quest’ultimo la tenda o la tapparella si può iniziare la regolazione dei punti di arresto
desiderati. Seguire le indicazioni serigrafate sulla testa del motore (Vedi figura).
When the motors leave the factory their limit switch is adjusted so that it allows one complete revolution in both rotating directions. After inserting the motor
in the rolling tube, and fixed the awning or shutter to it, adjust the stop points as required. Follow the directions screen-printed on the motor head (see figure).
F Tous les moteurs sortent de l'usine avec la fin de course réglée, d'une telle manière que soit assuré un tour complet dans les deux sens de
rotation. Après avoir branché le moteur sur le tube enrouleur et fixé à ce dernier le rideau ou le store, il est possible de commencer le réglage des
points d'arrêt souhaités. Suivre les indications sérigraphiées sur la tête du moteur (Voir la figure).
D Alle Motoren werden mit einer eingestellten Endlage ausgeliefert, die eine komplette Umdrehung in beide Drehrichtungen ermöglicht. Nach dem
Einsetzen des Motors in das Wickelrohr und der Befestigung der Markise oder des Rollladens am Wickelrohr kann die Einstellung der gewünschten
Endlagen vorgenommen werden. Dabei sind die auf dem Kopf des Motors aufgedruckten Hinweise zu beachten (Siehe Abbildung).
E Todos los motores salen de la fábrica con el fin de carrera regulado de tal forma que permita una vuelta completa en ambos sentidos de la
rotación. Después de haber introducido el motor en el tubo de enrollado, se fija a éste último el toldo o la persiana y a continuación se puede
iniciar la regulación de los puntos de parada deseados. Realizar las indicaciones serigrafiadas en la cabecera del motor (ver figura).
P Todos os motores saem da fábrica com o dispositivo de fim de curso para permitir uma volta completa em ambos os sentidos de rotação.
Depois de ter inserido o motor no tubo envolvedor e fixado a cortina ou a persiana a este, é possível iniciar a regulação dos pontos de paragem
desejados. Siga as instruções serigrafadas no cabeçote do motor (Veja a figura).
Wszystkie silniki mają fabrycznie ustawiony ogranicznik ruchu tak, aby umożliwić pełny obrót w obu kierunkach. Po wsunięciu silnika do rury nawojowej
i zamocowaniu do niej markizy lub rolety, możliwe jest rozpocząć regulację żądanych punktów zatrzymywania. Należy zastosować się do wskazówek
zaznaczonych na głowicy silnika (Patrz rysunek).
H Az összes motor gyári beállítása során a végálláskapcsoló úgy van beszabályozva, hogy lehetővé teszi mindkét irányban egy teljes fordulat elvégzését.
Illessze a motort a roló feltekerhető csövébe és rögzítse azt a rolóhoz vagy redőnyhöz, ezután beállíthatja a kívánt leállási pontokat. Tartsa be a
motorfejen látható útmutatást (lásd az ábrát).
Alle motoren verlaten de fabriek met een zodanige eindafstelling dat een volledige slag in beide draairichtingen mogelijk is. Nadat de motor in de
oprolbuis is geplaatst en het gordijn of rolluik aan de buis is bevestigd, kan met de eindafstelling worden begonnen. Volg de aanwijzingen die op
de motorkop zijn gedrukt (zie afbeelding).
S Alla motorerna levereras med fabriksinställda ändslag för att möjliggöra ett komplett varv i båda rotationsriktningarna. Efter att motorn har förts in
i rullgardinsröret och röret har fästs i persiennen eller rullgardinen, kan ni börja ställa in de önskade ändlägena. Följ de anvisningar som finns
tryckta på motorhuvudet (se figuren).
Όλοι οι κινητήρες βγαίνουν από το εργοστάσιο με ρυθμισμένο τερματικό πορείας με τρόπο τέτοιο ώστε να επιτρέπεται ολοκληρωμένη στροφή και
στις δύο κατευθύνσεις περιστροφής. Μετά την εισαγωγή του κινητήρα στο σωλήνα περιέλιξης και στερεωθούν σε αυτό η τέντα ή το ρολό μπορεί να
ξεκινήσει η ρύθμιση του επιθυμητού σημείου σύλληψης. Ακολουθήσατε τις τυπωμένες ενδείξεις στην κεφαλή του κινητήρα (Βλέπε εικόνα).
Všechny motory mají z výroby nastaveny koncové polohy tak, aby umožňovaly jednu celou otáčku v obou směrech otáčení. Po vložení motoru do
navíjecí trubky a po upevnění rolety nebo žaluzie je možné začít nastavovat požadované koncové polohy. Postupujte podle natištěných značek na hlavě
motoru (viz obrázek).
Tüm motorlar, her iki rotasyon yönünde de tam bir tur dönüş imkanı tanıyacak şekilde, fabrikadan kurs sonu ayarlanmış olarak çıkarlar. Motoru
sarma borusuna yerleştirdikten ve tente veya panjuru sarma borusuna sabitledikten sonra, istenilen stop noktaları ayarı yapılabilir. Motor kafası
üzerine kazınmış bilgilere uyunuz (Resme bakınız).
ﺭﺍﻭﺪﻟﺍ ﺏﻮﺒﻧﻷﺍ ﰲ ﻙﺮﶈﺍ ﺐﻴﻛﺮﺗ ﺪﻌﺑ .ﻥﺍﺭﻭﺪﻟﺍ ﱔﺎﲡﺍ ﻼﻛ ﰲ ﺔﻠﻣﰷ ﺓﺭﻭﺩ ﻞﻤﻌﺑ ﵟﺗ ﺔﻘﻳﺮﻄﺑ ﺎًﻘﺒﺴﻣ ﻪﻄﺒﺿ ﰎ ﻯﺮﳎ ﺔﻳﺎﳯﺑ ﻊﻨﺼﳌﺍ ﻦﻣ ﺕﰷﺮﶈﺍ ﻊﻴﲨ ﺩﺭﻭُ
.(ﲁﺸﻟﺍ ﺮﻈﻧﺍ) ﻙﺮﶈﺍ ﺱﺃﺭ ﲆﻋ ﺔﻋﻮﺒﻄﳌﺍ ﺕﺍﺩﺎﺷﺭﻹﺍ ﻊﺒﺗﺍ .ﺔﺑﻮﻠﻄﳌﺍ ﻒﻗﻮﺘﻟﺍ ﻁﺎﻘﻧ ﻂﺒﺿ ﺀﺪﺑ ﻦﻜﳝ ﻪﺑ ﻪﺘﻴﺒﺜﺗﻭ
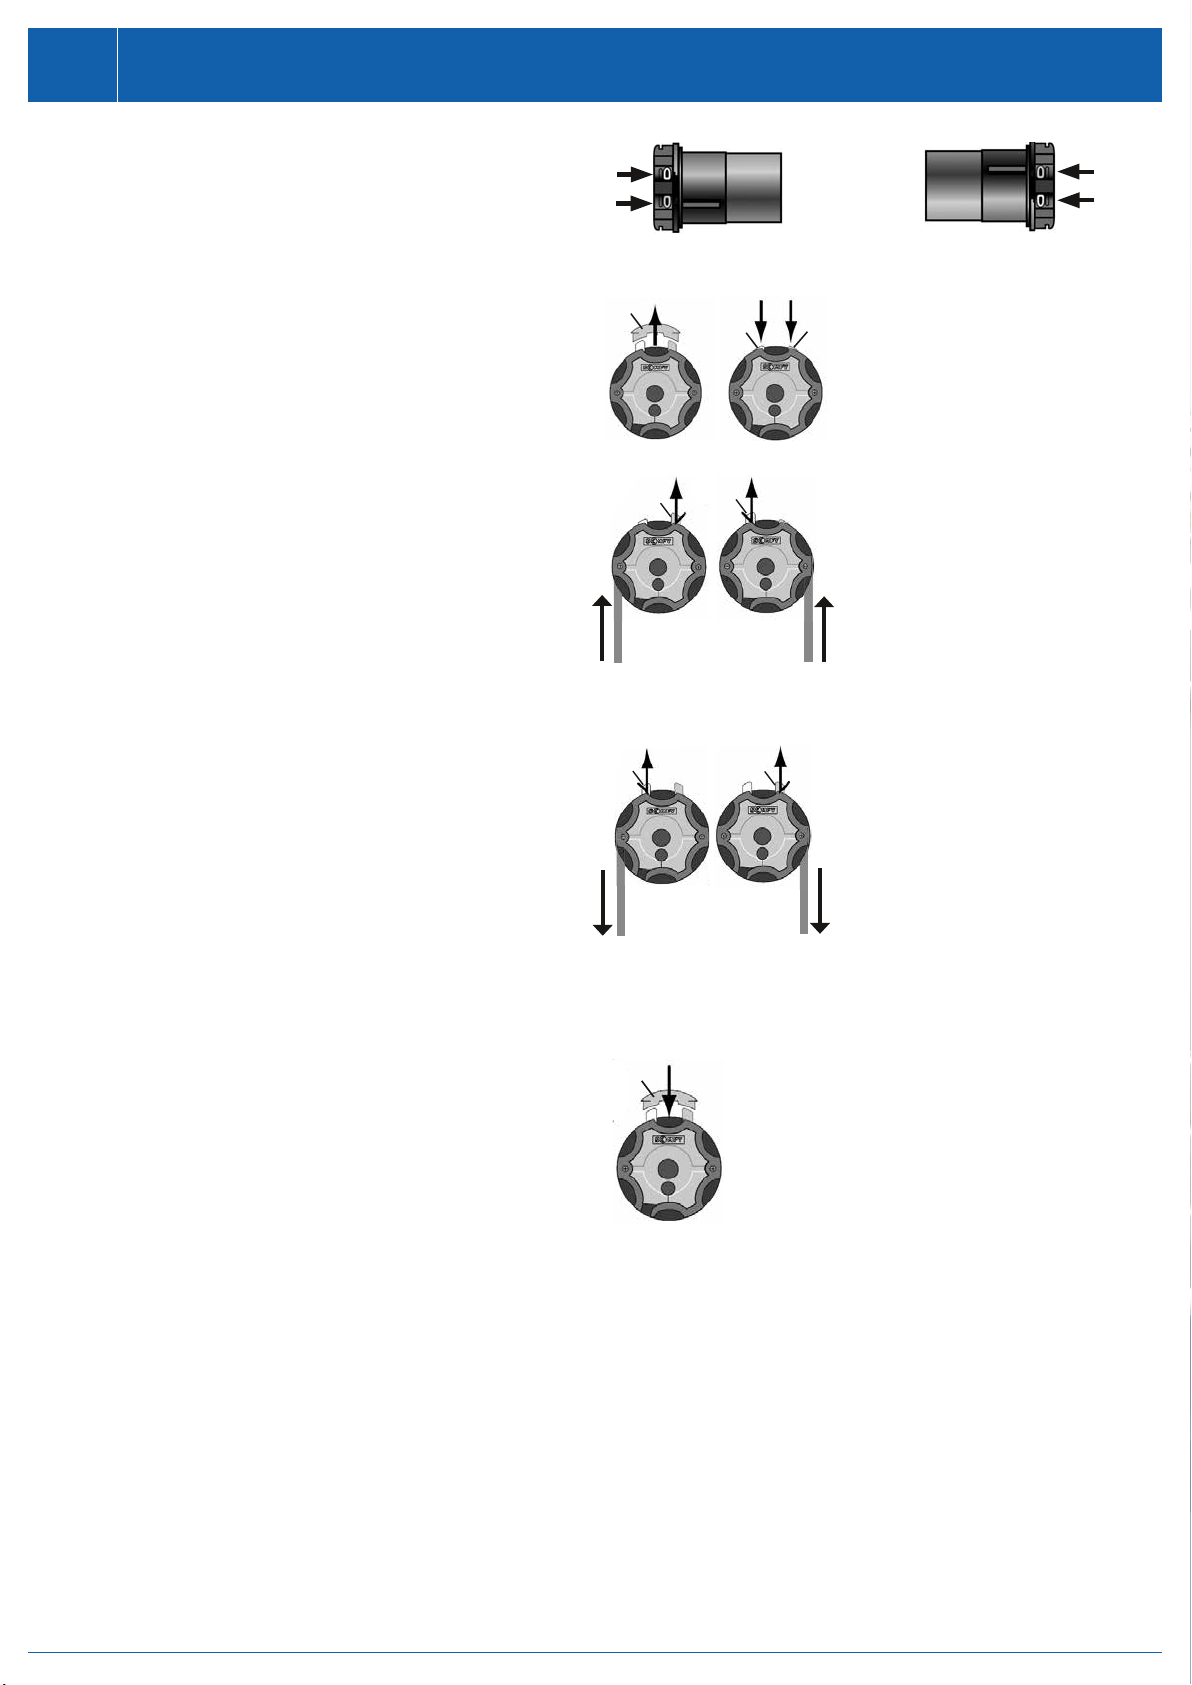
I - Le frecce 1 e 2 indicano i due sensi di rotazione del tubo avvolgitore.
- Al senso di rotazione 1 corrisponde la vite di regolazione A, al senso di regolazione 2 corrisponde la vite di regolazione B.
- Girando la vite di regolazione verso il segno + si consente al motore/tubo avvolgitore di eseguire un maggior numero di rotazioni; girando la vite
di regolazione verso il segno – si diminuiscono le rotazioni.
- Arrows 1 and 2 indicate the two directions of rotation of the rolling tube.
- Adjustment screw A corresponds to direction of rotation 1, and adjustment screw B corresponds to direction of rotation 2.
- Turning the adjustment screw towards the + mark allows the motor/rolling tube to make a greater number of rotations; turning the adjustment
screw towards the – mark decreases the number of rotations.
F - Les flèches 1 et 2 indiquent les deux sens de rotation du tube enrouleur.
- Au sens de rotation 1 correspond la vis de réglage A, au sens de réglage 2 correspond la vis de réglage B.
- En tournant la vis de réglage vers le signe +, on permet au moteur/tube enrouleur d’exécuter un nombre de rotations supérieur; en tournant la
vis de réglage vers le signe -, on diminue les rotations.
D - Die Pfeile 1 und 2 geben die beiden
- Drehrichtungen des Aufrollrohrs an.
- Die Drehrichtung 1 entspricht der Regulierungsschraube A und die Drehrichtung 2 der Regulierungsschraube B.
- Dreht man die Regulierungsschraube zum Zeichen + wird die Drehungsanzahl des/Motors/Aufrollrohrs erhöht, dreht man sie zum Zeichen -
werden die Drehungen vermindert.
E - Las flechas 1 y 2 indican los dos sentidos de rotación del tubo de enrollado.
- Al sentido de rotación 1 corresponde el tornillo de regulación A, al sentido de regulación 2 corresponde el tornillo de regulación B.
- Si se gira el tornillo de regulación hacia el signo (+) el motor/tubo de enrollado puede realizar un número mayor de rotaciones; si se gira el
tornillo de regulación hacia el signo (–) disminuyen las rotaciones.
P- As setas 1 e 2 indicam os dois sentidos de rotação do tubo de enrolamento.
- Ao sentido de rotação 1 corresponde o parafuso de regulação A, ao sentido de rotação 2 corresponde o parafuso de regulação B.
- Rodando o parafuso de regulação para o sinal + consente-se ao motor/tubo de enrolamento a execução do maior número de rotações;
rodando o parafuso de regulação para o sinal –diminuem-se as rotações.
- Strzałki 1 i 2 wskazują dwa kierunki obrotu rury nawojowej.
- Kierunkowi obrotu 1 odpowiada wkręt regulacyjny A, a kierunkowi obrotu 2 odpowiada wkręt regulacyjny B.
- Obracając wkręt regulacyjny w kierunku znaku +, umożliwia się silnikowi/rurze nawojowej wykonanie większej liczby obrotów; obracając wkręt
regulacyjny w kierunku znaku – , zmniejszana jest liczba obrotów.
H - Az 1. és 2. nyíl a feltekerő cső két forgási irányát mutatja.
- Az 1. forgási iránynak az A. beállító csavar, a 2. forgási iránynak a B. beállító csavar felel meg.
- A beállító csavar + jel felé történő elforgatásával a feltekerő motor/cső nagyobb számú forgást tud végrehajtani; a beállító csavar - jel felé történő
elforgatásával a csökken a forgások száma.
- De pijlen 1 en 2 geven de twee draairichtingen van de oprolbuis aan.
- De stelschroef A komt overeen met de draairichting 1, de stelschroef B komt overeen met de draairichting 2.
- Door de stelschroef in de richting van het teken + te draaien kan de motor/oprolbuis een groter aantal rotaties uitvoeren; door de stelschroef in
de richting van het teken – te draaien nemen de rotaties af.
S - Pilarna 1 och 2 anger rörets två rotationsriktningar.
- Ställskruven A hänger samman med rotationsriktning 1 och ställskruven B med rotationsriktning 2.
- Om du vrider ställskruven mot tecknet + gör motorn/röret ett större antal rotationer, om du vrider den mot tecknet - minskar antalet rotationer.
- Τα τόξα 1 και 2 δείχνουν τις δύο κατευθύνσεις περιστροφής του σωλήνα περιέλιξης.
- Στην κατεύθυνση περιστροφής 1 αντιστοιχεί η βίδα ρύθμισης A, στην κατεύθυνση ρύθμισης 2 αντιστοιχεί η βίδαρύθμισης B.
- Περιστρέφοντας τη βίδα ρύθμισης προς το σημείο + επιτρέπεται στο κινητήρα/σωλήνα περιέλιξης η εκτέλεση μεγαλύτερου αριθμού
περιστροφών περιστρέφοντας τη βίδα ρύθμισης προς το σημείο – μειώνονται οι περιστροφές.
- Šipky 1 a 2 označují oba směry otáčení navíjecí trubky.
- Směr otáčení 1 odpovídá nastavovacímu šroubu A, směr otáčení 2 odpovídá nastavovacímu šroubu B.
- Otáčením nastavovacího šroubu směrem ke znaménku + umožníte motoru/navíjecí trubce provést větší počet otáček; otáčením nastavovacího šroubu
směrem ke znaménku – snížíte počet otáček.
- 1 ve 2 okları sarma borusunun iki rotasyon yönünü gösterirler.
- Rotasyon yönü 1'e ayar vidası A karşılık gelir, rotasyon yönü 2'ye ayar vidası B karşılık gelir.
- Ayar vidası + işaretine doğru çevrildiğinde, motorun/sarma borusunun daha fazla sayıda rotasyon yapmasına imkan tanınır; ayar vidası –
işareti yönünde çevrildiğinde ise, rotasyon sayısı azalır. .ﺓﺭﺍﻭﺪﻟﺍ ﺓﺭﻮﺳﺎﻤﻟﺍ ﻥﺍﺭﻭﺩ ﻲﻫﺎﺠﺗﺍ ﻰﻟﺇ 2 ﻭ 1 ﻢﻬﺳﻷﺍ ﺮﻴﺸﺗ -
.B ﻂﺒﻀﻟﺍ ﺭﺎﻤﺴﻣ ﻙﺮﺤﺘﻳ ﻲﻧﺎﺜﻟﺍ ﻥﺍﺭﻭﺪﻟﺍ ﻩﺎﺠﺗﺍ ﻲﻓﻭ A ﻂﺒﻀﻟﺍ ﺭﺎﻤﺴﻣ ﻞﻤﻌﻳ ﻝﻭﻷﺍ ﻥﺍﺭﻭﺪﻟﺍ ﻩﺎﺠﺗﺍ ﻲﻓ -
.ﺕﺍﺭﻭﺪﻟﺍ ﺩﺪﻋ ﻞﻘﻳ – ﻩﺎﺠﺗﻻﺍ ﻲﻓ ﻂﺒﻀﻟﺍ ﺭﺎﻤﺴﻣ ﻒﻟ ﺪﻨﻋﻭ ،ﺕﺍﺭﻭﺪﻟﺍ ﻦﻣ ﺩﺪﻋ ﺮﺒﻛﺃ ﺓﺭﺍﻭﺪﻟﺍ ﺓﺭﻮﺳﺎﻤﻟﺍﻭ ﻙﺮﺤﻤﻟﺍ ﻲﻄﻌﻳ + ﻩﺎﺠﺗﻻﺍ ﻲﻓ ﻂﺒﻀﻟﺍ ﺭﺎﻤﺴﻣ ﻒﻟ ﺪﻨﻋ -
I Importante: nessuna garanzia è riconosciuta sul prodotto, qualora si presentino malfunzionamenti o inconvenienti, dovuti alla non osservanza
delle norme di installazione, o da interventi effettuati sul prodotto da personale non autorizzato o riconosciuto dal produttore. Se il cavo di
alimentazione è danneggiato, deve essere sostituito dal costruttore o dal suo servizio assistenza tecnica al fine di evitare pericoli.
Important: no product warranty is acknowledged if it displays malfunctionings or problems due to non-compliance with the rules of installation or
to work done on the product by unauthorised personnel not recognised by the manufacturer. If the power cable becomes damaged, it must be
replaced by the manufacturer or by its technical assistance service in order to prevent risks.
F Important: aucune garantie n’est reconnue sur le produit, au cas où l’on constaterait des défaillances ou inconvénients, dus au non-respect des normes
de mise en place ou produits par des interventions effectuées sur le produit de la part d’un personnel non autorisé ou agréé par le fabricant. Si le câble
d’alimentation est abîmé, c’est le fabricant ou le service après-vente qui doivent le remplacer, en vue d’éviter toute sorte de dangers.
D Wichtig: Es wird keine Gewährleistung für das Produkt anerkannt, wenn Fehlfunktionen oder Störungen festgestellt werden, die auf Nichteinhaltung
der Installationsanweisungen oder auf Eingriffe durch nicht befugtes oder nicht vom Hersteller anerkanntes Personal zurückzuführen sind. Wenn
das Netzkabel beschädigt ist, muss es unverzüglich vom Hersteller oder vom technischen Kundendienst durch ein neues ersetzt werden, um
Gefahren zu vermeiden.
E Importante: el producto pierde cualquier tipo de garantía en caso de que el funcionamiento defectuoso del mismo u otros inconvenientes se
deban a la inobservancia de las normas de instalación, o en caso de que se hayan realizado intervenciones en el producto por parte de personal
no autorizado y reconocido por el productor. Si el cable de alimentación se estropea, es necesario que su sustitución corra a cargo del
constructor o de su servicio de asistencia técnica, para evitar peligros.
P Importante: não será reconhecida nenhuma garantia do produto, caso se verifiquem maus funcionamentos ou problemas, devidos ao desrespeito
pelas normas de instalação, ou a intervenções efectuadas no produto por pessoal não autorizado e reconhecido pelo fabricante. Se o cabo de
alimentação estiver estragado, deve ser substituído pelo fabricante ou pelo seu Serviço de Assistência Técnica para evitar perigos.
Ważne: gwarancja produktu traci swą ważność jeśli nieprawidłowe funkcjonowanie produktu spowodowane jest nieprzestrzeganiem przepisów
dotyczących sposobu instalowania lub też w wypadku interwencji ze strony personelu, który nie został upoważniony i zatwierdzony przez
Producenta. Jeśli kabel zasilający jest uszkodzony, aby zapewnić bezpieczeństwo powinien on być wymieniony przez Producenta lub przez
personel jego Serwisu Technicznego.
H Fontos: nincs elismerve semmiféle garancia a gyártmányra, ha olyan hibás működés vagy probléma jelentkezik, melyeket a felszerelési előírások
figyelmen kívül hagyása okozott, vagy pedig a gyártmányon a gyártó által nem engedélyezett és elismert személy végzett beavatkozásokat. Ha a
tápkábel meghibásodik, a gyártónak vagy a gyártó szervizszolgálatának ki kell cserélnie a veszélyek elkerülése végett.
Belangrijk: het product wordt door geen enkele garantie gedekt wanneer zich storingen of ongemakken voordoen door het niet in acht nemen van
de installatievoorschriften of door werkzaamheden die aan het product zijn verricht door onbevoegd, niet door de producent erkend personeel. Bij
beschadiging van de voedingskabel moet deze door de fabrikant of door de technische servicedienst worden vervangen om mogelijke gevaren te
voorkomen.
S Viktigt: tillverkaren påtar sig inget ansvar för driftsstörningar eller problem som uppstår till följd av att installationsanvisningarna inte har följts eller
för ingrepp på produkten av obehöriga personer utan tillverkarens tillstånd. Om elsladden är skadad ska den för att undvika fara bytas ut av
tillverkaren eller dennes serviceverkstad.
Σημαντικό: ουδεμία εγγύηση αναγνωρίζεται για το προϊόν, όταν εμφανίζονται δυσλειτουργίες ή απρόβλεπτα, τα οποία οφείλονται σε μη
τήρηση των κανόνων εγκατάστασης, ή σε επεμβάσεις που πραγματοποιήθηκαν επί του προϊόντος από μη εξουσιοδοτημένο και
αναγνωρισμένο από τον κατασκευαστή προσωπικό. Εφόσον το καλώδιο τροφοδοσίας έχει υποστεί ζημιά, ο κατασκευαστής προβαίνει
στην αντικατάσταση ή και η τεχνική του εξυπηρέτηση για την αποφυγή κινδύνων.
Důležité: v případě poruch nebo potíží z důvodu nedodržení návodu k instalaci nebo zásahů prováděných na výrobku osobami nepovolenými nebo
nepověřenými výrobcem nebude uznaná žádná záruka na výrobku. Je-li napájecí kabel poškozen, musí být nahrazen výrobcem nebo jeho
technickým servisem, aby se předešlo nebezpečí.
Önemli: kurulum kurallarına uyulmamasından veya üretici tarafından yetkilendirilmemiş ve tanınmayan personel tarafından ürün üzerinde
geçekleştirilen müdahalelerden kaynaklanan arızalı çalışmalar veya problemler durumunda, ürün üzerinde hiçbir garanti tanınmaz. Besleme
kablosu hasar görmüş ise, tehlikeleri önlemek için, imalatçı veya teknik servis tarafından değiştirilmelidir.
ﺡﺮﺼﻣ ﺮﯿﻏﻭ ﻦﯿﻠﮬﺆﻣ ﺮﯿﻏ ﺹﺎﺨﺷﺃ ﻞﺧﺪﺗ ﻦﻋ ﺔﺠﺗﺎﻧ ﻭﺃ ﺐﯿﻛﺮﺘﻟﺍ ﺪﻋﺍﻮﻗ ﺓﺎﻋﺍﺮﻣ ﻡﺪﻋ ﻦﻋ ﺔﺠﺗﺎﻧ ﻝﺎﻄﻋﺃ ﻭﺃ ﻞﯿﻐﺸﺘﻟﺍ ﻲﻓ ﺄﻄﺧ ﻙﺎﻨﮬ ﻥﺎﻛ ﺍﺫﺇ ﺞﺘﻨﻤﻠﻟ ﻥﺎﻤﺿ ﺪﺟﻮﯾ ﻻ :ﻡﺎﮬ
.ﺭﺎﻄﺧﻷﺍ ﺐﻨﺠﺘﻟ ﺔﯿﻨﻓ ﺔﻣﺪﺧ ﺰﻛﺮﻣ ﻱﺃ ﻦﻣ ﻭﺃ ﻊﻨﺼﻤﻟﺍ ﻦﻤﮭﻟﺍﺪﺒﺘﺳﺍ ﺐﺠﯾ ﻒﻠﺗ ﺪﻗ ﺔﯿﺑﺮﮭﻜﻟﺍ ﺔﯾﺬﻐﺘﻟﺍ ﻚﻠﺳ ﻥﺎﻛ ﺍﺫﺇ .ﺔﻧﺎﯿﺼﻟﺍ ﻲﻓ ﺔﺠﺘﻨﻤﻟﺍ ﺔﻛﺮﺸﻟﺍ ﻦﻣ ﻞﻤﻌﻟﺎﺑ ﻢﮭﻟ
I 1 - Non collegare più motori allo stesso pulsante.
2 - Non collegare due pulsanti allo stesso motore.
3 - Non utilizzare mai un comando di tipo stabile.
4 - Non utilizzare pulsanti dove possano essere inseriti salita e
discesa contemporaneamente.
5 - Verificare il cablaggio.
6 - Accertarsi che il cavo non interferisca con parti in movimento.
1 - Aynı butona birden fazla motor bağlamayınız.
2 - Aynı motora iki buton bağlamayınız.
3 - Asla sabit tipte bir kumanda kullanmayınız.
4 - Aynı anda hem yükselme hem de alçalma girilebilecek butonlar
kullanmayınız.
5 - Kablo bağlantısını kontrol ediniz.
6 - Kablonun hareketli kısımlar ile temas etmediğinden emin olunuz.
1 - Do not connect two or more motors to the same button.
2 - Do not connect two buttons to the same motor.
3 - Never use a stable type command.
4 - Do not use buttons where ascent and descent can be cut in at
the same time.
5 - Check the wiring.
6 - Make sure wires do not get In the way of moving parts.
.ﺭﺰﻟﺍ ﺲﻔﻧ ﻰﻠﻋ ﻙﺮﺤﻣ ﻦﻣ ﺮﺜﻛﺃ ﻞﺼﺗ ﻻ - 1
.ﻙﺮﺤﻤﻟﺍ ﺲﻔﻨﺑ ﻦﻳﺭﺯ ﻞﺼﺗ ﻻ - 2
.ﺖﺑﺎﺛ ﻉﻮﻧ ﻦﻣ ﻢﻜﺤﺗ ﺓﺪﺣﻭ ﺍًﺪﺑﺃ ﻡﺩ - 3
.ﻲﺘﻗﻮﻟﺍ ﻁﻮﺒﻬﻟﺍﻭ ﺩﻮﻌﺼﻟﺍ ﻝﺎﺠﻣ ﻲﻓ ﺭﺍﺭﺯﺃ ﻡﺪﺨﺘﺴﺗ ﻻ - 4
ﺕﻼﺑﺎﻜﻟﺍ ﻞﻴﺻﻮﺗ ﻦﻣ ﺪﻛﺄﺗ - 5
.ﺔﻛﺮﺤﺘﻤﻟﺍ ﺀﺍﺰﺟﻷﺍ ﻊﻣ ﻞﺑﺎﻜﻟﺍ ﻞﺧﺍﺪﺗ ﻡﺪﻋ ﻦﻣ ﺪﻛﺄﺗ - 6
F1 - Ne pas brancher plusieurs moteurs sur le même bouton.
2 - Ne pas brancher deux boutons sur le même moteur.
3 - Ne jamais utiliser une commande de type stable.
4 - Ne pas utiliser de boutons, où il serait possible de connecter
les dispositifs de montée et descente simultanément.
5 - Vérifier le câblage.
6 - S'assurer que le câble n'interfère pas avec les parties
en mouvement.
D1 - Es sollen nicht mehrere Motoren an dieselbe Drucktaste
angeschlossen werden.
2 - Auf demselben Motor dürfen keinesfalls zwei Tasten
angeschlossen werden.
3 - Keinesfalls sollte eine stabile Steuerung verwendet werden.
4 - Es sollten keine Tasten benutzt werden, auf denen die
Hochfahrt und die Abfahrt gleichzeitig eingestellt werden kann.
5 - Die Verkabelung überprüfen.
6 - Sicherstellen, dass das Kabel nicht mit in Bewegung
befindlichen Teilen kollidiert.
E1 - No conecten varios motores al mismo pulsador.
2 - No conectar dos botones al mismo motor.
3 - No utilizar nunca una orden de tipo estable.
4 - No utilicen pulsadores donde se puedan activar subida y
bajada contemporáneamente.
5 - Comprueben el cableado.
6 - Asegúrense de que el cable no interfiera con partes en movimiento.
P1 - Não ligar mais do que um motor ao mesmo botão.
2 - Nunca ligue dois botões ao mesmo tempo.
3 - Nunca utilize um comando de tipo estável.
4 - Não utilizar botões onde possam ligados a subida e a descida
simultaneamente.
5 - Verifique a cablagem.
6 - Certifique-se que o cabo não interfira com partes em movimento.
1 - Nigdy nie podłączać kilku silników do tego samego przycisku.
2 - Nie podłączać dwóch przycisków do tego samego silnika.
3 - Nigdy nie używać steru stabilnego.
4 - Nie stosować przycisków, na których można przewidzieć
jednocześnie unoszenie i opuszczanie.
5 - Sprawdzić okablowanie.
6 - Upewnić się, czy przewód nie znajduje się zbyt blisko części
pozostających w ruchu.
H1 - Ne kössön több motort ugyanahhoz a nyomógombhoz.
2 - Ne kössön be két nyomógombot ugyanahhoz motorhoz.
3 - Ne használjon rögzített vezérlést.
4 - Ne használjon olyan nyomógombokat, melyekkel egyidejűleg
felmenést és lemenést is be lehet állítani.
5 - Ellenőrizze a csatlakozó vezetékeket.
6 - Ellenőrizze, hogy a vezeték ne érintkezzen a mozgó részekkel.
S 1 - Het is niet toegestaan meerdere motoren op dezelfde knop aan
te sluiten.
2 - Anslut inte två tryckknappar till samma motor.
3 - Använd aldrig ett kommando av stabil typ.
4 - Gebruik geen knoppen waar stijging en daling tegelijkertijd
kunnen worden ingeschakeld.
5 - Kontrollera kablaget.
6 - Säkerställ att kabeln inte stöter emot de rörliga delarna.
1 - Koppla inte fler än en motor till samma knapp.
2 - Sluit geen twee knoppen op dezelfde motor aan.
3 - Gebruik nooit een stabiele bediening.
4 - Använd inte knappar som gör att höjning och sänkning kan
kopplas in samtidigt.
5 - Controleer de bedrading.
6 - Ga na of de kabel geen belemmering vormt voor
bewegende onderdelen.
I
NOTE GENERALI -
GENERAL NOTES -
F
NOTES GENERALES -
D
ALLGEMEINE HINWEISE
E
NOTAS GENERALES -
P
NOTAS GERAIS -
OGÓLNE PRZYPISY -
H
ÁLTALÁNOS MEGJEGYZÉSEK
ALGEMENE OPMERKINGEN -
S
ALLMÄNNA ANMÄRKNINGAR -
ΓΕΝΙΚΕΣ ΣΗΜΕΙΩΣΕΙΣ
OBECNÉ POZNÁMKY - GENEL NOTLAR - ﺔﻣﺎﻋ ﺕﺎﻇﻮﺤﻠﻣ
1 2
1 - Μη συνδέσετε περισσότερους κινητήρες στο ίδιο πλήκτρο.
2 - Μνη συνδέσετε δύο πλήκτρα στον ίδιο κινητήρα.
3 - Μη χρησιμοποιείτε ποτέ εντολή σταθερού τύπου.
4 - Μη χρησιμοποιείτε πλήκτρα στα οποία μπορούν και
εισάγονται ταυτόχρονα άνοδος και κάθοδος.
5 - Ελέγξτε τη καλωδίωση.
6 - Βεβαιωθείτε ότι το καλώδιο δεν παρεμβάλλεται με
άλλα σημεία εν κινήσει.
1 - Nepřipojujte více motorů ke stejnému tlačítku.
2 - Nepřipojujte dvě tlačítka ke stejnému motoru.
3 - Nikdy nepoužívejte ovladač s aretací.
4 - Nepoužívejte tlačítka, kde je možné současně zapnout oba
směry otáčení.
5 - Zkontrolujte kabeláž.
6 - Ujistěte se, že kabel nezasahuje do pohybujících se částí.
INOTE PER LA GARANZIA - NOTES ON THE WARRANTY - FNOTES POUR LA GARANTIE
DHINWEISE ZUR GARANTIE - ENOTAS PARA LA GARANTÍA - PNOTAS SOBRE A GARANTIA
PRZYPISY DOTYCZĄCE GWARANCJI - HMEGJEGYZÉSEK A GARANCIÁHOZ - OPMERKINGEN VOOR
DE GARANTIE - SANMÄRKNINGAR OM GARANTIN - ΣΗΜΕΙΩΣΕΙΣ ΓΙΑ ΤΗΝ ΕΓΓΥΗΣΗ
POZNÁMKY O ZÁRUCE - GARANTİ NOTLARI -ﻥﲈﻀﻠﻟ ﺕﺎﻈﺣﻼﻣ
5
3
6
4
OK
Dichiarazione di conformità disponibile sul sito internet - The Declaration of conformity is available on the website - Déclaration de conformité disponible sur
le site Internet - Konformitätserklärung einsehbar auf der Internet-Seite - Declaración de conformidad disponible en la página Web - A Declaração de
conformidade pode ser consultada no site Web - Deklaracja zgodności dostępna na stronie web - A weboldalon található a megfelelőségi nyilatkozat
Conformiteitsverklaring beschikbaar op de internetsite - Försäkran om överensstämmelse finns på webbplatsen -Δήλωση συμφωνίας είναι διαθέσιμη στην
ιστοσελίδα - Prohlášení o shodě je k dispozici na webových stránkách - Uygunluk beyannamesi internet sitesinde mevcuttur - ﺖﻧﱰﻧﻻﺍ ﻊﻗﻮﻣ ﲆﻋ ﺡﺎﺘﻣ ﺔﻘﺑﺎﻄﳌﺍ ﻥﻼﻋﺇ
www.asamotor.com
C
B
A
D
Ø50 - Ø60 ST
Ø40 ST Ø50 - Ø60 MO
IREGOLAZIONE DEI PUNTI DI ARRESTO - ADJUSTING THE STOP POINTS - F REGLAGE DES POINTS D'ARRET
DEINSTELLUNG DER ENDLAGEN - EREGULACIÓN DE LOS PUNTOS DE PARADA-PREGULAÇÃO DOS PONTOS DE
PARAGEM - REGULOWANIE PUNKTÓW ZATRZYMYWANIA -H A LEÁLLÁSI PONTOK BEÁLLÍTÁSA
DE EINDSTANDEN AFSTELLEN - S REGLERING AV ÄNDLÄGENA - ΡΥΘΜΙΣΗ ΤΩΝ ΣΗΜΕΙΩΝ ΣΥΛΛΗΨΗΣ
NASTAVENÍ KONCOVÝCH POLOH - STOP NOKTALARININ AYARLANMASI - ﻒﻗﻮﺘﻟﺍ ﻁﺎﻘﻧ ﻂﺒﺿ
I Tutti i motori escono dalla fabbrica con il finecorsa regolato in modo tale da consentire un giro completo in entrambi i sensi di rotazione. Dopo
aver inserito il motore nel tubo avvolgitore e fissato a quest’ultimo la tenda o la tapparella si può iniziare la regolazione dei punti di arresto
desiderati. Seguire le indicazioni serigrafate sulla testa del motore (Vedi figura).
When the motors leave the factory their limit switch is adjusted so that it allows one complete revolution in both rotating directions. After inserting the motor
in the rolling tube, and fixed the awning or shutter to it, adjust the stop points as required. Follow the directions screen-printed on the motor head (see figure).
F Tous les moteurs sortent de l'usine avec la fin de course réglée, d'une telle manière que soit assuré un tour complet dans les deux sens de
rotation. Après avoir branché le moteur sur le tube enrouleur et fixé à ce dernier le rideau ou le store, il est possible de commencer le réglage des
points d'arrêt souhaités. Suivre les indications sérigraphiées sur la tête du moteur (Voir la figure).
D Alle Motoren werden mit einer eingestellten Endlage ausgeliefert, die eine komplette Umdrehung in beide Drehrichtungen ermöglicht. Nach dem
Einsetzen des Motors in das Wickelrohr und der Befestigung der Markise oder des Rollladens am Wickelrohr kann die Einstellung der gewünschten
Endlagen vorgenommen werden. Dabei sind die auf dem Kopf des Motors aufgedruckten Hinweise zu beachten (Siehe Abbildung).
E Todos los motores salen de la fábrica con el fin de carrera regulado de tal forma que permita una vuelta completa en ambos sentidos de la
rotación. Después de haber introducido el motor en el tubo de enrollado, se fija a éste último el toldo o la persiana y a continuación se puede
iniciar la regulación de los puntos de parada deseados. Realizar las indicaciones serigrafiadas en la cabecera del motor (ver figura).
P Todos os motores saem da fábrica com o dispositivo de fim de curso para permitir uma volta completa em ambos os sentidos de rotação.
Depois de ter inserido o motor no tubo envolvedor e fixado a cortina ou a persiana a este, é possível iniciar a regulação dos pontos de paragem
desejados. Siga as instruções serigrafadas no cabeçote do motor (Veja a figura).
Wszystkie silniki mają fabrycznie ustawiony ogranicznik ruchu tak, aby umożliwić pełny obrót w obu kierunkach. Po wsunięciu silnika do rury nawojowej
i zamocowaniu do niej markizy lub rolety, możliwe jest rozpocząć regulację żądanych punktów zatrzymywania. Należy zastosować się do wskazówek
zaznaczonych na głowicy silnika (Patrz rysunek).
H Az összes motor gyári beállítása során a végálláskapcsoló úgy van beszabályozva, hogy lehetővé teszi mindkét irányban egy teljes fordulat elvégzését.
Illessze a motort a roló feltekerhető csövébe és rögzítse azt a rolóhoz vagy redőnyhöz, ezután beállíthatja a kívánt leállási pontokat. Tartsa be a
motorfejen látható útmutatást (lásd az ábrát).
Alle motoren verlaten de fabriek met een zodanige eindafstelling dat een volledige slag in beide draairichtingen mogelijk is. Nadat de motor in de
oprolbuis is geplaatst en het gordijn of rolluik aan de buis is bevestigd, kan met de eindafstelling worden begonnen. Volg de aanwijzingen die op
de motorkop zijn gedrukt (zie afbeelding).
S Alla motorerna levereras med fabriksinställda ändslag för att möjliggöra ett komplett varv i båda rotationsriktningarna. Efter att motorn har förts in
i rullgardinsröret och röret har fästs i persiennen eller rullgardinen, kan ni börja ställa in de önskade ändlägena. Följ de anvisningar som finns
tryckta på motorhuvudet (se figuren).
Όλοι οι κινητήρες βγαίνουν από το εργοστάσιο με ρυθμισμένο τερματικό πορείας με τρόπο τέτοιο ώστε να επιτρέπεται ολοκληρωμένη στροφή και
στις δύο κατευθύνσεις περιστροφής. Μετά την εισαγωγή του κινητήρα στο σωλήνα περιέλιξης και στερεωθούν σε αυτό η τέντα ή το ρολό μπορεί να
ξεκινήσει η ρύθμιση του επιθυμητού σημείου σύλληψης. Ακολουθήσατε τις τυπωμένες ενδείξεις στην κεφαλή του κινητήρα (Βλέπε εικόνα).
Všechny motory mají z výroby nastaveny koncové polohy tak, aby umožňovaly jednu celou otáčku v obou směrech otáčení. Po vložení motoru do
navíjecí trubky a po upevnění rolety nebo žaluzie je možné začít nastavovat požadované koncové polohy. Postupujte podle natištěných značek na hlavě
motoru (viz obrázek).
Tüm motorlar, her iki rotasyon yönünde de tam bir tur dönüş imkanı tanıyacak şekilde, fabrikadan kurs sonu ayarlanmış olarak çıkarlar. Motoru
sarma borusuna yerleştirdikten ve tente veya panjuru sarma borusuna sabitledikten sonra, istenilen stop noktaları ayarı yapılabilir. Motor kafası
üzerine kazınmış bilgilere uyunuz (Resme bakınız).
ﺭﺍﻭﺪﻟﺍ ﺏﻮﺒﻧﻷﺍ ﰲ ﻙﺮﶈﺍ ﺐﻴﻛﺮﺗ ﺪﻌﺑ .ﻥﺍﺭﻭﺪﻟﺍ ﱔﺎﲡﺍ ﻼﻛ ﰲ ﺔﻠﻣﰷ ﺓﺭﻭﺩ ﻞﻤﻌﺑ ﵟﺗ ﺔﻘﻳﺮﻄﺑ ﺎًﻘﺒﺴﻣ ﻪﻄﺒﺿ ﰎ ﻯﺮﳎ ﺔﻳﺎﳯﺑ ﻊﻨﺼﳌﺍ ﻦﻣ ﺕﰷﺮﶈﺍ ﻊﻴﲨ ﺩﺭﻭُ
.(ﲁﺸﻟﺍ ﺮﻈﻧﺍ) ﻙﺮﶈﺍ ﺱﺃﺭ ﲆﻋ ﺔﻋﻮﺒﻄﳌﺍ ﺕﺍﺩﺎﺷﺭﻹﺍ ﻊﺒﺗﺍ .ﺔﺑﻮﻠﻄﳌﺍ ﻒﻗﻮﺘﻟﺍ ﻁﺎﻘﻧ ﻂﺒﺿ ﺀﺪﺑ ﻦﻜﳝ ﻪﺑ ﻪﺘﻴﺒﺜﺗﻭ
I - Le frecce 1 e 2 indicano i due sensi di rotazione del tubo avvolgitore.
- Al senso di rotazione 1 corrisponde la vite di regolazione A, al senso di regolazione 2 corrisponde la vite di regolazione B.
- Girando la vite di regolazione verso il segno + si consente al motore/tubo avvolgitore di eseguire un maggior numero di rotazioni; girando la vite
di regolazione verso il segno – si diminuiscono le rotazioni.
- Arrows 1 and 2 indicate the two directions of rotation of the rolling tube.
- Adjustment screw A corresponds to direction of rotation 1, and adjustment screw B corresponds to direction of rotation 2.
- Turning the adjustment screw towards the + mark allows the motor/rolling tube to make a greater number of rotations; turning the adjustment
screw towards the – mark decreases the number of rotations.
F - Les flèches 1 et 2 indiquent les deux sens de rotation du tube enrouleur.
- Au sens de rotation 1 correspond la vis de réglage A, au sens de réglage 2 correspond la vis de réglage B.
- En tournant la vis de réglage vers le signe +, on permet au moteur/tube enrouleur d’exécuter un nombre de rotations supérieur; en tournant la
vis de réglage vers le signe -, on diminue les rotations.
D - Die Pfeile 1 und 2 geben die beiden
- Drehrichtungen des Aufrollrohrs an.
- Die Drehrichtung 1 entspricht der Regulierungsschraube A und die Drehrichtung 2 der Regulierungsschraube B.
- Dreht man die Regulierungsschraube zum Zeichen + wird die Drehungsanzahl des/Motors/Aufrollrohrs erhöht, dreht man sie zum Zeichen -
werden die Drehungen vermindert.
E - Las flechas 1 y 2 indican los dos sentidos de rotación del tubo de enrollado.
- Al sentido de rotación 1 corresponde el tornillo de regulación A, al sentido de regulación 2 corresponde el tornillo de regulación B.
- Si se gira el tornillo de regulación hacia el signo (+) el motor/tubo de enrollado puede realizar un número mayor de rotaciones; si se gira el
tornillo de regulación hacia el signo (–) disminuyen las rotaciones.
P- As setas 1 e 2 indicam os dois sentidos de rotação do tubo de enrolamento.
- Ao sentido de rotação 1 corresponde o parafuso de regulação A, ao sentido de rotação 2 corresponde o parafuso de regulação B.
- Rodando o parafuso de regulação para o sinal + consente-se ao motor/tubo de enrolamento a execução do maior número de rotações;
rodando o parafuso de regulação para o sinal –diminuem-se as rotações.
- Strzałki 1 i 2 wskazują dwa kierunki obrotu rury nawojowej.
- Kierunkowi obrotu 1 odpowiada wkręt regulacyjny A, a kierunkowi obrotu 2 odpowiada wkręt regulacyjny B.
- Obracając wkręt regulacyjny w kierunku znaku +, umożliwia się silnikowi/rurze nawojowej wykonanie większej liczby obrotów; obracając wkręt
regulacyjny w kierunku znaku – , zmniejszana jest liczba obrotów.
H - Az 1. és 2. nyíl a feltekerő cső két forgási irányát mutatja.
- Az 1. forgási iránynak az A. beállító csavar, a 2. forgási iránynak a B. beállító csavar felel meg.
- A beállító csavar + jel felé történő elforgatásával a feltekerő motor/cső nagyobb számú forgást tud végrehajtani; a beállító csavar - jel felé történő
elforgatásával a csökken a forgások száma.
- De pijlen 1 en 2 geven de twee draairichtingen van de oprolbuis aan.
- De stelschroef A komt overeen met de draairichting 1, de stelschroef B komt overeen met de draairichting 2.
- Door de stelschroef in de richting van het teken + te draaien kan de motor/oprolbuis een groter aantal rotaties uitvoeren; door de stelschroef in
de richting van het teken – te draaien nemen de rotaties af.
S - Pilarna 1 och 2 anger rörets två rotationsriktningar.
- Ställskruven A hänger samman med rotationsriktning 1 och ställskruven B med rotationsriktning 2.
- Om du vrider ställskruven mot tecknet + gör motorn/röret ett större antal rotationer, om du vrider den mot tecknet - minskar antalet rotationer.
- Τα τόξα 1 και 2 δείχνουν τις δύο κατευθύνσεις περιστροφής του σωλήνα περιέλιξης.
- Στην κατεύθυνση περιστροφής 1 αντιστοιχεί η βίδα ρύθμισης A, στην κατεύθυνση ρύθμισης 2 αντιστοιχεί η βίδαρύθμισης B.
- Περιστρέφοντας τη βίδα ρύθμισης προς το σημείο + επιτρέπεται στο κινητήρα/σωλήνα περιέλιξης η εκτέλεση μεγαλύτερου αριθμού
περιστροφών περιστρέφοντας τη βίδα ρύθμισης προς το σημείο – μειώνονται οι περιστροφές.
- Šipky 1 a 2 označují oba směry otáčení navíjecí trubky.
- Směr otáčení 1 odpovídá nastavovacímu šroubu A, směr otáčení 2 odpovídá nastavovacímu šroubu B.
- Otáčením nastavovacího šroubu směrem ke znaménku + umožníte motoru/navíjecí trubce provést větší počet otáček; otáčením nastavovacího šroubu
směrem ke znaménku – snížíte počet otáček.
- 1 ve 2 okları sarma borusunun iki rotasyon yönünü gösterirler.
- Rotasyon yönü 1'e ayar vidası A karşılık gelir, rotasyon yönü 2'ye ayar vidası B karşılık gelir.
- Ayar vidası + işaretine doğru çevrildiğinde, motorun/sarma borusunun daha fazla sayıda rotasyon yapmasına imkan tanınır; ayar vidası –
işareti yönünde çevrildiğinde ise, rotasyon sayısı azalır. .ﺓﺭﺍﻭﺪﻟﺍ ﺓﺭﻮﺳﺎﻤﻟﺍ ﻥﺍﺭﻭﺩ ﻲﻫﺎﺠﺗﺍ ﻰﻟﺇ 2 ﻭ 1 ﻢﻬﺳﻷﺍ ﺮﻴﺸﺗ -
.B ﻂﺒﻀﻟﺍ ﺭﺎﻤﺴﻣ ﻙﺮﺤﺘﻳ ﻲﻧﺎﺜﻟﺍ ﻥﺍﺭﻭﺪﻟﺍ ﻩﺎﺠﺗﺍ ﻲﻓﻭ A ﻂﺒﻀﻟﺍ ﺭﺎﻤﺴﻣ ﻞﻤﻌﻳ ﻝﻭﻷﺍ ﻥﺍﺭﻭﺪﻟﺍ ﻩﺎﺠﺗﺍ ﻲﻓ -
.ﺕﺍﺭﻭﺪﻟﺍ ﺩﺪﻋ ﻞﻘﻳ – ﻩﺎﺠﺗﻻﺍ ﻲﻓ ﻂﺒﻀﻟﺍ ﺭﺎﻤﺴﻣ ﻒﻟ ﺪﻨﻋﻭ ،ﺕﺍﺭﻭﺪﻟﺍ ﻦﻣ ﺩﺪﻋ ﺮﺒﻛﺃ ﺓﺭﺍﻭﺪﻟﺍ ﺓﺭﻮﺳﺎﻤﻟﺍﻭ ﻙﺮﺤﻤﻟﺍ ﻲﻄﻌﻳ + ﻩﺎﺠﺗﻻﺍ ﻲﻓ ﻂﺒﻀﻟﺍ ﺭﺎﻤﺴﻣ ﻒﻟ ﺪﻨﻋ -
I Importante: nessuna garanzia è riconosciuta sul prodotto, qualora si presentino malfunzionamenti o inconvenienti, dovuti alla non osservanza
delle norme di installazione, o da interventi effettuati sul prodotto da personale non autorizzato o riconosciuto dal produttore. Se il cavo di
alimentazione è danneggiato, deve essere sostituito dal costruttore o dal suo servizio assistenza tecnica al fine di evitare pericoli.
Important: no product warranty is acknowledged if it displays malfunctionings or problems due to non-compliance with the rules of installation or
to work done on the product by unauthorised personnel not recognised by the manufacturer. If the power cable becomes damaged, it must be
replaced by the manufacturer or by its technical assistance service in order to prevent risks.
F Important: aucune garantie n’est reconnue sur le produit, au cas où l’on constaterait des défaillances ou inconvénients, dus au non-respect des normes
de mise en place ou produits par des interventions effectuées sur le produit de la part d’un personnel non autorisé ou agréé par le fabricant. Si le câble
d’alimentation est abîmé, c’est le fabricant ou le service après-vente qui doivent le remplacer, en vue d’éviter toute sorte de dangers.
D Wichtig: Es wird keine Gewährleistung für das Produkt anerkannt, wenn Fehlfunktionen oder Störungen festgestellt werden, die auf Nichteinhaltung
der Installationsanweisungen oder auf Eingriffe durch nicht befugtes oder nicht vom Hersteller anerkanntes Personal zurückzuführen sind. Wenn
das Netzkabel beschädigt ist, muss es unverzüglich vom Hersteller oder vom technischen Kundendienst durch ein neues ersetzt werden, um
Gefahren zu vermeiden.
E Importante: el producto pierde cualquier tipo de garantía en caso de que el funcionamiento defectuoso del mismo u otros inconvenientes se
deban a la inobservancia de las normas de instalación, o en caso de que se hayan realizado intervenciones en el producto por parte de personal
no autorizado y reconocido por el productor. Si el cable de alimentación se estropea, es necesario que su sustitución corra a cargo del
constructor o de su servicio de asistencia técnica, para evitar peligros.
P Importante: não será reconhecida nenhuma garantia do produto, caso se verifiquem maus funcionamentos ou problemas, devidos ao desrespeito
pelas normas de instalação, ou a intervenções efectuadas no produto por pessoal não autorizado e reconhecido pelo fabricante. Se o cabo de
alimentação estiver estragado, deve ser substituído pelo fabricante ou pelo seu Serviço de Assistência Técnica para evitar perigos.
Ważne: gwarancja produktu traci swą ważność jeśli nieprawidłowe funkcjonowanie produktu spowodowane jest nieprzestrzeganiem przepisów
dotyczących sposobu instalowania lub też w wypadku interwencji ze strony personelu, który nie został upoważniony i zatwierdzony przez
Producenta. Jeśli kabel zasilający jest uszkodzony, aby zapewnić bezpieczeństwo powinien on być wymieniony przez Producenta lub przez
personel jego Serwisu Technicznego.
H Fontos: nincs elismerve semmiféle garancia a gyártmányra, ha olyan hibás működés vagy probléma jelentkezik, melyeket a felszerelési előírások
figyelmen kívül hagyása okozott, vagy pedig a gyártmányon a gyártó által nem engedélyezett és elismert személy végzett beavatkozásokat. Ha a
tápkábel meghibásodik, a gyártónak vagy a gyártó szervizszolgálatának ki kell cserélnie a veszélyek elkerülése végett.
Belangrijk: het product wordt door geen enkele garantie gedekt wanneer zich storingen of ongemakken voordoen door het niet in acht nemen van
de installatievoorschriften of door werkzaamheden die aan het product zijn verricht door onbevoegd, niet door de producent erkend personeel. Bij
beschadiging van de voedingskabel moet deze door de fabrikant of door de technische servicedienst worden vervangen om mogelijke gevaren te
voorkomen.
S Viktigt: tillverkaren påtar sig inget ansvar för driftsstörningar eller problem som uppstår till följd av att installationsanvisningarna inte har följts eller
för ingrepp på produkten av obehöriga personer utan tillverkarens tillstånd. Om elsladden är skadad ska den för att undvika fara bytas ut av
tillverkaren eller dennes serviceverkstad.
Σημαντικό: ουδεμία εγγύηση αναγνωρίζεται για το προϊόν, όταν εμφανίζονται δυσλειτουργίες ή απρόβλεπτα, τα οποία οφείλονται σε μη
τήρηση των κανόνων εγκατάστασης, ή σε επεμβάσεις που πραγματοποιήθηκαν επί του προϊόντος από μη εξουσιοδοτημένο και
αναγνωρισμένο από τον κατασκευαστή προσωπικό. Εφόσον το καλώδιο τροφοδοσίας έχει υποστεί ζημιά, ο κατασκευαστής προβαίνει
στην αντικατάσταση ή και η τεχνική του εξυπηρέτηση για την αποφυγή κινδύνων.
Důležité: v případě poruch nebo potíží z důvodu nedodržení návodu k instalaci nebo zásahů prováděných na výrobku osobami nepovolenými nebo
nepověřenými výrobcem nebude uznaná žádná záruka na výrobku. Je-li napájecí kabel poškozen, musí být nahrazen výrobcem nebo jeho
technickým servisem, aby se předešlo nebezpečí.
Önemli: kurulum kurallarına uyulmamasından veya üretici tarafından yetkilendirilmemiş ve tanınmayan personel tarafından ürün üzerinde
geçekleştirilen müdahalelerden kaynaklanan arızalı çalışmalar veya problemler durumunda, ürün üzerinde hiçbir garanti tanınmaz. Besleme
kablosu hasar görmüş ise, tehlikeleri önlemek için, imalatçı veya teknik servis tarafından değiştirilmelidir.
ﺡﺮﺼﻣ ﺮﯿﻏﻭ ﻦﯿﻠﮬﺆﻣ ﺮﯿﻏ ﺹﺎﺨﺷﺃ ﻞﺧﺪﺗ ﻦﻋ ﺔﺠﺗﺎﻧ ﻭﺃ ﺐﯿﻛﺮﺘﻟﺍ ﺪﻋﺍﻮﻗ ﺓﺎﻋﺍﺮﻣ ﻡﺪﻋ ﻦﻋ ﺔﺠﺗﺎﻧ ﻝﺎﻄﻋﺃ ﻭﺃ ﻞﯿﻐﺸﺘﻟﺍ ﻲﻓ ﺄﻄﺧ ﻙﺎﻨﮬ ﻥﺎﻛ ﺍﺫﺇ ﺞﺘﻨﻤﻠﻟ ﻥﺎﻤﺿ ﺪﺟﻮﯾ ﻻ :ﻡﺎﮬ
.ﺭﺎﻄﺧﻷﺍ ﺐﻨﺠﺘﻟ ﺔﯿﻨﻓ ﺔﻣﺪﺧ ﺰﻛﺮﻣ ﻱﺃ ﻦﻣ ﻭﺃ ﻊﻨﺼﻤﻟﺍ ﻦﻤﮭﻟﺍﺪﺒﺘﺳﺍ ﺐﺠﯾ ﻒﻠﺗ ﺪﻗ ﺔﯿﺑﺮﮭﻜﻟﺍ ﺔﯾﺬﻐﺘﻟﺍ ﻚﻠﺳ ﻥﺎﻛ ﺍﺫﺇ .ﺔﻧﺎﯿﺼﻟﺍ ﻲﻓ ﺔﺠﺘﻨﻤﻟﺍ ﺔﻛﺮﺸﻟﺍ ﻦﻣ ﻞﻤﻌﻟﺎﺑ ﻢﮭﻟ
I 1 - Non collegare più motori allo stesso pulsante.
2 - Non collegare due pulsanti allo stesso motore.
3 - Non utilizzare mai un comando di tipo stabile.
4 - Non utilizzare pulsanti dove possano essere inseriti salita e
discesa contemporaneamente.
5 - Verificare il cablaggio.
6 - Accertarsi che il cavo non interferisca con parti in movimento.
1 - Aynı butona birden fazla motor bağlamayınız.
2 - Aynı motora iki buton bağlamayınız.
3 - Asla sabit tipte bir kumanda kullanmayınız.
4 - Aynı anda hem yükselme hem de alçalma girilebilecek butonlar
kullanmayınız.
5 - Kablo bağlantısını kontrol ediniz.
6 - Kablonun hareketli kısımlar ile temas etmediğinden emin olunuz.
1 - Do not connect two or more motors to the same button.
2 - Do not connect two buttons to the same motor.
3 - Never use a stable type command.
4 - Do not use buttons where ascent and descent can be cut in at
the same time.
5 - Check the wiring.
6 - Make sure wires do not get In the way of moving parts.
.ﺭﺰﻟﺍ ﺲﻔﻧ ﻰﻠﻋ ﻙﺮﺤﻣ ﻦﻣ ﺮﺜﻛﺃ ﻞﺼﺗ ﻻ - 1
.ﻙﺮﺤﻤﻟﺍ ﺲﻔﻨﺑ ﻦﻳﺭﺯ ﻞﺼﺗ ﻻ - 2
.ﺖﺑﺎﺛ ﻉﻮﻧ ﻦﻣ ﻢﻜﺤﺗ ﺓﺪﺣﻭ ﺍًﺪﺑﺃ ﻡﺩ - 3
.ﻲﺘﻗﻮﻟﺍ ﻁﻮﺒﻬﻟﺍﻭ ﺩﻮﻌﺼﻟﺍ ﻝﺎﺠﻣ ﻲﻓ ﺭﺍﺭﺯﺃ ﻡﺪﺨﺘﺴﺗ ﻻ - 4
ﺕﻼﺑﺎﻜﻟﺍ ﻞﻴﺻﻮﺗ ﻦﻣ ﺪﻛﺄﺗ - 5
.ﺔﻛﺮﺤﺘﻤﻟﺍ ﺀﺍﺰﺟﻷﺍ ﻊﻣ ﻞﺑﺎﻜﻟﺍ ﻞﺧﺍﺪﺗ ﻡﺪﻋ ﻦﻣ ﺪﻛﺄﺗ - 6
F1 - Ne pas brancher plusieurs moteurs sur le même bouton.
2 - Ne pas brancher deux boutons sur le même moteur.
3 - Ne jamais utiliser une commande de type stable.
4 - Ne pas utiliser de boutons, où il serait possible de connecter
les dispositifs de montée et descente simultanément.
5 - Vérifier le câblage.
6 - S'assurer que le câble n'interfère pas avec les parties
en mouvement.
D1 - Es sollen nicht mehrere Motoren an dieselbe Drucktaste
angeschlossen werden.
2 - Auf demselben Motor dürfen keinesfalls zwei Tasten
angeschlossen werden.
3 - Keinesfalls sollte eine stabile Steuerung verwendet werden.
4 - Es sollten keine Tasten benutzt werden, auf denen die
Hochfahrt und die Abfahrt gleichzeitig eingestellt werden kann.
5 - Die Verkabelung überprüfen.
6 - Sicherstellen, dass das Kabel nicht mit in Bewegung
befindlichen Teilen kollidiert.
E1 - No conecten varios motores al mismo pulsador.
2 - No conectar dos botones al mismo motor.
3 - No utilizar nunca una orden de tipo estable.
4 - No utilicen pulsadores donde se puedan activar subida y
bajada contemporáneamente.
5 - Comprueben el cableado.
6 - Asegúrense de que el cable no interfiera con partes en movimiento.
P1 - Não ligar mais do que um motor ao mesmo botão.
2 - Nunca ligue dois botões ao mesmo tempo.
3 - Nunca utilize um comando de tipo estável.
4 - Não utilizar botões onde possam ligados a subida e a descida
simultaneamente.
5 - Verifique a cablagem.
6 - Certifique-se que o cabo não interfira com partes em movimento.
1 - Nigdy nie podłączać kilku silników do tego samego przycisku.
2 - Nie podłączać dwóch przycisków do tego samego silnika.
3 - Nigdy nie używać steru stabilnego.
4 - Nie stosować przycisków, na których można przewidzieć
jednocześnie unoszenie i opuszczanie.
5 - Sprawdzić okablowanie.
6 - Upewnić się, czy przewód nie znajduje się zbyt blisko części
pozostających w ruchu.
H1 - Ne kössön több motort ugyanahhoz a nyomógombhoz.
2 - Ne kössön be két nyomógombot ugyanahhoz motorhoz.
3 - Ne használjon rögzített vezérlést.
4 - Ne használjon olyan nyomógombokat, melyekkel egyidejűleg
felmenést és lemenést is be lehet állítani.
5 - Ellenőrizze a csatlakozó vezetékeket.
6 - Ellenőrizze, hogy a vezeték ne érintkezzen a mozgó részekkel.
S 1 - Het is niet toegestaan meerdere motoren op dezelfde knop aan
te sluiten.
2 - Anslut inte två tryckknappar till samma motor.
3 - Använd aldrig ett kommando av stabil typ.
4 - Gebruik geen knoppen waar stijging en daling tegelijkertijd
kunnen worden ingeschakeld.
5 - Kontrollera kablaget.
6 - Säkerställ att kabeln inte stöter emot de rörliga delarna.
1 - Koppla inte fler än en motor till samma knapp.
2 - Sluit geen twee knoppen op dezelfde motor aan.
3 - Gebruik nooit een stabiele bediening.
4 - Använd inte knappar som gör att höjning och sänkning kan
kopplas in samtidigt.
5 - Controleer de bedrading.
6 - Ga na of de kabel geen belemmering vormt voor
bewegende onderdelen.
I
NOTE GENERALI -
GENERAL NOTES -
F
NOTES GENERALES -
D
ALLGEMEINE HINWEISE
E
NOTAS GENERALES -
P
NOTAS GERAIS -
OGÓLNE PRZYPISY -
H
ÁLTALÁNOS MEGJEGYZÉSEK
ALGEMENE OPMERKINGEN -
S
ALLMÄNNA ANMÄRKNINGAR -
ΓΕΝΙΚΕΣ ΣΗΜΕΙΩΣΕΙΣ
OBECNÉ POZNÁMKY - GENEL NOTLAR - ﺔﻣﺎﻋ ﺕﺎﻇﻮﺤﻠﻣ
1 2
1 - Μη συνδέσετε περισσότερους κινητήρες στο ίδιο πλήκτρο.
2 - Μνη συνδέσετε δύο πλήκτρα στον ίδιο κινητήρα.
3 - Μη χρησιμοποιείτε ποτέ εντολή σταθερού τύπου.
4 - Μη χρησιμοποιείτε πλήκτρα στα οποία μπορούν και
εισάγονται ταυτόχρονα άνοδος και κάθοδος.
5 - Ελέγξτε τη καλωδίωση.
6 - Βεβαιωθείτε ότι το καλώδιο δεν παρεμβάλλεται με
άλλα σημεία εν κινήσει.
1 - Nepřipojujte více motorů ke stejnému tlačítku.
2 - Nepřipojujte dvě tlačítka ke stejnému motoru.
3 - Nikdy nepoužívejte ovladač s aretací.
4 - Nepoužívejte tlačítka, kde je možné současně zapnout oba
směry otáčení.
5 - Zkontrolujte kabeláž.
6 - Ujistěte se, že kabel nezasahuje do pohybujících se částí.
1 + 2 3 4
5 6