Schenley Hestia SLFCSM064 User manual

Schenley Steam Mop
“Hestia”
Be Simple, Be Noble.
User Manual

Dear Customer,
Sincerely,
Your Schenley Team
Thank you for choosing the Schenley Steam Mop. At
Schenley, we strive to bring the best home cleaning
experience through our products and services. The
Schenley Steam Mop is a remarkable solution for deep
steam cleaning. With our adjustable attachments, you
can use it not only as a steam mop but as a multi-
functional steam cleaner, capable of cleaning hard
floors, tiles, and windows; removing grease off kitchen
stoves, range hoods and tables; clearing stains from
bathtubs, toilet seats, fittings and much more.
This user manual aims to provide you with guidelines
on how to operate your Schenley Steam Mop and shows
important safety instructions. Any use that does not
conform to the guidelines described in this manual may
void the limited warranty. Please read the complete
instructions carefully before using the appliance and
retain it for future reference.
Once again we thank you for being a valued Schenley
customer.
Schenley
Introduction
2
THANK YOU!
If you follow the operating and care instructions in this
manual, your Schenley Steam Mop will provide you with a
long-time reliable service.
Table of Contents
Cover Page
Introduction
Table of Contents
Safety Warnings
Parts and Attachments
Assemble Your Steam Mop
Operate Your Steam Mop
Clean and Maintenance
Technical Specifications
Troubleshooting
Warranty and Customer Service
1
2
3
4
7
8
13
15
16
17
18
3
Congratulations on your purchase and
welcome to the Schenley family.

Safety Warnings
• Do not allow children to use this steam mop. Children
must not be allowed to play with the appliance.
• Keep children away while you are operating the steam
mop and when leaving the appliance to cool down
after use.
• Keep all packaging materials out of reach of children
to avoid the danger of suffocation.
• When disposing of the steam mop, safely cut the main
cable to ensure that it can no longer be used.
• This steam mop may be used by persons with reduced
physical, sensory or mental capacities, provided they
are supervised or have been trained in the safe use of
the appliance and understand the potential dangers.
To reduce the risk of
danger to children and
people with restricted
capabilities:
4
WARNING:
To reduce the risk of
fire or electric shock:
• It is not recommended to use an extension cord with
the steam mop.
• Do not immerse the steam mop in water as this could
result in electric shock.
• Do not ll more than 8.5 . oz. (250 ml) of water into
the water tank. If water accidentally has run down
the steam mop while the tank is being lled, the
steam mop must not be connected to power until it is
completely dry.
• Do not touch the appliance with wet hands and do not
operate it outdoors or in rooms with high humidity.
WARNING:
Please read all instructions and safety warnings carefully before using
your Schenley Steam Mop. If you give this product to others, please
remember to give them these instructions as well.
Polarized Plug: As a safety feature, this steam mop uses a polarized
plug, meaning one blade is wider than the other. This plug will fit into
a polarized outlet only one way. If the plug does not fit into the outlet,
reverse the plug. If it still does not fit, contact a qualified electrician. Do
not attempt to defeat this safety feature.
• Do not leave the steam mop unattended when
plugged in.
• Do not ll the water tank when plugged in.
• Do not use the power cord to pull or carry the steam
mob. Make sure that the power cord is not damaged
by sharp edges or corners.
• Only connect the steam mop to a properly installed,
earthed wall socket that complies with the Technical
Specications (See Page 14) of the appli ance.
• Always unplug the steam mop immediately after use.
• Do not direct steam or water at appliances containing
electrical compo nents (for example, inside an oven).
• Do not use the steam mop with a damaged power
cord or plug. Do not attempt to repair the steam
mop by yourself if the steam mop is not working as it
should or has been dropped, damaged, left outdoors,
or dropped into water. Please contact our customer
service: schenleycare@schenleytech.com. Incorrect
reassembly or repair may cause a risk of electrical
shock or injury.
Safety Warnings
5
The steam emitted
from the steam mop
is very hot and may
cause scalding. Please
use caution when
using the steam mop.
To reduce the risk of
scalds and burns:
• Do not touch any of the attachments while the steam
mop is in use.
• Do not direct the steam at people, animals, plants or
delicate objects.
• Do not put your hands or feet under the steam mop.
• Do not use the steam mop without water in the tank.
• Do not touch the hot surfaces of the steam mop
during operation.
• Do not cover the hot steam mop. Keep the hot
steam mop away from curtains, blankets and other
ammable or heat-sensitive materials.
• The steam mop is very hot after use. Allow it to cool
down for 15 minutes and use caution when emptying
the water tank and removing the attachments.
• Only store away the appliance after it has cooled
off completely. Always empty the water tank before
storing the appliance away.
WARNING:
Safety Warnings
• Do not add cleaning detergents, solutions, alcohol,
fragrances, oil, or any other chemicals to the water
used in the steam mop as it may damage the
product and make it unsafe to use.
• Do not use the metal brush on delicate surfaces.
• Only use tap water or distilled water to ll the tank.
• Only use the accessories supplied.
• Do not use the steam mop on leather, velvet, wax-
polished furniture, synthetic fabrics, or other delicate,
steam-sensitive materials.
• Do not use the steam mop on unsealed wood or
unglazed ceramic oors. The hot steam may remove
the sheen on surfaces that have been treated with
wax, and occasion ally on some wax-free oors.
• Always test terracotta oors, wood oors and similar
materials that you want to treat on an inconspicuous
part of the material in order to determine whether it is
suitable for steam cleaning. If necessary, consult the
manufacturer of the material you wish to clean.
• Do not expose the appliance to extreme sunlight,
frost, rain, or snow.
• Store the steam mop in a cool, dry location. Keep the
device away from heat and in or close to areas where
the surrounding temperature is relatively hot (e.g. gas
or electric cookers, heaters, or ovens).
6
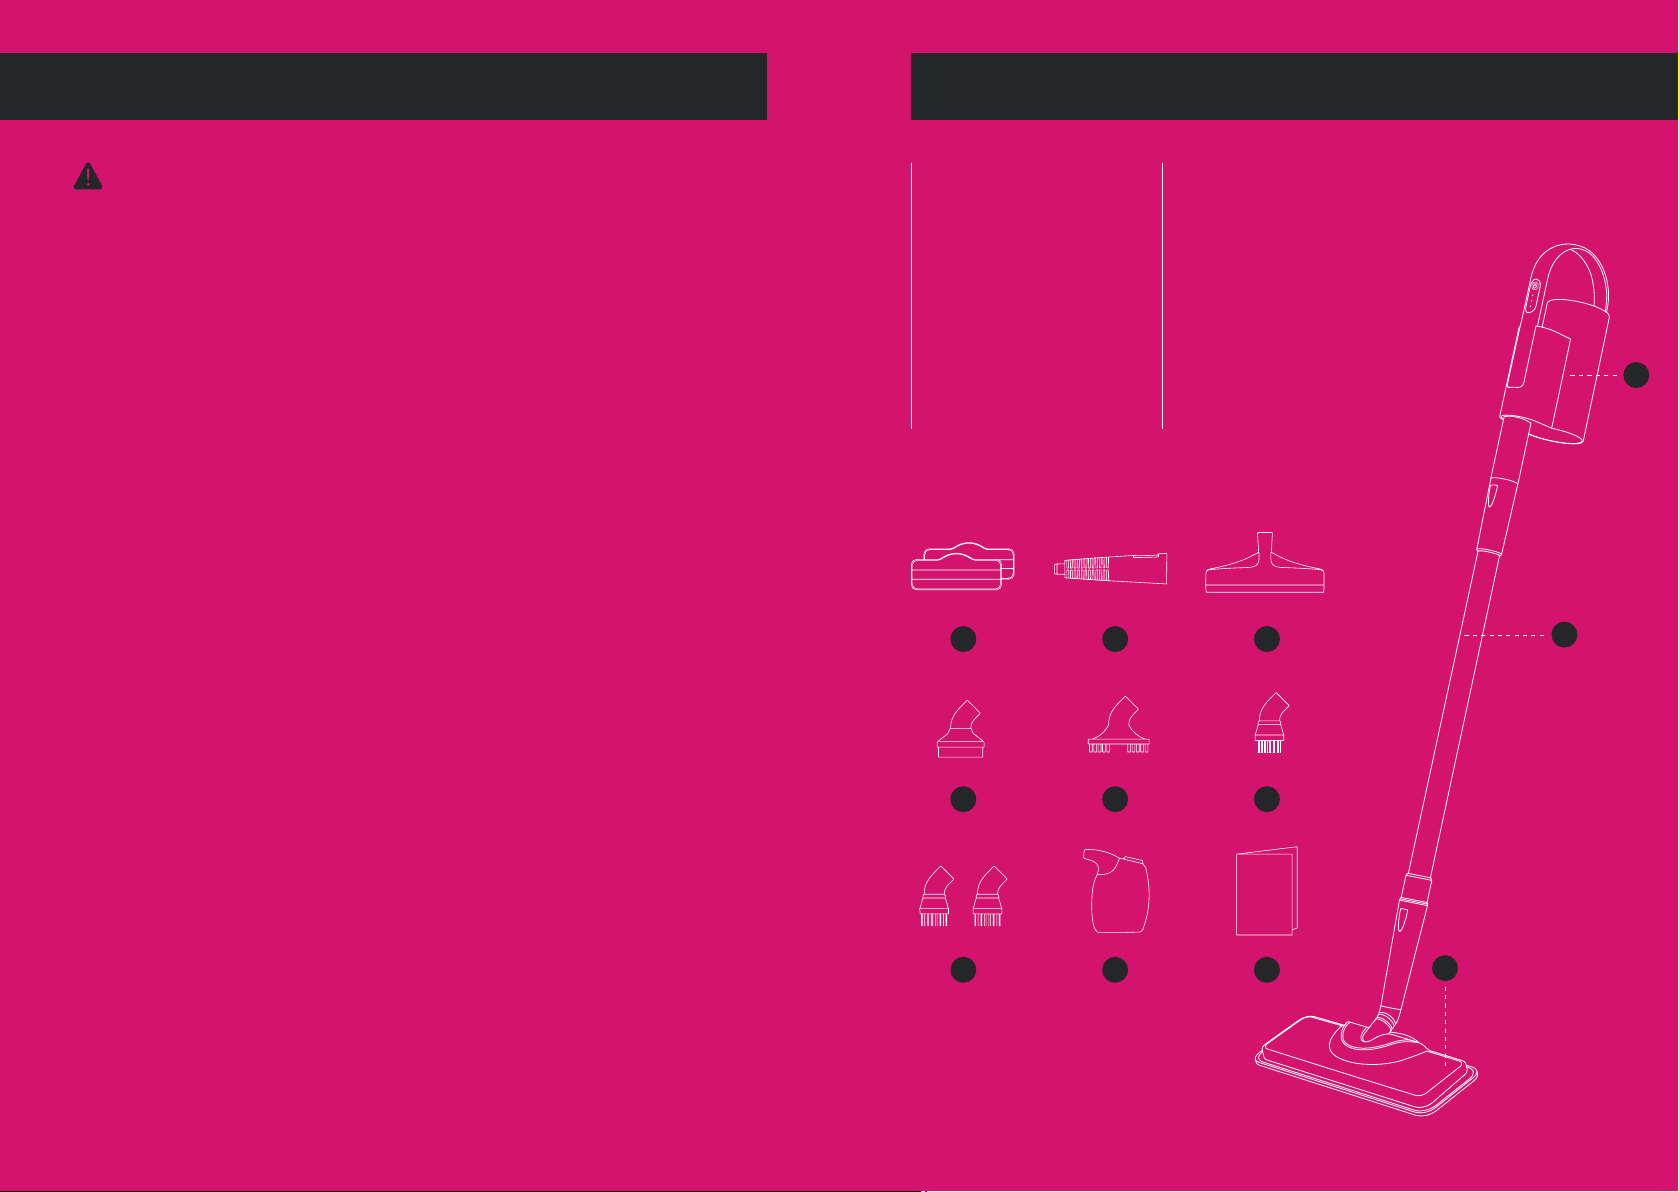
Parts and Attachments
7
To reduce the risk of
injury and material
damage:
WARNING:
2
3
11 12
97
5
10
8
64
Jet Nozzle5. Glass Squeegee6.
Sponge Head7. Grout Brush8.
Metal Brush9. Nylon Brush x 210.
Measuring Cup
11. User Manual
12.
Microber Pad x 24.
1. Steamer Main Body 2. Extension Rod
3. Mop Head
1
Assemble Your Steam Mop
8
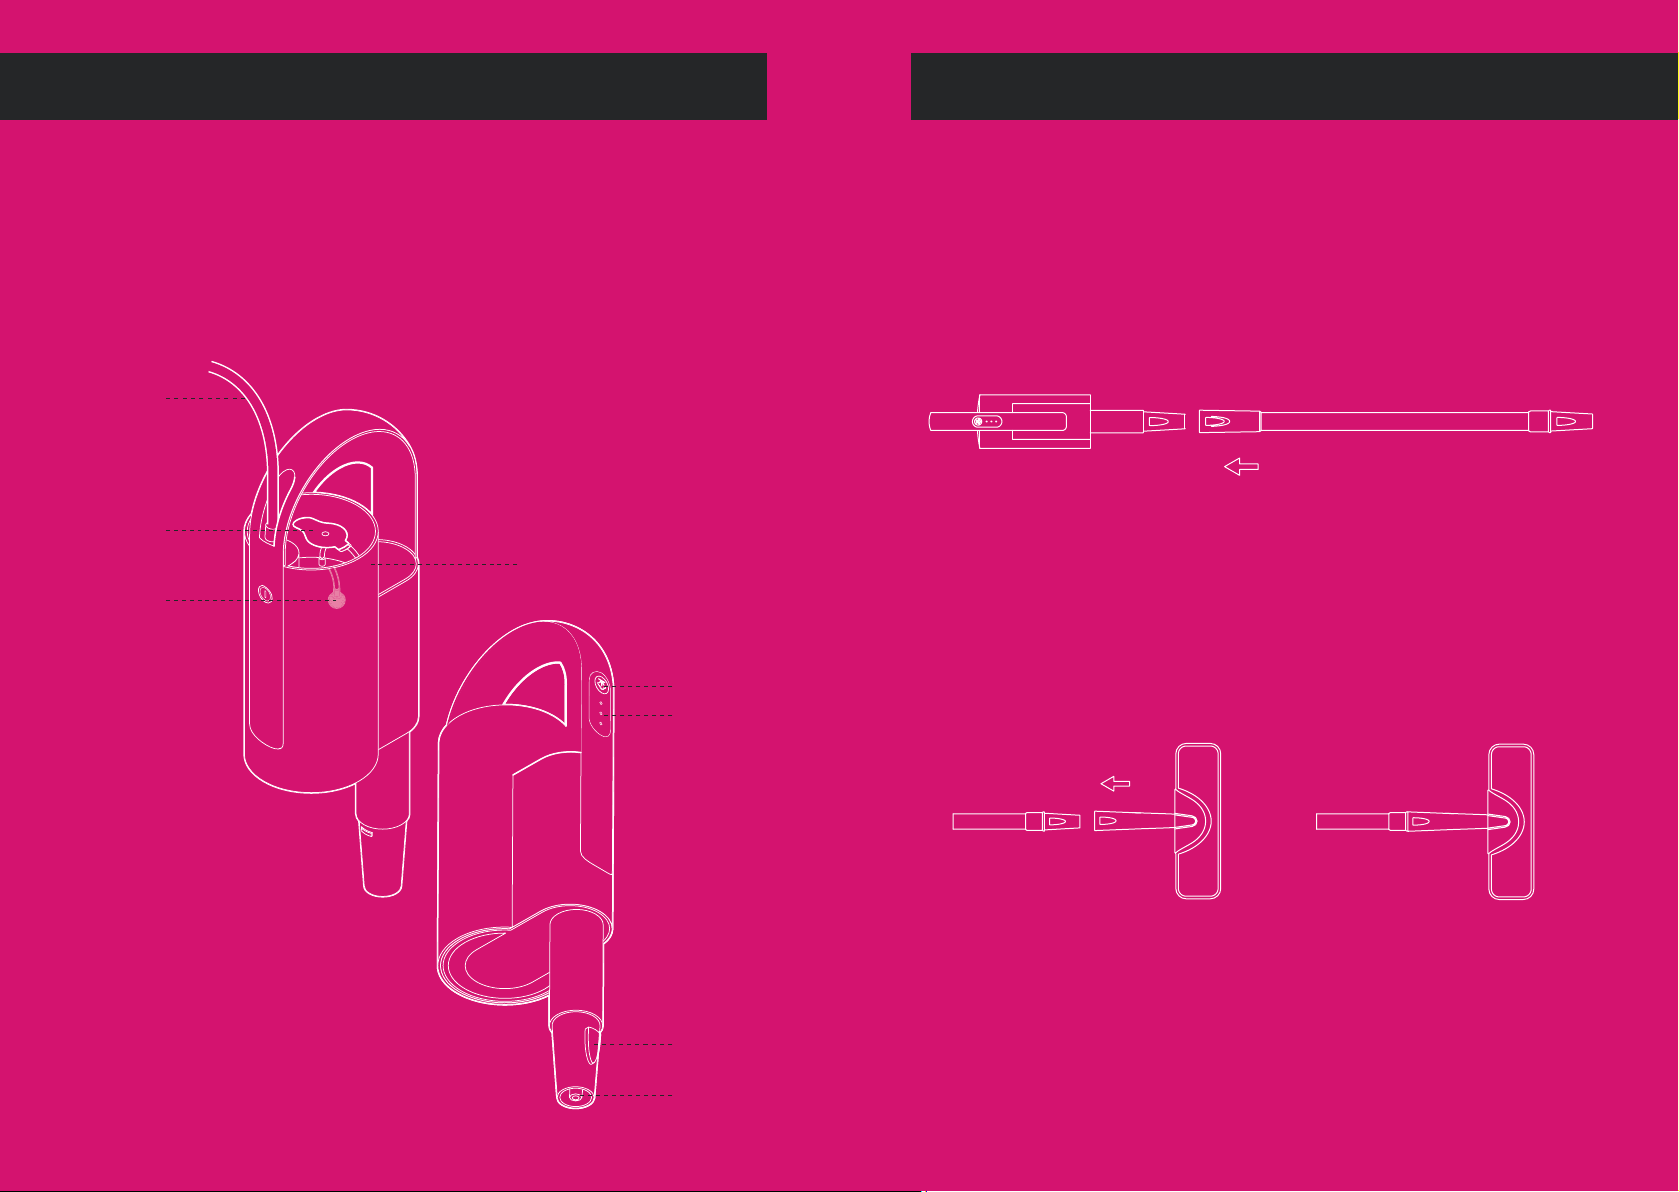
1. Steamer Main Body
Power Cord
Water Tank Lid
Water Tank
Control Button
Indicator Lights
Release Button
Steam Outlet
Water Inlet
The steamer main body is the critical component that generates steam when
connected to electrical power. It has a water tank, power cord, control button,
indicator lights, handle, steam pipe, and a steam generation system inside.
Attachments can be connected to the steamer main body to serve various cleaning
purposes.
2. Extension Rod
3. Mop Head
4. Microber Pads - SLASSM004
Assemble Your Steam Mop
9
Before using your steam mop, connect the steamer main body to the extension rod.
Connect the mop head onto the other end of the extension rod.
The microber pads are machine washable and safe for virtually all hard oor
surfaces.
• Align the extension rod with the steamer main body nozzle.
• Press down the release button on the steamer main body and slide the extension
rod onto the steam outlet until you hear and feel the release button click into
place.
• Align the mop head with the end of the extension rod.
• Press down the release button on the extension rod and slide the mop head onto
the extension rod until you hear and feel the release button click into place.

Assemble Your Steam Mop
10
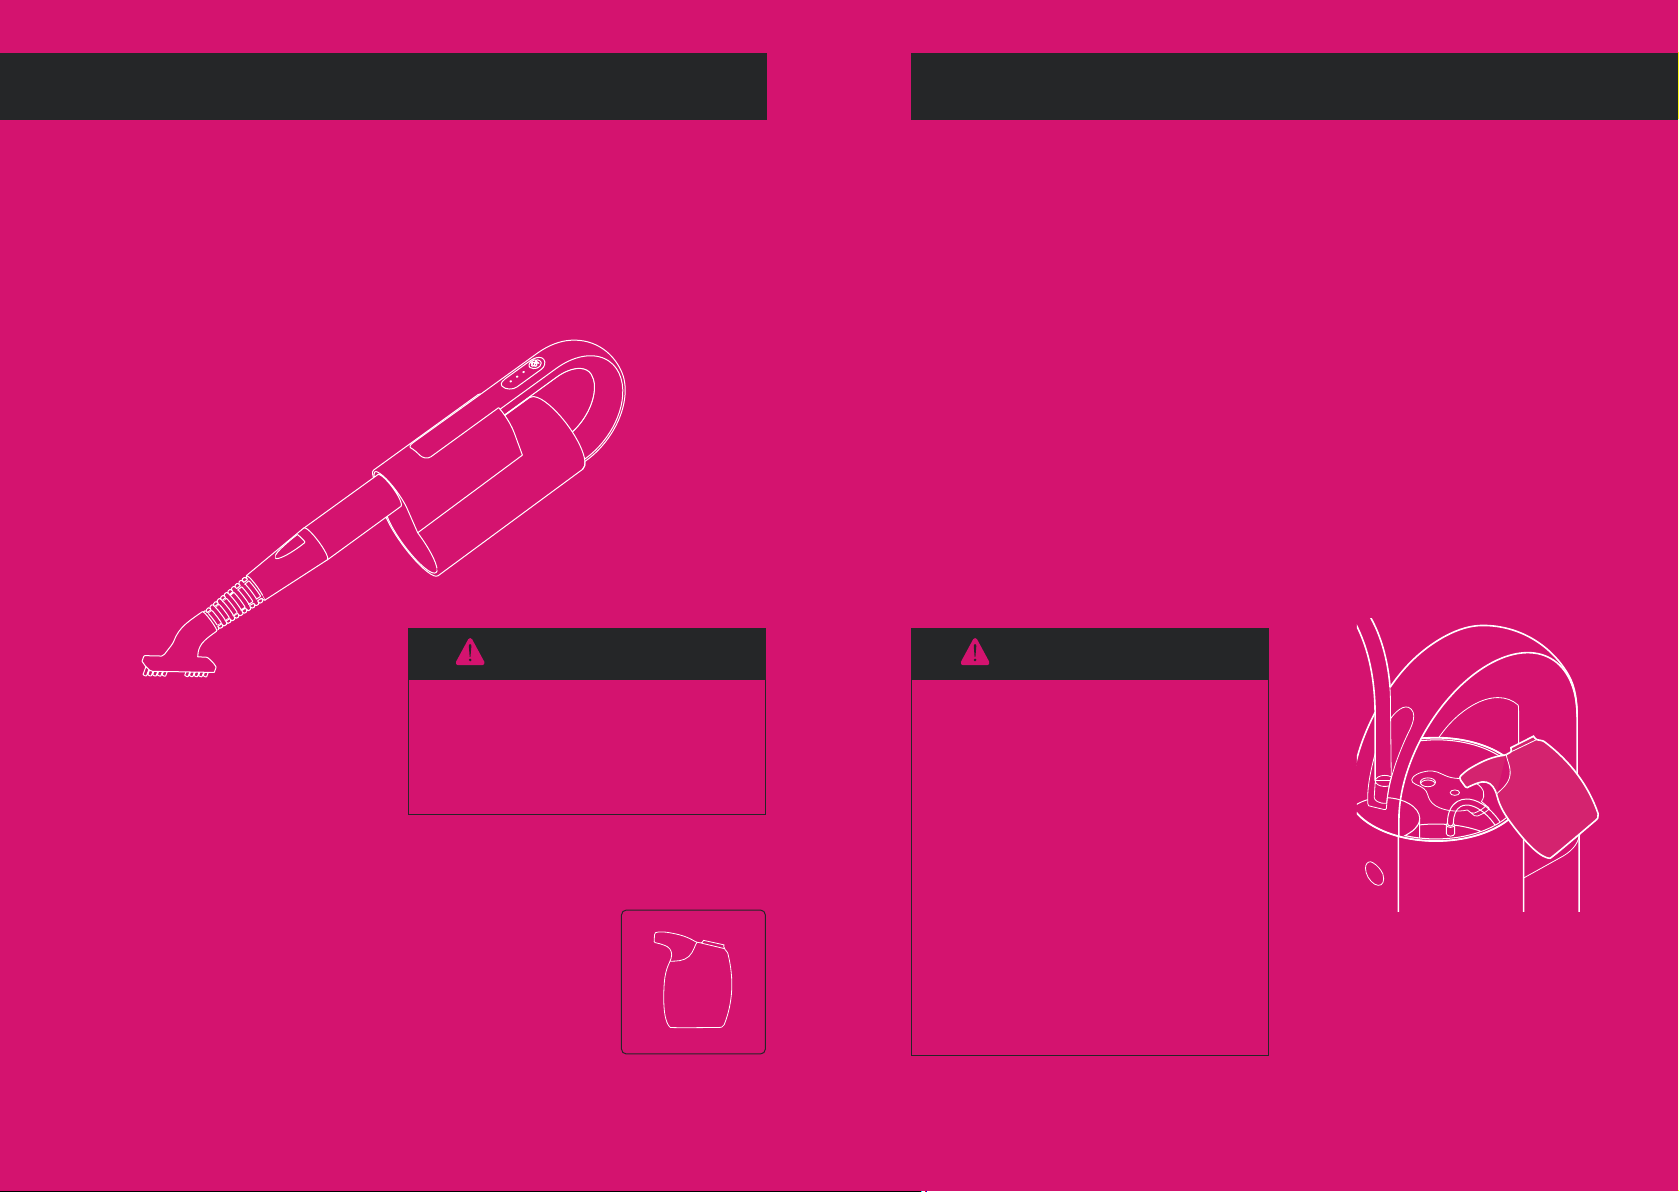
5. Jet Nozzle - SLASSM005
The jet nozzle is for hard-to-reach areas and is used as an extension for brushes
and other attachments.
• Align the jet nozzle with the steamer main body nozzle. Press down the release
button on the steamer main body nozzle and slide the jet nozzle onto the steamer
main body until you hear and feel the release button click into place.
• To remove the jet nozzle, press down the release button on the steamer main body
nozzle, rotate the jet nozzle slightly, and then pull the jet nozzle off completely.
Assemble Your Steam Mop
11
7. Sponge Head - SLASSM007
The sponge head is for cleaning surfaces with grease
or sticky liquids, for example, kitchen table, countertop,
water sink, etc.
8. Grout Brush - SLASSM008
The grout brush is for cleaning narrow surfaces, for
example, corners, tile oor grout, etc.
9. Metal Brush - SLASSM009
The metal brush is for cleaning robust surfaces, for
example, dirty grills, patio tiles, etc.
10. Nylon Brush - SLASSM010
The nylon brush is for removing stubborn dirt and stains
on, for example, water taps, bathroom ttings, hubcaps,
etc.
6. Glass Squeegee - SLASSM006
The glass squeegee is for cleaning smooth surfaces, for
example, mirrors, windows, showers, etc.
• Place one microber pad on a at surface with the white side facing up.
• Match the mop head with the microber pad in the orientation shown below.
Press down on the microber pad using the mop head, and the microber pad
will adhere to the mop head.
NOTE: The microber pads are reusable. Hand wash or machine wash the microber
pads after use. Do not use bleach, powdered detergent, or fabric softeners
as they may damage or leave a coating on the microber pads that will
reduce cleaning performance and absorbency. Microber pads should be
line-dried or tumble-dried on a low setting, as this will extend the life of the
microber fabric. We recommend replacing your microber pads every 3 to 4
months. You may purchase replacement pads and other accessories through
Schenley.
Assemble Your Steam Mop
12
To Connect these Attachments:
• Align your selected attachment with the jet nozzle tip.
• Firmly push it down as far as it will go to prevent steam leakage.
• To remove the attachment, grab the attachment rmly and pull it off from the
jet nozzle.
• The steam mop is still very hot after
use. Allow it to cool down before
removing the extension rod or any
attachments used.
CAUTION:
11. Measuring Cup - SLASSM011
Use the measuring cup to pour water into the water
tank. When lling the water tank, be sure to limit
the maximum volume to 8.5 . oz (250ml) to avoid
spilling.
Operate Your Steam Mop
13
1. Unpacking
2. Filling the Water Tank
Remove the steam mop and accessories from the package. Ensure all parts are
present and show no sign of damage.
• Hold the steam mop to the upright position, then open the water tank lid.
• The maximum water capacity of the water tank is 8.5 . oz (250ml). The measuring
cup has water volume marks on the side. Fill the measuring cup with tap water or
distilled water no more than 8.5 . oz (250ml).
• Carefully pour water from the measuring cup into the water tank. Do not overll.
• Push the water tank lid rmly back onto the tank to ensure there is no water leak.
• Ensure the steam mop is powered
off and the power cord is unplugged
when lling the water. If the steam
mop has been in-use, allow the unit
to cool down for 15 minutes before
relling. Failure to do so may result in
burns from escaping steam.
• When lling the water to the water
tank, always use the measuring cup
so to prevent water from spilling onto
the steam mop, which may cause
damage to the electrical components.
CAUTION:

Operate Your Steam Mop
14
3. Using Your Steam Mop
• When the water tank is lled and the selected attachment is connected, plug the
power cord into an electrical outlet.
• Once powered on, the steam mop heating system immediately starts heating
up. The 3 indicator lights light up and then go out one after another indicating
the device is heating up.
• After approximately 15 seconds, the steam mop is heated up, and 2 indicator
lights ash, indicating the device is ready to use.
• Press the control button to begin using the steam mop. There are three steam
levels:
1. Minimum level: One indicator light
2. Middle level: Two indicator lights
3. Maximum level: Three indicator lights
• Press the control button to change to the desired steam level.
• To stop the steam, hold the control button for 2-3 seconds until the steam goes
out, but the heating system is still heating up. To power off the steam mop, unplug
the power cord.
Clean and Maintenance
15
1. Handling
• Allow the steam mop to cool down for at least 15 minutes before handling.
• Press and hold the steam button to release all remaining pressure.
• Remove all attachments from the steamer main body and store them properly.
2. Cleaning
• Rinse out the water tank once a month with clean water to remove any limescale
deposits.
• Wipe down the appliance, as required, using a damp cloth.
• Clean the attachments regularly to keep them sanitized.
• Clean the steam outlet nozzle with a needle, if limescale deposits accumulate.
3. Storing
• Remove all water from the water tank before storing it.
• Store the steam mop and attachments in a cool, dry location. Do not store the
steam mop in the vicinity of gas or electric cookers, heaters or ovens.
• Leave the lid of the water tank open.
• When cleaning or maintaining your steam mop, ensure
the power cord is always unplugged.
CAUTION:
• Do not leave the steam mop unattended when plugged
in. The steam mop will remain heating when the
power cord is plugged in. To power off the steam mop
completely, unplug the power cord.
CAUTION:

Technical Specifications
Product Name
Product Model
Rated Voltage
Rated Frequency
Rated Power
Water Tank Capacity
Heating Time
Power Cord Length
Color
Steamer Main Body Dimensions
Number of Accessories
Safety Feature
Warranty
Steam Mop
SLFCSM064
120V
60Hz
1200W
8.5 FL. OZ.
15s
16 FT
Schenley Magenta & Noble Gray
17.13 x 3.54 x 5.51 IN
12
Over Heating Prevention
1 Year
16 17
Issue Scenarios
No steam
Weak steam
Can’t change
the steam level
Attachment
incompatible
with the jet
nozzle
Possible Reasons
The steam mop isn’t
securely plugged into
an electrical outlet.
Check your fuse or circuit breaker. If the
indicator lights are not illuminated when
the power cord is plugged in, try a different
outlet.
The steam mop is
heating up.
The control button
isn’t properly pressed
down.
If the indicator lights are on, wait about
15 seconds for the steam mop to heat up
before use. Press the control button to
select a steam setting.
Firmly press down the control button. If the
indicator light changes, then the steam
level changes as well.
Solutions
Troubleshooting
This is normal.
Indicator lights
malfunction.
Lower-level steam settings does produce
intermittent steam. For more consistent
steam select the maximum steam level.
If your steam mop is producing steam
but the indicator lights are not lit, contact
Schenley customer service.
There is no water in
the water tank.
There is no water in
the water tank.
The attachment is
not fully pushed in.
Please ensure the water tank is lled with
water before plugging in the power cord.
Always make sure there is water in the
water tank when using your steam mop.
Grab the attachment rmly and pull it off
the jet nozzle.
CAUTION: The steam mop may still be very
hot after use. Allow it to cool down for 15
minutes before handling the attachments.
The steam mop
requires repair. Contact Schenley customer service.

Schenley warrants to the original retail purchaser that the Schenley Steam Mop will be
free from defects in material and workmanship for one year from the date of the
original purchase. This warranty applies to products used for personal purposes, and
not for commercial or rental purposes.
To receive warranty service, the original customer purchaser should contact
Schenley customer service for immediate assistance. Proof of purchase in the form
of a bill of sale or receipt invoice, indicating that the steam mop is within the
warranty period, must be presented in order to obtain the requested services. In
accordance with applicable law, Schenley may request you to provide additional
documents before receiving warranty service. Please contact Schenley customer
service for more details: schenleycare@schenleytech.com.
Please be aware the shipping expenses to return the product to Schenley customer
service are not covered by this warranty and must be paid by the customer.
If a hardware defect arises and a valid claim is received within the warranty period,
Schenley, at its sole option and to the extent permitted by law, will either a) repair
the defect at no charge, using new or refurbished replacement parts, b) exchange
the product with a product that is new or which has been manufactured from new
or serviceable used parts and is at least functionally equivalent to the original
device, or c) refund the purchase price of the product.
A replacement product or part thereof shall enjoy the warranty of the original
product for the remainder of the warranty period, or 90 days from the date of
replacement or repair, whichever provides you longer protection. Refunds can
only be given if the original product is returned.
This warranty does not apply to:
1) Any non-Schenley Steam Mop product or accessories even if packaged or sold with the product;
2) Damage caused by use with non-Schenley steam mop product or accessories;
3) Damage caused by accident, abuse, misuse, ood, re, earthquake, or other external causes;
4) Damage caused by operating the product outside permitted or intended uses;
5) Damage caused by modifying the product or parts;
6) Consumable parts, such as batteries, fuses, and lights;
7) Cosmetic damage.
Warranty and Customer Service
18
EXCEPTIONS AND EXCLUSIONS
Twitter: @SchenleyTech
Instagram: @SchenleyTech
Facebook: www.facebook.com/SchenleyTech
YouTube: www.youtube.com/c/Schenley
Warranty and Customer Service
This warranty is only valid in the country where it is purchased and only applies to
product purchased in that country.
If your product should require service:
You may contact us through schenleycare@schenleytech.com to have a customer
care specialist assist you.
If you like our products, please subscribe to our channels:
19

Table of contents

 user guide")


