Schiit SOL User manual

UNIPIVOT TURNTABLE
IN NORSE MYTHOLOGY, SOL WAS THE SUN. LIKE MANI WAS THE MOON.
BOTH ARE ROUND, SO WE CHOSE THOSE NAMES FOR THE TURNTABLE AND PHONO PREAMP..
YEAH. WE’RE NOT REAL COMPLEX SOMETIMES.
IN ANY CASE, WE HOPE YOU ENJOY OUR CAST-ALUMINUM,
UNCONSTRAINED UNIPIVOT, ADJUSTABLE-ON-THE-FLY VTA TURNTABLE,
EVEN IF YOU THINK THE NAME IS KINDA SILLY.
SOL
OWNER’S MANUAL

The following is required by the roughly 9,542 government agencies
and regulations we have to comply with. If you have some common
sense, they should seem pretty straightforward. In any case, read
these instructions before proceeding farther, follow all instructions, and heed
all warnings. Or else!
1. If you don’t know how to install audio devices, get a qualied professional
to help.
2. Never use this device near water, and clean only with a
dry cloth.
3. Assure adequate ventilation, do not block any ventilation openings, or place
near heat sources.
4. Use only the supplied power cord or suitable replacement. Route cords away
from trafc areas and protect them from being pinched. Unplug the cord from
the outlet if the apparatus is unused for a long period of time.
5. To prevent electric shock, do not use the plug with an
extension cord, receptacle, or outlet unless blades can be
fully inserted.
6. Refer all servicing to qualied service personnel. Service is required when
the device has been damaged, including cord or plug damage, liquid has been
spilled or objects have fallen into the device, the device has been exposed to
rain or moisture, does not operate normally, or has been dropped.
WARNING: TO REDUCE THE RISK OF FIRE OR
ELECTRIC SHOCK, DO NOT EXPOSE THIS DEVICE TO RAIN OR
MOISTURE.
INTRODUCTION
Sol is our way of taking affordable turntables to a higher level,
which is why it looks, well...a bit weirder than anything else out
there. That’s why we decided to go with cast aluminum, rather than
wood and acrylic, and we also decided to give you a real, honest,
unconstrained unipivot arm that’s wayyyyy longer than most
turntable arms, and we also decided to give you on-the-fly VTA
adjustment, along with lots and lots of other adjustments. That’s a
lot of decisions. Now, you just need to decide which cartridge you
want to use, and enjoy some music with Sol!
IN THE BOX
(1) Sol Aluminum Plinth (black nish)
(1) Sol Aluminum Platter (natural nish)
(1) Sol Poron Foam Mat
(1) Sol Carbon Fiber Tone Arm
(1) Sol Motor and Pulley Assembly
(1) Sol Motor Power Cable, 12”
(1) 16VAC Wall Wart (er, “audiophile power supply”)
(1) Hardware Kit, which includes
(1) Bag of Headshell Screws (various lengths)
(1) Set of 3 Anti-Skate Weights
(1) Length of Nylon Monolament
(1) ¼” Diameter Carbon Steel Ball Bearing
(1) Sol Drive Belt
(1) Allen Wrench Set (1/8”, 3/16”, 5/64”, 0.05”)
BEFORE YOU BEGIN
Take a deep breath. Make a cup of tea. Don’t be in a hurry. Turn-
tables aren’t plug-and-play. To get the most out of Sol, you’re going
to need to do a bit of assembly...and then you’re going to have to
install and set up a cartridge. The good news is that you’ll end up
with much higher performance than you can get with “ready to go”
tables.
THE EASI(EST) WAY
For easiest setup, we recommend you watch the video
linked to at schiit.com/sol-setup
PLINTH AND PLATTER ASSEMBLY
Careful! The Sol Plinth is partially assembled for shipping. Don’t
flip it over, or you may have to re-assemble it. (And don’t panic if
something falls off, just replace it and move on.)
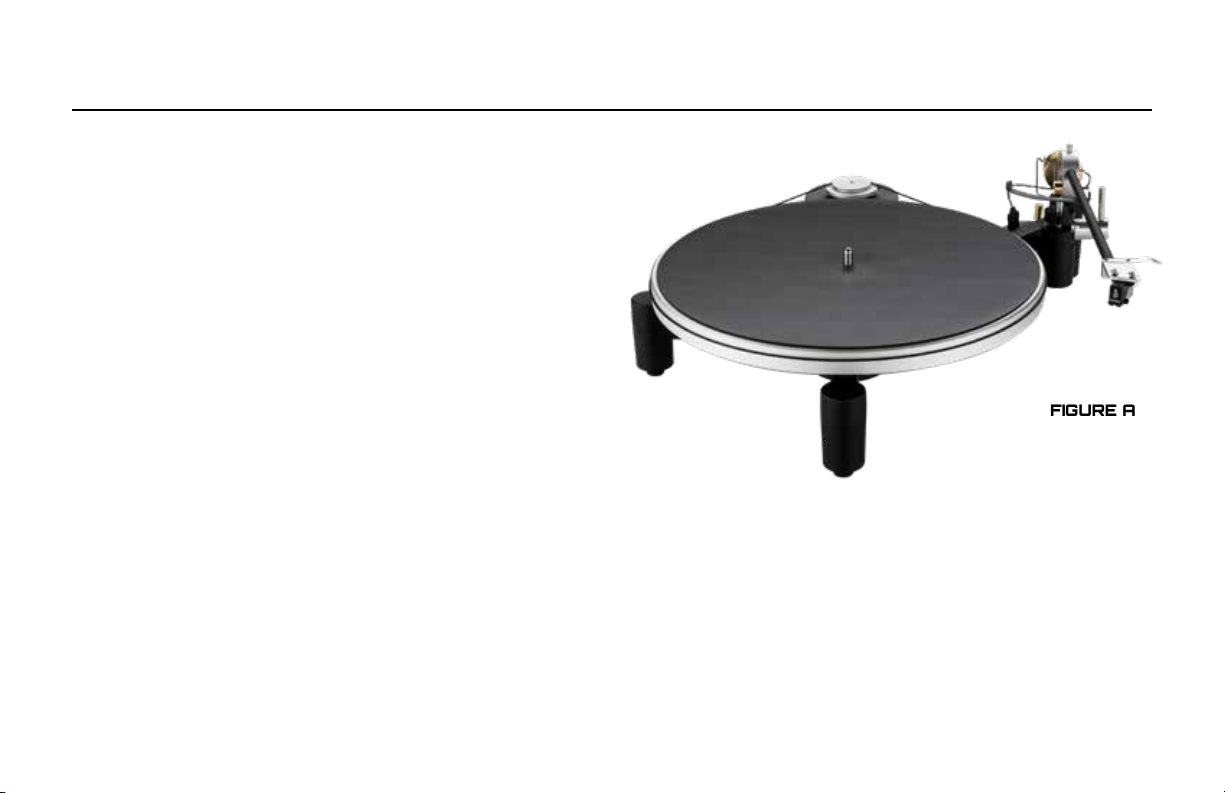
1 Place the Sol Plinth on a level, stable surface near your audio
equipment. On top of a heavy equipment rack is ideal, since you’ll
be able to get to all of the Sol’s adjustments. We recommend align-
ing the plinth so that the rst short leg points straight ahead, as
shown in Figure A.
GETTING STARTED
2 Slide the Sol Platter onto the bearing housing until it bottoms
out. You may need to loosen the bearing cap screws using the
5/64” allen key to get it to slide on and then tighten them up when
the platter is fully seated onto the plinth.
3 Place the Sol Poron Foam Mat on top of the platter. This is
important to decouple your records from the aluminum platter.
A
FIGURE A

MOTOR, PULLEY, AND BELT SETUP
2 Connect the Sol Motor and Pulley as-
sembly. Use the Sol Motor Power Cable to
connect the barrel jack on the Motor and
Pulley assembly to the OUT jack on the rear
output pod of the Sol Plinth. See Figure C
for details.
3 Connect the 16VAC Wall Wart to the IN
jack of the rear output pod of the Sol Plinth,
also as shown in Figure C.
4 Install the drive belt. The best way to do
this is by holding it at the motor pulley and
looping it around the Sol Platter, as shown
in Figure D. Use the small pulley for 33 RPM
records, and the larger pulley for 45 RPM
records.
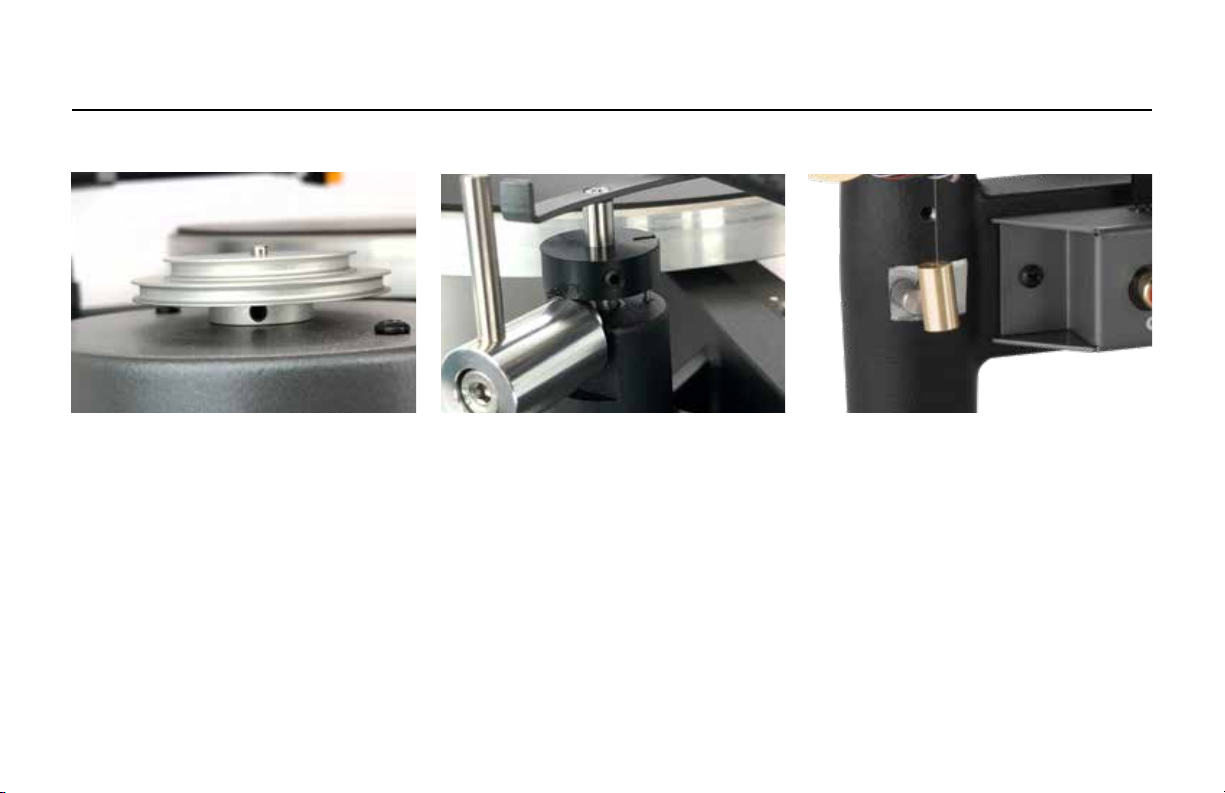
1 Place the Sol Motor and Pulley Assembly
near the platter. The edge of the larger pul-
ley should end up about 1” away from the
edge of the platter, as shown in Figure B.
GETTING STARTED
FIGURE B FIGURE C
FIGURE D
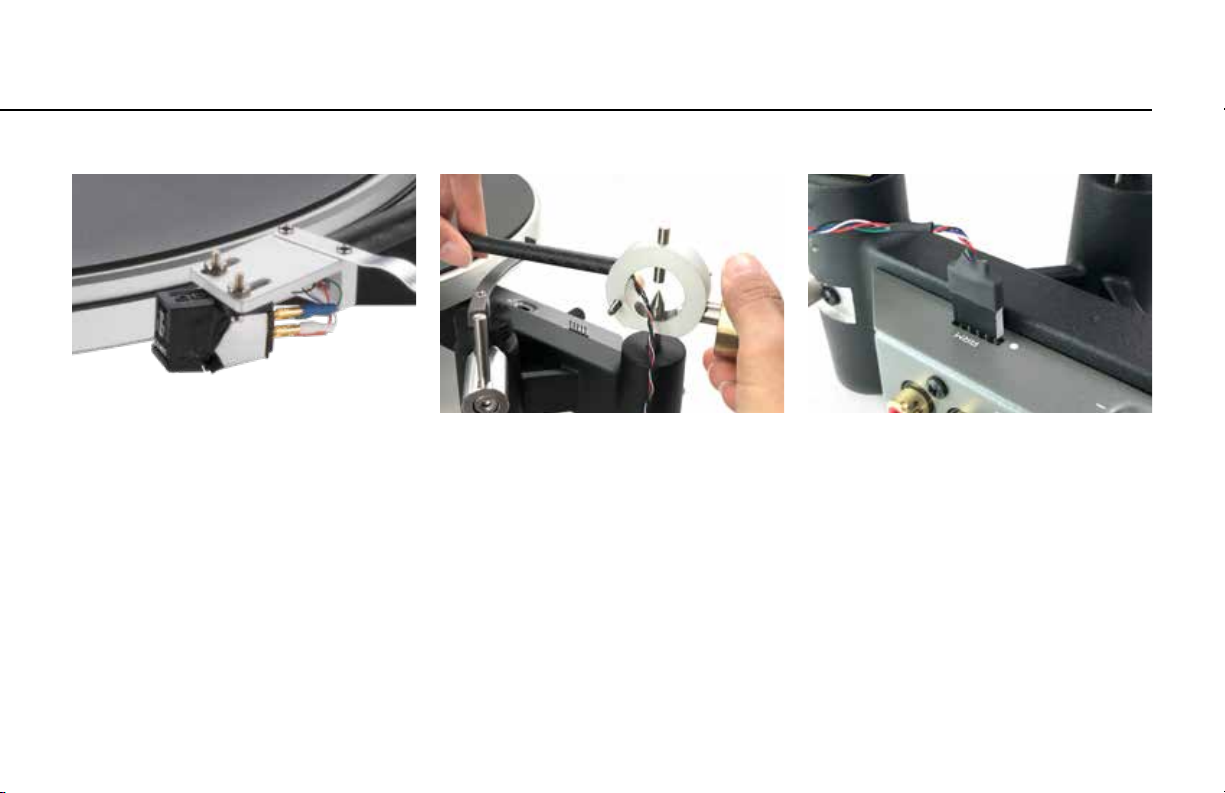
CARTRIDGE INSTALLATION TONEARM SETUP
1 Attach the cartridge to the tonearm. Use
the nonmagnetic screws provided. Screws
should be snug but not tight, so you can
align the cartridge later.
2 Attach the tonearm wires. Be care-
ful—these wires are fragile! Sol uses the
standard wiring convention:
Red = Right Signal, Green = Right Ground
White = Left Signal, Blue = Left Ground
See Figure E for a typical cartridge installed
on the Sol Carbon Fiber Tonearm.
Once you’ve selected and installed your car-
tridge, you can proceed to tonearm setup.
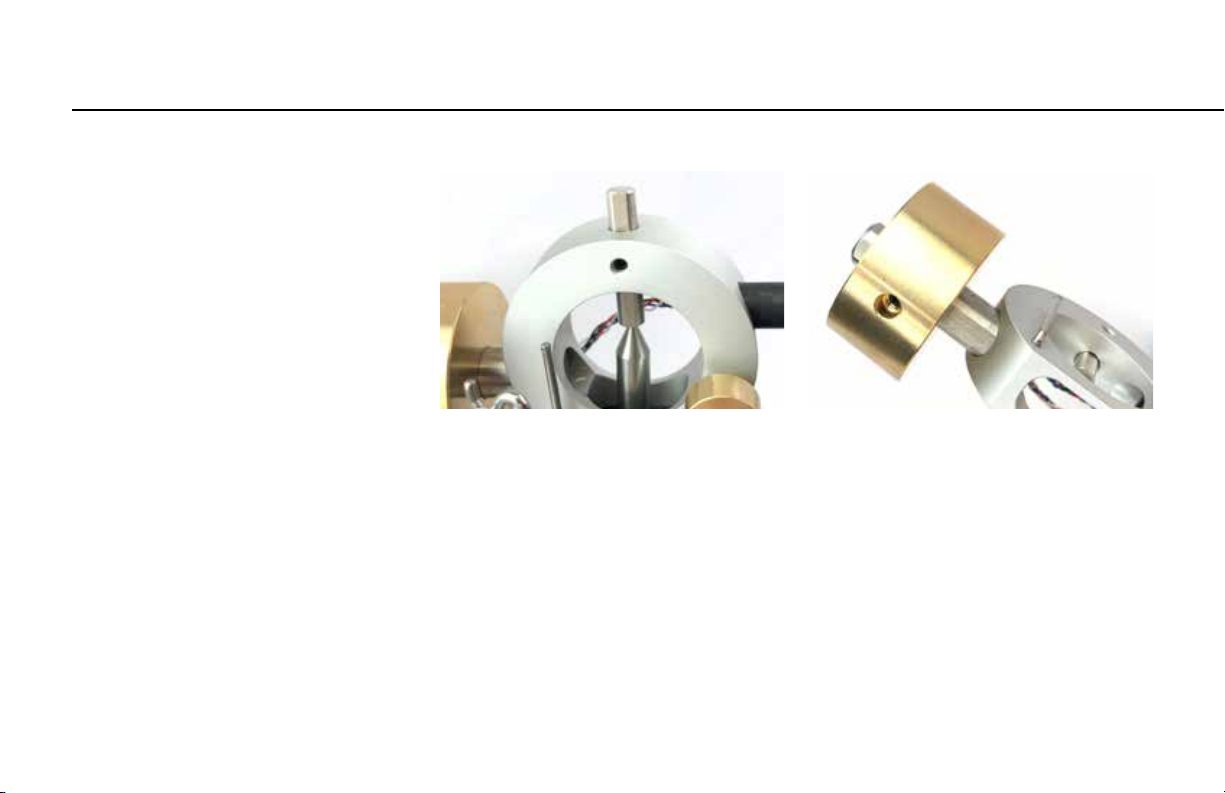
1 With the stylus guard in place on the
cartridge, gently place the tonearm on the
pivot pin, as shown in Figure F. Make sure
it doesn’t overbalance and fall off; make
sure it is resting on the cueing shelf. If it is
not, loosen the counterweight and slide it in
towards the pivot until it is.
2 Plug the tonearm wire into the header on
the rear output pod of the plinth. Match the
white dot on the pod and the white dot on
the side of the tonearm wire connector. At
resting position the cueing lever should be
in the up position, as shown in Figure G.
FIGURE E
FIGURE F FIGURE G
We recommend you watch the Sol
Setup video linked to from the Sol
page at schiit.com/sol-setup
However, we’re also providing a list of
adjustments here for your reference.
Depending on your particular setup,
you may not need to do all of these
adjustments.
1 To adjust the tonearm pivot cup height,
loosen the set screw on the side of the
tonearm ring, and carefully slide it up or
down until your cartridge is level. If your
cartridge is already level, you don’t need to
make this adjustment. If you can’t get your
cartridge level, you may need to adjust plat-
ter and motor pulley height. See Figure H.
2 To adjust the stylus force, you will
need some type of gram scale. Different
cartridges have different recommended
stylus forces, but it is typically around 1.75
grams. Using the 5/64” allen key, loosen
the set screw on the bottom of the tonearm
counterweight and move the counterweight
forwards or backwards as needed to achieve
I
ADJUSTMENT
TONEARM HEIGHT STYLUS FORCE
FIGURE IFIGURE H

the desired cartridge weight. See Figure I.
3 To adjust the VTA, loosen the 1/16” set
screw on the side of long arm of the plinth.
Use the small knob to adjust the height of
the pivot pin as needed. Then tighten the set
screw to lock it in place. This adjustment
can be done when the record is playing. See
Figure J
4 To adjust cartridge angle, turn the lateral
counterweight clockwise or counter-clock-
wise as necessary. The goal is to keep the
tonearm as straight up and down as pos-
sible when playing a record. See Figure K.
5 To adjust platter height, loosen the set
screw on the bottom of the plinth using the
3/8” allen key. Raise and lower the bearing
shaft as needed, then tighten the set screw.
VTA CARTRIDGE ANGLE PLATTER HEIGHT
FIGURE J
FIGURE K
FIGURE L
ADJUSTMENT
See Figure L.
6 To adjust the motor pulley height, (so the
belt doesn’t walk itself off of the edge of
the platter), loosen the set screw at the
bottom of the pulley wheel using the 0.05”
allen key and push the pulley up or down.
See Figure M.
7 To adjust the cueing height, loosen the
set screw on the back of the cuing disc
using the 5/64in allen key. You can raise
and lower the cuing disc on the cuing
plunger as needed. Tighten the set screw
when nished. See Figure N.
8 To adjust the anti-skate weight, you
will need a grooveless record. Using one
of the three anti-skate weights and the
monolament line provided, adjust until the
stylus is steady on the grooveless record.
See Figure O.
ANTI-SKATEMOTOR PULLEY HEIGHT CUEING HEIGHT
FIGURE O
FIGURE L
FIGURE M
FIGURE N
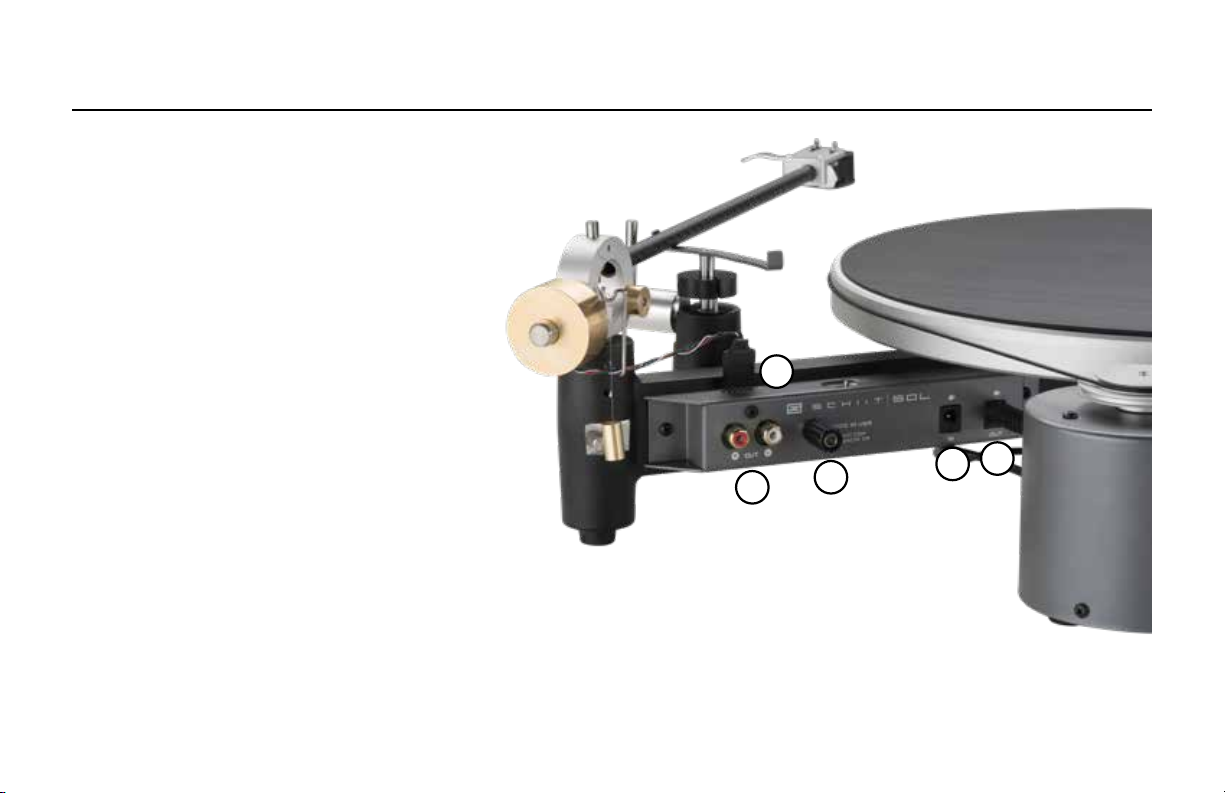
CONNECTIONS
1234
5
Okay, are you ready to be done? I bet you
are! Well, you’re very close. And if you’re
unsure of anything, just go back and review
the videos at schiit.com/sol-videos
Just a couple more things to connect!
1 RCA Outputs. This is where the sound
comes out. Connect to your phono preamp
with short, well-shielded RCA cables.
2 Ground. Connect this to your phono pre-
amp with a short, thick ground wire.
3 Power Input. Connect the wall-wart barrel
connector here.
4 Power Output. Connect the barrel jumper
from the motor pod here.
5 Tonearm Connector. Connect the tonearm
connector here, observing proper orientation
(or your channels will be reversed.)
Okay, so are you ready to hear something?
Good. It’s easy from here on out!
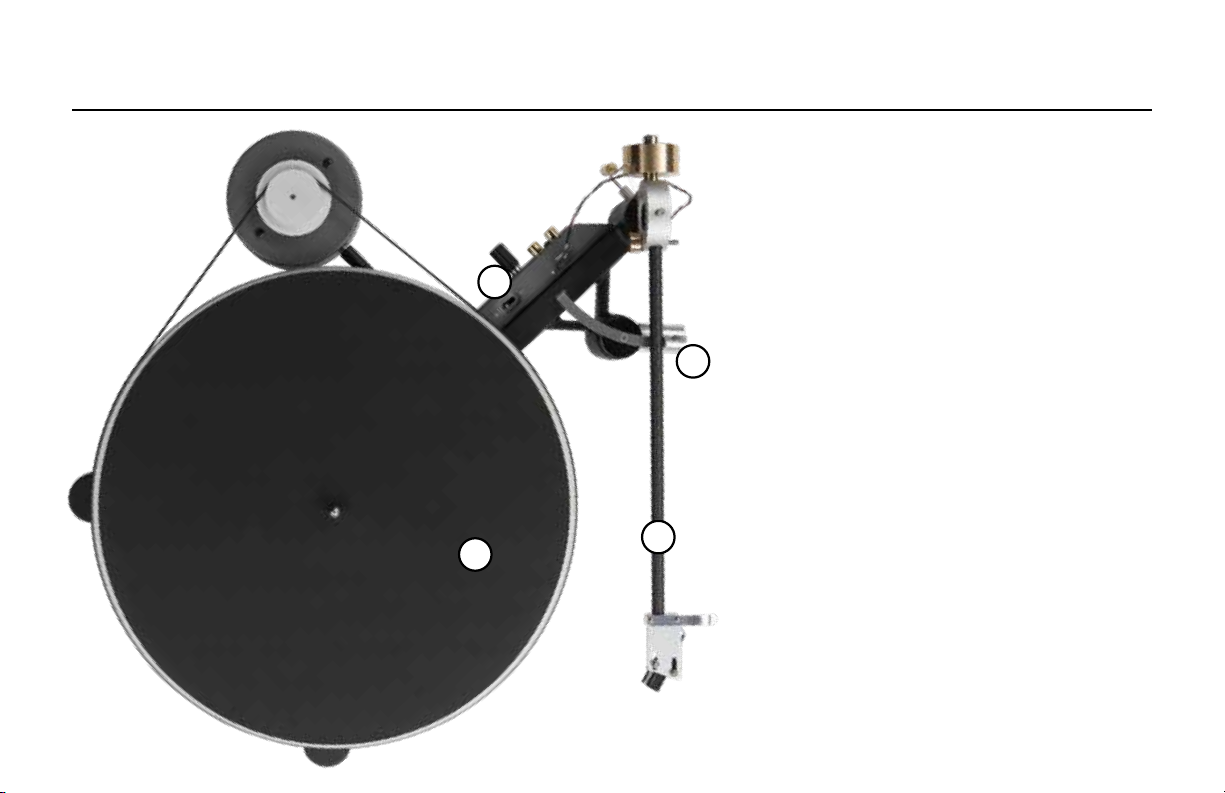
1 Place your record on to the platter.
2Turn on the motor, using the switch. You
may need to give the platter a little nudge
in the clockwise direction, this is totally
normal.
3 Move the tonearm to the desired track on
the record.Or you can start at the beginning,
if you are a completist.
4 Using the cueing lever, slowly lower the
arm onto the record. We recommend you
hold the cueing lever until the needle has
touched the record and you hear music.
You can also adjust VTA on the fly to ne
tune the sound, if you’d like. This is covered
in the Adjustments section.
Enjoy!
PLAYING A RECORD
13
4
2
Table of contents


