Schiller Mantis 7566A User manual

MAN 802-0006
Rev. A
XP TILLER/
CULTIVATOR
MODEL:
7566A
PARTS / OPERATOR’S /
SAFETY MANUAL

1
Schiller Grounds Care, Inc. P/N 802-0006
TABLE OF CONTENTS
Preface . . . . . . . . . . . . . . . . . . . . . . . . . . . . . . . . . . . . . . . . . . . . . . . . . . . . . . . . . . . . . . . . . . . . . . . . . . . . . . . . . . . . . . 2
Contact and Disclaimer . . . . . . . . . . . . . . . . . . . . . . . . . . . . . . . . . . . . . . . . . . . . . . . . . . . . . . . . . . . . . . . . . . . . . . . 2
Description of Product. . . . . . . . . . . . . . . . . . . . . . . . . . . . . . . . . . . . . . . . . . . . . . . . . . . . . . . . . . . . . . . . . . . . . . . . . . . 3
Purpose . . . . . . . . . . . . . . . . . . . . . . . . . . . . . . . . . . . . . . . . . . . . . . . . . . . . . . . . . . . . . . . . . . . . . . . . . . . . . . . . . . . 3
Technical Data . . . . . . . . . . . . . . . . . . . . . . . . . . . . . . . . . . . . . . . . . . . . . . . . . . . . . . . . . . . . . . . . . . . . . . . . . . . . . .3
Product Compliance. . . . . . . . . . . . . . . . . . . . . . . . . . . . . . . . . . . . . . . . . . . . . . . . . . . . . . . . . . . . . . . . . . . . . . . . . .3
Safety Instructions. . . . . . . . . . . . . . . . . . . . . . . . . . . . . . . . . . . . . . . . . . . . . . . . . . . . . . . . . . . . . . . . . . . . . . . . . . . . . . 4
Signal Words . . . . . . . . . . . . . . . . . . . . . . . . . . . . . . . . . . . . . . . . . . . . . . . . . . . . . . . . . . . . . . . . . . . . . . . . . . . . . . . 4
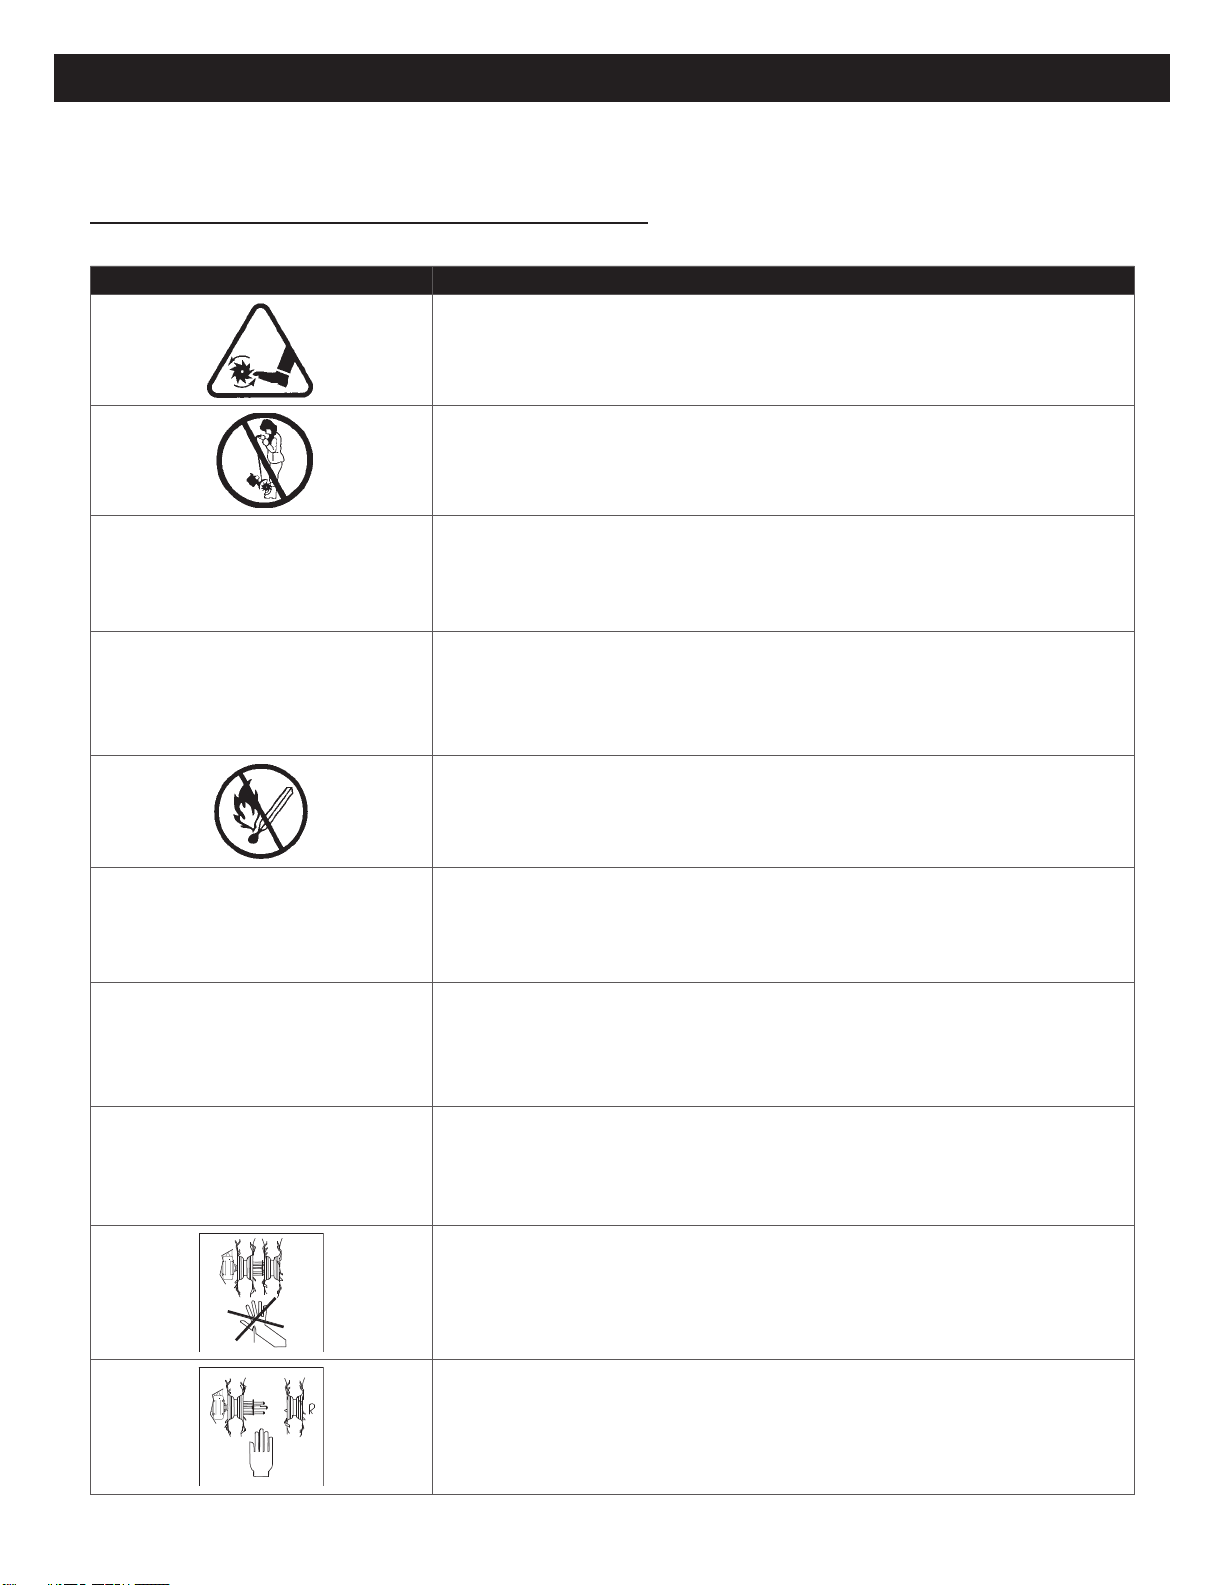
Safety Labels & Symbols . . . . . . . . . . . . . . . . . . . . . . . . . . . . . . . . . . . . . . . . . . . . . . . . . . . . . . . . . . . . . . . . . . . . . . 5
Operator Preparation . . . . . . . . . . . . . . . . . . . . . . . . . . . . . . . . . . . . . . . . . . . . . . . . . . . . . . . . . . . . . . . . . . . . . . . . . 6
Site Preparation . . . . . . . . . . . . . . . . . . . . . . . . . . . . . . . . . . . . . . . . . . . . . . . . . . . . . . . . . . . . . . . . . . . . . . . . . . . . . 7
Machine Preparation . . . . . . . . . . . . . . . . . . . . . . . . . . . . . . . . . . . . . . . . . . . . . . . . . . . . . . . . . . . . . . . . . . . . . . . . . 7
Starting. . . . . . . . . . . . . . . . . . . . . . . . . . . . . . . . . . . . . . . . . . . . . . . . . . . . . . . . . . . . . . . . . . . . . . . . . . . . . . . . . . . .7
General Operation . . . . . . . . . . . . . . . . . . . . . . . . . . . . . . . . . . . . . . . . . . . . . . . . . . . . . . . . . . . . . . . . . . . . . . . . . . .8
Operating on Slopes. . . . . . . . . . . . . . . . . . . . . . . . . . . . . . . . . . . . . . . . . . . . . . . . . . . . . . . . . . . . . . . . . . . . . . . . . .8
Interrupting Operation. . . . . . . . . . . . . . . . . . . . . . . . . . . . . . . . . . . . . . . . . . . . . . . . . . . . . . . . . . . . . . . . . . . . . . . . . 8
Maintenance. . . . . . . . . . . . . . . . . . . . . . . . . . . . . . . . . . . . . . . . . . . . . . . . . . . . . . . . . . . . . . . . . . . . . . . . . . . . . . . .9
Preparation . . . . . . . . . . . . . . . . . . . . . . . . . . . . . . . . . . . . . . . . . . . . . . . . . . . . . . . . . . . . . . . . . . . . . . . . . . . . . . . . . . 10
Unpacking. . . . . . . . . . . . . . . . . . . . . . . . . . . . . . . . . . . . . . . . . . . . . . . . . . . . . . . . . . . . . . . . . . . . . . . . . . . . . . . . . 10
Lower Handle Assembly. . . . . . . . . . . . . . . . . . . . . . . . . . . . . . . . . . . . . . . . . . . . . . . . . . . . . . . . . . . . . . . . . . . . . . 11
Kickstand Assembly . . . . . . . . . . . . . . . . . . . . . . . . . . . . . . . . . . . . . . . . . . . . . . . . . . . . . . . . . . . . . . . . . . . . . . . . . 12
Upper Handle Assembly. . . . . . . . . . . . . . . . . . . . . . . . . . . . . . . . . . . . . . . . . . . . . . . . . . . . . . . . . . . . . . . . . . . . . .12
Controls . . . . . . . . . . . . . . . . . . . . . . . . . . . . . . . . . . . . . . . . . . . . . . . . . . . . . . . . . . . . . . . . . . . . . . . . . . . . . . . . . . 14
Transportation. . . . . . . . . . . . . . . . . . . . . . . . . . . . . . . . . . . . . . . . . . . . . . . . . . . . . . . . . . . . . . . . . . . . . . . . . . . . . . 14
Storage. . . . . . . . . . . . . . . . . . . . . . . . . . . . . . . . . . . . . . . . . . . . . . . . . . . . . . . . . . . . . . . . . . . . . . . . . . . . . . . . . . .15
Fueling, Starting, and Stopping . . . . . . . . . . . . . . . . . . . . . . . . . . . . . . . . . . . . . . . . . . . . . . . . . . . . . . . . . . . . . . . . 15
Operation. . . . . . . . . . . . . . . . . . . . . . . . . . . . . . . . . . . . . . . . . . . . . . . . . . . . . . . . . . . . . . . . . . . . . . . . . . . . . . . . . . . . 16
Operation . . . . . . . . . . . . . . . . . . . . . . . . . . . . . . . . . . . . . . . . . . . . . . . . . . . . . . . . . . . . . . . . . . . . . . . . . . . . . . . . . 17
Maintenance and Cleaning . . . . . . . . . . . . . . . . . . . . . . . . . . . . . . . . . . . . . . . . . . . . . . . . . . . . . . . . . . . . . . . . . . . . . . 19
Maintenance. . . . . . . . . . . . . . . . . . . . . . . . . . . . . . . . . . . . . . . . . . . . . . . . . . . . . . . . . . . . . . . . . . . . . . . . . . . . . . .19
Troubleshooting and Repair . . . . . . . . . . . . . . . . . . . . . . . . . . . . . . . . . . . . . . . . . . . . . . . . . . . . . . . . . . . . . . . . . . . . . 21
Appendix A Drawings & Parts Lists . . . . . . . . . . . . . . . . . . . . . . . . . . . . . . . . . . . . . . . . . . . . . . . . . . . . . . . . . . . . . . . . 22
Parts Explosion. . . . . . . . . . . . . . . . . . . . . . . . . . . . . . . . . . . . . . . . . . . . . . . . . . . . . . . . . . . . . . . . . . . . . . . . . . . . . 22
Parts List. . . . . . . . . . . . . . . . . . . . . . . . . . . . . . . . . . . . . . . . . . . . . . . . . . . . . . . . . . . . . . . . . . . . . . . . . . . . . . . . . . 23
Appendix B Related Documentation . . . . . . . . . . . . . . . . . . . . . . . . . . . . . . . . . . . . . . . . . . . . . . . . . . . . . . . . . . . . . . . 24
How to Reseat the ange . . . . . . . . . . . . . . . . . . . . . . . . . . . . . . . . . . . . . . . . . . . . . . . . . . . . . . . . . . . . . . . . . . . . .24
Air Filter Maintenance. . . . . . . . . . . . . . . . . . . . . . . . . . . . . . . . . . . . . . . . . . . . . . . . . . . . . . . . . . . . . . . . . . . . . . . . 25
Attaching Throttle Cable. . . . . . . . . . . . . . . . . . . . . . . . . . . . . . . . . . . . . . . . . . . . . . . . . . . . . . . . . . . . . . . . . . . . . . 26
Corrective Action for Overlled Oil . . . . . . . . . . . . . . . . . . . . . . . . . . . . . . . . . . . . . . . . . . . . . . . . . . . . . . . . . . . . . . 28
Visual Check for Throttle Assembly XP Tiller . . . . . . . . . . . . . . . . . . . . . . . . . . . . . . . . . . . . . . . . . . . . . . . . . . . . . . 29
Warranty Statement. . . . . . . . . . . . . . . . . . . . . . . . . . . . . . . . . . . . . . . . . . . . . . . . . . . . . . . . . . . . . . . . . . . . . . . . . . . . 30
TABLE OF CONTENTS

2
Schiller Grounds Care, Inc. P/N 802-0006
This Operation / Parts Manual (the “Manual”) is part of the machine and provides the information necessary for safe and efcient
operation and service of this product. Suppliers of both new and second-hand machines are required to make sure this manual is
provided with the machine. The information in this Manual affects your safety, your legal rights and your legal responsibilities. Read
this entire Manual carefully to ensure proper conguration before use. Failure to read and follow instructions and warnings in this
Manual may result in serious injury to yourself or others, damage to your SCHILLER GROUNDS CARE INC. product, or damage to
other persons or objects in the vicinity. This Manual and all other collateral documents are subject to change at the sole discretion of
SCHILLERGROUNDS CAREINC. Forup-to-date productinformation, visitMantis.com andclickon theproduct pagefor thisproduct.
By using this product, you hereby signify that you have read the Manual, this disclaimer and warning carefully and that you understand
and agree to abide by their terms and conditions. You agree that you are solely responsible for your own conduct while using this
product, and for any consequences thereof. You agree to use this product only for purposes for which it was intended, that are proper
and are in accordance with all applicable laws, rules, and regulations, and all terms, conditions, precautions, practices, policies and
guidelines that SCHILLER GROUNDS CARE INC. has made and may make available.
If the equipment is operated other than strictly in accordance with the provision of this Manual, as updated from time to time on our
website, SCHILLER GROUNDS CARE INC. accepts no liability, including without limitation strict liability, for loss, damage or injury
incurred directly or indirectly from the use of this product. The user shall observe all safe and lawful practices including, but not limited
to, those set forth in this document.
Unauthorized modications create extreme safety hazards for operators and bystanders along with potential product damage. Schiller
Grounds Care, Inc. strongly warns against, rejects and disclaims any modications, accessories or product alterations that are not
designed, developed, tested and approved by the Schiller Grounds Care, Inc. Engineering Department. Any Schiller Grounds Care,
Inc. warranty is voided if a product is altered, modied or changed in any manner without approval from Schiller Grounds Care, Inc. Any
and all liability for personal injury and/or property damage caused by unauthorized modications, accessories or product alterations
are considered the responsibility of the individual(s) or company designing and/or making such changes. Schiller Grounds Care, Inc.
will vigorously pursue full indemnication and costs from any party responsible for such unauthorized post-manufacture modications
and/or accessories should personal injury and/or property damage result.
Schiller Grounds Care, Inc.
Mantis Brand
1028 Street Road Southampton, PA 18966
PHONE 877-596-6337
FAX 215-357-8045
PREFACE
CONTACT AND DISCLAIMER
THIS OPERATOR MANUAL IS PART OF THE MACHINE AND MUST
BE PROVIDED WITH ALL NEW AND SECOND-HAND MACHINES.

3
Schiller Grounds Care, Inc. P/N 802-0006
DESCRIPTION OF PRODUCT
Please read this entire manual before installation and use. Schiller Grounds Care reserves the right to change, alter
or improve the product and this document at any time without prior notice. Due to continuous product improvements,
product images may not be exact. Some assembly may be required.
Read and keep this manual for future reference. This manual contains important information regarding safety, assembly, operation,
and maintenance. The owner must be certain that all the product information is included with the unit. This information includes the
manual, the replacement parts, and the warranties. This information must be included to make sure state laws and other laws are
followed. All persons who rent/loan this unit must have access to and understand this information. This manual should remain with
the product even if it is resold.
NOTICE
THIS IS A MOTORIZED ROTARY TILLER THAT WORKS THE SOIL BY MEANS OF ROTATING TINES. IT IS PEDESTRIAN-
CONTROLLED, BUT NOT SELF-PROPELLED, WITH A GASOLINE-FUELED INTERNAL COMBUSTION ENGINE TO
POWER THE TINES. IT SHALL NOT BE USED FOR ANY OTHER PURPOSE.
PURPOSE
TECHNICAL DATA
EMISSIONS
Refer to the engine owners' operating manual for further details related to this Honda statement: Your new Honda engine
complies with both the U.S. EPA and State of California emission regulations. American Honda provides the same emission
warranty coverage for Honda Power Equipment engines sold in all 50 states. In all areas of the United States, your Honda Power
Equipment engine is designed, built, and equipped to meet the U.S. EPA and CaliforniaAir Resources Board emission standard for
spark ignited engines.
SPARK ARRESTOR
This unit is factory equipped with a spark arrestor. Some federal, state, and local authorities require, by law, that certain
internal combustion engines operated on forest brush and/or grass-covered areas be equipped with a spark arrestor, maintained
in effective working order, or the engine be constructed, equipped and maintained for the prevention of re. Check for regulations
pertaining to these requirements. Failure to follow these requirements could subject you to liability or a ne. If it requires
replacement, contact your local service dealer to install the appropriate mufer assembly.
PRODUCT COMPLIANCE
Product 7566A (XP model)
Engine 4-cycle Honda
Displacement (cc) 35
Fuel Capacity (qt. / L) 0.67 / 0.63 No mixing of gas and oil required
Tilling Width, in (cm) 16 (40.6)
Tilling Depth, in (cm) 10 (25.4)
Max Tine Speed 240 rpm
Dimensions L x W x H, in (cm) 54 x 18 x 20 (138 x 46 x 51)
Dry Weight, lbs (kg) 34 (16)
Starting/Operation Recoil, Variable speed throttle
Warranty* 2-Year Consumer / 2-Year Commercial / Rental

4
Schiller Grounds Care, Inc. P/N 802-0006
SAFETY INSTRUCTIONS
SIGNAL WORDS
SIGNAL WORD DEFINITIONS:
The signal words below are used to identify levels of hazard seriousness. These words appear in this manual and on the safety
labels attached to Schiller Grounds Care, Inc. machines. For your safety and the safety of others, read and follow the information
given with these signal words and/or the symbol shown above.
This symbol means:
ATTENTION!
BECOME ALERT!
Yoursafetyandthesafetyofothersisinvolved.
Signal Word Description
DANGER DANGER INDICATES A HAZARDOUS SITUATION THAT, IF NOT AVOIDED, WILL RESULT IN
DEATH OR SERIOUS INJURY.
WARNING WARNING INDICATES A HAZARDOUS SITUATION THAT, IF NOT AVOIDED, COULD
RESULT IN DEATH OR SERIOUS INJURY.
CAUTION CAUTION INDICATES A HAZARDOUS SITUATION THAT, IF NOT AVOIDED, COULD RESULT
IN MINOR OR MODERATE INJURY.
NOTICE NOTICE INDICATES INFORMATION OR PROCEDURES THAT RELATE DIRECTLY OR
INDIRECTLY TO THE SAFETY OF PERSONNEL OR EQUIPMENT/PROPERTY.

5
Schiller Grounds Care, Inc. P/N 802-0006
SAFETY INSTRUCTIONS
SAFETY LABELS & SYMBOLS
Symbol Description
Cutting hazard; keep feet and hands away from rotating tines.
Do not carry the tiller in this position.
Read owner’s manual before using tiller, or performing any repair or maintenance.
Keep owners manual in a safe place and replace if missing or damaged.
Don’t operate indoors.
Don’t fuel, refuel, or check fuel while the engine is hot, while smoking, or near an open
ame or other ignition source.
Wear ear and eye protection.
When assembling the handles, make sure fuel tank faces away from operator. Refer
to assembly instructions.
Incorrect assembly.
Do not reach your ngers and\or hands in between the tine blades.
Always remove the outer tines before removing the inner tines.

6
Schiller Grounds Care, Inc. P/N 802-0006
SAFETY INSTRUCTIONS
READ THE OPERATION & SAFETY MANUAL
– If an operator or mechanic cannot read English, it is the owner’s responsibility to explain this material to them.
– Contact your factory representative for clarication if any portion of this material is unclear.
– Adhere to the warnings and instructions depicted in the safety decals on the machines.
– Replace any missing or damaged labels.
– Keep warning labels and this operator’s manual legible and intact.
– Become familiar with the safe operation of the equipment, operator controls and safety signs.
– Know how to stop the engine and attachments quickly in an emergency.
– Do not operate or allow another person to operate this machine if there are any questions about safety
– Never attempt to use a machine that is damaged or has unauthorized modications
– All operators and mechanics should be trained. The owner is responsible for training the users.
– Wear appropriate clothing, including safety goggles or safety glasses with side shields when operating.
– Wear substantial footwear. Do not operate barefoot or wearing open sandals. Long hair, loose clothing or jewelry may get
tangled in moving parts.
– Wear appropriate hearing protection.
– Wear dust mask to avoid breathing dust.
– Wear safety glasses.
– Wear gloves to reduce the transmission of vibration to the hands.
– Never allow children, unskilled or improperly trained people to operate this equipment. Local regulations can restrict the age of
the operator.
– Do not operate machine when fatigued.
– Do not operate machine while under the inuence of drugs or alcohol, or any other condition of impairment.
– Always operate the machine using two hands. Keep a rm grip on both handles.
– The owner/user can prevent and is responsible for accidents or injuries occurring to themselves, other people or property.
– Always operate the machine in daylight or good articial light.
MULTIPLE OPERATORS
– Keep a safe distance between operators when working together.
WARNING
USERS RISK SERIOUS INJURY TO THEMSELVES AND
OTHERS IF THE MACHINE IS USED IMPROPERLY OR
WITH DISREGARD FOR SAFETY PRECAUTIONS.
WARNING
SERIOUS INJURY CAN RESULT FROM IMPROPER USE
AND CARE OF THIS MACHINE OR FAILURE TO WEAR
PROPER PROTECTIVE GEAR FOR EYES AND EARS.
OPERATOR PREPARATION

7
Schiller Grounds Care, Inc. P/N 802-0006
SAFETY INSTRUCTIONS
– Do not tamper with or defeat safety devices. Keep guards, shields and interlock safety devices in place and in proper working
condition. They are for your protection.
– Keep all fasteners such as nuts, bolts and pins well secured.
– Visually verify that machine and attachments, if any, are in good operating condition. Immediately replace worn or damaged
parts.
– Always follow maintenance instructions given in manual.
– Do not engage the tines until ready to use.
– Never attempt to adjust the machine while the engine is running; wait until the engine and/or tines comes to a complete stop or
injury may result
WARNING
FAILURE TO COMPLY WITH SAFETY INSTRUCTIONS MAY RESULT IN SERIOUS
PERSONAL INJURY, AND/OR EQUIPMENT AND PROPERTY DAMAGE
– Start the engine carefully, according to all manufacturer’s instructions and with feet well away from tool(s)
– Always pull starter cord slowly until resistance is felt to avoid kickback and prevent arm or hand injury.
– Keep hands and feet clear of the tines
– Don’t attempt to start the engine if fuel is spilled. Move the machine away from the area of spillage and avoid creating any spark
or source of ignition until fuel vapors have dissipated or spill has been cleared.
WARNING
FUELING A HOT ENGINE OR NEAR AN IGNITION SOURCE CAN CAUSE A FIRE
AND RESULT IN SERIOUS PERSONAL INJURY AND/OR PROPERTY DAMAGE.
MACHINE PREPARATION
STARTING
– Evaluate the terrain to determine what accessories and attachments are needed to properly and safely perform the job.
– Only use accessories and attachments approved by the manufacturer.
– Identify and mark buried objects such as sprinkler heads, stakes, water valves, sewer pipes, water pipes, electric wires, masonry,
metal, etc
– Remove all objects or debris from the area that may be picked up or thrown by the machine.
– Keep pets and people, especially young children, away from the area and immediately cease operation of the equipment if any
enter the area.
– Operate only in daylight or in good articial light.
– Evaluate the terrain to determine how to safely perform the job.
SITE PREPARATION

8
Schiller Grounds Care, Inc. P/N 802-0006
SAFETY INSTRUCTIONS
– Never pick up or carry the machine when the engine is running.
– Maintain rm footing and good balance when operating the machine.
– Walk with the machine, do not run.
– Do not run the engine in an enclosed area where dangerous fumes can collect.
– Never leave a machine unattended. Always stop the engine when leaving the operator position.
– Use extreme caution when reversing or pulling machine towards you.
– Do not stand in front of tiller when tines are rotating.
– Remove debris from mufers and engine to help prevent res.
– Do not attempt to remove jammed material or clear tines while they are moving or while the engine is running.
– Always remove the outer set of tines before removing the inner set of tines.
– Do not operate tiller without two sets of tines in place.
WARNING
OPERATION OF THIS EQUIPMENT MAY CREATE A SPARKS THAT CAN START FIRES AROUND DRY
VEGETATION. A SPARK ARRESTOR IS INSTALLED. THE OPERATOR SHOULD CONTACT LOCAL FIRE
AGENCIES FOR LAWS OR REGULATIONS RELATING TO FIRE PREVENTION REQUIREMENTS.
WARNING
THE ENGINE EXHAUST FROM THIS PRODUCT CONTAINS CHEMICALS KNOWN TO THE STATE OF
CALIFORNIA TO CAUSE CANCER, BIRTH DEFECTS OR OTHER REPRODUCTIVE HARM. FOR MORE
INFORMATION, GO TO WWW.P65WARNINGS.CA.GOV.
GENERAL OPERATION
– All slopes require extra caution.
– Evaluate the risks involved before operating on slopes
– Do not operate on slopes if uneasy or uncertain. Ultimate responsibility for safe operation on slopes rests with the operator.
– Do not operate on steep slopes.
– Keep all movement and change of direction on slopes slow and gradual.
– Be sure of your footing on slopes.
OPERATING ON SLOPES
– Before leaving the operator’s position:
• Shut off the engine
– Wait until all parts stop moving, stop the engine, and allow the engine to cool before:
• refueling
• making adjustments
• clearing or unclogging blockages
• inspecting the machine
• maintaining or repairing the machine
• transporting the machine
INTERRUPTING OPERATION

9
Schiller Grounds Care, Inc. P/N 802-0006
SAFETY INSTRUCTIONS
TINES
– The tines are sharp and can cut. Use extra caution when handling.
– Remove obstructions with care.
– Wrap the tines or wear gloves.
– Only replace tines. Never straighten or weld.
FUEL
– Gasoline and diesel fuels are ammable; gasoline vapors are explosive. Use extra care when handling.
– Always use fresh gasoline. Stale gasoline can cause damage.
– Always store fuel in containers specically designed for this purpose.
– Do not store fuel in a house.
– Always add fuel before starting the engine.
– Always replace all fuel tank and container caps securely.
– Never remove the fuel cap or add fuel while the engine is running or when the engine is hot.
– Don’t use starter uids they will cause permanent engine damage.
– When refueling or checking fuel level:
• Stop the engine and allow to cool
• Do not smoke
• Refuel outdoors only
• Use a funnel
• Do not overll
• If fuel is spilled, do not attempt to start the engine until the spill is cleaned up and vapors have cleared.
MAINTENANCE AND ADJUSTMENTS
– Don’t run engine if electrical system causes sparks outside the cylinder. During periodical checks of the spark plug, keep plug a
safe distance from cylinder to avoid burning evaporated fuel from cylinder.
– Don’t check for spark with spark plug or plug wire removed. Use an approved tester.
– Don’t crank engine with spark plug removed unless spark plug wire is disconnected. Sparks can ignite fumes.
– Don’t operate your tiller if there is an accumulation of debris around the mufer or cooling ns.
– Don’t touch hot mufers, cylinders or cooling ns; contact may cause serious burns.
– Don’t change the engine governor setting or over throttle the engine.
– Don’t attempt to remove spark plug while engine is hot. Removing a spark plug from a hot engine can cause irreparable
damage to the engine and will void your warranty.
– Always operate engine with spark arrestor installed and operating properly.
MAINTENANCE

10
Schiller Grounds Care, Inc. P/N 802-0006
PREPARATION
UNPACKING
Key Qty. Description
T1 1 Engine Assembly (includes Fender Guard &
Worm Gear Transmission)
T2 1 Tine Assembly (includes Left & Right Inner Tine
Assembly, Left & Right Outer Tine Assembly,
2-Retaining Pins)
T3 1 Right Upper Handle Assembly with Throttle Cable
Attached to Engine
T4 1 Upper Handle, Left
T5 1 Upper Handle, Right
T6 1 Lower Handle, Left
T7 1 Front Carry Handle, Right
T8 1 Front Carry Handle, Left
T9 1 Foam Grip
Key Qty. Description
T10 1 Rear Carry Handle w/ Grip
T11 2 Carriage Bolt (2.25”)
T12 8 Hex 2-Way Lock Nut
T13 2 Hex Bolt (3.25”)
T14 4 Hex Head Cap Screw (1.25”)
T15 2 Throttle Clip
T16 2 Knob
T17 2 Kickstand: Flange Bolt (1.25”)
T18 1 Kickstand: Bracket
T19 1 Kickstand
T20 1 Handle Brace
WHAT YOU WILL NEED TO ASSEMBLE THE TILLER
Prior to removing the contents and assembling, it is important to:
• Have a clean work area.
• Make sure all necessary tools are handy.
• Ratchet wrench with an extension to reach deep-seated bolts
• 7/16” wrench
• 7/16” socket
• 3/8” socket or crescent wrench
T1
T2
T3
T4
T5
T9
T8
T18
T17
T16
T19
T10
T20
T7
T6
T14
T15
T11
T12
T13

11
Schiller Grounds Care, Inc. P/N 802-0006
PREPARATION
123
Open the box and remove the inserts and
loose parts found on top of the tiller cradle IMPORTANT: Keep the engine within the
cardboard cradle during Lower Handle
Assembly
Open the cradle by pulling the sides apart
5 6
RECESSED
CHANNELS
Slide the foam grip onto the front right carry
handle handle Slide the front left carry handle into the foam grip on the front right carry handle. Position this
assembly onto the outside of the lower left and right handles and slide into the recessed channels.
Secure with the two 3.25” bolts and lock nuts. Fasten nger tight.
789
Secure the rear carry handle between the
lower handles with two 1.125” bolts - keep with
hex head on inside of the rear carry handle.
Fasten with two lock nuts and tighten with
wrench and socket
Tighten all handle bolts with the wrench and
socket. Completed Lower Handle Assembly for the
Mantis XP Tiller
LOWER HANDLE ASSEMBLY

12
Schiller Grounds Care, Inc. P/N 802-0006
123
Locate the kickstand hardware Locate the UP arrow on the kickstand bracket
and keep the arrow pointing up. Position
the bracket just above the bend of the lower
handles and connect the kickstand with the
bolts. Tighten with 3/8” wrench.
Completed Lower Handle Assembly with
Kickstand for the Mantis XP Tiller
KICKSTAND ASSEMBLY
PREPARATION
UPPER HANDLE ASSEMBLY
123
With the kickstand down, the cardboard cradle
can be removed. NOTE: the tiller handles
kit for the XP Tiller has extra hardware not
needed for assembly: two clamps and two tine
retaining pins.
Lay the upper handles on the ground with the
right upper handle on the gas-cap side of the
engine.
Install the handle brace using the supplied
bolts and nuts.

13
Schiller Grounds Care, Inc. P/N 802-0006
PREPARATION
UPPER HANDLE ASSEMBLY (CONT)
456
Select the desired height and attach each
upper handle to the lower handle using the
supplied bolts and plastic knobs.
NOTE: be sure the bolt head is seated
securely in the square hole. Loosen and tighten the adjustable handle
knobs as necessary to fold or extend the
Mantis handles.
789
Secure the throttle cable clip, making sure the
cable is not twisted and there is proper throttle
movement.
NOTE: Prior to starting the engine, test the throttle
connection by depressing the lockout trigger, and
fully squeezing the throttle trigger. If you don’t
hear the throttle click on both the full squeeze and
the release you should follow the instructions for
Visual Check for Throttle Assembly
Position extra throttle cable length as shown
above
10
Fully-assembled Mantis XP Tiller.

14
Schiller Grounds Care, Inc. P/N 802-0006
PREPARATION
SWITCH (A) Move to the “OFF” position to stop the engine. Move to the “ON” position before starting engine.
THROTTLE TRIGGER (B) Controls engine speed
LOCKOUT TRIGGER (C) Depress to unlock throttle
CHOKE (D) UP = Closed DOWN = Open
CONTROLS
D
C
A
B
CARRY
– Use the carry handles to lift the tiller, keeping the sharp tines to either side of the body.
WALK
– While the tiller is running, slowly squeeze the throttle to move at a comfortable forward pace across the ground.
IN AN AUTOMOBILE
– Remove the fuel from the tank before transporting the tiller in a vehicle.
– Fold down the handles if necessary.
– Transport the tiller in an upright position. Never lay the tiller on its side or uids may leak out.
TRANSPORTATION
SWITCH ON

15
Schiller Grounds Care, Inc. P/N 802-0006
PREPARATION
ENGINE
– Before storing the tiller for any period longer than two weeks, consult the engine manufacturer’s operating manual for instructions
regarding fuel tank draining, engine oil, air lter, and spark plug. Failure to properly prepare the engine for storage may result in
engine damage.
TINES
– Wipe the tines with oil or spray them with a protective lubricant like WD-40 to prevent rust
– Remove tines or attachments and lightly oil tine shaft at least once a year.
TRANSMISSION
– Check the grease level in the worm gear transmission housing. Add grease if needed.
POSITION
– Store your Tiller in an upright position in a clean, dry place.
WARNING
ENGINE DAMAGE MAY OCCUR IF THE MACHINE IS STORED
IN ANYTHING OTHER THAN AN UPRIGHT POSITION.
WARNING
DO NOT STORE IN AN AREA WHERE FUEL FUMES MAY
ACCUMULATE AND REACH A FLAME OR SPARK
STORAGE
NOTICE
MANTIS TILLERS ARE SHIPPED DRY: WITHOUT OIL
AND WITHOUT GAS. ATTEMPTING TO RUN THE TILLER
WITHOUT OIL AND GAS WILL RESULT IN ENGINE DAMAGE.
ADDING OIL
– Rock the tiller forward so that it rests on its front carry handle. (Figure 1)
NOTICE
PROPERLY FILL THE CRANKCASE DURING THE INITIAL
SETUP. FAILURE TO FILL THE CRANKCASE WILL RESULT
IN ENGINE DAMAGE.
– Remove the oil plug and ll the reservoir with the entire bottle of pre-measured (3.4 oz) 4-cycle engine oil (included).
– Replace the oil plug.
– Return the unit to the upright position and put the kickstand down.
FUELING, STARTING, AND STOPPING
FIGURE 1

16
Schiller Grounds Care, Inc. P/N 802-0006
OPERATION
ADDING FUEL
– Fill the gas tank to four-fths capacity with midgrade 89 octane unleaded gasoline.
STARTING (COLD ENGINE)
– Turn on the tiller by pressing the rocker switch on the throttle handle so the “I” position is down.
– Close the choke by moving the choke lever to the UP position.
– Press the primer bulb until the bulb is lled with gas, then press it two more times.
– Pull the starter cord lightly until you feel resistance, then give it a short, sharp pull.
NOTE: do not fully extend the cord or let the cord snap back into the starter housing.
– After the engine is running, open the choke by moving the lever to the DOWN position.
– Let the engine run for a minute before use.
STARTING (WARM ENGINE)
– Turn on the tiller by pressing the rocker switch on the throttle handle so the “I” position is down.
– Open the choke by moving the lever to the DOWN position.
– Pull the starter cord lightly until you feel resistance, then give it a short, sharp pull.
– Let the engine run for a minute before use.
STOPPING
– Let the engine run briey to cool down before shutting off.
– Turn off the tiller by pressing the rocker switch on the throttle handle so the “O” position is down.
EMISSIONS
– Engines which are certied to comply with California and federal EPA emission regulations are certied to operate on regular
unleaded gasoline. Refer to the engine operating manual for more details.
ETHANOL
– Do not use gasoline containing more than 10% ethanol.
WARNING
FUELING A HOT ENGINE OR NEAR AN IGNITION SOURCE
CAN CAUSE A FIRE AND RESULT IN SERIOUS PERSONAL
INJURY AND/OR PROPERTY DAMAGE.
WARNING
TO AVOID PERMANENT ENGINE DAMAGE, DO NOT USE
STARTING FLUIDS.
FUELING, STARTING, AND STOPPING (CONT)

17
Schiller Grounds Care, Inc. P/N 802-0006
OPERATION
MOVING THE POWERED TILLER
Start/Stop
Switch
– Move the start/stop switch to ON which is indicated by the “I” symbol.
– Depress the Lockout Trigger.
– Squeeze the Throttle Trigger slowly.
– Maintain a rm grip on the both handles.
MOVING THE TILLER FORWARD (NOT TILLING)
– Walk behind the powered tiller at a forward pace necessary to avoid digging into the soil.
TILLING
– Position the tiller in the work area
– Stand behind the powered tiller and walk backward to provide resistance for the tines to dig into the soil.
– Provide less resistance to allow the tiller to move forward and more resistance to dig.
– Use the tiller in the same motion as an upright vacuum cleaner - continuously walk forward and pull back.
DEEP TILLING
– Provide resistance to the powered tiller in the same area until the desired depth is achieved.
OPERATION

18
Schiller Grounds Care, Inc. P/N 802-0006
OPERATION
SHALLOW TILLING / CULTIVATING
– Switch the tine positions from the default tilling position. (Figure 1)
To set them for tilling, attach the tines so
the points of the blades face forward - away
from the operator. The tines’ points will
contact the ground rst.
Tine
Rotation
Tine Teeth
Back
Handles
Front
TILLING POSITION
FIGURE 1
For cultivating, reverse the tines so that
the points of the tines face backward -
toward the operator. Now the long at part
of the tine’s blade will contact the ground
rst.
SHALLOW TILLING/
CULTIVATING POSITION
Tine
Rotation
Tine Teeth
Back
Handles
Front
FIGURE 2
STEPS
1. Turn off the tiller and allow to cool.
2. Push the tiller forward and allow it to rest on the front carry handle.
3. Remove the retaining pins and remove both the left and right outer tines.
4. Remove the retaining pins and remove both the left and right inner tines from the transmission axle.
D-SHAPED
HOLE
Inner Tines
Outer Tines
5. Place the right-side inner tines on the left side of the transmission axle.
6. Place the left-side inner tines on the right side of the transmission axle.
NOTE: The D-shaped hole should be visible and away from the transmission axle.
7. Install the retaining pins.
OPERATION (CONT)

19
Schiller Grounds Care, Inc. P/N 802-0006
MAINTENANCE AND CLEANING
WARNING
TO AVOID PERSONAL INJURY, STOP THE MACHINE, TURN
OFF THE ENGINE, ALLOW ALL MOVING PARTS TO STOP, AND
DISCONNECT THE SPARK PLUG WIRE BEFORE PERFORMING
ANY MAINTENANCE OR MAKING ADJUSTMENTS.
GENERAL
– Check engine oil level and air lter element daily.
– Check for loose bolts and connections.
– Refer to the engine operating manual for more details.
CLEANING THE TINES
CAUTION
WEAR GLOVES TO AVOID INJURY WHEN WORKING
ON TILLER TINES.
– Turn off the engine.
– Use an optional Tine Detangler or other tool to pull the tangled weeds.
– Follow the steps shown within the Shallow Tilling/Cultivating section to remove the tines for cleaning tightly bound material.
AIR FILTER
WARNING
TO AVOID ENGINE DAMAGE, DO NOT OPERATE THE
MACHINE WITHOUT A PROPER AIR FILTER ELEMENT.
– Locate the air lter in the black plastic housing behind the gas tank cap.
– Remove the cover by squeezing the two locking tabs and swing open towards the front of the engine.
– Check the air lter for moisture or dirt.
– Remove and replace the lter if necessary.
– Consult the engine manufacturer’s manual for more information.
FUEL FILTER
– Refer to your Honda®engine manual for more details.
TRANSMISSION CARE
NOTE: Factory production includes Lithium EP #1 grease added to properly lubricate the transmission for the rst 10
hours of operation. Add grease as needed or after approximately 50 hours of use.
– Remove the tines.
– Lean the tiller forward to expose the transmission housing cover and remove the cover and gasket.
MAINTENANCE
Table of contents
Other Schiller Tiller manuals