Schuchmann MADITA-Fun User manual

Instructions for use.
madita-fun. The modern, integrative therapy chair.
madita-fun.

Our promise.
Dear Customer,
at this point we would like to thank you for placing your trust in our company and for
purchasing our product. We ask you to read through the Instructions for use carefully
prior to initial commissioning of the product, and to observe them. Please note that gui-
delines and representations in these Instructions for use may deviate from your product
due to diering equipment.
We reserve the right to make technical modifications.
Important information!
Ensure that these Instructions for use remain with the product..
Your schuchmann-Team

03 Contents.
1. Preparation. ...................................................................................05
1.1 Delivery....................................................................................................................... 05
1.2 Safety measures prior to use.......................................................................... 05
1.3 Safe disposal.......................................................................................................... 05
1.3.1 Packaging............................................................................................... 05
1.3.2 Produkt.................................................................................................... 05
1.4 Where to store the Instructions for use..................................................... 05
2. Product description. .......................................................................06
2.1 Material information............................................................................................ 06
2.2 Handling / transport.......................................................................................... 06
2.3 Application areas, use according to the intended purpose......... 06
2.4 Use not in accordance with the intended
purpose / warning guidelines ...............................................................................07
2.5 Equipment for basic model.............................................................................07
2.6 Auflistung Zubehör.............................................................................................. 08
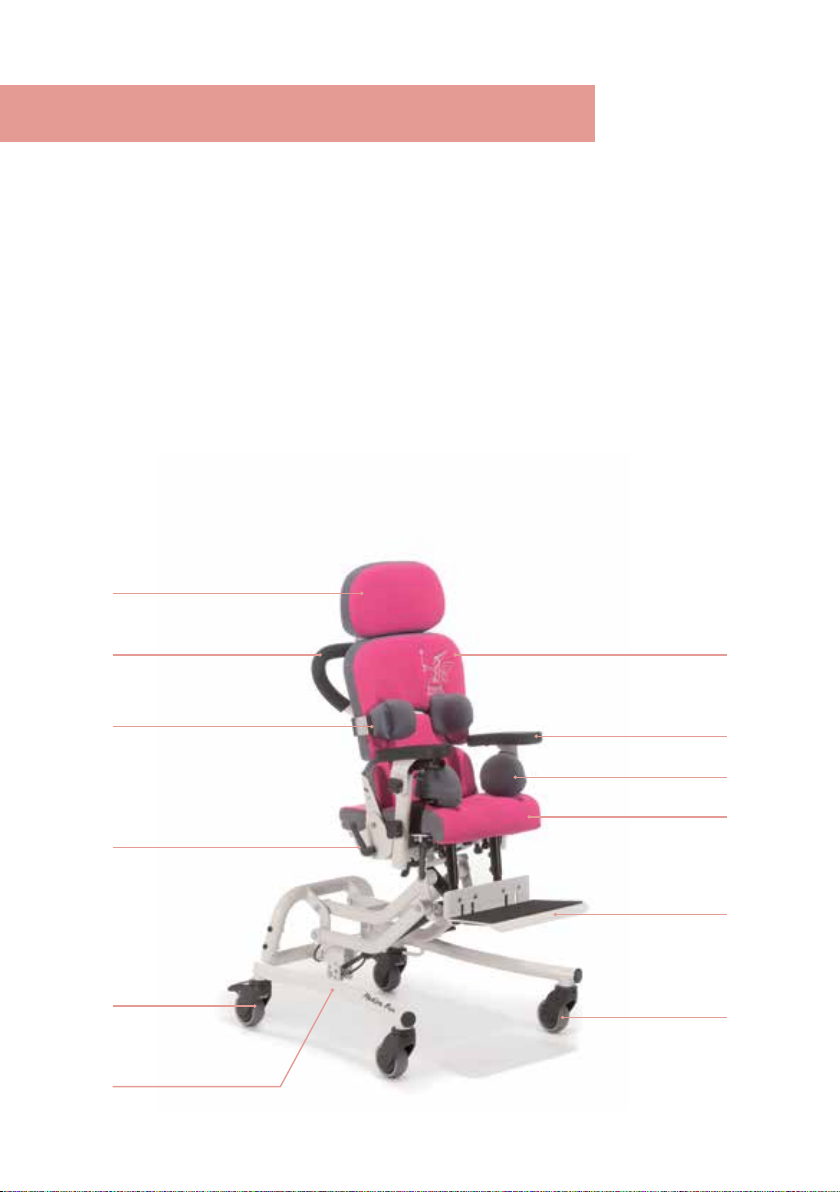
2.7 Product overview................................................................................................. 08
3. Settings. ............................................... 09
3.1 Seat height.............................................................................................................. 09
3.2 Seat angle ............................................................................................................... 10
3.3 Seat depth .............................................................................................................. 10
3.4 Back inclination..................................................................................................... 10
3.5 Back height ...............................................................................................................11
3.6 Armrests.......................................................................................................................11
3.7 Foot support ............................................................................................................12
3.8 Footrests ....................................................................................................................13
3.8.1 Positioning of the footrests .............................................................14
3.9 Footrests with foot pans ....................................................................................15
4. Accessories. ...................................................................................16
4.1 Headrest.....................................................................................................................16
4.2 Conversion kit for combination sub-frame..............................................16
4.3 Removable back ...................................................................................................17
4.4 Thorax pelotte pads............................................................................................ 17
4.5 Foldable thorax pelotte pads ........................................................................ 17
4.6 Thigh guide ..............................................................................................................18
4.7 Abducting leg guides..........................................................................................18
4.8 Adjustable pelvic guide .....................................................................................19
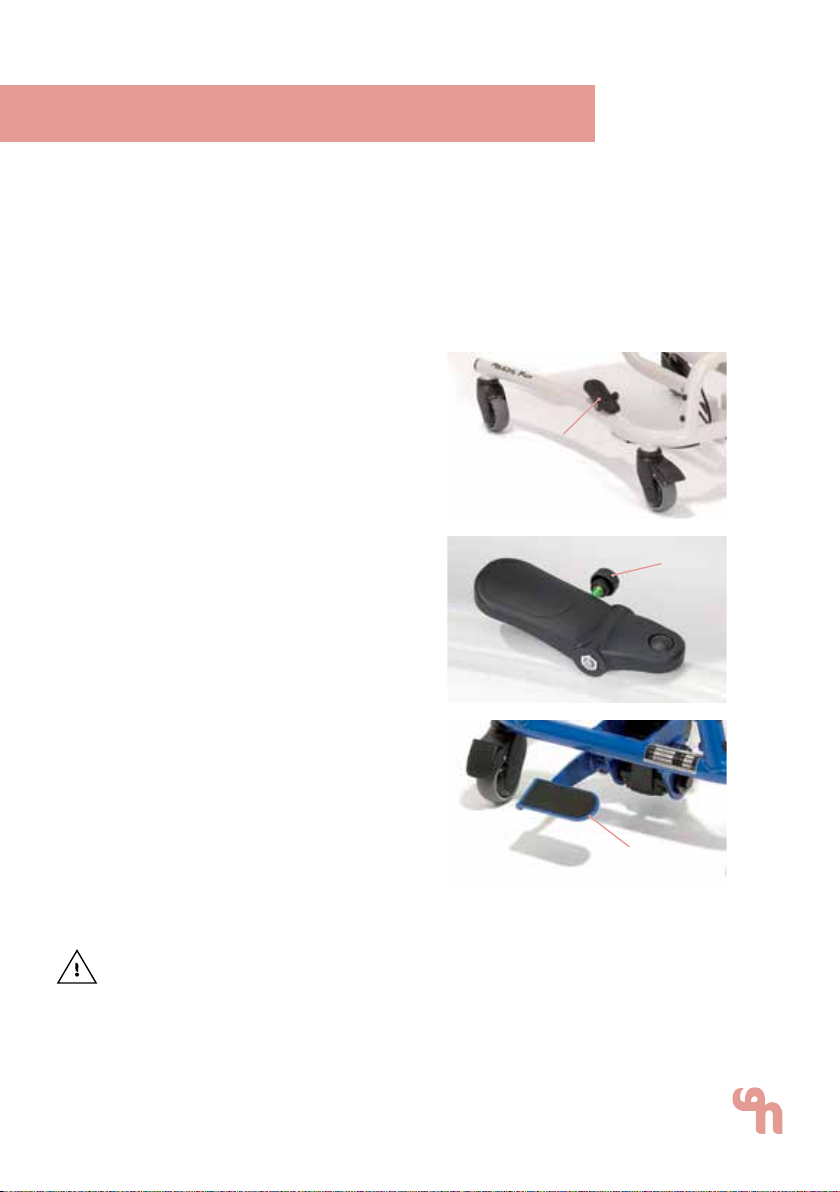
4.9 Parking brake...........................................................................................................19
4.10 Anti-tip mechanism ...........................................................................................19
4.11 Therapy table.........................................................................................................19
4.12 Knee abduction wedge ..................................................................................20
4.13 Wheel base extension......................................................................................20

0404 Inhalt.
5. Repairs and cleaning. .....................................................................20
5.1 Cleaning.....................................................................................................................20
5.2 Repairs .......................................................................................................................20
5.3 Spare parts..............................................................................................................20
5.4 Duration of use and re-use..............................................................................21
6. Technical data. ...............................................................................21
7. Guarantee. .....................................................................................22
8. Identication. ................................................................................23
8.1 EC declaration of conformity ..........................................................................23
8.2 Serial number / date of manufacture .......................................................24
8.3 Product version......................................................................................................24
8.4 Ausgabe des Dokuments.................................................................................24
8.5 Name and address of the manufacturer,
specialist dealer supplying the product..........................................................24

05 1. Preparation.
1.1 Delivery
On receiving the product, please check it for completeness, lack of faults and
any transport damage. Inspect the goods in the presence of your forwarder
Should transport damage have occurred, please arrange for an inventory
(determination of the faults) to be made in the presence of the forwarder.
Please send a complaint in writing to the specialist dealer responsible.
1.2 Safety measures prior to use
Correct usage of the therapy chair requires precise and careful training of
the accompanying person. We ask you to read through the Instructions for
use carefully prior to initial commissioning of the therapy chair, and to ob-
serve them. Cushioned parts, in particular armrests, may become hot when
exposed to direct sunlight. Cover these parts or protect the equipment from
direct sunlight.
1.3 Safe disposal
In order to preserve and protect the environment, to prevent environmental
pollution and to improve the recycling of raw materials, please note the dis-
posal instructions in points 1.3.1 and 1.3.2.
1.3.1 Packaging
The product packaging should be stored in case the product needs to be
transported again. Should you have to return the product for repairs or in
case of a guarantee claim, please if possible use the original box so that
the product is optimally packaged. Separate the packaging materials for
recycling according to their classification. Do not leave packaging materials
unattended, as they are a possible source of danger.
1.3.2 Produkt
Separate the raw materials used in the product for recycling according to
their classification (see material information under 2.1)
1.4 Where to store the Instructions for use
Please store these Instructions for use carefully and ensure that these
Instructions for use remain with the product in case of re-use.

06 2. Product description.
2.1 Material information
The base frame and the individual elements are made of steel and alumini-
um which are non-corroding and powder-coated. The covers are made of
100% polyester and are flame resistant (according to DIN EN 1021-1+2).
2.2 Handling / transport
The therapy chair is not designed to be carried, as it is fitted with castors.
Should you have to carry the equipment due to obstacles, ensure that all
moving parts are tightened. Then position yourself next to the therapy chair,
grip it at the front and rear under the seat unit and carry it to the required
location. To transport the therapy chair, reduce all adjustments to their most
compact size (fold up foot support, set lowest seat height etc.)
Tighten all moving parts prior to carrying!
The child may not be located in the therapy chair whilst it is being
transported!
2.3 Application areas, use according to the intended purpose
The madita-fun. therapy chair has been designed for children and teen-
agers who are unable to sit or stand independently, but whose limited torso
posture does not continuously require sitting in a seat pan. The madita-fun.
is a flexible-use therapy chair which grows with the child for use at home,
in nursery school and at school, and can be used for all age classes from
toddler to teenager. Individually adjustable seat dimensions and supporting
pelotte pads allow a stable and upright sitting position.

07
2.4 Use not in accordance with the intended
purpose / warning guidelines
• Ensurethatthetherapychairisonlyusedbyonechild/teenager.
• Onlyusethetherapychaironanevenandsolidsurface.
• Donotusethetherapychairtotransportpeople.
• Inordertoguaranteesafeliftingwhentransportingthetherapychair,
stand at the side of the therapy chair and grasp the front and back of
the seat surface. Here all movable parts should be tightened.
• Neverleavethechildunattendedinthetherapychair.
• Correctusageofthetherapychairrequirespreciseandcarefultraining
of the accompanying person.
• Themax.load(seepoint 6) may not be exceeded.
• Donotusethetherapychairifithasdefective,wornormissingparts.
• Forreasonsofresafety,thetherapychairmaynotbeplacedcloseto
an open fire or any other strong source of heat such as electric or gas
heaters.
• OnlyuseaccessoriesandsparepartsmadebySchuchmann,otherwise
you will endanger the child.
• Onlyusethetherapychairifallcomponentshavebeencorrectly
mounted and adjusted.
• Pleaseensurethatnoneoftheuser‘sextremitiesareintherespective
area when making adjustments of any kind to minimise the risk of injury.
• PleasereadouttheInstructionsforuseforuserssueringfromavisual
or reading impairment, so that they can use the therapy chair safely.
2.5 Equipment for basic model
• Incl.armrests,footsupport,pushhandle,standardseatpadwithcover
• Seatheightcanbeadjustedwithgaspressurespringassistance
(1200N, 800N for Size 0)
• 4castors(75mm),ofthese2withlockingdevices
• Adjustmentpossibilities:Seatangle(viagaspressurespring500N),back
angle, seat depth and seat width, angle, height and width-adjustable
armrests, height-adjustable backrest, foldable foot support, adjustable
knee angle, foot angle and height
2. Product description.

08
2.6 Auistung Zubehör
• Headrest
• Removableback
• Thoraxpelottepads(alsofoldable)
• Thighguide
• Adjustablepelvicguide
• Therapytable
• Kneeabductionwedge
• Conversionkitforcombination
subframe
• Centralparkingbrake
2.7 Product overview
The Fig. below is intended to show you the designation of the most
important components as well as the terms which you will find in these
Instructions for use.
2. Product description.
Headrest
Base frame
Push handle
Back angle adjustment
Thorax pelotte pads
Castor at rear with
locking device Front castor
Back
Armrests
Thigh guide
Seat pad
Footrest
• Hydraulicheightadjustment
• Electricalheightadjustment
• Anti-tipmechanism
• Incontinencecoating
• Wheelbaseextension
• Strapassemblykitforthe
seat area
• Strapassemblykitforthe
back area
• Incontinencecoating
• Fixingaids

09
Settings and adjustments to the product or accessories may only be made
by people who have been given the necessary instructions by a medical
productadvisor.Pleaseensurethatnoneoftheuser‘sextremitiesareinthe
respective area when making adjustments of any kind to minimise the risk
of injury.
3.1 Seat height
The seat height is adjusted using a
gas pressure spring. In order to ad-
just the seat height upwards, the foot
pedal (A) on the base frame is actua-
ted. By pressing it lightly, the seat unit
slides upwards. Lowering is achieved
through pressure from above onto the
seat whilst at the same time operating
the foot pedal. The gas pressure spring
serves merely to assist with adjustment
of the height. The foot pedal can be
secured against inadvertent operation
with the spring pin (B) (located on the
inside of the foot pedal). To do this, turn
the spring pin until it engages. If neces-
sary, assist engagement by moving the
foot pedal gently. The locking eect is
cancelled by pulling out the spring pin
and turning it a quarter turn.
Alternatively, the seat height can be
adjusted using the hydraulic height
adjustment. In order to bring the the-
rapy chair up, pump the pedal (C) until
the chair reaches the required height.
In order to lower the therapy chair, pla-
ce a foot under the pedal (C) and press
it upwards.
Ensure that, during setting / adjustment of the seat height, no body parts
(feet) are trapped in the area of the setting / adjustment mechanism (bet-
ween the oor and the footrest of the therapy chair) in order to avoid in-
juries
09 3. Settings.
A
B
C

10
Electrical height adjustment is also possib-
le. This is operated with the existing remote
operation (A). Press the arrow key downwards
in order to adjust the seat height downwards
and upwards in order to adjust the seat height
upwards.
In case of problems with the control unit, please contact a specialist dea-
ler so that the product can be returned to the factory if required. As soon
as the housing is opened, the Linak sticker (B) is damaged, whereupon the
2-year guarantee automatically expires.
3.2 Seat angle
The lever for the seat angle adjustment is
equipped with a child lock. In order to adjust
the angle of the seat unit, the hand trigger (C)
at the rear below the seat pan holder must be
actuated by pushing it together horizontally
until it engages. The seat unit can now be ad-
justed in an active or passive position. It is op-
tionally possible to mount the release handle
(D) for the seat angle adjustment on the push
bar / handle. To adjust the seat angle, simply
activate the release handle (D).
3.3 Seat depth
To adjust the seat depth, loosen the two wing
screws (E) under the seat unit. Then the seat
surface can be moved continuously forwards
or backwards.
After each adjustment, please retighten all
screw connections!
3.4 Back inclination
Der Rücken lässt sich nach Lösen des
Klemmhebels (F) auf der rechten Seite der
Sitzeinheit im Winkel verstellen.
Ensure that, during setting / adjustment of
the back inclination, no body parts are trap-
ped in the area of the setting / adjustment
mechanism in order to avoid injuries.
3. Settings.
A
C
C
F
C
D
B

11 3. Settings.
3.5 Back height
Loosen the cylinder head screw (A) with
the hexagonal wrench (M8) at the rear
and bring the back into the required
height.
3.6 Armrests
The armrests can be adjusted in angle,
height and width. The angular adjust-
ment takes place after loosening the
star knob (B). The height can be adjus-
ted through loosening the star knob (C).
The width adjustment takes place af-
ter loosening the two grub screws (D),
which are located on the underside of
the seat unit.
After each adjustment, please
retighten all screw connections!
A
B
C
D D

12 3. Settings.
3.7 Foot support
A foot support (A) is already included
in the basic model of the MADITA-Fun
therapy chair. This has a non-slip surfa-
ce (B) and has 8 slots (C) for fixing straps
such as foot cus or foot fixing straps.
In order to adjust the knee angle, plea-
se loosen the clamping lever (D) under
the seat surface, bring the foot support
into the required position and retighten
the clamping lever (D). The foot support
can be folded up in order, for example,
to facilitate climbing in (E).
In order to continuously adjust the
height, please loosen the four grub
screws (F), bring the foot support into
the required position and retighten the
grub screws (F). When adjusting the
height, please ensure that the mar-
kings (G) on the adapter tubes of the
foot support are not exceeded in order
to guarantee secure clamping through
the grub screws (F). The foot angle can
also be adjusted for optimum positio-
ning of the feet. To do this, first fold the
foot support upwards and then screw
the hexagon socket screws (H) in or
out. Counter the nuts (I) after each foot
angle adjustment.
Counter the nuts (I) after each foot
angle adjustment!
After each adjustment, please retigh-
ten the clamping lever and the grub
screws!
A
B
C
EF
GG
I
H
H
F
D

13
3.8 Footrests
Optionally, madita-fun. can also be
equipped with footrests (A). These have
a non-slip surface (B) and have 4 slots
each (C) for fixing straps such as foot
cus or foot fixing straps. For adjust-
ment of the knee angle, please loosen
the clamping lever (D) under the seat
surface on both sides, bring the foot-
rests into the required position and
retighten the clamping lever (D). The
footrests can be folded up, for example
in order to facilitate climbing in (E). For
continuous height adjustment, please
loosen the two grub screws (F) on each
footrest, bring the footrests into the re-
quired position and retighten the grub
screws (F). During height adjustment,
please ensure that the markings (G)
on the adapter tubes of the footrests
are not exceeded in order to guaran-
tee secure clamping through the grub
screws (F).
After each adjustment, please
retighten the clamping lever and the
grub screws!
D
A
F
GG
C
E
BA
3. Settings.

14
3.8.1 Positioning of the footrests
For optimum positioning of the
feet, the footrests can be adjusted
independently of each other in width,
angle and depth.
Width
In order to adjust the width (C), please
loosen the pan head screws (D) under
the footrests, bring the footrest into the
required position and retighten the pan
head screws (D).
Angle / depth
In order to adjust the angle and the
depth (E), please loosen the pan head
screws (F) under the footrests, bring the
footrest into the required position and
retighten the pan head screws (F). In
addition, additional width adjustments
can also be made in this way.
Securing against folding up
The footrests can be secured against
unwanted folding up. To do this, simply
loosen the hook and eye fastener (G)
under the footrest, bring the footrest
into the required position and close the
hook and eye fastener (G) again.
After each adjustment, please
retighten all screw connections!
3. Settings.
F
B
D
C
C
E E
AA
G

15 3. Settings.
3.9 Footrests with foot pans
Optionally, the footrests can also be
equipped with foot pans (A). Here, as
on the standard design, the knee angle
can be adjusted, the foot pans folded
up and the height adjusted (see point
3.8). For optimum positioning of the
feet, the footrests with foot pans can
be adjusted independently of each
other in width, angle and depth (see
point 3.8.1).
After each adjustment, please
retighten all screw connections!
3.10 Castors
The therapy chair should always be
prevented from rolling away inadver-
tently through braking of the 2 rear
castors. To do this, press the brakes (B)
down with the tip of your foot.
The brake serves merely to prevent
inadvertent rolling away on level
surfaces!
A
A
B
B

16 4. Accessories.
4.1 Headrest
The headrest can be adjusted in
height, depth and angle. In order to do
this, please loosen the 2 cylinder head
screws (A) with a hexagonal wrench
and bring the headrest into the requi-
red position.
4.2 Conversion kit for combination sub-frame
When retrofitting the madita-fun. to
the combination sub-frame, the plastic
castors are replaced through 6“ pneu-
matic tyres with castor forks and 12 ½“
drum brake wheels. The drum brakes
work independent of air pressure. They
are integrated into the wheel hubs and
cannot be accessed. They provide the
companion to the user the possibili-
ty of assisting with the braking action
(in particular when driving down hills)
and of locking the sub-frame. This is
conducted through the two brake le-
vers (B) which are mounted onto the
push handle. The drum brakes are set by turning the setting screws in or
out. They are located at the lower end of the brake cables in the brake
saddle. Leave this work to your specialist dealer in case of any uncertainty.
Handling the wheels on the combination sub-frame
Thefollowinggeneralrulesapply:
High air pressure: Low rolling resistance / less suspension comfort
Low air pressure: Higher rolling resistance / more suspension comfort
A
B

17
4.3 Removable back
The removable back can be operated on the
back of the therapy chair. Loosen the turning
handle (A), press the locking lever (B) together
and then remove the back.
The function of the removable back can be in-
tegrated into the therapy plan and also used
for short periods of time, as the back, including
the headrest, is quickly plugged in again, and
provides the child with a positioner and sup-
port when they are tired.
After each adjustment, please retighten
all screw connections!
4.4 Thorax pelotte pads
The thorax pelotte pads are individually ad-
justable in height and width. In order to do
this, please loosen the 2 pan head screws with
a hexagonal wrench (A) and bring the thorax
pelotte pads into the required position.
4.5 Foldable thorax pelotte pads
The foldable thorax pelotte pads can be
folded to the sides to ease placement of
the child. To do this, please press the red
pushbutton (B) on the side of the thorax
pelotte pad over the joint, and swivel the
pelotte pad away to the side.
When folding back, ensure that the thorax
pelotte pad engages!
A
B
4. Accessories.
C
D

18
4.6 Thigh guide
The thigh guide pads are individually adjusta-
ble in height and depth. In order to adjust the
depth, loosen the nuts (A) under the seat area
and bring the thigh guide pad into the requi-
red position. The depth adjustment is possible
on any thigh guide except on the standard
version for Size 0 with adjustable pelvic guide.
In order to adjust the depth, please open the
zips (B), loosen the 3 pan head screws (E) with
a hexagonal wrench and bring the pad into
the required position.
After each adjustment, please retighten
all screw connections!
4.7 Abducting leg guides
The abducting leg guides permit the medi-
cally necessary abduction of the thighs and
the compensation of a seat depth dierence.
In order to adjust the leg guides, please loo-
sen the nuts (A) below the seat surface, and
bring the leg guides into the required positi-
on. You can easily adjust the abduction angle
(1), the thigh width (2) and also the leg length
compensation or seat depth dierence (3) via
the slotted holes whilst the child is sitting in the
therapy chair.
B
C
4. Accessories.
A
D
3
12

19
4.8 Adjustable pelvic guide
The adjustable pelvic guide can be adjusted
in width, provides the child with a high level of
security and positions the pelvis. First loosen
the cylinder head screw on the rear of the the-
rapy chair at the lower edge of the cover (A).
Then push the front of the pad down slightly
and loosen the hexagon socket screw (B). Now
please place the child into the chair and bring
the adjustable pelvic guide into the requi-
red position. First retighten the cylinder head
screw (A) and then remove the child again.
Now you only need to tighten the hexagon
socket screw (B) and then you can place the
child back in the chair.
Ziehen Sie nach jeder Einstellung die
Schraubverbindungen wieder fest!
4.9 Parking brake
The parking brake can be used by the user
themselves. If the lever (C) is pressed down,
the brake is released. If the lever is pointing
upwards, the brake is applied.
4.10 Anti-tip mechanism
The anti-tip mechanism is adjustable in
height. To adjust the height, open the lever (D),
position the anti-tip mechanism to the requi-
red height and close the lever once more.
4.11 Therapy table
The therapy table can be adjusted in height
and depth. Height adjustment takes place
via adjustment of the armrests (see point 3.6).
For adjustment of the depth, loosen the wing
screw (E) and bring the therapy table into the
required position. In order to fold the therapy
table to the side, for example when the child
gets in or out, loosen the wing screws (E+F),
swivel the table upwards and guide it to the
side of the therapy chair (G).
A
B
C
D
E
G
F
4. Accessories.

20
4.12 Knee abduction wedge
The knee abduction wedge must be moun-
ted onto the front of the seat plate using a
quickrelease axle. To do this, please press the
knob (A) on the quick-release axle, and the
abduction wedge can easily be removed or
inserted. When inserting the abduction wed-
ge, you should be able to hear it engage with
an audible „click“.
4.13 Wheel base extension
The wheel base extension (B) cannot be
adjusted! It is inserted at the front of the frame
and serves only for stability.
After each adjustment, please retighten all
screw connections!
5. Repairs and cleaning.
5.1 Cleaning
Please clean all frame elements with a sponge or damp cloth. The covers
can be removed and washed at 30° in the washing machine. Please do not
dry the covers in a dryer and do not use aggressive cleaning agents or simi-
lar products. Please also pay attention to our general cleaning and hygiene
advice. You can find this on www.schuchmann.de/madita-fun.
5.2 Repairs
Please carry out a daily visual inspection and check the therapy chair regu-
larly for cracks, breaks, missing parts and malfunctions. In case of a defect
or malfunction, please contact the specialist dealer who supplied you with
the product (see 8.5).
5.3 Spare parts
Should you wish to order spare parts, please contact the specialist dealer
who supplied you with the product, stating the serial number of the therapy
chair (see 8.5). Necessary spare parts and accessories must only be installed
by trained personnel.
A
B
4. Accessories.
Other manuals for MADITA-Fun
4
This manual suits for next models
5
Table of contents
Other Schuchmann Indoor Furnishing manuals
Popular Indoor Furnishing manuals by other brands

PowellKids
PowellKids 335-238 Assembly instructions

VONDOM
VONDOM Faz 54166T Assembling instructions

Garden Trading
Garden Trading Adelphi Assembly instructions

BLACK RED WHITE
BLACK RED WHITE AZTECA S205-KOM2S/4/5 Assembly instructions

Broyhill
Broyhill EAGLE BROOKE KVS9494 Assembly instruction

Cooper Lighting
Cooper Lighting AMETRIX 1249 Specification sheet