Scinomix SCI-PRINT SOLO User manual

Scinomix
SCI
-
PRINT
SOLO
SCINOMIX SCI-PRINT SOLO
USER GUIDE

2
General Information
Scinomix Sci-Print SOLO Ver ion 1.2.0.1002
General Information
The information contained in thi document i ubject to change without notice.
Information provided by Scinomix i believed to be accurate and reliable. However, the u er i
re pon ible for the proper and correct u e of the product. If the u er doe not follow the in truction
given in thi manual, Scinomix doe not take any re pon ibility for injurie or damage cau ed by the
Scinomix product.
Instrument Information
Manufacturer: Scinomix, Inc
Model Number: 1045 SCI-PRINT SOLO
Serial Number: _________________
Contact
Scinomix, Inc
4069 Wedgeway Court
Earth City, MO 63045
USA
Telephone: 314-298-9800
Fax: 314-298-8111
Internet: www. cinomix.com
Before operating the instrument, the user must read and understand this manual.
Installation and Servicing
Only Scinomix ervice per onnel or an authorized di tributor hall perform in tallation, ervicing and
rein tallation of the in trument.

3
Table of Content
Scinomix Sci-Print SOLO Ver ion 1.2.0.1002
Table of Contents
General Information .....................................................................................................................................2
Table of Content ..........................................................................................................................................3
Chapter 1. Introduction...............................................................................................................................5
Hardware Overview ..................................................................................................................................5
Overview ................................................................................................................................................... 9
Power Requirement ............................................................................................................................9
Fu e .....................................................................................................................................................9
Air Requirement ..................................................................................................................................9
Network Requirement .........................................................................................................................9
Operating Environment ........................................................................................................................9
Health and Safety....................................................................................................................................10
Important Note ...................................................................................................................................10
Intended U e.......................................................................................................................................10
Per onal Protective Equipment (PPE).................................................................................................10
Tran port and Storage ........................................................................................................................10
Lifting Point .......................................................................................................................................10
External Cover ...................................................................................................................................10
Electrical Safety...................................................................................................................................10
In tallation ..........................................................................................................................................11
Noi e Level .........................................................................................................................................11
Service and Maintenance....................................................................................................................11
Symbol on Equipment .......................................................................................................................11
Chapter 2. Startup..................................................................................................................................... 12
Mechanically Integrating the Sci-Print SOLO to an Automated Sy tem .................................................12
Mounting bracket 1045-600-052-A ....................................................................................................12
Left view..............................................................................................................................................13
Front View (Roller extended for Vial Placement/Pickup – Larger diagram in Appendix A)................13
Top View (Roller extended for Vial Placement/ Pickup – Larger diagram in Appendix A) .................14
Connecting the Sci-Print SOLO................................................................................................................14

4
Table of Content
Scinomix Sci-Print SOLO Ver ion 1.2.0.1002
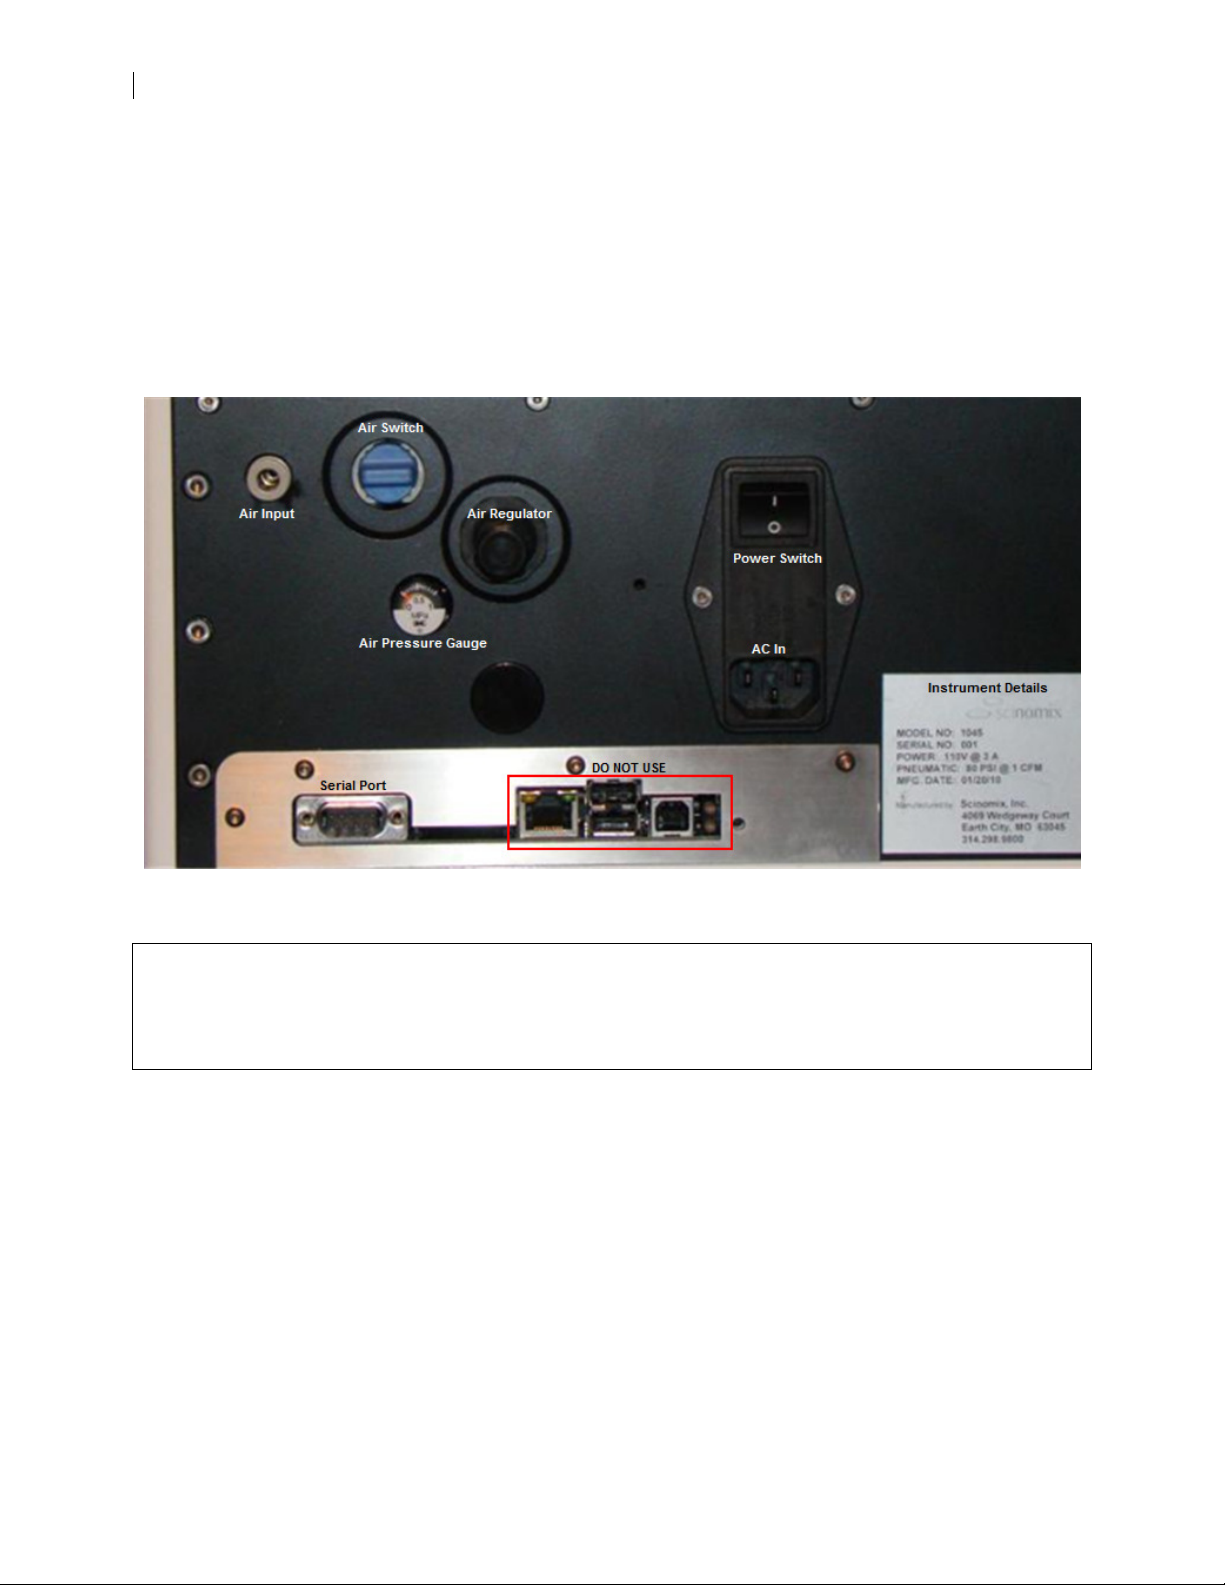
Air........................................................................................................................................................14
Power ..................................................................................................................................................14
RS232 ..................................................................................................................................................14
Starting the Sci-Print SOLO .....................................................................................................................14
U ing the Sci-Print SOLO U er Interface for Setup and Diagno tic .......................................................15
Chapter 3. Label De ign.............................................................................................................................16
Overview ................................................................................................................................................. 16
Defining Label Stock................................................................................................................................16
Defining Label Text and Print Layout......................................................................................................18
Checking Label Text and Layout..............................................................................................................20
Chapter 4. Sci-Print SOLO Software Integration Interface........................................................................21
Method .................................................................................................................................................. 21
Error Code and De cription ................................................................................................................25
Sample vb.net Application ......................................................................................................................27
Chapter 5: Maintenance .............................................................................................................................28
Overview ................................................................................................................................................. 28
Printer .....................................................................................................................................................28
Loading Label from a Roll ..................................................................................................................28
Loading Ribbon ...................................................................................................................................31
Cleaning the Print Head ......................................................................................................................32
Cleaning the Peel Plate .......................................................................................................................32
Roller .....................................................................................................................................................32
Chapter 6. Hardware Diagno tic ..............................................................................................................32
Overview ................................................................................................................................................. 32
Output ................................................................................................................................................... 33
Input ......................................................................................................................................................34
Serial Communication.............................................................................................................................34
Appendix A. Machine and Mounting Dimen ion .....................................................................................35
Appendix B: Conver ion Chart from MPa to PSI.........................................................................................38
Appendix C: Declaration of Conformity......................................................................................................39
Appendix D..................................................................................................................................................40

5
Chapter 1. Introduction
Scinomix Sci-Print SOLO Ver ion 1.2.0.1002
Chapter 1. Introduction
Hardware Overview
Plea e review the following diagram and familiarize your elf with the terminology u ed.
Front View
Figure 1a.

6
Chapter 1. Introduction
Scinomix Sci-Print SOLO Ver ion 1.2.0.1002
Left View
Figure 1b.

7
Chapter 1. Introduction
Scinomix Sci-Print SOLO Ver ion 1.2.0.1002
Right View
Figure 1c.

8
Chapter 1. Introduction
Scinomix Sci-Print SOLO Ver ion 1.2.0.1002
See the picture below for the annotated connection panel on the end of the in trument:
NOTE:
Do not connect to the Ethernet or USB ports on the connection panel unless directed to do so
by Scinomix Functionality of the machine may be adversely affected

9
Chapter 1. Introduction
Scinomix Sci-Print SOLO Ver ion 1.2.0.1002
Overview
The Scinomix Sci-Print SOLO i a ingle proce tube labeler that i mainly u ed a part of an integration
y tem. Typically it i integrated with an automated ample handling in trument.
Once the label tock and label text layout are defined, the printing and applying of label i carried out
under the control of the ma ter in trument ’ control application. Tube are moved in and out of the Sci-
Print SOLO automatically u ing the controlling in trument gripper.
If the Sci-Print SOLO i being u ed a a tand-alone in trument, a imple application will be included
with the in trument.
Power Requirements
110VAC @3A
220VAC @1.5A
uses
F1 & F2: 5 x 20 T3.15A @ 250V
F3: 312 T2A @ 250V
F4: 312 T3A @ 250V
Air Requirements
60-80 PSI @ 1 CFM. The air pre ure gauge on the SOLO di play the air pre ure in Megapa cal (Mpa).
Network Requirements
The VX2 connect to a computer via an RS232 erial port. A erial port or USB- erial port adaptor i
required on the computer.
Operating Environment
Indoor use only
Temperature: 10°C to 40°C
Humidity: 20 to 80% non-conden ing
Altitude: Up to 2000M
Main upply: +/- 10% Rated Voltage
Tran ient overvoltage: In tallation Category (Overvoltage category) II
Rated pollution: Pollution degree 2

10
Chapter 1. Introduction
Scinomix Sci-Print SOLO Ver ion 1.2.0.1002
Health and Safety
Important Note
Before using the equipment, it is very important that you have read this manual and have
understood all the safety instructions
Intended Use
The Scinomix Sci-Print SOLO i intended for u e in laboratory etting under the environmental
condition li ted above. If the equipment i u ed in a manner not pecified by the manufacturer, the
protection provided by the equipment may be impaired.
Personal Protective Equipment (PPE)
The Sci-Print SOLO doe not require the u e of any pecial PPE. However, the u er hould adhere to any
PPE tandard in the laboratory in which the SOLO i in talled.
Transport and Storage
The equipment mu t be tored and tran ported in temperature within the range -25°C to +55°C.
Lifting Points
The equipment i to be lifted by 2 people.
External Covers
Warning – If any of the external cover on the equipment are removed the power
upply i not automatically interrupted. If it i nece ary to remove any of the
external cover it i e ential that the power i switched off fir t. Do not attempt to
u e the robot until the cover are replaced.
Electrical Safety
The equipment mu t be connected to a properly earthed power outlet to protect
u er from the ri k of electric hock. The main cha i of the machine i earthed
together with all a ociated electrical component .
Do not remove any of the fixed cover , a there are no u er erviceable part in ide.
All internal work hould be referred to approved ervice per onnel.

11
Chapter 1. Introduction
Scinomix Sci-Print SOLO Ver ion 1.2.0.1002
Installation
The Sci-Print SOLO hould be in talled on a flat, mooth benchtop clear of ob truction . In tallation of
the in trument hould be carried out by a Scinomix Service Technician or Scinomix- approved trained
per onnel.
Noise Levels
During normal operation the level of airborne noi e emitted by the robot will not exceed 70db
mea ured at a di tance of 1 meter.
Service and Maintenance
It i trongly recommend that maintenance be carried out regularly by a Scinomix-approved ervice
engineer.
Symbols on Equipment
Symbol Meaning
Beware moving part .
Refer to Equipment Manual for operating in truction .
20XX
The year of manufacture i given on the erial number label which i located
on the ide of the unit.
European Economic Area (EEA)
Thi mark on the product indicate compliance with the following EEC Directive :
- 2006/42/EEC, relating to The Supply of Machinery (Safety) Regulation 1992
- 2004/108/EEC with amendment 92/31/EEC, relating to Electromagnetic
Compatibility
- 2006/95/EEC, the Low Voltage Directive

12
Chapter 2. Startup
Scinomix Sci-Print SOLO Ver ion 1.2.0.1002
Chapter 2. Startup
Mechanically Integrating the Sci-Print SOLO to an Automated System
The Sci-Print SOLO can be affixed to a platform u ing 2 x 1045-600-052-A mounting bracket ( hown
below). It i important that the SOLO i properly ecured and level at all time . Plea e refer to the
chematic below for proper dimen ion of the Sci-Print SOLO. The e drawing indicate a relatively
mall vial, uch a a 1.4 mL vial with a diameter of 8 millimeter . Exact vial po itioning will vary ba ed on
the height and diameter of the vial being u ed. Note that all measurement values are in millimeters
Mounting bracket 1045-600-052-A
Po ition both bracket on the mounting urface, according to the upplied dimen ion in Appendix A,
and bolt down u ing 5mm crew in the appropriate lot . The feet of the Sci-Print SOLO hould now
locate in the rece ed hole in the bracket .

13
Chapter 2. Startup
Scinomix Sci-Print SOLO Ver ion 1.2.0.1002
Left view
The haded red area indicate the placement of the tube in the roller
ront View (Roller extended for Vial Placement/Pickup – Larger diagram in Appendix A)
The red arrow indicate the placement of the tube in the roller

14
Chapter 2. Startup
Scinomix Sci-Print SOLO Ver ion 1.2.0.1002
Top View (Roller extended for Vial Placement/ Pickup – Larger diagram in Appendix A)
The red arrow indicate the placement of the tube in the roller
Connecting the Sci-Print SOLO
Air Connect the air on the back ide of the in trument by pu hing the blue air line into the air input.
Te t the connection by pulling on the air line; if you feel re i tance, the air line i properly connected.
(To remove the air line, gently pu h on the white outer ring of the air input and pull on the air line). The
other end of the air line hould be connected to the air ource. En ure that the air i turned on by
moving the air witch to the vertical “ON” po ition. Check that the air pre ure i ufficient by noting
the pre ure on the pre ure gauge located near the air input on the right ide of the SOLO.
Power Make ure that the power witch i in the OFF po ition (O). Connect the power cable to the
SOLO, and then plug in to an appropriate ocket. Turn on the power to the in trument by clicking the
power witch to the ON po ition (I).
RS232 Connect the RS232 cable to the port on the right ide of the SOLO, and then connect the other
end to the computer of the controlling in trument. If the computer you are u ing doe not have a erial
port, you will need to u e a erial-USB adaptor.
Starting the Sci-Print SOLO
Fir t check the following item
-Your computer i connected to the SOLO u ing RS232
-The SOLO ha an air upply attached
-The SOLO power button i on

15
Chapter 2. Startup
Scinomix Sci-Print SOLO Ver ion 1.2.0.1002
NOTE:
It may take up to 1 minute for the Sci-Print SOLO instrument to become ready after power
on Before this time, communication with the instrument is impossible and any attempt to
initialize the device driver will fail
Using the Sci-Print SOLO User Interface for Setup and Diagnostics
A previou ly mentioned, the Sci-Print SOLO i primarily u ed within an integrated laboratory
automation y tem, and a uch it operate under the control of that third-party y tem. However, the
SOLO u er interface mu t be u ed to create the text and layout of the label , and can al o be acce ed
for trouble hooting purpo e .
When the SOLO i integrated with a third-party in trument, the controlling in trument’ u er interface
will include a link to the SOLO interface. The Diagno tic creen i then brought up:

16
Chapter 3. Label De ign
Scinomix Sci-Print SOLO Ver ion 1.2.0.1002
From thi creen, the u er can u e the configuration menu to create new label tock and label layout .
The diagno tic menu i u ed to view log and ee the tatu of variou input and output of the
in trument. The Utilitie li ted on the front allow direct communication with the in trument and are
u ed mainly for trouble hooting purpo e .
Chapter 3. Label Design
Overview
The SOLO can be et up to run print job on a variety of u er-named label tock . Each i et up to
upport be t print quality ba ed on ize, material, tiffne , and adhe ion. A label editor i provided to
enter the propertie of a label tock.
Defining Label Stock
To u e the label editor, go to the configuration menu on the Main Screen, then elect “Label Stock”
The Label Stock Editor Screen will be di played:

17
Chapter 3. Label De ign
Scinomix Sci-Print SOLO Ver ion 1.2.0.1002
Thi creen allow the u er to define the phy ical characteri tic of the label being u ed, including the
length of the label, the width of the label, and the pan of the label (i.e. the di tance from the leading
edge of one label to the leading edge of the next label). The margin , peel off peed and di tance, and
heat etting can al o be adju ted. Once any de ired change are made, Click OK to ave or Cancel to
cancel without aving. You can al o create a new label, copy an exi ting label, and delete an exi ting
label from the Label Stock Editor creen.
Note that Scinomix can provide default settings for many different label types.

18
Chapter 3. Label De ign
Scinomix Sci-Print SOLO Ver ion 1.2.0.1002
Defining Label Text and Print Layout
To u e the Label Document editor, go to the configuration menu on the Main Screen and Select “Label
Document ”
The Label Document Configuration creen will open and di play the label u ed mo t recently . U e
the drop down menu to elect another document, or u e the New, Copy, or Delete button to create,
copy, or delete label document , re pectively.

19
Chapter 3. Label De ign
Scinomix Sci-Print SOLO Ver ion 1.2.0.1002
Choo e the type of label tock to be u ed u ing the drop down menu of the Stock Definition Field
To add text field , click on the “add” button to bring up ample text in the Source text box. (The
actual text to be printed i ent through command to the SOLO from the controlling in trumentation).
The maximum number of print field i 10. If you want the text to be di played a a barcode, click the
“barcode” radio button option.
Select the po itioning of the text on the label by entering numeric value in the Left and Top Margin
field of the Po ition field. The text can al o be angled a de ired. Note that once the text ha been
di played on the label preview creen, the u er can click on the text and drag and drop to the de ired

20
Chapter 3. Label De ign
Scinomix Sci-Print SOLO Ver ion 1.2.0.1002
location, which will automatically et the left and top margin value . Click the “Refre h” button at any
time to update the layout of the label.
Select the de ired text font, ize, and tyle.
When the label document i complete, click “OK” to ave or “Cancel” to cancel the label document.
Checking Label Text and Layout
A good way to te t the uitability of your label text and layout i to u e the label editing capabilitie
di played on the main Diagno tic creen:
Becau e the actual label text i coming from the controlling in trument, the text hown on the Label
Preview i merely ample text. The di played text i li ted in the Editable Label Field . To check the
This manual suits for next models
1
Table of contents