Bico Cellenion proteoCHIP EVO 96 User manual
User Manual
proteoCHIP EVO 96 for SCP
UM_proteoCHIP_05
Rev.0.0 –eff. date: 07/12/2023
Page: 1/14
User Manual
proteoCHIP EVO 96 for SCP
(Single Cell Proteomics)

User Manual
proteoCHIP EVO 96 for SCP
UM_proteoCHIP_05
Rev.0.0 –eff. date: 07/12/2023
Page: 2/14
Table of contents
Document history...........................................................................................................2
1Introduction.............................................................................................................3
2Equipment and reagents.........................................................................................4
2.1 Equipment needed...........................................................................................4
2.2 Reagents needed.............................................................................................5
2.3 Cell culture.......................................................................................................5
3Preparation of the cellenONE..................................................................................6
3.1 Preparation of the system ................................................................................6
3.2 Cleaning of the cellenONE interior and preparation of reagents.......................6
4proteoCHIP EVO 96 –cellenONE Runs for SCP.....................................................7
4.1 Run 1: Master Mix dispensing..........................................................................8
4.2 Run 2: Cell Isolation.........................................................................................9
4.3 Run 3: Incubation at 50 °C (1h)......................................................................10
4.4 Run 4: Cooldown to 20 °C (~30min)...............................................................11
4.5 Run 5: Dilution ...............................................................................................12
4.6 Sample transfer..............................................................................................13
4.6.1 Option 1 –Transfer to Evotips.................................................................13
4.6.2 Option 2 –96-Well plate..........................................................................14
Document history
Revision
Author(s)
Changes
Effective date
0.0
D. Hartlmayr
Creation
07/12/2023

User Manual
proteoCHIP EVO 96 for SCP
UM_proteoCHIP_05
Rev.0.0 –eff. date: 07/12/2023
Page: 3/14
1 Introduction
Important notes will be highlighted in green boxes.
All basic functions of the cellenONE associated with dispensing or cell sorting are
presented in great details in the User Manual for cellenONE. Furthermore, the User
Manual for Proteomics Workflows provides step-by-step instructions with software
screenshots through the most basic procedures referenced in this manual.
This manual serves as a check-list for the label-free Single Cell Proteomics (SCP)
experiments using cellenONE software and proteoCHIP EVO 96. The protocol starts with
placing the proteoCHIP(s) EVO 96 into the proteoCHIP EVO 96 holder(s) and ends with
the direct transfer step to Evotips via centrifugation.
Note. It is highly recommended to read the User Manual for cellenONE and the User
Manual for Proteomics Workflows, before performing proteomics experiments with the
cellenONE.

User Manual
proteoCHIP EVO 96 for SCP
UM_proteoCHIP_05
Rev.0.0 –eff. date: 07/12/2023
Page: 4/14
2 Equipment and reagents
2.1 Equipment needed
Product code
Description
P-20-CM/L
cellenONE PDC M Piezo
Dispensing Capillary,
cellenONE PDC L Piezo
Dispensing Capillary
(Fixed drop volume between 300-
450 pL or 450-600 pL respectively)
4x manifold
C-PEVO-96-10
proteoCHIP_EVO_96
The proteoCHIP EVO 96 Set
containing:
•Ten proteoCHIP EVO 96
The proteoCHIP EVO 96 is a
nanowell chip with 96 nanowells,
enabling label-free single cell
proteomics sample preparation for
direct transfer to Evotip and Evotip
Pure™.
As part of the
Accessory
kit:
C-PEVO-96-
AK
The proteoCHIP EVO 96
Centrifugation Dummy is a
counterweight forcentrifugation when
transferring samples from
proteoCHIP EVO 96 to Evotips
C-PEVO-96-
CHB
or
As part of the
Accessory
kit:
C-PEVO-96-
AK
proteoCHIP_EVO_96 cellenONE
Holder
Holder to accommodate up to one
proteoCHIP EVO 96 on the deck of
the cellenONE throughout sample
preparation (reagent dispensing, cell
isolation and incubation steps).
(1 piece/pack)

User Manual
proteoCHIP EVO 96 for SCP
UM_proteoCHIP_05
Rev.0.0 –eff. date: 07/12/2023
Page: 5/14
2.2 Reagents needed
Use only MS-grade reagents and prepare dilutions with purified water (>18 MΩ, <3ppb
TOC at 25 °C) See the full recipe in Chapter 4.1.
•Master mix protease: 100 ng/µL Trypsin or Trypsin-LysC mixture in 50 mM acetic
acid. Store at -20 °C (see Note 1).
•Master mix lysis reagent: 1% n-Dodecyl-β-D-maltoside (DDM) in purified water.
Store at -20 °C (see Note 2).
•Master mix buffer: 1M Triethylammonium bicarbonate (TEAB). Store at 4 °C (see
Note 3).
•0.1% Trifluoroacetic acid (TFA) or formic acid (FA) in purified water.
•For adherent cell culture: 0.05% Trypsin-EDTA.
•1x Phosphate-buffered saline (PBS).
•For reagent aliquoting: Low-binding 0.2 mL PCR tubes.
Note 1. Prepare 20 µL aliquots of 100 ng/µL enzyme solution (i.e., 200 µL Mastermix).
Store the aliquots short term at -20 °C or for prolonged storage of enzymes (more than 1
month) dissolve the enzymes in 50 mM acetic acid and store at -80 °C.
Note 2. Prepare 40 µL aliquots of 1% DDM solution (i.e., 200 µL Mastermix). Store the
aliquots at -20 °C.
Note 3. Test buffer stability every 6 months and exchange if needed.
2.3 Cell culture
When using adherent cell culture, use 0.05% Trypsin-EDTA to detach your cells.
Afterwards, wash your cell suspension 3x by centrifuging it at 250 g for 2 minutes and
then resuspending the cell pellet with PBS (equal to the starting volume). Bring the cell
suspension to a final concentration of 100-200 cells/µL. Keep the cell suspension on ice
until use. Make sure to isolate single cells within 3h after detaching them.

User Manual
proteoCHIP EVO 96 for SCP
UM_proteoCHIP_05
Rev.0.0 –eff. date: 07/12/2023
Page: 6/14
3 Preparation of the cellenONE
3.1 Preparation of the system
•Exchange Water of the System Liquid bottle: Degas fresh MilliQ-Water for 15 min
by applying a vacuum and placing the System Liquid bottle inside the ultrasonic
water bath.
•Check if filtered water needs to be added to the Fresh Water bottle at the bottom
of the cellenONE or if the waste needs to be emptied.
•Insert the PDC in the black PDC cassette and place the cassette in the cellenONE
(but don’t connect the tubing yet). Align the red cross with the tip of the capillary
and focus the PDC (press the light bulb symbol to turn the blue LED on if needed).
Click Prime and follow the steps.
•Connect the small flush bottle tubing to the outlet for PDCs inside the cellenONE.
•When the specific message is displayed, disconnect the tubing of the small flush
bottle and click “Continue”. Wait until the first drop comes out and then connect
the PDC tubing to the outlet for PDCs inside the cellenONE.
•When the Prime Run is finished, check the droplet. If there is no droplet or the
droplet is not stable, make sure that the Voltage and Pulse settings match the
settings written on the PDC box. Otherwise, try the tasks
FlushWashstation1_250ul or AirEx several times until stable droplets are formed.
•Adjust the PDC settings (Voltage and Pulse) for optimal droplet shape.
•Measure the drop volume.
3.2 Cleaning of the cellenONE interior and preparation of reagents
•Wipe the top of the cellenONE door and the inside of the enclosure as well as the
proteoCHIP EVO 96 holder with isopropanol or 70% ethanol.
•When manipulating inside the cellenONE, make sure that you are wearing gloves
and a lab coat. No skin should be exposed inside the enclosure to avoid
contamination.
•Avoid opening the door as much as possible during the experiment.
•Set the temperature to 10 °C.
•All solutions should be prepared in a biosafety cabinet.
Note. Please make sure that the 14 days wash is regularly performed (suggested every
14 days), clean the humidifier with 70% ethanol every 14 days if possible, and clean the
PDC with 0.5% sciCleansolution (pipette 2 mL0.5% sciClean solution intothe clean white
wash tray, then perform the Task: sciClean) at the end of every experiment followed by 3
flushes (Flush_PDC).

User Manual
proteoCHIP EVO 96 for SCP
UM_proteoCHIP_05
Rev.0.0 –eff. date: 07/12/2023
Page: 7/14
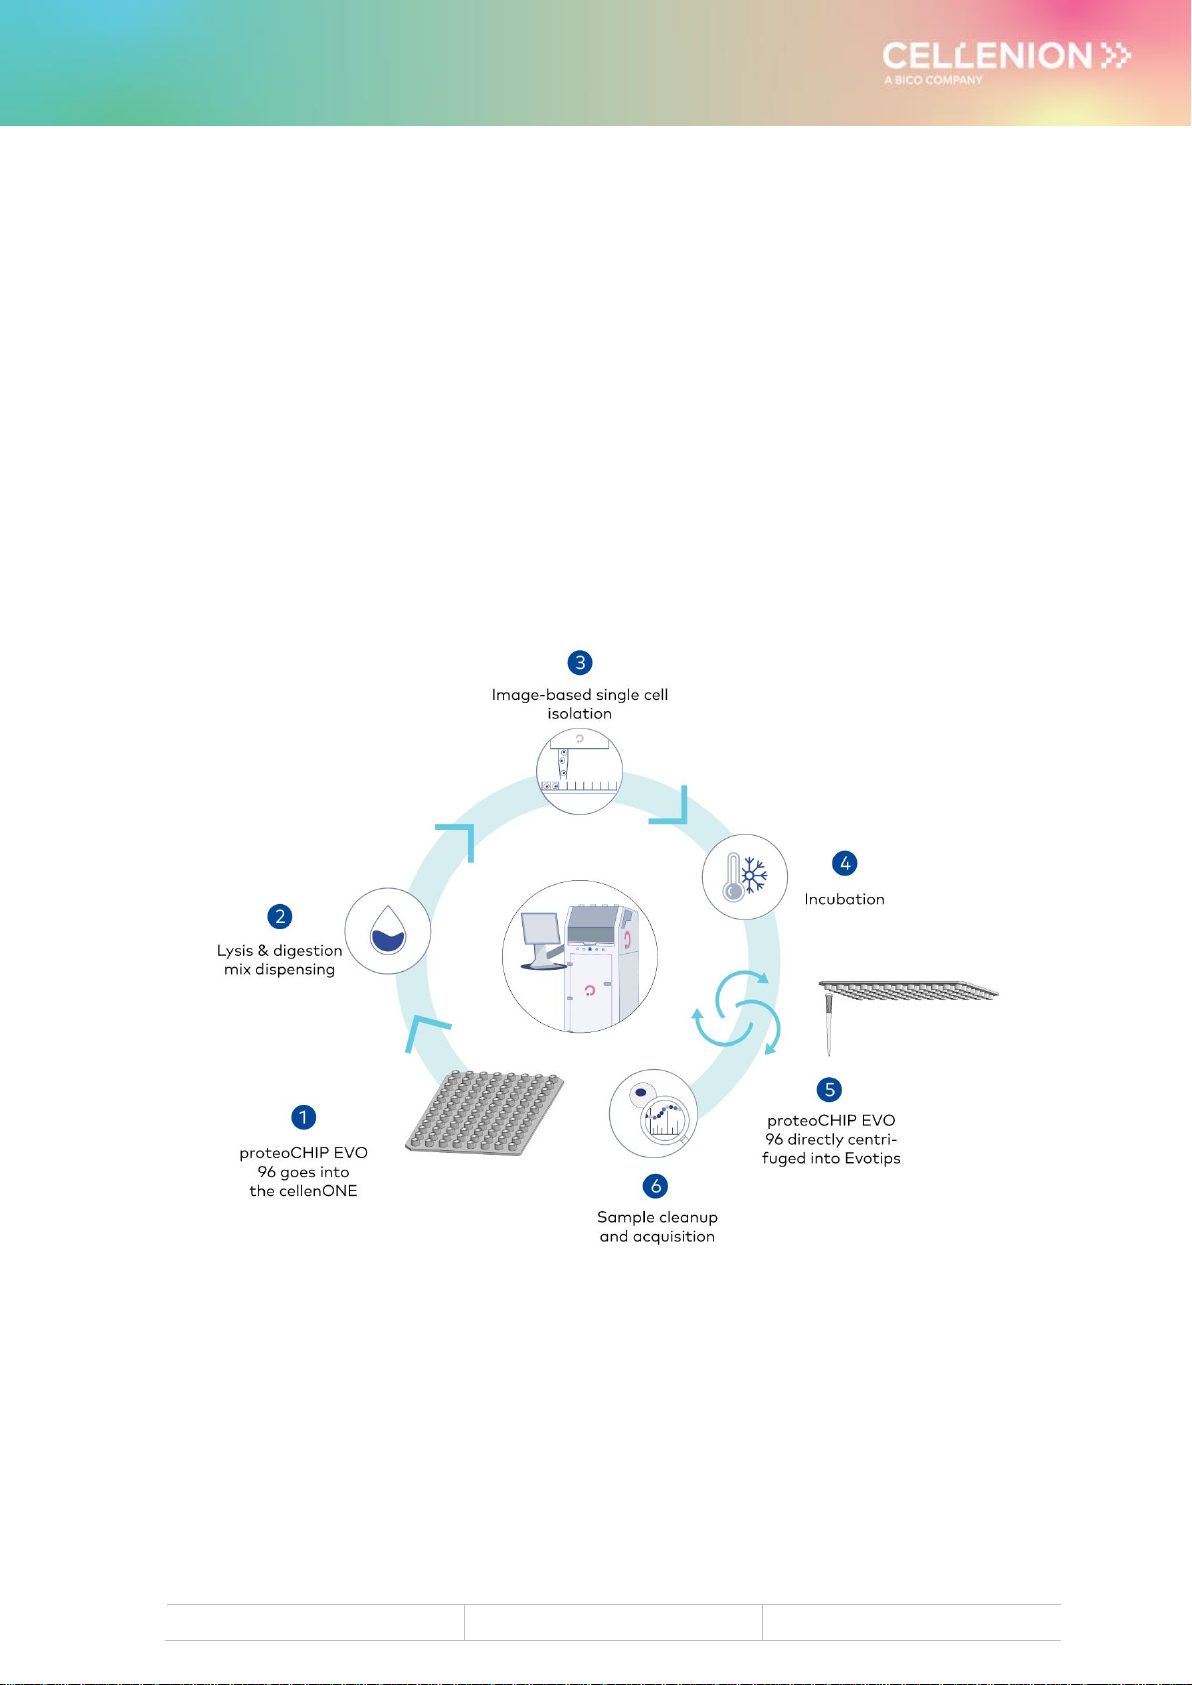
4 proteoCHIP EVO 96 –cellenONE Runs for
SCP
Figure 1. proteoCHIP EVO 96 inside the cellenONE holder
Place the proteoCHIP(s)_EVO_96 inside the cellenONE holder(s)(ref. C-PEVO-96-CHB)
and insert the holder(s) containing the proteoCHIP inside the instrument on top of the
cooling plates (see Figure 1).
Note 1. For some Runs you will be required to select the Field files for either processing
one or two proteoCHIPs EVO 96.
Note 2. When processing two proteoCHIPs EVO 96, the cellenWASH positions are
designated for sample aspiration. The cellenVIALS that are used in these positions hold
a dead volume of ~45-50 µL. Please keep in mind, that therefore you will need at least
~65-70 µL of cell suspension for the cell isolation Run. When processing only one
proteoCHIP EVO 96, “MTP384” can be selected as “Probe” on the right cooling plate
position with a dead volume of only 3 µL.

User Manual
proteoCHIP EVO 96 for SCP
UM_proteoCHIP_05
Rev.0.0 –eff. date: 07/12/2023
Page: 8/14
4.1 Run 1: Master Mix dispensing
Prepare 200 µL of Master Mix: 20 µL 1M TEAB + 120 µL H2O + 40 µL 1% DDM + 20 µL
100 ng/µL Trypsin (or Trypsin/LysC). Do not vortex the sample, but gently pipette the
solution up and down several times to avoid bubbles.
Main tab
•Probe: “cellenWASH”
•Run: “EVO_96_SCP_Run_1_MasterMix”
•Target: “proteoCHIP_EVO_96”
Nozzle Setup tab
•For dispensing the Lysis Buffer make note of the original Voltage setting, then
increase it by 5-10%. Press “Set Nozzle Parameters”.
•Check if the drop is stable by performing a Drop Check. Start Continuous
Dispensing and check if the droplet is still stable after 10 seconds.
•Measure the Drop Volume. Droplet recognition will be needed during the Run,
so make sure that the drop is detected with a red circle. If not, slightly adjust the
Voltage and Pulse until the red circle is shown when performing the Drop Check.
Target Setup tab
•Load the Field (Target
→
Load Field)“EVO_96_SCP_Run_1_MasterMix_1Chip”
or “EVO_96_SCP_Run_1_MasterMix_2Chips”depending on the use of one or
two proteoCHIPs EVO 96.
•Update the Field table if needed: Adjust volume (Field
→
Edit Field table) if
needed. The volume dispensed per well is given in number of drops and is
calculated based on a drop volume of 375 pL and a final dispensing volume of
300 nL per well (i.e., 800 drops).
•Place one or two fresh cellenVIALs in the first or first two cellenWASH positions
(i.e., A1 or A1 & B1) depending on the use of one or two proteoCHIPs EVO 96.
Fill the cellenVIAL(s) with 100 µL of Master Mix without introducing any bubbles.
Run tab
•Start the Run.
•Select the module position(s) of your proteoCHIP(s) EVO 96.

User Manual
proteoCHIP EVO 96 for SCP
UM_proteoCHIP_05
Rev.0.0 –eff. date: 07/12/2023
Page: 9/14
4.2 Run 2: Cell Isolation
Prepare your cell suspension as described in Paragraph 2.3.
Main tab
•Probe: “cellenWASH”
•Run: “EVO_96_SCP_Run_2_Cell_Isolation” or
“EVO_96_SCP_Run_2_Cell_Isolation_NoUptake”
•Target: “proteoCHIP_EVO_96”
Nozzle Setup tab
•For dispensing the Cell suspension decrease the Voltage back to its original
value and press “Set Nozzle Parameters”.
•Check if the drop is stable by performing a Drop Check.
•Measure the Drop Volume.
Target Setup tab
•Load the Field (Target
→
Load Field)“EVO_96_SCP_Run_2_Cells”.
•There should be only 1 drop per well selected if single cells are to be isolated. If
multiple cells are to be isolated in a well, then add 1 drop multiple times to the
same well, NOT X drops (the table should show “1,1,1,1,1” for 5 cells in one well,
NOT “5”).
•Load at least 70 µL (see Note 2 on page 7 of this manual) of the cell suspension
into a cellenVIAL and place it in the first position of the cellenWASH station (i.e.,
A1).
Run tab
•Start the Run.
•Select the module position(s) of your proteoCHIP(s) EVO 96.
•If you want to continue sorting with the already aspirated cells, select and start
the Run “EVO_96_SCP_Run_2_Cell_Isolation_NoUptake”.
•Flush the PDC before continuing with Run 3 by performing the task
Flush_PDC.

User Manual
proteoCHIP EVO 96 for SCP
UM_proteoCHIP_05
Rev.0.0 –eff. date: 07/12/2023
Page: 10/14
4.3 Run 3: Incubation at 50 °C (1h)
Main tab
•Probe: “cellenWASH”
•Run: “EVO_96_SCP_Run_3_Incubation_50C”
•Target: “proteoCHIP_EVO_96”
Nozzle Setup tab
•Increase the Frequency from 500 Hz to 1000 Hz when processing two
proteoCHIPs EVO 96 in parallel, and press “Set Nozzle Parameters”. Otherwise
keep it at 500 Hz.
•Start Continuous Dispensing and check if the droplet is still stable after 10
seconds.
•Measure the Drop Volume.
Target Setup tab
•Load the Field (Target
→
Load Field)“EVO_96_SCP_Run_3&4_Incubation&
Cooldown”.
•Update the Field table if needed: Adjust the volume (Field →Edit Field table) if
needed. The volume dispensed per well is given in number of drops and is
calculated based on a drop volume of 375 pL and a final dispensing volume of
260 nL per well (i.e., 800 drops).
Run tab
•Start the Run.
•Select one module position when using one proteoCHIP EVO 96 and select
both module positions when processing two chips.
•After 60 min, when ready, stop the Run and immediately proceed to Run 4.

User Manual
proteoCHIP EVO 96 for SCP
UM_proteoCHIP_05
Rev.0.0 –eff. date: 07/12/2023
Page: 11/14
4.4 Run 4: Cooldown to 20 °C (~30min)
Main tab
•Probe: “cellenWASH”
•Run: “EVO_96_SCP_Run_4_Cooldown_20C”
•Target: “proteoCHIP_EVO_96”
Nozzle Setup tab
•Keep all the settings from the previous run.
Target Setup tab
•Keep the Target Setup from the previous run.
Run tab
•Start the Run.
•Select one module position when using one proteoCHIP EVO 96 and select
both module positions when processing two chips.
•The cooling plate will now cool down to 20 °C and it will continue to rehydrate
until a temperature of 25 °C. A message will pop up when this temperature is
reached.

User Manual
proteoCHIP EVO 96 for SCP
UM_proteoCHIP_05
Rev.0.0 –eff. date: 07/12/2023
Page: 12/14
4.5 Run 5: Dilution
For dilution use 0.1% TFA or 0.1% FA (Mass Spec grade). In the end 3.2 µL of
solution is added to each well resulting in a total volume of ~3.5 µL.
Main tab
•Probe: “cellenWASH”
•Run: “EVO_96_SCP_Run_5_Dilution”
•Target: “proteoCHIP_EVO_96
Nozzle Setup tab
•Check if the drop is stable by performing a Drop Check. In this Run the pump
and not the Piezo element will be used for dispensing the 0.1% TFA/FA.To make
sure that the pumping step works properly, please move to camera position,
press the light bulb symbol and go to the tab Pump in Nozzle setup. Insert the
parameters 3.2 µL for volume and 20 µL/s for speed and press Start. If you see
a jet of water being ejected out of the PDC, the pumping step works perfectly
fine. Repeat a few times (see Note 1).
Target Setup tab
•Load the Field (Target
→
Load Field)“EVO_96_Run_5_Dilution_1Chip” or
“EVO_96_Run_5_Dilution_2Chips” depending on the use of one or two chips.
•Place two or four cellenVIALs into the first two or four positions of the
cellenWASH station, respectively.
•Load 250 µL of the 0.1% TFA/FA into each of the cellenVIALs.
Run tab
•Start the Run.
•Select the module position of your proteoCHIP(s) EVO 96.
Note 1. If you observe that the dilution droplet does not properly fall to the target,
please gently bring the white silica-part of the sciTIPCLEANER in contact with the tip
of your PDC in the Home Position. It might be needed to perform the FlushPDC task
multiple times afterwards if a lot of silica particles have accumulated on the tip of the
PDC. You can also remove the particles by gently cleaning the tip with a Kimwipe
soaked in 70% EtOH. TFA accumulating on the side of the PDC is automatically
washed away during the Run.
Note 2. Alternatively, pipette manually 3.2 µL 0.1% TFA/FA to each well (preferably
by using a multichannel pipette).
User Manual
proteoCHIP EVO 96 for SCP
UM_proteoCHIP_05
Rev.0.0 –eff. date: 07/12/2023
Page: 13/14
4.6 Sample transfer
4.6.1 Option 1 –Transfer to Evotips
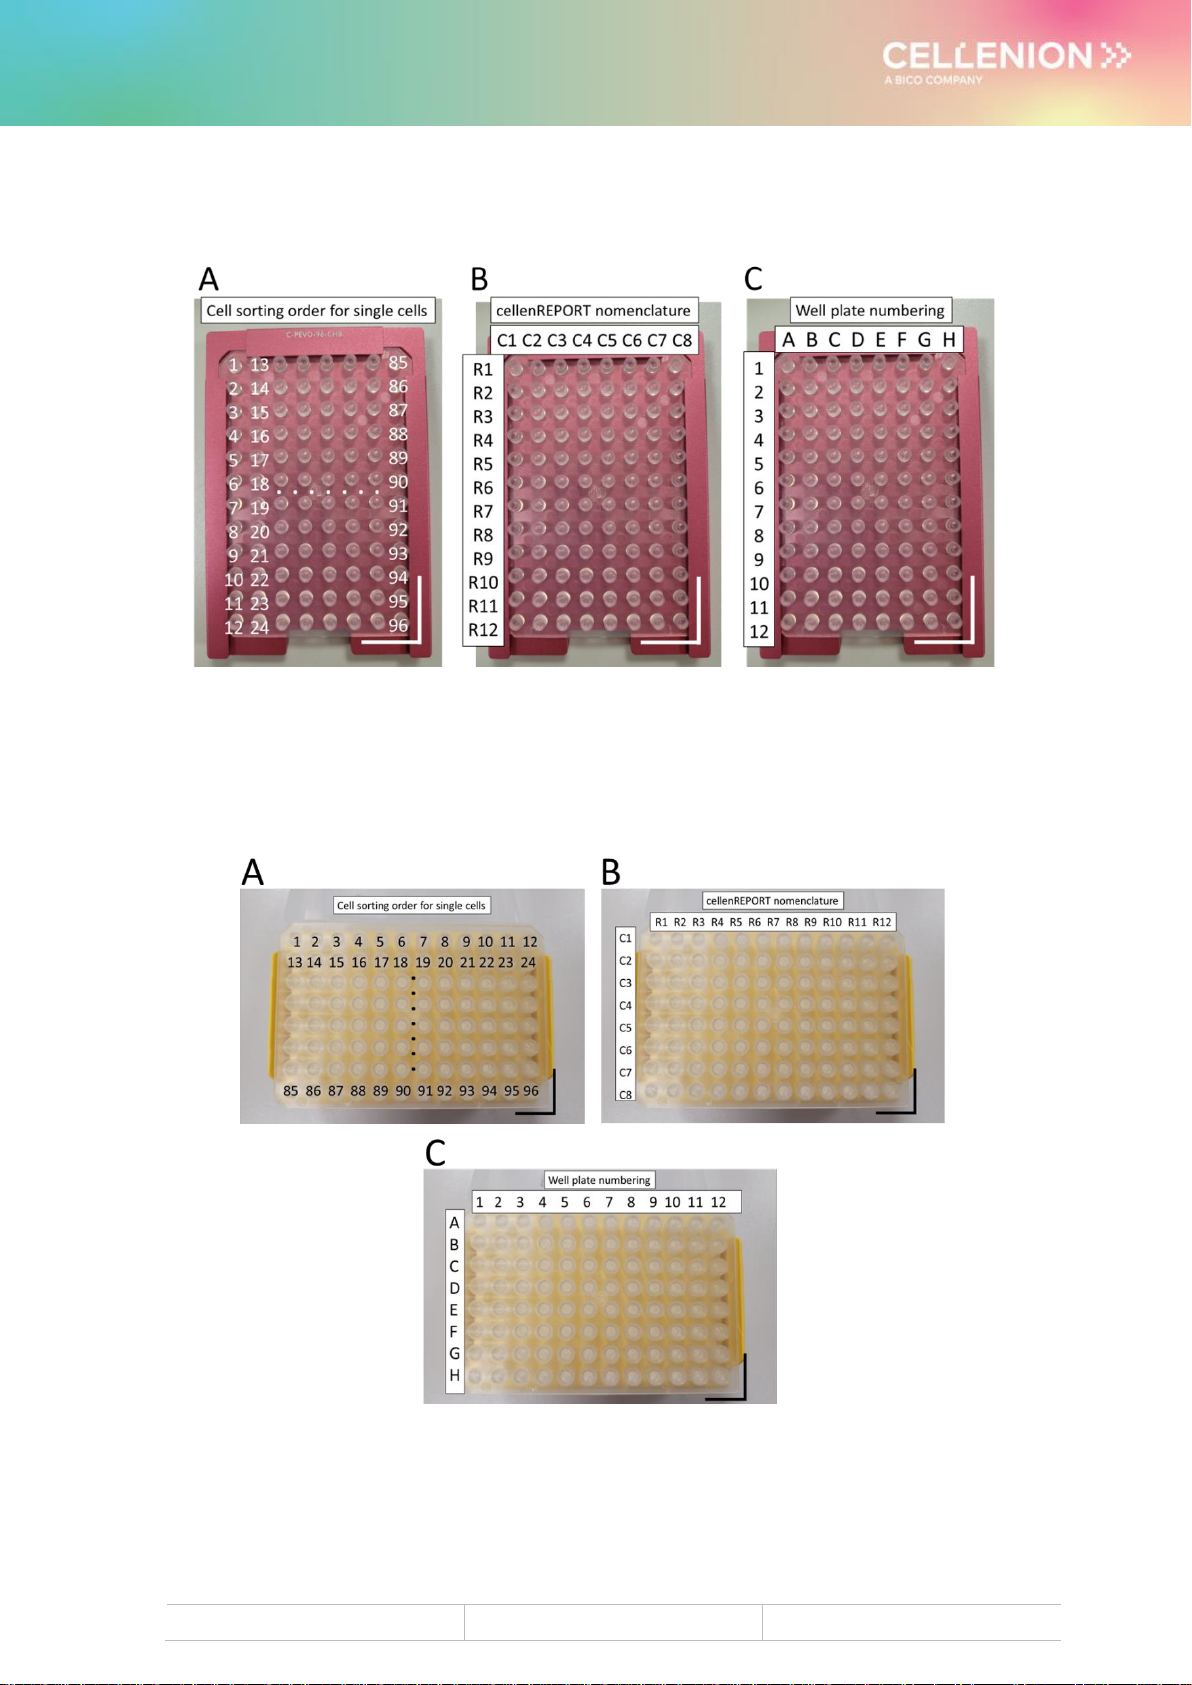
Figure 2: proteoCHIP EVO 96 inside of the corresponding Holder. The sharp corner of
the chip is shown in the bottom right corner. (A) Cell sorting order within a single cell
isolation Run. (B) Nomenclature of each cell image presented in the cellenREPORT. (C)
Well plate numbering corresponding to the Evotip box.
Figure 3: proteoCHIP EVO 96 on-top of a Evotip box with the mirrored naming schemes
of single wells. The sharp corner of the chip is shown on the bottom right corner. (A)
Cell sorting order within a single cell isolation Run. (B) Nomenclature of each cell image
presented in the cellenREPORT. (C) Well plate numbering corresponding to the Evotip
box.

User Manual
proteoCHIP EVO 96 for SCP
UM_proteoCHIP_05
Rev.0.0 –eff. date: 07/12/2023
Page: 14/14
•Since only ~3 µL of sample is transferred, preload the Evotips with only 17 µL
Solvent A instead of 20 µL at the correct Evotip protocol step (“Loading”).
•Gently place the proteoCHIP EVO 96 with the diluted samples turning it upside
down on top of the Evotips and close the Evotip box lid. Keep in mind that the
sample injection scheme of your Evosep system will be mirrored compared
to your cell sorting scheme after the transfer. See Figure 2 and Figure 3 for
the cell sorting order, naming scheme within the cellenREPORT, the well plate
numbering and mirroring effect after placing the Chip on top of the Evotips. Make
sure to orient the chip in a way that the samples represent the injection scheme
of your Evosep system (e.g., Figure 3C).
•Transfer the Evotip box with the chip into a centrifuge and make sure that the
counterweight is adjusted accordingly. An empty Evotip box can be used as a
counterweight by adding water to the box until the weight is matched.
•Centrifuge the samples into the Evotips at 700 rcf for 30 seconds according to the
Evotip protocol.
4.6.2 Option 2 –96-Well plate
Alternatively, gently place the proteoCHIP EVO 96 with the diluted samples turning it
upside down on top of a low-binding 96-well plate and make sure that the counterweight
is adjusted accordingly. Centrifuge the samples into the 96-well plate at 700 rcf for 30
seconds.
Table of contents
Other Bico Laboratory Equipment manuals


