manuals.online logo
Brands
  1. Home
  2. •
  3. Brands
  4. •
  5. Scosche
  6. •
  7. Telephone Accessories
  8. •
  9. Scosche TerraClamp MAGICMOUNT PSM11015 User manual

Scosche TerraClamp MAGICMOUNT PSM11015 User manual

PSM11015
TerraClamp™
MAGICMOUNT™TRIPLE CLAMP
3
5
4
3
2
6
1
PARTS INCLUDED
1. (1) Elastic Band
2. (1) *MAGICMOUNT™ w/ Mounting Plates
3. (1) 1.5" Extension Bar
4. (2) Adjustment Knobs w/ Washers
5. (2) Mounting Adapter Pairs
6. (1) Pivot Joint Bolt Mount
7. Includes 3 different different size bolts:
-M8 x 1.5mm x 55mm
-M8 x 1.5mm x 60mm
-M8 x 1.5mm x 65mm
*Caution: This magnetic mount is not a toy.
The small magnetics are harmful if swallowed. Keep
out of reach of children.
WARNING: Do not use the magnetic mount with
any hard-drive based devices such as iPod
classic, iPod video and Zume MP3 players.
OPTION 3 (large plate only)
Attach adhesive side of
metal plate to interior of
case, between device and
inside of case. Plate will
adhere to magnetic
mount through rear
panel of case.
NOTE: If you choose not to attach
the metal plate to the device or
case please leave the adhesive backing in place.
Position the plate between the device and interior of
case with the metal surface facing the case.
OPTION 1 (small or large plate)
Attach adhesive side of metal
plate directly to back of device
OPTION 2
(small or large plate)
Attach adhesive side
of metal plate directly
to back of case
MOUNTING THE MAGICPLATE™
DEVICE
CASE
CASE
DEVICE
For Typical
Smartphones
For Wireless
Charging
Qi-enabled
Smartphones
REMOVING
THE
MAGICPLATE™
Use a thin plastic
card to carefully
lift the plate's
adhesive surface
from the mounting
surface. Slowly lift
up and remove
the plate.
ADHESIVE SIDE
MAGICPLATE™
PLACEMENT
ASSEMBLY
Bolt Mount
Assembly
Bolt Mount
Assembly
E
F
D
G
H
I
A**
C
B**
(Top Assembly)
**
NOTE: For a stable and secure riding
experience we recommend using the
provided elastic band when mounting
Select and mount the appropriate
size bolt onto location before fully
Insert MAGICMOUNT™ ball into the
elastic center ring & hook into place (B).
Mount the ball of the magnetic assembly (C) &
the bar extension (D) to the two adapters (E).
Secure the assembly using the screw and
Align the two lower adapters to the
mounted ball from step one (G) along with
Secure the assembly using the screw and
washer provided (I), see bolt mount
assembly illustration for result. Actual mounting ball*
**
the device to a mobile application.
Use Non-elastic band option on
stationary applications ONLY
Instructions
1.
assembling (A*).
2.
3.
4.
washer provided (F).
5.
the top assembly (H).
6.
joint not transparent
SET-UP GUIDE
Elastic Band
With the metal plate positioned onto the
device, align the elastic band with your
device and attach to the corners of your
device as shown (A). The elastic band will
secure your device while riding.
NOTE: Elastic band can be attached
horizontally or vertically
3
B
A
360°360°
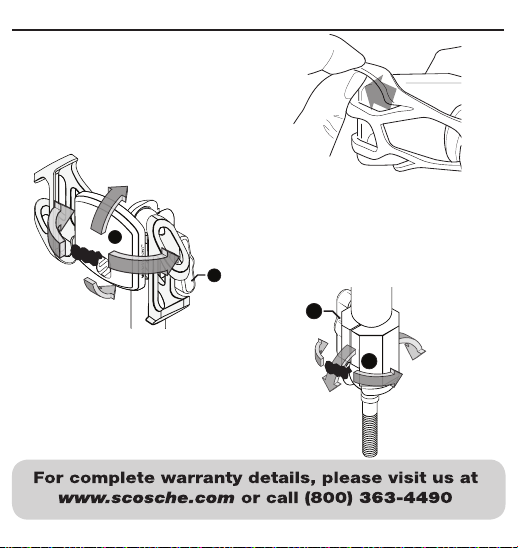
Bolt Mount Adjustment
Loosen knob (C) to reposition the angle (D)
of the bolt mount and bar extension. Once
the position is set, tighten the knob (C) to
secure the positioning angle of the bar
extension.
NOTE: When loosened the angle of the bar
is capable of 360° rotation for positioning.
MAGICMOUNT™ Adjustment
Loosen knob (A) to reposition the angle (B)
of the magnetic mount head. Once the
position is set, tighten the knob (A) to secure
the positioning angle of the bar extension.
NOTE: When loosened the angle of the bar
is capable of 360° rotation for positioning.
360°
360°
C
D
©2018 SCOSCHE INDUSTRIES, INC. SI 300PSM11015 02/18

Other Scosche Telephone Accessories manuals

Scosche MAGICMOUNT Pro Select User manual

Scosche

Scosche MAGICMOUNT Pro Select User manual

Scosche MAGICMOUNT User manual

Scosche

Scosche MAGICMOUNT User manual

Scosche MAGICMOUNT PRO MM2WDSR User manual

Scosche

Scosche MAGICMOUNT PRO MM2WDSR User manual

Popular Telephone Accessories manuals by other brands

Viking DLE-200B Technical practice

Viking

Viking DLE-200B Technical practice

Lucent Technologies SPIRIT 1224 Controller user guide

Lucent Technologies

Lucent Technologies SPIRIT 1224 Controller user guide

BT DIVERSE 5400 user guide

BT

BT DIVERSE 5400 user guide

Tadiran Telecom EMERALD ICE installation manual

Tadiran Telecom

Tadiran Telecom EMERALD ICE installation manual

Musicam FieldFone II user guide

Musicam

Musicam FieldFone II user guide

Polycom KIRK KIRK 4040 Features guide

Polycom

Polycom KIRK KIRK 4040 Features guide

TIPTEL DECT Set 50 user manual

TIPTEL

TIPTEL DECT Set 50 user manual

Panasonic KX-UDS124 installation guide

Panasonic

Panasonic KX-UDS124 installation guide

BT BT7600 Quick setup and user guide

BT

BT BT7600 Quick setup and user guide

MCheeta CT-CID803 Plus user manual

MCheeta

MCheeta CT-CID803 Plus user manual

View VP-PC installation guide

View

View VP-PC installation guide

Baldwin Boxall BT8 operating instructions

Baldwin Boxall

Baldwin Boxall BT8 operating instructions

SMC Networks SMCDPCR-AP specification

SMC Networks

SMC Networks SMCDPCR-AP specification

SkyLink SD-001 user manual

SkyLink

SkyLink SD-001 user manual

Nera ISDN user guide

Nera

Nera ISDN user guide

Intellitouch MOH-500E Specifications

Intellitouch

Intellitouch MOH-500E Specifications

Viking SQRG-12 Technical practice

Viking

Viking SQRG-12 Technical practice

Bang & Olufsen beocom 1401 user manual

Bang & Olufsen

Bang & Olufsen beocom 1401 user manual

manuals.online logo
manuals.online logoBrands
  • About & Mission
  • Contact us
  • Privacy Policy
  • Terms and Conditions

Copyright 2025 Manuals.Online. All Rights Reserved.