Scotts AccuPro 2000 User manual

BENEFITS
1. Hopper capacity: 42 litres
2. Allows exact setting of application rate for small and large granules
3. Patented Helical Cone for a uniform and consistent spread pattern
4. Galvanized steel
5. Larger pneumatic wheels for easier pushing and no tread marks
6. Large diameter frame is more durable
7. Extended handle (91 cm) with tuff-foam grips for added comfort
8. Transparent cover for protection of the product against rain and wind
Spreader
information
Scotts I ternational B.V.,n
Scotts P ofessionalr
xP.O. Bo 40, 4190 CA Geldermalsen,
The Netherlands
Tel.: +31 (0)418 655 700
Fax: +31 (0)418 655 795
E-mail: info@scottsprofessional.com
Internet: www.scottsprofessional.com
AccuPro 2000
Rotary Spreader
SPREADER SETTING GUIDELINES
Settings for SINGLE PASS application at full rate
Spreader setting at full label rates. Amount of product (g/m2) applied after one run:Product Name Cone
setting
Effective
width (m) 5 10 15 20 25 30 35 40 45 50 55 60
Sierrablen 4 4.7 Q R½ T½ V X Q(x2) R(x2) R½(x2)
SierrablenPlus 4 4.8 O P R S T
Sportsmaster 4 3.7 L M N O½ P½ Q R S T U
Sportsmaster CRF 3 5.0 Q R½ Y½
Sportsmaster Organic 3 5.5 V X R(x2)
Sierraform GT 6 3.7 I½ K L M M½
Greenmaster Pro-Lite 6 3.7 M N
Greenmaster Organic 9 4.0 O P P½
Fairwaymaster Mini 4 4.8 O P R S T
H2Pro granules 5 4.0 J K½ M
STEP Hi-Mag 7 4.3 H I½ K½
Settings for DOUBLE PASS application at half rate
Spreader setting at half label rates. Amount of product (g/m2) applied after two runs:Product Name Cone
setting
Effective
width (m) 5 10 15 20 25 30 35 40 45 50 55 60
Sierrablen 4 4.7 M N O O½ P Q R R½
SierrablenPlus 4 4.8 L M M½ N N½
Sportsmaster 4 3.7 L L½ M M½ N O O½
Sportsmaster CRF 3 5.0 M½ O O½
Sportsmaster Organic 3 5.5 P Q R
Sierraform GT 6 3.7 H I½ J½ K
Greenmaster Pro-Lite 6 3.7 J½ K
Greenmaster Organic 9 4.0 L½ M M½
Fairwaymaster Mini 4 4.8 L M M½ N N½
H2Pro granules 5 4.0 H½ I J
STEP Hi-Mag 7 4.3 G½ H I
The spreader settings are guidelines only. The spreader should be calibrated
prior to application to ensure accuracy. The spreader settings are based on a
walking speed of 5 km/hour. Walking faster or slower than 5 km/hour
will alter the spread width and application rate. Exact rates are dependent
upon the spreader itself and the accuracy of the person operating it.

ASSEMBLY
4. Place the bent end of the main shutoff connecting
rod through the hole in the lever and secure it with a
cotter pin on the right side.
1. Turn the spreader upside-down. Place the wheels
on the axle with the longer portion of the hubs facing
inward. Secure the drive wheel A (right side) to the
axle using the 3/16” cotter pin. Attach the idler wheel
B (left side) to the axle. Then insert the 1/8” cotter
pin through the axle and secure.
A
B
5. Thread one hex nut onto the lower end of the main
shutoff control rod until it stops. Insert the rod
through the pivot lever arm, as shown, and thread the
second nut up to the pivot lever arm; do not tighten.
2. Place the spreader on its front side and attach the
rest to the frame using four 2 1/2” Phillips screws
and four lock nuts.
Top Nut
Pivot Lever
Arm
3. Return the spreader to the upright position and
attach the handle to the rest with four 11/2” carriage
bolts and four lock nuts. Be sure that the main
shutoff lever is facing up.
6. Pull the main shutoff lever to the closed position and
look inside to see if the port holes are closed. If not,
adjust the top nut down in small increments and check
for closure. CAUTION - DO NOT ADJUST THE
TOP NUT TOO FAR DOWN TO PREVENT
BINDING THE MECHANISM. When the ports
close completely, bring the bottom nut up and tighten
both.
Main Shutoff Plate
Closed Position

MAINTENANCE
7. Using a grease gun, lubricate the grease fittings on
the axle bearing housings and gear carrier. Apply a
small amount of grease to the gear teeth. Install the two
gearbox cover halves and secure with the three retainer
clips. Insert the screen inside the hopper and secure it
with factory installed clips.
1. Empty the spreader after each use. Return the unused material
to its original container and seal to prevent moisture-caused
clumping.
2. Wash the spreader thoroughly and dry in sunny or heated area.
Wipe or blow off excess water to revent corrosion. Clean all
residue from rotor plate.
Grease Fittings 3. Periodically grease the axle bearing housings as indicated in
assembly step #7.
4. Periodically oil the pivot points on the main shutoff/rate
control linkage, as well as the spring inside the rate control
housing.
5. Periodically clean and inspect the gears by removing the
gearbox cover halves. Apply a small amount of grease to the gear
teeth for lubrication. Apply grease at the gear carrier fittings
indicated in assembly step #7. Be sure to reinstall gearbox cover
halves prior to use.
6. Maintain tire pressure at 20 psi maximum.
7. If the axle requires disassembly, be sure to reassemble it so the
drive wheel attaches on the right side. Incorrect spread patterns
will result if the rotor plate does not rotate in a counter-clockwise
direction.
Grease Fittings
7. A hopper cover is provided with your new spreader. Use it to
protect turf product inside the hopper from light rain or windy
conditions during transportation.
HOW TO USE
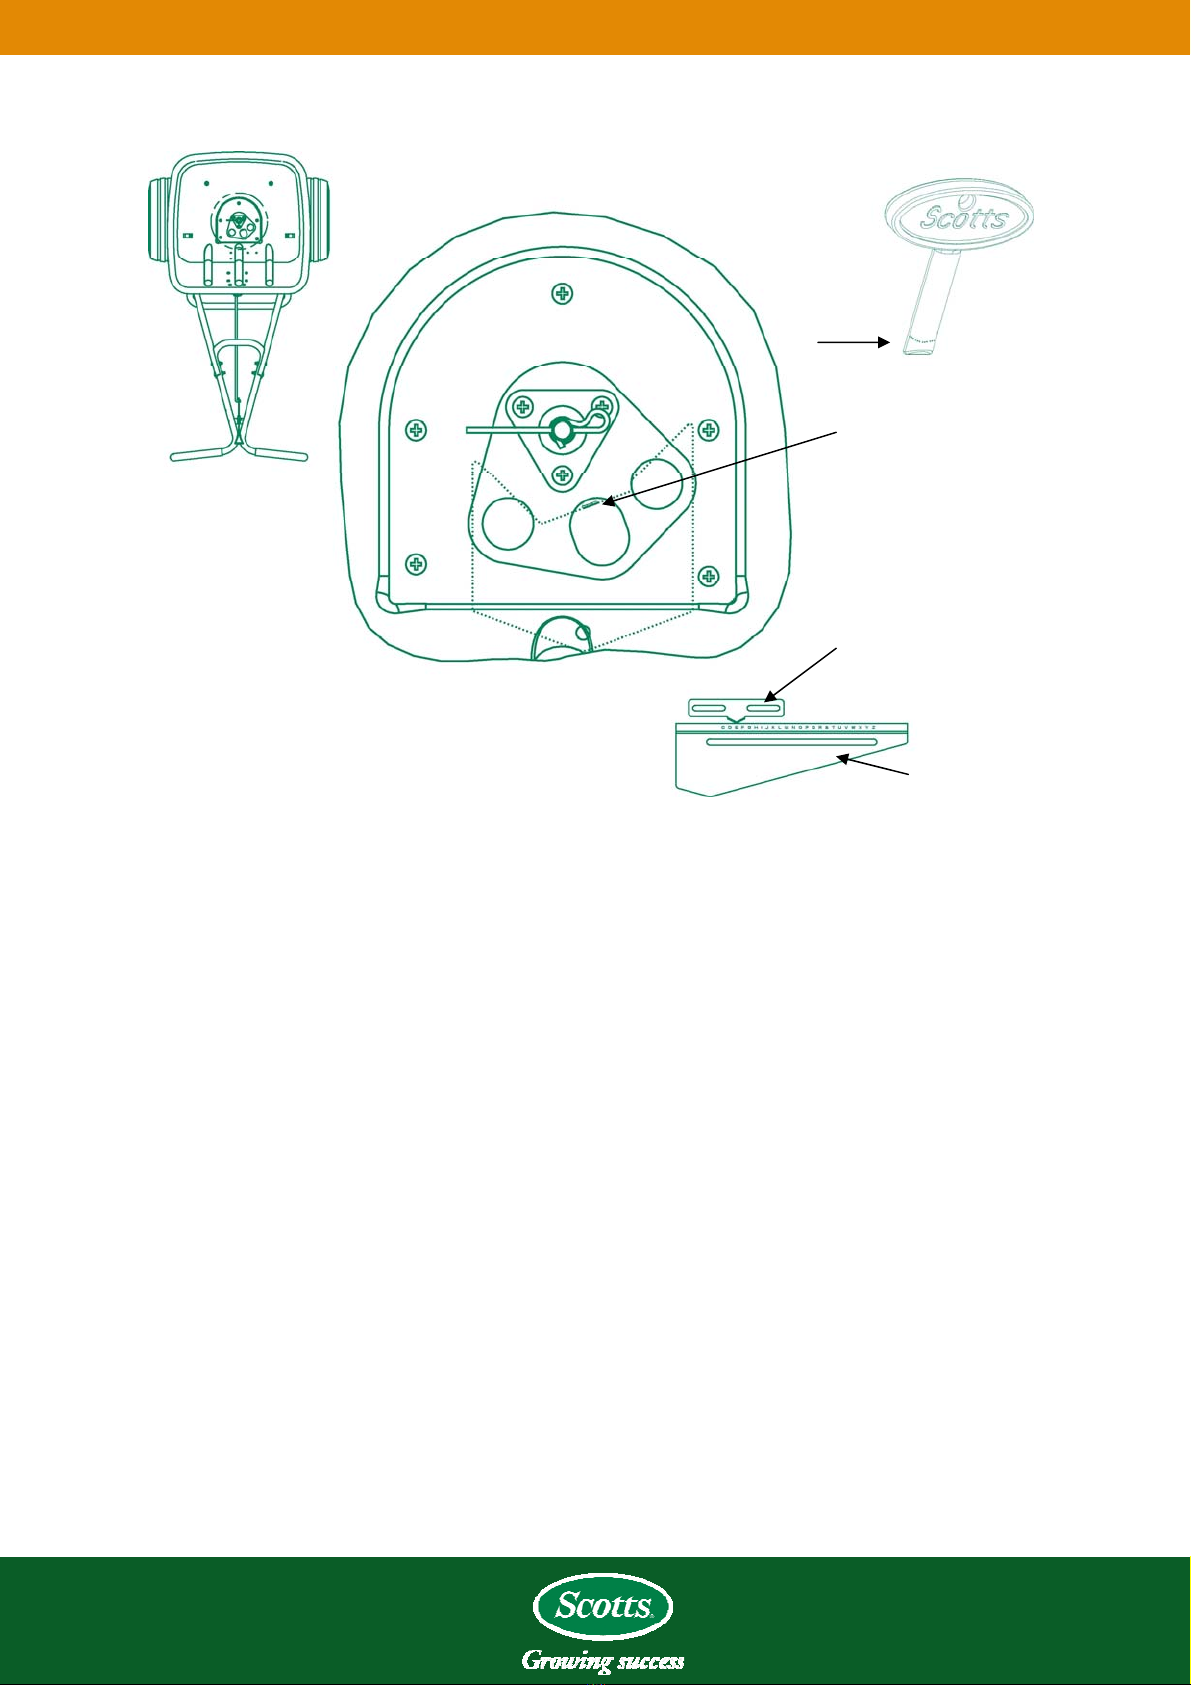
1. Check product bag for rate setting (letter), cone setting
(number), and swath width. The rate setting is achieved by
loosening the rate control knob and sliding the rate control plate
to the desired letter. The cone setting is used to control-spread
pattern and is adjusted by rotating the index tab on the orange
helical cone to the desired number.
Rate Control Plate
Helical Cone
2. Pull the main shutoff lever to the closed position before filling
the hopper.
3. Start rolling the spreader forward before opening the ports;
close ports before stopping.
4. Hold handle so that the hopper is level. Tipping the spreader
too far forward or backward will cause uneven spreading.
5. Use the swath width recommended on the bag for your
spreader model and push the spreader at 3 mph (a brisk walking
pace). Apply material only in the forward direction, not while
pulling.
Main Shut Off Lever
6. The settings given on the product label are recommended
starting points. Test rate and pattern on a small area before
treating a large area. Actual application rate can vary
depending on weather, spreader condition, and walking
speed.
Cone Setting
RECOMMENDED WALKING PATTERN
Optimum distribution at half rate
and double pass.

CALIBRATION INSTRUCTIONS
calibration
depth
Calibration Ke
y
Pointer
“E” Position
Rate Control Plate
Your professional spreader has been factory calibrated.
For best results, occasionally check calibration and adjust if necessary.
1. Set the rate control plate to the “E” position.
2. Push the main shutoff lever to the OPEN position.
3. Insert the calibration key vertically into the center port hole, as shown in the accompanying diagram.
4. If the calibration key fits snugly, the spreader is properly calibrated. If not, continue with steps 5-12.
5. Loosen the rate control knob and slide the rate control plate all the way to the left.
6. Insert the calibration key as described in Step #3.
7. Pull the main shutoff lever back to ease the shutoff plate against the calibration key. Use the main shut off lever
to hold the calibration key in place.
8. Slide the rate control plate to the right until it comes in contact with the protruding end of the rate control rod.
9. Tighten the rate control knob.
10. Remove the calibration key and pull the main shut off lever to the closed position.
11. Loosen the nuts securing the rate control pointer and slide the pointer so that it centers on the “E” setting of
the rate control plate.
12. Re-tighten the nuts on the pointer.
Table of contents
Other Scotts Spreader manuals
Popular Spreader manuals by other brands

SnowEx
SnowEx Super Maxx SP-9300XH Owner's manual and installation instructions

Andersons
Andersons Model2000 manual

PermaGreen Supreme
PermaGreen Supreme MAGNUM SmartSteer C3C 2009 Operator's manual

SnowEx
SnowEx Sidewalk-Pro SD-95 instruction manual

Buyers
Buyers SaltDogg 1470601SSE installation instructions

Meyer
Meyer 38100 owner's manual

KUHN
KUHN ALTOR 6070 Operator's manual

Shindaiwa
Shindaiwa RS76 owner's manual

SnowEx
SnowEx V-Pro SP-2000 owner's manual

Art's-Way Manufacturing
Art's-Way Manufacturing X900 Operator manual & illustrated parts list

Millcreek
Millcreek 25G Series Operator's manual

Neilsen
Neilsen CT2213 Assembly and operating instruction