Scotts S12020 Series User manual

SAFETY RULES
When battery pack is not in use, keep it away from
other metal objects like: paper clips, coins, keys, nails,
screws, or other small metal objects that can make
a connection from one terminal to another. Shorting
the battery terminals together may cause sparks, burns,
or a fire.
Always remove battery pack from your tool when not
charging, and when assembling parts, making adjust-
ments, cleaning, or when not in use. Removing battery
pack will prevent accidental starting that could cause
serious personal injury.
Always remove battery pack before storing the device.
Always wear eye protection with side shields marked
to comply with ANSI Z87.1. Failure to do so could result
in objects being thrown into your eyes and other possible
serious injuries.
Keep battery pack dry, clean, and free from oil and
grease. Always use a clean cloth when cleaning. Never
use brake fluids, gasoline, petroleum-based products, or
any solvents to clean battery pack.
Save these instructions. Refer to them frequently and
use them to instruct others who may use this tool. If you
loan someone this tool, loan them these instructions also
to prevent misuse of the product and possible injury.
CALIFORNIA PROPOSITION 65
WARNING:
This product contains chemicals, including lead, known
to the State of California to cause cancer, birth defects
and other reproductive harm. Wash hands after
handling.
WARNING!
READ AND UNDERSTAND ALL INSTRUCTIONS.
Failure to follow all instructions listed below, may result
in electric shock, fire and/or serious personal injury.
Battery tools do not have to be plugged into an elec-
trical outlet; therefore, they are always in operating
condition. Be aware of possible hazards when not
using your battery tool or when changing accessories.
Following this rule will reduce the risk of electric shock,
fire, or serious personal injury.
Do not place battery tools or their batteries near fire
or heat. This will reduce the risk of explosion and pos-
sibly injury.
Do not crush, drop or damage battery pack. Do not
use a battery pack or charger that has been dropped
or received a sharp blow. A damaged battery is subject
to explosion. Properly dispose of a dropped or damaged
battery immediately.
Batteries can explode in the presence of a source
of ignition, such as a pilot light. To reduce the risk of
serious personal injury, never use any cordless product
in the presence of open flame. An exploded battery can
propel debris and chemicals. If exposed, flush with water
immediately.
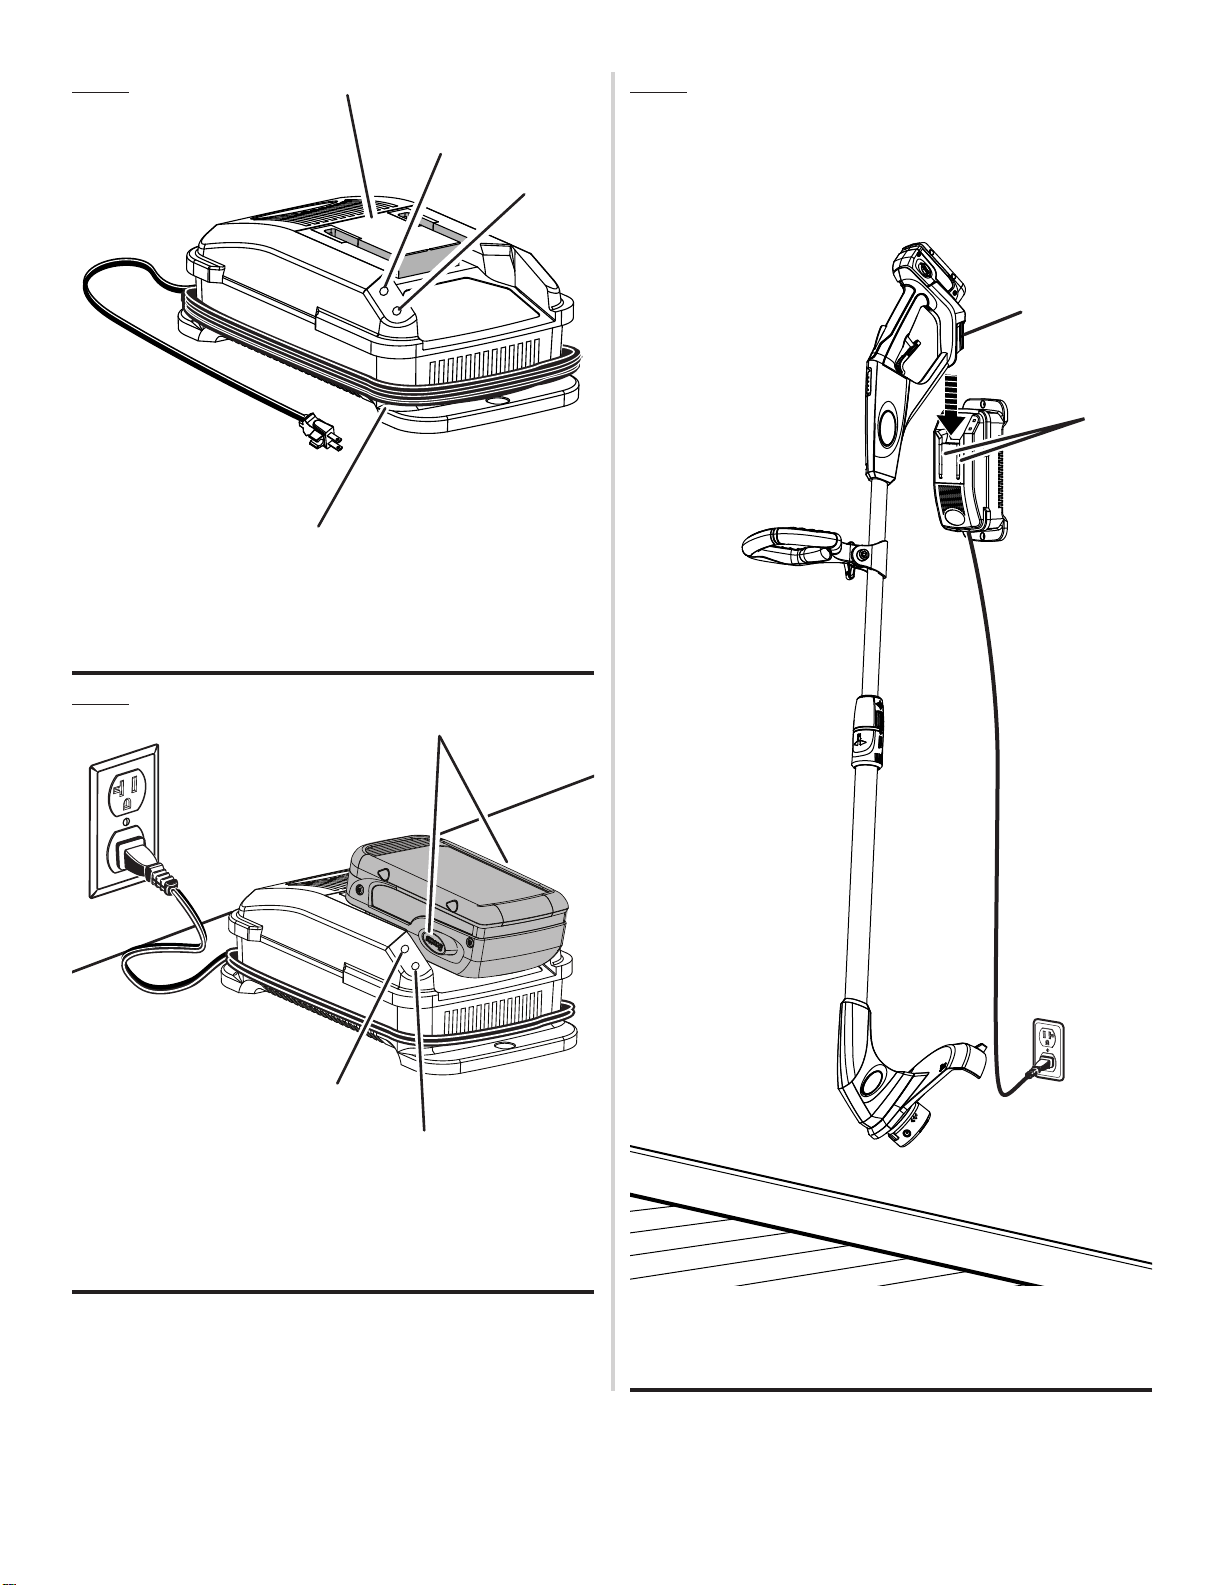
Do not charge battery tool in a damp or wet location.
Following this rule will reduce the risk of electric shock.
Charge only with Scotts®20 V Lithium Ion battery
chargers. Use of other chargers may result in personal
injury, fire, or damage.
Do not charge in an area of extreme heat or cold. It
will work best at normal room temperature. To reduce
the risk of serious personal injury, do not store outside or
in vehicles.
Under extreme usage or temperature conditions, bat-
tery leakage may occur. If liquid comes in contact with
your skin, wash immediately with soap and water. If
liquid gets into your eyes, flush them with clean water
for at least 10 minutes, then seek immediate medical
attention. Following this rule will reduce the risk of seri-
ous personal injury.
S12020 SERIES
20 VOLT LITHIUM-ION
BATTERY PACK
Use this battery pack for Scotts®20 V cordless products
only. Refer to the Operator’s Manual provided with product.
Always mention the model number above when communi-
cating with us regarding this battery pack.
LITHIUM-ION BATTERY PACKS
Lithium-ion batteries deliver fade free power for their entire
run time. Lithium-ion tools will not gradually lose power due
todecreasingbatterycharge.Instead,powerfromthebattery
pack will drop from full to zero once the full charge has been
drained from the battery. Once this happens, recharging of
the battery is required. It is not necessary to drain the battery
pack completely before recharging.
BATTERY PROTECTION FEATURES
Lithium-ion battery packs are designed with features that
protect the lithium-ion cells and maximize battery life.
If the tool stops during use, release the trigger to reset and
resume operation. If the tool still does not work, the battery
needs to be recharged.
COLD WEATHER OPERATION
The lithium-ion battery pack can be used in temperatures
down to –4°F. Put the battery pack on a tool and use the tool
in a light duty application. After about a minute, the pack will
warm up and begin operating normally.
OPERATION

BATTERY FUEL GAUGE
Scotts®outdoor products feature a battery fuel gaugelocated
on the tool. When the tool is activated, the fuel gauge will
display the amount of charge left in a connected battery.
CHARGING THE BATTERY PACK
Battery packs are shipped in a low charge condition to
prevent possible problems. Therefore, you should charge
prior to first use. If the charger does not charge the battery
pack under normal circumstances, return both the battery
pack and charger to your nearest Authorized Service Center
for electrical check.
Charge the battery pack only with the recommended
charger.
Refer to charger operator’s manual for charging instruc-
tions.
CHARGING A HOT BATTERY PACK
When using a tool continuously, the battery pack may
become hot. A hot battery pack may be placed directly onto
the charger port but charging will not begin until the battery
temperature cools to within acceptable temperature range.
Whena hot battery pack is placedon the charger, the charger
may indicate the pack is not ready to charge. Please refer
to charger operator’s manual. When the battery pack cools,
the charger will automatically begin charging.
CHARGING A COLD BATTERY PACK
A cold battery pack may be placed directly onto the charger
port but charging will not begin until the battery temperature
warms to within acceptable temperature range. When a
cold battery pack is placed on the charger, the charger may
indicate the pack is not ready to charge. Please refer to
charger operator’s manual. When the battery pack warms,
the charger will automatically begin charging.
OWT INDUSTRIES, INC.
P.O. Box 35, Highway 8
Pickens, SC 29671 USA
1-877-243-2774
www.scotts.com
MAINTENANCE
BATTERIES
These batteries have been designed to provide maximum
trouble-freelife.However, like all batteries, they will eventually
wear out. Do not disassemble battery pack and attempt to
replace the batteries. Handling of these batteries, especially
whenwearingringsandjewelry,couldresultinaseriousburn.
For battery pack storage longer than 30 days:
Store the battery pack where the temperature is below
80°F and away from moisture.
Store battery packs in a 30%-50% charged condition.
Every six months of storage, charge the pack as normal.
BATTERY PACK REMOVAL AND
PREPARATION FOR RECYCLING
To preserve natural resources, please recycle or dispose of
batteries properly.
This product contains lithium-ion batteries.
Local, state or federal laws may prohibit
disposal of lithium-ion batteries in ordinary
trash.
Consult your local waste authority for
information regarding available recycling and/
or disposal options.
WARNING!
Upon removal, cover the battery pack’s terminals with
heavy-duty adhesive tape. Do not attempt to destroy or
disassemble battery pack or remove any of its compo-
nents. Lithium-ion batteries must be recycled or disposed
of properly. Also, never touch both terminals with metal
objects and/or body parts as short circuit may result.
Keep away from children. Failure to comply with these
warnings could result in fire and/or serious injury.
SAVE THESE INSTRUCTIONS
This product has a three-year limited warranty.
For warranty details go to www.scotts.com.
Scotts®is a registered trademark of OMS Investments, Inc., and is used under license.

S200
20 Volt Lithium-Ion Battery Charger
Chargeur de batterie au lithium-ion 20 V
Cargador de baterías
de iones de litio de 20 V
OPERATOR’S MANUAL
MANUEL D’UTILISATION
MANUAL DEL OPERADOR
SAVE THIS MANUAL FOR
FUTURE REFERENCE
WARNING: To reduce the
risk of injury, the user must read and
understand the operator’s manual
before using this product.
ADVERTENCIA: Para reducir
elriesgodelesiones, elusuario debeleer
y comprender el manual del operador
antes de usar este producto.
AVERTISSEMENT :
Pour
réduire les risques de blessures,
l’utilisateur doit lire et veiller à bien
comprendrele manuel d’utilisationavant
d’employer ce produit.
TABLE OF CONTENTS
****************
Safety Rules for Charger......................2
Symbols ...............................................3
Assembly .............................................4
Operation ..........................................4-5
Maintenance ........................................6
Illustrations...........................................7
Parts Ordering and
Service ................................. Back Page
TABLE DES MATIÈRES
****************
Règles de sécurité concernant
le chargeur .........................................2
Symboles ...........................................3
Assemblage .......................................4
Utilisation ........................................4-5
Entretien.............................................6
Illustrations.........................................7
Commande de pièces
et réparation..................... Page arrière
ÍNDICE DE CONTENIDO
****************
Reglas de seguridad para
el empleo del cargador......................2
Símbolos............................................3
Armado..............................................4
Funcionamiento............................. 4-5
Mantenimiento...................................6
Ilustraciones ......................................7
Pedidos de piezas
y servicio.......................Pág. posterior
CONSERVER CE MANUEL
POUR FUTURE RÉFÉRENCE
GUARDE ESTE MANUAL
PARA FUTURAS CONSULTAS
ACCEPTS ALL SCOTTS®
20 V BATTERY PACKS
COMPATIBLE AVEC TOUTES LE BLOC-PILES
SCOTTS®DE 20 V
ACEPTA TODAS LOS PAQUETES
DE BATERÍAS SCOTTS®DE 20 V

2 — English
SAFETY RULES FOR CHARGER
Always wear eye protection with side shields marked
to comply with ANSI Z87.1. Failure to do so could result
in objects being thrown into your eyes resulting in possible
serious injury.
An extension cord should not be used unless
absolutely necessary. Use of improper extension cord
could result in a risk of fire and electric shock. If extension
cord must be used, make sure:
a. That pins on plug of extension cord are the same
number, size and shape as those of plug on charger.
b. That extension cord is properly wired and in
good electrical condition; and
c. That wire size is large enough for AC ampere
rating of charger as specified below:
Cord Length (Feet) 25' 50' 100'
Cord Size (AWG) 16 16 16
NOTE: AWG = American Wire Gauge
Do not operate charger with a damaged cord or plug,
which could cause shorting and electric shock. If damaged,
have the charger replaced by an authorized serviceman.
Do not operate charger if it has received a sharp blow,
been dropped, or otherwise damaged in any way.
Take it to an authorized serviceman for electrical check
to determine if the charger is in good working order.
Do not disassemble charger. Take it to an authorized
serviceman when service or repair is required. Incorrect
reassembly may result in a risk of electric shock or fire.
Unplug charger from outlet before attempting any
maintenance or cleaning to reduce the risk of electric
shock.
Disconnect charger from the power supply when
not in use. This will reduce the risk of electric shock or
damage to the charger if metal items should fall into the
opening. It also will help prevent damage to the charger
during a power surge.
Risk of electric shock. Do not touch un-insulated portion
of output connector or un-insulated battery terminal.
Save these instructions. Refer to them frequently and
use them to instruct others who may use this tool. If you
loan someone this tool, loan them these instructions also
to prevent misuse of the product and possible injury.
WARNING!
READ AND UNDERSTAND ALL INSTRUCTIONS.
Failure to follow all instructions listed below, may result
in electric shock, fire and/or serious personal injury.
Before using charger, read all instructions and cautionary
markings in this manual, on charger, battery, and product
using battery to prevent misuse of the products and
possible injury or damage.
WARNING:
Charge only one lithium-ion rechargeable battery at a
time. Other types of batteries may burst, causing personal
injury, fire, or damage. For compatible battery packs
see tool/appliance/battery pack/charger correlation
supplement 990000811.
Do not use charger outdoors or expose to wet or damp
conditions. Water entering charger will increase the risk
of electric shock.
Use of an attachment not recommended or sold by the
battery charger manufacturer may result in a risk of
fire, electric shock, or injury to persons. Following this
rule will reduce the risk of electric shock, fire, or serious
personal injury.
Do not abuse cord or charger. Never use the cord to
carry the charger. Do not pull the charger cord rather than
the plug when disconnecting from receptacle. Damage
to the cord or charger could occur and create an electric
shock hazard. Replace damaged cords immediately.
Make sure cord is located so that it will not be stepped
on, tripped over, come in contact with sharp edges
or moving parts or otherwise subjected to damage or
stress. This will reduce the risk of accidental falls, which
could cause injury, and damage to the cord, which could
result in electric shock.
Keep cord and charger away from heat to prevent
damage to housing or internal parts.
Do not let gasoline, oils, petroleum-based products,
etc. come in contact with plastic parts. They contain
chemicals that can damage, weaken, or destroy plastic.
IMPORTANT SAFETY INSTRUCTIONS
1. SAVE THESE INSTRUCTIONS - DANGER: TO REDUCE RISK OF FIRE
OR ELECTRIC SHOCK CAREFULLY FOLLOW THESE INSTRUCTIONS.
This manual contains important safety and operating instructions for battery charger S200.
2. Before using battery charger, read all instructions and cautionary markings on battery charger, battery, and product
using battery.
3. NOTICE: To reduce the risk of injury, charge only nickel-cadmium or lithium-ion rechargeable batteries. Other types
of batteries may burst, causing personal injury or damage.

3 — English
SYMBOLS
Some of the following symbols may be used on this product. Please study them and learn their meaning. Proper
interpretation of these symbols will allow you to operate the product better and safer.
Safety Alert Indicates a potential personal injury hazard.
Read Operator’s Manual To reduce the risk of injury, user must read and understand
operator’s manual before using this product.
Eye Protection Always wear eye protection with side shields marked to comply
with ANSI Z87.1.
Wet Conditions Alert Do not expose to rain or use in damp locations.
V Volts Voltage
Hz Hertz Frequency (cycles per second)
W Watt Power
Alternating Current Type of current
Direct Current Type or a characteristic of current
SYMBOL NAME DESIGNATION/EXPLANATION
The following signal words and meanings are intended to explain the levels of risk associated with this product.
SYMBOL SIGNAL MEANING
DANGER: Indicates an imminently hazardous situation, which, if not avoided, will result
in death or serious injury.
WARNING: Indicates a potentially hazardous situation, which, if not avoided, could result
in death or serious injury.
CAUTION: Indicates a potentially hazardous situation, which, if not avoided, may result in
minor or moderate injury.
NOTICE: (Without Safety Alert Symbol) Indicates important information not related to an
injury hazard, such as a situation that may result in property damage.
CALIFORNIA PROPOSITION 65
WARNING:
This product may contain chemicals, including lead, known to the State of California to cause cancer, birth defects or
other reproductive harm. Wash hands after handling.

4 — English
ASSEMBLY
WARNING:
Do not use this product if it is not completely assembled
or if any parts appear to be missing or damaged. Use of
a product that is not properly and completely assembled
or with damaged or missing parts could result in serious
personal injury.
WARNING:
Do not attempt to modify this product or create acces-
sories not recommended for use with this product. Any
such alteration or modification is misuse and could result
in a hazardous condition leading to possible serious
personal injury.
WARNING:
Do not allow familiarity with products to make you
careless. Remember that a careless fraction of a second
is sufficient to inflict serious injury.
WARNING:
Always wear eye protection with side shields marked to
comply with ANSI Z87.1. Failure to do so could result in
objects being thrown into your eyes resulting in possible
serious injury.
APPLICATIONS
You may use this product for the following purpose:
Charging Scotts®20 V Li-Ion battery packs
NOTICE:
If at any point during the charging process none of the
LEDs are lit, remove the battery pack from the charger
to avoid damaging the product. DO NOT insert another
battery. Return the charger and battery to your nearest
authorized service center for service or replacement.
NOTICE:
Charge in a well-ventilated area. Do not block charger
vents. Keep them clear to allow proper ventilation.
ENERGY SAVE MODE
The charger will enter Energy Save Mode when not charging
or when maintaining batteries. This allows the charger to
conserve energy by charging batteries only as needed, and
alsoprotectsthe cells and maximizes the life of your batteries.
If any parts are damaged or missing, please call 1-877-243-2774 for assistance.
OPERATION
CHARGING
See Figures 1 - 2, page 7.
Battery packs are shipped in a low charge condition to
prevent possible problems. Therefore, you should charge
them before first use. If the charger does not charge your
battery pack under normal circumstances, return both the
battery pack and charger to your nearest repair center for
electrical check.
Battery pack will be charged in approximately 45 minutes.
Make sure the power supply is normal household voltage,
120 volts, AC only, 60 Hz.
Connect the charger to a power supply.
Attach the battery pack to the charger by aligning the
raised ribs on the battery pack with the grooves in the
charger, then slide the battery pack onto the charger.
Ensure contacts on the battery pack engage properly
with contacts in the charger.
Do not place the charger in an area of extreme heat or
cold. It will work best at normal room temperature.
The battery pack may become slightly warm to the touch
while charging. This is normal and does not indicate a
problem.
When the battery pack is charged, the green LED will
remain on, indicating the charger is in Maintenance Mode.
After completing Maintenance Mode, the green LED
will begin fading on/off continuously. This indicates the
battery is charged and the charger is in Energy Save
Mode.
Charger will periodically wake from Energy Save Mode to
ensure the battery pack remains in a fully charged state.
To remove the battery pack from the charger, pull up on
the battery pack.

5 — English
OPERATION
WALL-MOUNTED CHARGING STATION
See Figure 3, page 7.
The charger can be mounted on the wall, which allows you to
recharge the battery pack while it is still installed in the tool.
Charger should be mounted on a wall stud using the
screws provided.
Position the charger close enough to an outlet so an
extension cord is not required. Wrap any excess cord
remaining after plugging in the charger around the charger
body.
Make sure to mount the charger high enough to prevent
unauthorized activation of the tool during charging.
With the battery installed and the tool turned off, place
the tool in the charger by aligning the raised ribs on the
tool housing with the grooves in the charger as shown.
Slide the tool down until it is fully seated on the charger.
CHARGING A HOT BATTERY PACK
When using a tool continuously, the battery pack may
become hot. A hot battery pack may be placed directly
onto the charger port but charging will not begin until the
battery temperature cools to within acceptable temperature
range. When a hot battery pack is placed on the charger,
the red LED will begin flashing and the green LED will be off.
When the battery pack cools, the charger will automatically
begin charging.
CHARGING A COLD BATTERY PACK
A cold battery pack may be placed directly onto the charger
port but charging will not begin until the battery temperature
warms to within acceptable temperature range. When a cold
battery pack is placed on the charger, the red LED will begin
flashing and the green LED will be off. When the battery
pack warms, the charger will automatically begin charging.
MODE BATTERY PACK RED
LED
GREEN
LED ACTION
Power
Without
battery pack ON
OFF Ready to charge battery pack.
Testing
Hot battery pack
Flashing
OFF
When battery pack reaches cooled temperature, charger
begins charge mode.
Cold battery pack When battery pack reaches warmed temperature, char-
ger begins charge mode.
Deeply discharged Charger pre-charges battery until normal voltage is
reached, then begins charge mode.
Defective
Defective
Fading
OFF Battery pack or charger is defective.
• If defective, try to repeat the conditions a second time by removing and reinstalling the battery pack. If the LED status repeats a
second time, try charging a different battery.
• If a different battery charges normally, dispose of the defective pack (see Maintenance section).
• If a different battery also indicates “Defective,” the charger may be defective.
Charging
Charging
ON Flashing
Battery is being charged.
Charged
Battery is charged OFF
ON
Battery is charged; charger is in Maintenance Mode.
Energy
Save Mode
Battery full /
Energy Save mode OFF
Fading
Battery is charged and charger is in Energy Save mode.
LED FUNCTION OF CHARGER

6 — English
MAINTENANCE
WARNING:
When servicing use only identical replacement parts. Use
of any other parts can create a hazard or cause product
damage.
WARNING:
To avoid serious personal injury, always remove the bat-
tery pack from the tool when cleaning or performing any
maintenance.
GENERAL MAINTENANCE
Avoid using solvents when cleaning plastic parts. Most
plastics are susceptible to damage from various types of
commercial solvents and may be damaged by their use. Use
clean cloths to remove dirt, dust, oil, grease, etc.
NOTE: FIGURES (ILLUSTRATIONS) START ON PAGE 7
AFTER FRENCH AND SPANISH LANGUAGE SECTIONS
WARNING:
Do not at any time let brake fluids, gasoline, petroleum-
based products, penetrating oils, etc., come in contact
with plastic parts. Chemicals can damage, weaken or
destroy plastic which can result in serious personal injury.
STORAGE
Always remove the battery pack before storing the charger
or any time the charger is unplugged.
This product has a Three-Year Limited Warranty.
Warranty details are available at www.scotts.com

7
Fig. 1
Fig. 2
A
D
B
C
A - Red LED (témoin rouge, indicador de rojo)
B - Green LED (témoin vert, indicador de verde)
C - Battery port (port de pile, port de batería)
D - Cord wrap (rembobineur, soporte para enrollar el cordón)
C
A - Red LED (témoin rouge, indicador de rojo)
B - Green LED (témoin vert, indicador de verde)
C - Depress latches to remove battery pack (enfoncer les attaches
pour retirer le bloc-pile, para extraer el paquete de baterías
oprima los pestillos)
B
A
Fig. 3
CHARGER SHOWN WITH S20200 STRING TRIMMER/EDGER
CHARGEUR ILLUSTRÉ AVEC UN TAILLE-BORDURES/COUPE-
BORDURES À FIL S20200
SE MUESTRA EL CARGADOR CON RECORTADORA DE HILO/
BORDEADORA S20200
A - Raised ribs on tool (nervures élevées sur l’outil, costillas realzadas en
la herramienta)
B - Charger grooves (rainures du chargeur, ranuras del cargador)
A
B

990000810
1-15-14 (REV:01)
OWT INDUSTRIES, INC.
P.O. Box 35, Highway 8, Pickens, SC 29671, USA
1-877-243-2774 www.scotts.com
PARTS AND SERVICE
Prior to requesting service or purchasing replacement parts, please obtain your model and serial number from the product
data plate and record in the spaces below.
Model No. ________________________Serial No. __________________________
To obtain replacement parts:
Replacement parts can be purchased online at www.scotts.com or by calling 1-877-243-2774. Replacement parts can also
be obtained at one of our Authorized Service Centers.
To locate an authorized service center:
Authorized Service Centers can be located online at www.scotts.com or by calling 1-877-243-2774.
To obtain customer or technical support:
To obtain Customer or Technical Support please contact us at 1-877-243-2774.
PIÈCES ET SERVICE
Avant de faire la demande de service ou l’achat de pièces de remplacement, veuillez obtenir le numéro de série du modèle à
partir de la plaque de données du produit et écrivez en dans les espaces ci-dessous.
Numéro de modèle ________________Numéro de série____________________
Pour obtenir les pièces de remplacement :
Les pièces de remplacement peuvent être achetées en ligne sur le site www.scotts.com ou par téléphone au 1-877-243-2774.
Les pièces de remplacement peuvent être obtenues à un de nos centres de service autorisés.
Pour trouver un centre de service autorisé :
Les centres de service autorisés peuvent être localisés en ligne au www.scotts.com ou en téléphonant au 1-877-243-2774.
Pour obtenir de l’aide en contactant le service à la clientèle :
Pour contacter le service à la clientèle pour une question technique ou pour tout autre renseignement, veuillez nous téléphoner
au 1-877-243-2774.
PIEZAS DE REPUESTO Y SERVICIO
Antes de solicitar servicio técnico o comprar piezas de repuesto, obtenga su modelo y número de serie de la placa de datos
del producto y escriba en los espacios suministrados a continuación.
Número de modelo________________Número de serie____________________
Para obtener piezas de repuesto:
Las piezas de repuesto se pueden comprar en nuestro sitio en la red mundial, en la dirección www.scotts.com o llamando al
1-877-243-2774. Las piezas de repuesto también se pueden obtener en uno de nuestros Centros de Servicio Autorizados.
Para localizar un centro de servicio autorizado:
Puede encontrar los Centros de Servicio Autorizados visitando nuestro sitio en la red mundial, en la dirección
www.scotts.com o llamando al 1-877-243-2774.
Para obtener servicio o asistencia técnica al consumidor:
Para obtener Servicio o Asistencia Técnica al Consumidor, sírvase comunicarse con nosotros llamando al 1-877-243-2774.
OPERATOR’S MANUAL
MANUEL D’UTILISATION / MANUAL DEL OPERADOR
20 Volt Lithium-Ion Battery Charger
Chargeur de batterie au lithium-ion 20 V
Cargador de baterías de iones de litio de 20 V
S200
Scotts®is a registered trademark of OMS Investments, Inc., and is used under license.
Scotts®est une marque déposée de OMS Investments, Inc., et est utilisée en vertu d’une licence.
Scotts®es una marca registrada de OMS Investments, Inc., y se utiliza conforme a una licencia.

S20200
20 Volt String Trimmer/Edger
Tondeuse à fouet/taille-bordure de 20 V
Recortadora de hilo/recortadora de bordes
de 20 V
OPERATOR’S MANUAL
MANUEL D’UTILISATION
MANUAL DEL OPERADOR
SAVE THIS MANUAL FOR
FUTURE REFERENCE
WARNING: To reduce the
risk of injury, the user must read and
understand the operator’s manual
before using this product.
ADVERTENCIA: Para reducir
elriesgo delesiones, elusuario debeleer
y comprender el manual del operador
antes de usar este producto.
AVERTISSEMENT :
Pour
réduire les risques de blessures,
l’utilisateur doit lire et veiller à bien
comprendrele manuel d’utilisationavant
d’employer ce produit.
TABLE OF CONTENTS
****************
Important Safety Instructions............2-3
Symbols ...............................................4
Features ...............................................5
Assembly .............................................6
Operation ..........................................7-8
Maintenance ...................................9-10
Troubleshooting .................................10
Warranty.............................................11
Parts Ordering and
Service ................................. Back Page
TABLE DES MATIÈRES
****************
Instructions importantes
concernant la securite ....................2-3
Symboles ...........................................4
Caractéristiques.................................5
Assemblage .......................................6
Utilisation ........................................7-8
Entretien........................................9-10
Dépannage.......................................10
Garantie ...........................................11
Commande de pièces
et réparation......................Page arrière
ÍNDICE DE CONTENIDO
****************
Instrucciones de seguidad
importantes.................................... 2-3
Símbolos............................................4
Características...................................5
Armado..............................................6
Funcionamiento............................. 7-8
Mantenimiento............................. 9-10
Corrección de problemas................10
Garantía ...........................................11
Pedidos de piezas
y servicio.......................Pág. posterior
CONSERVER CE MANUEL
POUR FUTURE RÉFÉRENCE
GUARDE ESTE MANUAL
PARA FUTURAS CONSULTAS
ACCEPTS ALL SCOTTS®20V BATTERY PACKS
BATTERIES AND CHARGERS SOLD SEPARATELY
COMPATIBLE AVEC TOUTES LE BLOC-PILES SCOTTS®DE 20 V
PILE ET CHARGEUR VENDUS SÉPARÉMENT
ACEPTA TODAS LOS PAQUETES DE BATERÍAS SCOTTS®DE 20 V
LAS BATERÍAS Y EL CARGADOR SE VENDEN POR SEPARADO

ii
See this fold-out section for all the figures
referenced in the operator’s manual.
Voir que cette section d’encart pour toutes les
figures a adressé dans le manuel d’utilisation.
Vea esta sección de la página desplegable para
todas las figuras mencionó en el manual del operador.
Fig. 1
A - Switch trigger and lock-out lever (gâchette
et levier de blocage, gatillo del interruptor y
palanca de seguro)
B - Trigger lock-out (verrouillage de la gâchette,
seguro del gatillo)
C - Battery fuel gauge (indicateur de niveau de
charge du bloc-piles, indicador de carga de
la batería)
D - Rotating rear handle (poignée arrière
rotative, mango delantero ajustable)
E - Adjustable front handle (poignée avant
réglable, mango delantero ajustable)
F - Telescoping shaft (arbre télescopique, brazo
telescópico)
G - Line cut-off blade (lame de sectionnement
de ligne, cuchilla de corte del hilo)
H - Grass defector (déflecteur d’herbe, deflector
de hierba)
A
Fig. 2
B
E
D
F
A - Trigger lock-out (verrouillage de la gâchette,
seguro del gatillo)
B - Switch trigger (gâchette, gatillo del
interruptor)
Fig. 5
H
B
A
Fig. 4
A - Latches (loquets, pestillos)
C
A - Grass deflector (déflecteur d’herbe, deflector
de hierba)
B - Trimmer head (tête de la tondeuse, cabezal
de la recortadora)
C - Line cut-off blade (lame de sectionnement
de ligne, cuchilla de corte del hilo)
D - Screws (vis, tornillos)
D
Fig. 3
A - Front handle (poignée avant, mango
delantero)
B - Wing bolt (boulon à oreilles,perno de
mariposa)
A
B
A
Fig. 6
C
G
A - Lock-out lever (levier de blocage, palanca de
seguro)
B - Switch trigger (gâchette, gatillo del
interruptor)
C - Raised ribs on tool (nervures élevées sur
l’outil, costillas realzadas en la herramienta)
D - Charger grooves (rainures du chargeur,
ranuras del cargador)
A
B
A
B
C
D

iii
A - Direction of rotation (sens de rotation,
sentido de la rotación)
B - Best cutting area (d’efficacité, área de corte
óptima)
C - Dangerous cutting area (zone de coup
dangereuse, área de corte peligrosa)
Fig. 10
A
B
C
A
Fig. 11
A - Black button (bouton noir, botón negro)
B - Line (ligne, hilo)
WIND CLOCKWISE
ENROULER DANS LE SENS HORAIRE
ENROLLE HACIA LA DERECHA
A - Spool retainer (retenue de bobine, retén del
carrete)
B - Tabs (languettes, pestañas)
C - Spool (bobine, carrete)
D - Slots (fentes, ranuras)
E - Eyelet (trou, agujero)
Fig. 15
A - Spool (bobine, carrete)
B - Hole (trou, agujero)
Fig. 16
A
B
Fig. 14
Fig. 9
Fig. 12
D
A
B
E
PROPER OPERATING POSITION
POSITION D’UTILISATION
CORRECTE
POSICIÓN CORRECTA
PROPER EDGING OPERATING POSITION
POSITION D’UTILISATION CORRECTE
POUR COUPE-BORDURES
POSICIÓN CORRECTA PARA EL MANEJO
DE LA CORTAR BORDES
A
A - Screw (vis, tornillo)
B - Line cut-off blade (lame coupe-ligne,
cuchilla de corte)
C
A
A - Rotating rear handle (poignée arrière
rotative, mango delantero ajustable)
B - Edging coupler (coupleur du taille-bordure,
acoplador para cortar bordes)
Fig. 13
B
B
Fig. 7
A - Telescoping shaft (arbre télescopique, brazo
telescópico)
B - Loosen (desserrer, aflojar)
C - Tighten (aflojar, asegurar)
D - Telescoping shaft coupler (coupleur du
arbre télescopique, acoplador del brazo
telescópico)
D
B
C
A
Fig. 8
A - Knob (bouton, perilla)
A
B

2 — English
WARNING!
When using electric gardening appliances, basic safety
precautions should always be followed to reduce the risk
of fire, electric shock and personal injury.
READ ALL INSTRUCTIONS
For safe operation, read and understand all instructions
before using this product. Follow all safety instructions.
Failure to follow all safety instructions listed below, can
result in serious personal injury.
Do not allow children or untrained individuals to use this
unit.
Check the work area before each use. Remove all objects
such as rocks, broken glass, nails, wire, or string which
can be thrown or become entangled in the machine.
Always wear eye protection with side shields marked to
comply with ANSI Z87.1. Following this rule will reduce
the risk of serious personal injury.
Use Safety Glasses – Wear a face or dust mask if the
operation is dusty. Always wear safety glasses with side
shields. Everyday glasses have only impact resistant
lenses. They are NOT safety glasses. Following this rule
will reduce the risk of eye injury.
Protect your lungs. Wear a face or dust mask if the op-
eration is dusty. Following this rule will reduce the risk of
serious personal injury.
Dress Properly – Do not wear loose clothing or jewel-
ery. They can be caught in moving parts. Use of rubber
gloves and substantial footwear is recommended when
working outdoors. Wear heavy, long pants, long sleeves,
boots, and gloves. Do not wear short pants, sandals, or
go barefoot. Do not wear jewelry of any kind.
Securelong hair above shoulder level to prevent entangle-
ment in moving parts.
Keep children away - Keep all bystanders, children, and
pets at least 50 ft. away.
Stay alert - Watch what you are doing. Use common
sense. Do not operate this unit when you are tired, ill, or
under the influence of alcohol, drugs, or medication.
Do not operate in poor lighting.
Keep all parts of your body away from any moving part.
Do not operate power tools in explosive atmospheres,
such as in the presence of flammable liquids, gases, or
dust. Power tools create sparks which may ignite the
dust or fumes.
IMPORTANT SAFETY INSTRUCTIONS
Avoidbody contact with groundedsurfacessuch as
pipes,
radiators, ranges, and refrigerators. There is an increased
risk of electric shock if your body is grounded.
Avoid Dangerous Environments - Don’t expose appliance
or string trimmer to rain or wet conditions. Water enter-
ing an appliance or string trimmer will increase the risk
of electric shock.
Use Right Appliance - Do not force tool. Use the correct
tool for your application. The correct tool will do the job
better and safer at the rate for which it is designed.
Don’t Force Appliance – It will do the job better and with
less likelihood of a risk of injury at the rate for which it
was designed.
Do not operate the equipment while barefoot or when
wearing sandals or similar lightweight footwear. Wear
protective footwear that will protect your feet and improve
your footing on slippery surfaces.
Do not overreach - Keep firm footing and balance. Over-
reaching can result in loss of balance.
Avoid accidental starting - Be sure switch trigger is in
the locked or off position before inserting battery pack.
Carrying tools with your finger on the switch trigger or
inserting the battery pack into a tool with the switch on
invites accidents.
Do not use tool if switch trigger does not turn it on or off.
Any tool that cannot be controlled with the switch trigger
is dangerous and must be repaired.
Disconnect battery pack - Disconnect battery pack from
the appliance before servicing or changing accessories
such as cutting line. Such preventive safety measures
reduce the risk of starting the tool accidentally.
Use only identical manufacturer’s replacement parts and
accessories. Use of any other parts may create a hazard
or cause product damage.
Maintain appliance with care - Replace string head if
cracked, chipped, or damaged in any way. Be sure the
string head is properly installed and securely fastened.
Failure to do so can cause serious injury. Keep handles
dry, clean and free from oil and grease.
Check for damaged parts - Before further use of the tool,
any part that is damaged should be carefully checked
to determine that it will operate properly and perform its
intended function. Check for alignment of moving parts,
binding of moving parts, breakage of parts, mounting,
and any other conditions that may affect its operation. A
guard or other part that is damaged should be properly
repaired or replaced by an authorized service dealer.

3 — English
Use only with battery and charger listed. For use with 20V
lithium-ion battery packs. See Tool/Appliance/Battery
Pack/Charger Correlation Supplement 990000811.
Do not dispose of the batteries in a fire. The cell may
explode. Check with local codes for possible special
disposal instructions.
Donotopenormutilate the batteries. Released electrolyte
is corrosive and may cause damage to the eyes or skin.
It may be toxic if swallowed.
Do not place battery tools or their batteries near fire or
heat. This will reduce the risk of explosion and possibly
injury.
Batteries can explode in the presence of a source of
ignition, such as a pilot light. To reduce the risk of seri-
ous personal injury, never use any cordless product in
the presence of open flame. An exploded battery can
propel debris and chemicals. If exposed, flush with water
immediately.
Do not crush, drop or damage battery pack. Do not
use a battery pack or charger that has been dropped or
received a sharp blow. A damaged battery is subject to
explosion. Properly dispose of a dropped or damaged
battery immediately.
Exercise care in handling batteries in order not to short the
battery with conducting materials suchas rings, bracelets,
and keys. The battery or conductor may overheat and
cause burns.
For best results, your battery tool should be charged in
a location where the temperature is more than 50°F but
less than 100°F. To reduce the risk of serious personal
injury, do not store outside or in vehicles.
Under extreme usage or temperature conditions, battery
leakage may occur. If liquid comes in contact with your
skin, wash immediately with soap and water. If liquid gets
into your eyes, flush them with clean water for at least 10
minutes,thenseek immediate medicalattention.Following
this rule will reduce the risk of serious personal injury.
Save these instructions. Refer to them frequently and
use them to instruct others who may use this power tool.
If you loan someone this power tool, loan them these
instructions also.
Make sure all guards, straps, deflectors and handles are
properly and securely attached.
Use only the manufacturer’s replacement line in the
cutting head. Do not use any other cutting attachment,
for example, metal wire, rope, or the like. To install any
other brand of cutting head to this string trimmer can
result in serious personal injury.
Never operate unit without the grass deflector in place
and in good condition.
Maintain a firm grip on both handles while trimming. Keep
string head below waist level. Never cut with the string
head located over 30 in. or more above the ground.
Store idle appliances indoors - When not in use, string
trimmer should be stored indoors in a dry, locked place
out of the reach of children.
Never use blades, flailing devices, wire or rope. Unit is
designed for line trimmer use only. Use of any other ac-
cessories or attachments will increase the risk of injury.
Inspect area to be cut. Remove objects (rocks, broken
glass, nails, wire, string, etc.) which can be thrown or
become entangled in cutting head.
Keep the air vents clean and free of debris to avoid over-
heating the motor. Clean after each use.
Stop the unit and disconnect the power source when not
in use. Carry the unit with the motor stopped.
Store out of the reach of children.
Do not hang unit so that the switch trigger is depressed.
Battery tools do not have to be plugged into an electrical
outlet; therefore, they are always in operating condition.
Be aware of possible hazards when not using your bat-
tery tool or when changing accessories. Always engage
the lock-out lever before placing the trimmer on the wall-
mounted charger. Following this rule will reduce the risk
of electric shock, fire, or serious personal injury.
Do not charge battery tool in rain, or damp or wet location.
Following this rule will reduce the risk of electric shock.
Do not use battery-operated appliance in rain.
Remove or disconnect battery when not charging, and
before servicing, cleaning, removing material from the
gardening appliance, or storing.
IMPORTANT SAFETY INSTRUCTIONS

4 — English
SYMBOLS
The following signal words and meanings are intended to explain the levels of risk associated with this product.
SYMBOL SIGNAL MEANING
DANGER: Indicates an imminently hazardous situation, which, if not avoided, will result
in death or serious injury.
WARNING: Indicates a potentially hazardous situation, which, if not avoided, could result
in death or serious injury.
CAUTION: Indicates a potentially hazardous situation, which, if not avoided, may result in
minor or moderate injury.
NOTICE: (Without Safety Alert Symbol) Indicates important information not related to an
injury hazard, such as a situation that may result in property damage.
Some of the following symbols may be used on this product. Please study them and learn their meaning. Proper
interpretation of these symbols will allow you to operate the product better and safer.
SYMBOL NAME DESIGNATION/EXPLANATION
Safety Alert Indicates a potential personal injury hazard.
Read Operator’s
Manual
To reduce the risk of injury, user must read and understand operator’s
manual before using this product.
Eye Protection Always wear eye protection with side shields marked to comply with
ANSI Z87.1.
Wet Conditions Alert Do not expose to rain or use in damp locations.
Keep Bystanders
Away Keep all bystanders at least 50 ft. away.
Ricochet Thrown objects can ricochet and result in personal injury or property
damage.
No Blade Do not install or use any type of blade on a product displaying this
symbol.
Recycle Symbol
This product uses lithium-ion (Li-ion) batteries. Local, state, or federal
laws may prohibit disposal of batteries in ordinary trash. Consult your
local waste authority for information regarding available recycling and/
or disposal options.
Direct Current Type or a characteristic of current
n
o
No Load Speed Rotational speed, at no load
.../min Per Minute Revolutions, strokes, surface speed, orbits etc., per minute
V Volts Voltage
Hz Hertz Frequency (cycles per second)
min Minutes Time

5 — English
FEATURES
PRODUCT SPECIFICATIONS
Motor...................................................................................................................................................................... 20 Volt DC
Cutting Swath............................................................................................................................................................ 10-12 in.
Line Size....................................................................................................................................0.065 in. or 0.080 in. twisted
KNOW YOUR STRING TRIMMER
See Figure 1.
The safe use of this product requires an understanding of
the information on the tool and in this operator’s manual as
well as a knowledge of the project you are attempting. Before
use of this product, familiarize yourself with all operating
features and safety rules.
ADJUSTABLE CUTTING DIAMETER
The cutting diameter is adjustable from 10 in. to 12 in. by
rotating the line cutoff blade.
ADJUSTABLE FRONT HANDLE
The front handle assembly can be adjusted for ease of
operation and to help prevent loss of control.
BATTERY FUEL GAUGE
The battery fuel gauge shows the amount of charge in the
battery when the trigger is depressed.
GRASS DEFLECTOR
The trimmer includes a grass deflector that helps protect
from flying debris.
LOCK-OUT LEVER
Engaging the lock-out lever prevents accidental starting or
unauthorized use.
ROTATING REAR HANDLE
The rotating rear handle can be locked in two different posi-
tions for ease of use when edging and trimming.
TELESCOPING SHAFT
The string trimmer can be adjusted to different extension
points for ease of use.
TRIGGER LOCK-OUT
The trigger lock-out prevents accidental starting.

6 — English
ASSEMBLY
UNPACKING
This product requires assembly.
Carefully remove the product and any accessories from
the box. Make sure that all items listed in the packing list
are included.
WARNING:
Do not use this product if any parts on the Packing List
are already assembled to your product when you unpack
it. Parts on this list are not assembled to the product by
the manufacturer and require customer installation. Use
of a product that may have been improperly assembled
could result in serious personal injury.
Inspect the product carefully to make sure no breakage
or damage occurred during shipping.
Do not discard the packing material until you have care-
fully inspected and satisfactorily operated the product.
If any parts are damaged or missing, please call
1-877-243-2774 for assistance.
PACKING LIST
String Trimmer
Adjustable Front Handle
Grass Deflector Assembly with Screws
Operator’s Manual
WARNING:
If any parts are damaged or missing do not operate this
product until the parts are replaced. Use of this product
with damaged or missing parts could result in serious
personal injury.
WARNING:
Do not attempt to modify this product or create
accessories not recommended for use with this product.
Any such alteration or modification is misuse and could
result in a hazardous condition leading to possible serious
personal injury.
WARNING:
To prevent accidental starting that could cause serious
personal injury, always remove the battery pack from the
product when assembling parts.
ATTACHING GRASS DEFLECTOR
See Figure 2.
WARNING:
The line cut-off blade on the grass deflector is sharp.
Avoid contact with the blade. Failure to avoid contact
can result in serious personal injury.
Remove supplied screws from the trimmer head with a
phillips screwdriver.
Fit the grass deflector into the slots on trimmer head.
Line up the screw holes in the grass deflector with the
holes in the trimmer head.
Install supplied screws and tighten by turning clockwise
with a phillips screwdriver.
ATTACHING THE FRONT HANDLE
See Figure 3.
Loosen and remove the wing bolt from the handle.
Install the handle on the rear handle pole in the area
indicated by the illustration.
Adjust handle up or down, if necessary, to desired
operating position.
Reinstall the wing bolt. Tighten wing bolt to secure.

7 — English
OPERATION
WARNING:
Do not allow familiarity with products to make you care-
less. Remember that a careless fraction of a second is
sufficient to inflict serious injury.
WARNING:
Always wear eye protection with side shields marked to
comply with ANSI Z87.1. Failure to do so could result in
objects being thrown into your eyes and other possible
serious injuries.
WARNING:
Never use blades, flailing devices, wire, or rope on this
product. Do not use any attachments or accessories not
recommended by the manufacturer of this product. The
use of attachments or accessories not recommended
can result in serious personal injury.
WARNING:
Always remove battery pack from your tool when you
are assembling parts, making adjustments, or cleaning.
Removing battery pack will prevent accidental starting
that could cause serious personal injury.
INSTALLING/REMOVING BATTERY PACK
See Figures 4 - 5.
To install battery pack:
Insert the battery pack into the product as shown.
Make sure the latches on each side of the battery pack
snap into place and the battery pack is secured before
beginning operation.
Check the battery fuel gauge while depressing the switch
trigger to determine the amount of charge remaining in
the battery pack.
To remove battery pack:
Depress the latches on each side of the battery pack.
Remove the battery pack.
NOTE: It is not necessary to remove the battery pack from
the tool to recharge.
With the battery installed, place the tool in the wall-
mounted charger by aligning the raised ribs on the tool
housing with the grooves in the charger as shown.
Slide the tool down until it is fully seated on the charger.
WARNING:
When charging the battery while installed on the tool,
always make sure to engage the lock-out lever to prevent
accidental starting. Failure to do so could result in serious
personal injury.
WARNING:
To avoid serious personal injury, always remove the bat-
tery pack and keep hands clear of the trigger lock-out
when carrying or transporting the tool.
STARTING/STOPPING THE STRING TRIMMER
See Figure 6.
To start the string trimmer, press and hold the trigger
lock-out, then depress the switch trigger.
To stop the string trimmer, release the switch trigger.
TELESCOPING SHAFT
See Figure 7.
The shaft can be extended or shortened for ease of use.
Remove the battery pack.
Loosen the telescoping shaft coupler by turning it coun-
terclockwise. Slide the shaft to the desired position.
Tighten the coupler by turning clockwise. Make sure the
shaft is securely tightened before reinstalling the battery
pack.
ADJUSTABLE FRONT HANDLE
See Figure 8.
The angle of the front handle can be adjusted 180°.
Remove the battery pack.
Set the trimmer on a flat surface and turn the knob coun-
terclockwise to loosen the handle.
For trimming, adjust the handle upward.
For edging, adjust the handle downward.
Turn the knob clockwise until the handle is securely
tightened before reinstalling the battery pack.
OPERATING THE TRIMMER
See Figure 9.
Follow these tips when using the string trimmer:
Hold the trimmer with your right hand on the rear handle
and your left hand on the front handle.
Keep a firm grip with both hands while in operation.
Trimmer should be held at a comfortable position with
the rear handle about hip height.
Cut tall grass from the top down. This will prevent grass
from wrapping around the shaft housing and string head
which may cause damage from overheating.
If grass becomes wrapped around the string head:
Remove the battery pack.
Remove the grass.
This manual suits for next models
2
Table of contents
Other Scotts Trimmer manuals

Scotts
Scotts LPHT12122S User manual

Scotts
Scotts LST01562S User manual

Scotts
Scotts HT10020S User manual

Scotts
Scotts LST02012S User manual

Scotts
Scotts LHT12462S User manual

Scotts
Scotts LST01540S User manual

Scotts
Scotts S20600 User manual

Scotts
Scotts LHT12224S User manual

Scotts
Scotts LHT12440S User manual

Scotts
Scotts LST01324S User manual