SCULPFUN iCube Series User manual

English Deutsch Français Italiano Español polski
iCube Pro -5W iCube ProMax -10W
iCube -3W
Desktop laser engraving machine user manual

1. Product Structure ------------------------------ 1
2. Focus ------------------------------------------- 2
3. APP software download and installation ----- 3
4. Connect the machine to WiFi ----------------- 3
5. Introduction to APP interface ----------------- 5
6. PC software introduction ---------------------- 9
7. Filter cotton replacement --------------------- 10
8. FAQ --------------------------------------------- 11
iCube Machine User Manual
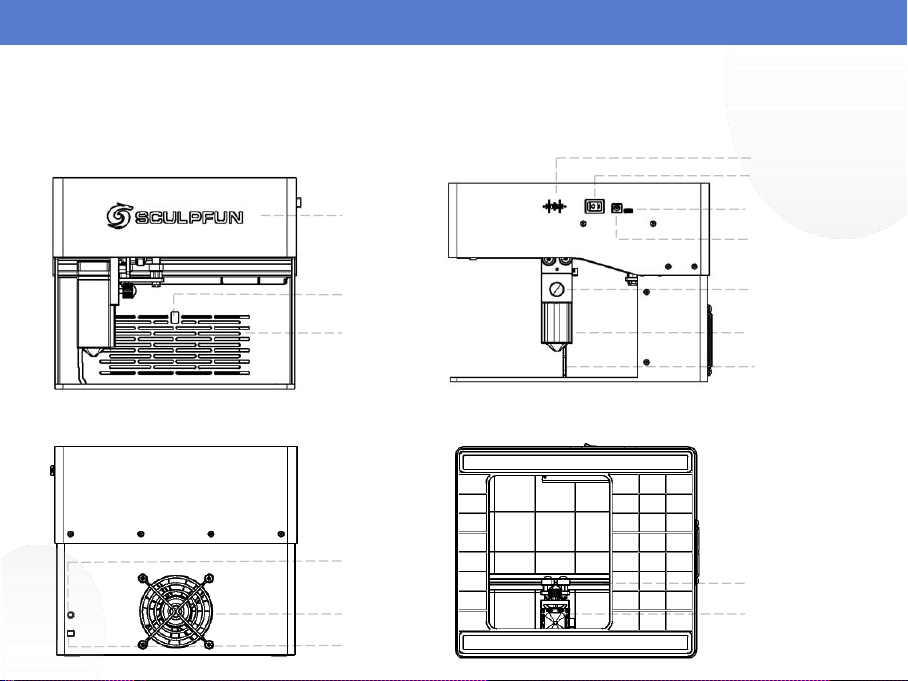
①Front view
④Bottom view
②Right view
③Back view
Host
Temperature
Sensor
filter Laser module
Fold and focus
TYPE-C interface
Power interface
ON/OFF switch
buzzer
Thumb screws
fan Laser module
Y axis
tracheal hole
wire hole
1 © Sculpfun 2023
iCube Machine User Manual
1. Product structure chart

iCube Machine User Manual
2. Focus
① Put down the focusing column on the left side of the laser head, turn the right
hand screw, place the laser head at a suitable height, tighten the screw, and
retract the focusing column.
② When carving objects of different heights, you need to refocus to ensure the
working effect.
2
engraved objects
iCube Machine User Manual
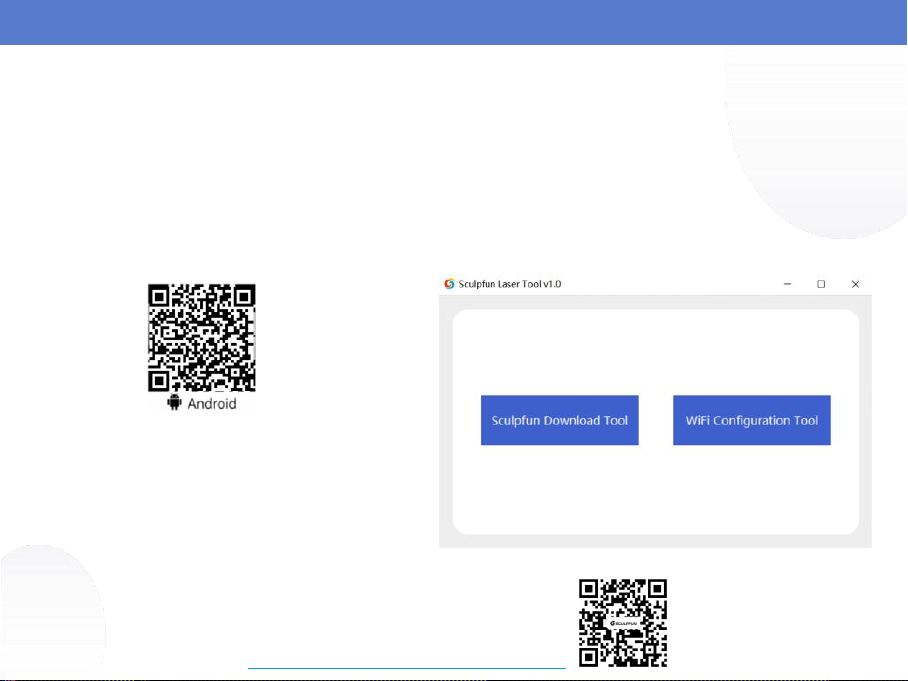
3. APP software download and
installation
①Scan the code to enter the official website
to download Sculpfun Laser Tool (MAC
& WIN)WiFi configuration software
②Download Android mobile APP OR search
sculpfun in Apple store
4. Connect the machine to WiFi
①Connect device to power
②For the first configuration, you need to connect
the data cable to the computer.
③Pass Sculpfun Laser Tool Software settings
④Choose WiFi Configuration Tool
Note: The software upgrade interface may
change. Scan the QR code or follow the
official YOUTUBE channel to get the latest
detailed usage video tutorials.
https://www.youtube.com/@SCULPFUNReal
Note:
1. Android needs to use a browser to scan
the QR code to download.
2. After successful installation, you need
to give corresponding permissions
3

iCube Machine User Manual
①Select the COM corresponding
to the machine
②Click Connect to connect the
machine
①Enter the WIFI name and password at home
②Click Connect WiFi
③Click Get IP to obtain the IP address of the current
machine. At this time, you can unplug the data cable
and transfer it to the mobile APP for operation.
①
②
①
②
③
4

iCube Machine User Manual
5. Introduction to mobile APP interface
①Fill in the machine WiFi
address
②Click Connect to connect
the machine
1
2
① Set up
User Agreement/Privacy
Terms/Version
Information/Language Settings
② Machine information
Machine name/IP address
3
③ Creation
Camera/Built-in material
library/Picture library/Brush/QR
code/Edit text
4
5 6
④ Control
Control engraving machine
movement
⑤ Graving
View files uploaded on the
machine
⑥ Visit official website
5
iCube Machine User Manual
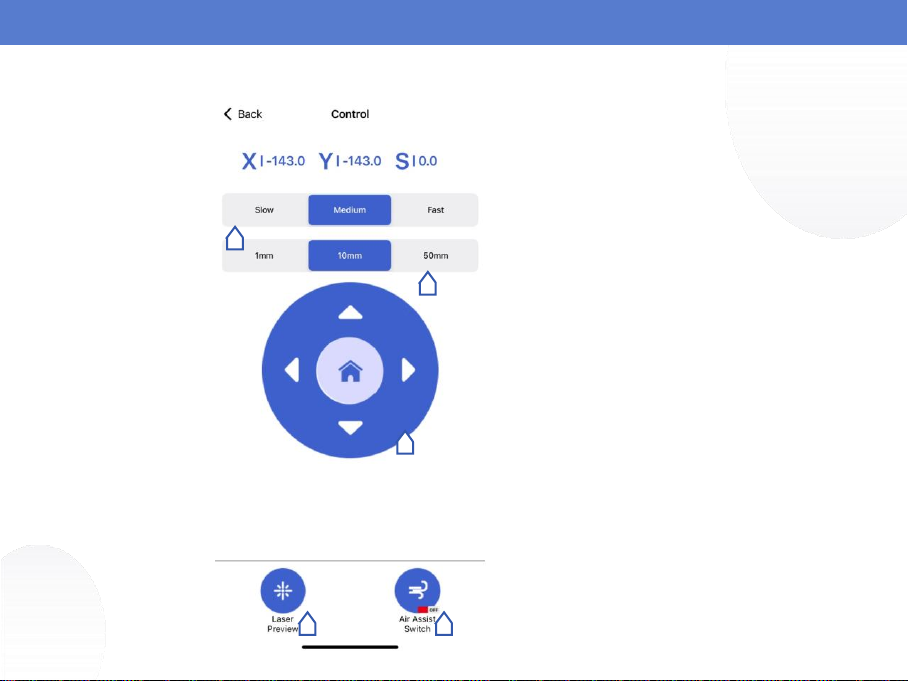
5.0 Control interface
1
2
① Set the laser moving speed
② Set the distance the laser moves
in a single click
3
③ Control Panel
The middle is reset
4 5
④ laser preview
⑤ Air assist (stay tuned)
6

iCube Machine User Manual
5.1 Introduction to APP creation
interface
①Eraser
②Brush
③Drawing area
④Insert
shape/QR code
⑤Operating
area/text input
⑥Material import
1 2
3
4
5
6
5.2 Engraving mode selection
①Mode selection
②Corresponding
mode parameter
settings
③Reset
parameters
④After selecting
the mode and
parameters,
select Next to
prepare for
engraving.
1
2
34
7

iCube Machine User Manual
5.3 Engraving parameter settings
① Name the file name
②Adjust engraving
size
③Set engraving speed
④Set engraving power
⑤Move laser position
⑥Engraving preview
⑦Upload engraving
file
⑧Air assist switch
(stay tuned)
① ②
③ ④
⑤ ⑥ ⑦
⑧
①After the upload is
completed, the
machine will start the
engraving task
②Displays the engraving
progress bar, and the
bottom can control the
machine to pause and
start
③Just wait for the
engraving to be
completed
5.4 Engraving interface
8
This manual suits for next models
3
Table of contents
Languages:


