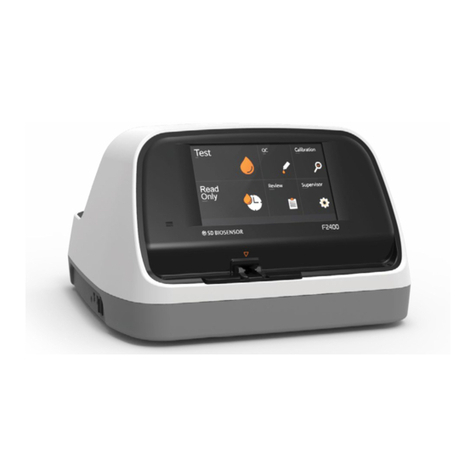
SD Biosensor F100 User manual

STANDARD F100 ANALYZER USER MANUAL
Head office C-4th&5th, 16, Deogyeong-daero, 1556beon-gil, Yeongtong-gu, Suwon-si, Gyeonggi-do, 16690, REPUBLIC OF KOREA
Manufacturing site
74, Osongsaengmyeong 4-ro, Osong-eup, Heungdeok-gu, Cheongju-si, Chungcheongbuk-do, 28161, REPUBLIC OF KOREA
Manufactured by


STANDARDTM
Thank you for your purchase of the STANDARD F100 Analyzer.
This user manual contains all the information needed to use the analyzer and keep
it ready to operate. Please read this user manual carefully before using the analyzer.
Familiarize yourself with the required preparations and the measurement procedure
before performing the rst measurement. Also read the package inserts of the test
strips to be used for the planned test.
If you have any questions about the analyzer, please contact your healthcare pro-
fessional or local distributor. You can also visit www.sdbiosensor.com for product
demonstrations.
Thank you again for choosing the STANDARD F100 analyzer.

4
TABLE OF CONTENTS
CHAPTER 01. General Information ............................................................... 6
Main Menu Structure...............................................................................6
Symbol .....................................................................................................7
Brief Precautions and Limitations...........................................................8
CHAPTER 02. Introduction ............................................................................. 9
Intended Use: Purpose of the Analyzer..................................................9
Product Description.................................................................................9
Before You Start Testing..........................................................................9
System Components.............................................................................10
STANDARD F100 Analyzer ...................................................................10
STANDARD F100 Display .....................................................................12
Power Supply.........................................................................................13
CHAPTER 03. Setting and Performing ....................................................... 14
Operating the Analyzer..........................................................................14
Set the Analyzer.....................................................................................15
Performing a Measurement...................................................................30
Standard Test and Read Only Modes ..................................................31
CHAPTER 04. Using the Analyzer Memory and Data Transfer............... 33
Displaying Stored Measured Values.....................................................33
Delete Memory ......................................................................................33
Printing ...................................................................................................33
Data Transfer .........................................................................................34
CHAPTER 05. Calibration Set Test .............................................................. 35
Calibration Set Test................................................................................35
How to Use the Calibration Set ............................................................35
CHAPTER 06. Shut down, Cleaning and Maintenance............................ 37
Shut Down .............................................................................................37
Cleaning your Analyzer..........................................................................37
Maintenance and Transportation ..........................................................37

5
CHAPTER 07. Screen Messages and Troubleshooting ........................... 38
Warning Messages ................................................................................38
Error Messages......................................................................................39
ANNEX 01. Information for Healthcare Professionals......................... 41
Protection against Infections ................................................................41

6
CHAPTER 01. General Information
MAiN MENu STRuCTuRE
Setting
Read
Only Calibration Review
Standard
Test
Unit SetTime Set Beep Next Page Back
Date Set
Delete
Memory
Print Set F/W Info Back
F/W Version F/W Update
Back
Language
Set

7
SyMbol
The packaging materials, labels and instruction for use for STANDARD F100
analyzer may contain the following symbols or abbreviations which are listed
below with their meaning.
Symbol Description
Manufacturer
In vitro diagnostic medical device
Intended to use outside the body.
v
Consult instructions for use
Reference number
Date of manufacture
Indicate the date of manufacture for this analyzer
Serial number for this analyzer
Note
Indicate that the product is fragile and you need to handle it with care
Batch code
Indicate the lot number for this system
Crossed out wheeled bin
Discard it separately from other household waste
Fulfill the requirements of Directive 98/79/EC on in vitro diagnostic
medical devices
Indicate that you should keep the product dry
Caution!
Indicate a situation, which if not avoided could result in damage to the
device or incorrect results.
Potential Biohazard!

8
bRiEF PRECAuTioNS AND liMiTATioNS
Caution
• For in vitro diagnostic use.
• Always operate the STANDARD F100 analyzer on a surface
that is level and dry and not in direct sunlight.
• STANDARD F100 analyzer has internal correction for normal
levels of ambient light, but highly intense light falling into the
analyzer may cause serious interference with the measurement
and must be avoided.
• Never move the analyzer while there is a test in progress.
• Do not drop the analyzer as it could damage the unit.
• Do not attempt to open or disassemble the analyzer.
• Do not immerse in water or cleaning solutions.
• Dispose of the battery and accessories in accordance with
local guidelines.
To reduce the risk of incorrect results
• The STANDARD F100 analyzer should be used by trained operators.
• Do not use if the analyzer is reporting an error condition that cannot be
corrected.
• To obtain accurate results, refer to the assay-specic package insert for details
on specic tests.
• Use the test kit within the expiration dating.
Potential
Biohazard!
To reduce the risk of biohazard
• Dispose of used specimens in accordance with federal, state
and local requirements.
• Treat specimens and patient samples as potentially
biohazardous material.
• Seek specic training or guidance if you are not experienced
with specimen collection and handling procedures.
• Use of nitrile, latex, or other gloves is recommended when
handling patient samples.

9
CHAPTER 02. Introduction
Intended Use: Purpose of the Analyzer
The STANDARD F100 analyzer works to measure the quantitative or qualitative
measurement of body uid such as blood, urine, nasal mucus, and so on. The
analyzer is indicated for monitoring or diagnosing the body fluid parameter.
The STANDARD F100 analyzer should be used with the specified test strips.
This analyzer is indicated in clinical settings by healthcare professionals. The
STANDARD F100 analyzer intended to be used with the specific test strip
manufactured by SD BIOSENSOR, Inc.
Product Description
The STANDARD F100 analyzer is an optoelectronic instrument that uses a
reectance-based measurement method to evaluate the line signal (uorescent or
visible ray) intensities on the assay test strip, and a specic algorithm to determine
the quantitative or qualitative results of any target analyte(s). The analyzer
then displays the test results to the user in the screen. The result can also be
automatically printed through an external printer if it has connected to the analyzer.
Before You Start Testing
Note
Carefully read and follow the instructions in the user manual
and package inserts for the test strips and control solutions. It
is very important to follow the instructions in order to prevent an
incorrect result or improper treatment.
Before use, please check the latest version of software from your
distributor and head ofce. Then update and start measuring.
Samples
The STANDARD F100 analyzer should be only used the specic test strips for
STANDARD F100 analyzer. Because samples are quite different to the test strip’s
parameter, follow the instruction from the reference of the test strip’s manual.
Safety information
There is a potential risk of infection. We recommend that healthcare professionals
using the STANDARD F100 analyzer to perform measurements for more than one
patient use gloves and follow all other locally applicable health and safety regulations.

10
Operating conditions
To ensure proper function of your STANDARD F100 analyzer, observe the
following guidelines.
• The STANDARD F100 analyzer is only for interior use.
• Operate the analyzer only within the acceptable environmental conditions;
temperature: 0-50°C, humidity: 10-93%.
• In order to perform a measurement, place the analyzer on a level surface or
hold it in your hand.
• Strong electromagnetic elds may impair the function of the analyzer. Do not
use the analyzer close to sources of strong electromagnetic radiation.
• The analyzer's air vents must be free for air. (Do not cover the air vents.)
• If the analyzer cause a sudden malfunction, unplug the AC adapter from the outlet.
System Components
Inspect the shipping container for obvious shipping damage prior to opening.
Unpack the shipping container and inspect the unit and components for damage.
STANDARD F100 Analyzer
Specication
Analyzer STANDARD F100 analyzer
Power Supply Input: AC 100~240 V, 50/60 Hz
(Voltage tolerance ± 10 %) Output: DC 5V/2A
Power Consumption Max 5W
Over Voltage Category II
Pollution Degree II
Labeling User Manual, Quick Guide
Rating Power Supply DC 5 V
Accessories of the STANDARD F100 Analyzer
Item Details
Accessory STANDARD F Calibration Set F CAL-1, F CAL-2, F CAL-3
Batteries 4 Batteries (1.5 V, AA)
Optional
STANDARD F Test Device Specic test device manufactured
by SD Biosensor, Inc.
Barcode scanner USB Barcode scanner
STANDARD Printer Portable printer
Printer paper
AC/DC Power Adaptor
Input: AC 100~240 V, 50/60 Hz
(Voltage tolerance ± 10 %)
Output: DC 5V/2A
BT Dongle
With a BT Dongle connection, checking test results in mobile application and
using a wireless printer are available.

11
Overview of F100 Analyzer
C.LCD
H.Battery Compartment Lid
I.DC Jack Port
D.Right Button
E.Strip Slot
B.Center (Enter) Button
A.Left Button
F.PC Communication Port
G.Printer Port, Additional Port
A. Left Button : Use for moving cursor or exit test mode
B. Center (Enter) Button : Use for power on/off or menu selection
C. LCD Display
D. Right Button : Use for moving cursor
E. Strip Slot : Part for inserting a test strip to analyzer

12
F. PC Communication Port : Use for downloading test results to a personal
computer. (if you have software) or use for upgrading analyzer’s software
G. Printer Port, Additional Port : Print test results to external thermal printer
(If you have STANDARD thermal printer)
H. Battery Compartment Lid : Provide access to the battery compartment
(4 AA 1.5V alkaline batteries)
I. DC Jack Port : Connect power supply adapter 5V/2A
STANDARD F100 Display
Battery level Beep ON
AC adapter in Test strip
Printing External device
Desktop Control solution
Sample Processing
Expired date Temperature
Test strip's
barcode

13
Power Supply
5V/2A AC/DC power adapter or 4 AA alkaline batteries can be used.
When using batteries, to save power, the analyzer turns itself off after 1 minutes
unless a button is pressed or a new test strip is inserted. When the analyzer
turns itself off, all test results obtained so far remain in the memory. With a set of
fresh batteries, you will normally be able to perform at least 50 measurements.
When the low battery (empty display) warning is displayed, approximately 10
measurements can still be performed. In this case, replace the batteries as soon
as possible.

14
CHAPTER 03. Setting and Performing
Operating the Analyzer
Before using the analyzer, check the following steps as a priority.
5V/2A AC/DC power adapter or 4 AA alkaline batteries can be used for
STANDARD F100 analyzer.
STEP 1-1. Insert batteries
The requested batteries are 1.5V AA-sized alkaline manganese batteries. To avoid
the risk of trouble, do not use rechargeable batteries in the STANDARD F100
analyzer.
1. Open the battery lid by slightly pressing the cover towards the center of the
analyzer.
2. Remove the battery lid from the analyzer.
3. Insert four batteries into the compartment according to the illustrations. Please
set the batteries with correct polarity orientation. “+” (battery head) and “–”
(terminals).
4. Close the battery lid.
5. Turn the analyzer if batteries work properly or not.
6. Check the function of display to prevent misinterpretations.
Note
• If the display screen does not function for a long time, you can
press the center button for few seconds (the next time you
switch on the analyzer). The display screen is then shown for
the time when you press the button.
• After replacing the batteries, verify that the time and date are
correct. If they are not, reset the analyzer.
• Because batteries with different capacities can induce the
malfunction of the analyzer, replace all four batteries at the
same time.

15
STEP 1-2. Connect AC/DC adapter jack
1. SD BIOSENSOR doesn’t provide adopter. (You can use AC/DC adapter jack
that is 4 mm external-diameter and 1.7 mm internal-diameter, and output is
5V/2A.)
2. Connect AC/DC adapter jack to the DC jack port at the back of analyzer.
3. The adopter must compliance with EN ISO 61010.
Note
If the batteries are already inserted and then DC adapter jack is
connected, the analyzer use a power only from AC/DC jack.
Set the Analyzer
Brief overview of the analyzer settings
Stage Setting Detailed Setting Default Setting
1Date Set Format: mm-dd/dd-mm
Year/Month/Day Current Date
2Time Set Format: 24h-12h
Hour/Minute/Second 24h/Current Time
3Unit Set HbA1c NGSP %
4Beep Set On
Off On
5Language Set English
Chinese English
6Print Set Auto Print: On / Off
Copies 1 / 2 Auto Print On/Copies 1
7Delete Memory Delete all memory -
8 F/W Info F/W Version
F/W Update Current F/W Information
* The new analyzer is set-up with “Default setting” format.

16
Entering set mode
Setting
Read
Only Calibration Review
Standard
Test
Unit SetTime Set Beep Next Page Back
Date Set
Delete
Memory
Print Set F/W Info Back
F/W Version F/W Update
Back
Language
Set
1. If you want to enter the setting mode, press the ◄or ►button to move the
cursor.
2. To select the setting mode or turn on/off the analyzer, press the center button.
3. If you select the ‘Setting’, total 8 menu will be displayed.
4. The setting procedure can be terminated at any time by pressing the Back
button.
Left button Center button Right button
◄►
Move cursor Select Move cursor

17
Main Menu
Date Setting Menu Language Setting Menu

18
Date Set
At 1st stage, set the date.
Setting
Read
Only Calibration Review
Standard
Test
Unit SetTime Set Beep Next Page Back
Date Set
Delete
Memory
Print Set F/W Info Back
F/W Version F/W Update
Back
Language
Set
The rst menu is ‘Date Set’. In the Setting Menu, select the ‘Date Set’ to change
the present date. You can set up the year, month, day, and month-day or day-
month format.
Left button Center button Right button
◄►
Move cursor Select Move cursor
Default Setting: mm-dd, current date

19
Time Set
At 2nd stage, set the time.
Setting
Read
Only Calibration Review
Standard
Test
Unit SetTime Set Beep Next Page Back
Date Set
Delete
Memory
Print Set F/W Info Back
F/W Version F/W Update
Back
Language
Set
The second menu is ‘Time Set’. You can set up the hour, minute, second, and
12h or 24h time format. After choosing the 12h or 24h format, you can press the
button to update the current time.
Left button Center button Right button
◄►
Move cursor Select Move cursor
Default Setting: 24h/Current time

20
Unit Set
At 3rd stage, set the unit.
Setting
Read
Only Calibration Review
Standard
Test
Unit SetTime Set Beep Next Page Back
Date Set
Delete
Memory
Print Set F/W Info Back
F/W Version F/W Update
Back
Language
Set
The third menu is ‘Unit Set’. Unit set is only for quantitative analysis STANDARD
F100 analyzer applies corresponding unit. When you carry out the quantitative
analysis of sample, STANDARD F100 analyzer applies corresponding unit. The
parameters can be increased by update of analyzer software.
Left button Center button Right button
◄►
Move cursor Select Move cursor
Ex : HbA1c
Table of contents
Other SD Biosensor Measuring Instrument manuals