Sea & Sea 2G User manual

Camera User Guide
Basic Operations
If you are using the camera for the first time, read this section.
This section provides a basic overview of how to turn on the camera, take
pictures and play back pictures.
Advanced Operations
Read this section when you want to learn more about the different
camera functions.
This section provides more detailed information about the functions used to
take pictures and play back pictures, as well as information on how to
customize the camera settings, print pictures, and use the camera with a
computer.
The rechargeable lithium-ion battery needs to be charged before use. The
battery is not charged at the time of purchase.
The serial number of this
product is given on the bottom
face of the camera.

This manual provides information on how to use the shooting and playback
functions of this product, as well as warnings on its use.
To make the best use of this product’s functions, read this manual thoroughly
before use. Please keep this manual handy for ease of reference.
This publication may not be reproduced in whole or in part without the express written permission.
The contents of this document may be changed in the future, without prior notice.
This booklet was created with thorough attention to its content. If, however, you have a question, spot an
error, or find a description lacking, please refer to the end of this booklet for information on how to contact us.
Microsoft, MS, Windows, and Windows Vista are registered trademarks of Microsoft Corporation in the
United States of America and other countries.
Macintosh, Power Macintosh, and Mac OS are registered trademarks of Apple Inc. in the United States of
America and other countries.
Adobe and Adobe Acrobat are trademarks of Adobe Systems Incorporated.
All trademarked company and product names mentioned in this manual are the property of their respective
owners.
Safety Precautions For the safe use of your camera, be sure to read the safety precautions
thoroughly.
Test Shooting Please be sure to do some test shooting to make sure it is recording
properly before normal use.
Copyright Reproduction or alteration of copyrighted documents,magazines, music
and other materials, other than for personal, home or similarly limited
purposes, without theconsentof the copyright holderis prohibited.
Exemption from Liability We assumesno liability forfailure to record or play back images caused by
malfunction of this product.
Radio Interference Operating this product in the vicinity of other electronic equipment may
adversely affect the performance of both devices. In particular, operating
the camera close to a radio or television may lead to interference. If
interference occurs, follow the procedures below.
•Move the camera as far away as possible from the TV, radio or other
device.
•Reorient the TV or radio antenna.
•Plug the devices into separate electrical outlets.
Preface

1
The following two manuals are included with this camera.
The camera is provided with the Irodio Photo & Video Studio software that
allowsyoutodisplayandeditimagesonyourcomputer.ForhowtouseIrodio
Photo & Video Studio, see the displayed “Help”.
For more information on Irodio Photo & Video Studio, contact the Customer
Support Center below.
North America (U.S.) TEL: (Toll Free) +1-800-458-4029
Europe
UK, Germany, France and Spain: TEL: (Toll Free) +800-1532-4865
Other Countries: TEL: +44-1489-564-764
Asia TEL: +63-2-438-0090
China TEL: +86-21-5385-3786
Business hours: 9:00 AM to 5:00 PM
“Camera User Guide” (This booklet)
This guide explains the usage and functions of the camera. It
also explains how to install the provided software on your
computer.
“Software User Guide” (PDF file)
The “Software User Guide” is available in the following folders
on the provided CD-ROM.
Thisguideexplains how to download images from thecamera
to your computer and display and edit them on your computer.
Using These Manuals
Each language has its own
“Software User Guide” in its
respective language folder. The
“Camera User Guide” for
languages other than Japanese
and English are also included in
these folders.
To copy the User Guide onto
yourharddisk,copythePDF file
from the respective folder
directly to your hard disk.
2
* The illustrations shown in this manual may differ from the actual items.
Wide-angle zoom lens can capture wide-
angle pictures
This camera has a compact body only
25 mm thick, featuring a 24-72 mm* 3×
optical zoom lens that covers a wide range
of shooting.Thewide-angle lensisgreat for
capturing buildings, landscape scenes,
group photos, and more.
*Equivalent to that on a 35 mm camera
Camera shake correction function
reduces blurring (P.131)
The camera comes with a camera shake
correction function to allow you to take
clearer pictures with minimized blurring
even indoors, at night and in other
situations where camera shake may occur.
Aperture priority mode, manual
exposuremode,andprogramshiftmode
for fine-tuned adjustments
You can manually set the aperture value
and shutter speed. This small, compact,
and lightweight camera has advanced
modes that rival those of digital SLR
cameras.
CCD with approx. 12.1 effective megapixels
and RAW mode capable of recording up to
5 consecutive shots (P.99)
The camera has a CCD with approx. 12.1 million
effective pixels to ensure high-resolution images.
WithRAW mode, you canalso usethecamera’s
imageprocessingenginetosavetherawpicture
data as a DNG file (up to five consecutive
images) before converting it to JPEG format.
This makes it possible to perform high quality
image processing on a computer with minimal
image quality deterioration (requires image
editing software that supports DNGfiles). When
takingpicturesinRAWmode,aJPEG filebased
on the DNG file is recorded at the same time.
Key Features

3
Macroshooting(P.42)at1cm,plusclose-up
flashshooting(P.44)at20cmforwide-angle
and 15 cm for telephoto shots
The camera is equipped with close-up
functions that allow you to take pictures at a
distance ofonly 1cmforthe wide-angleside
and 4 cm for the telephoto side, from the
front of the lens to the subject.
Sincetheflashsupportsdistancesofonly20
cm for the wide-angle side and 15 cm for the
telephoto side, you can also take clear
macro shots even under low light conditions.
Electronic levelfunction tohelp keep the
image level (P.60)
The camera is equipped with an electronic
level function that is useful for keeping the
image levelwhentakingpicturesof scenery
or buildings. The camera uses a level
indicator displayed on the picture display
and a level sound to let you know whether
the image is level.
Up-down dial and ADJ. lever for faster
and easier operations (P.20)
You can use the up-down dial and ADJ.
lever to quickly and easily make the
shooting settings and various menu
operations.
You can also press the ADJ. lever to easily
select ADJ. mode (P.66) and make various
shooting settings.
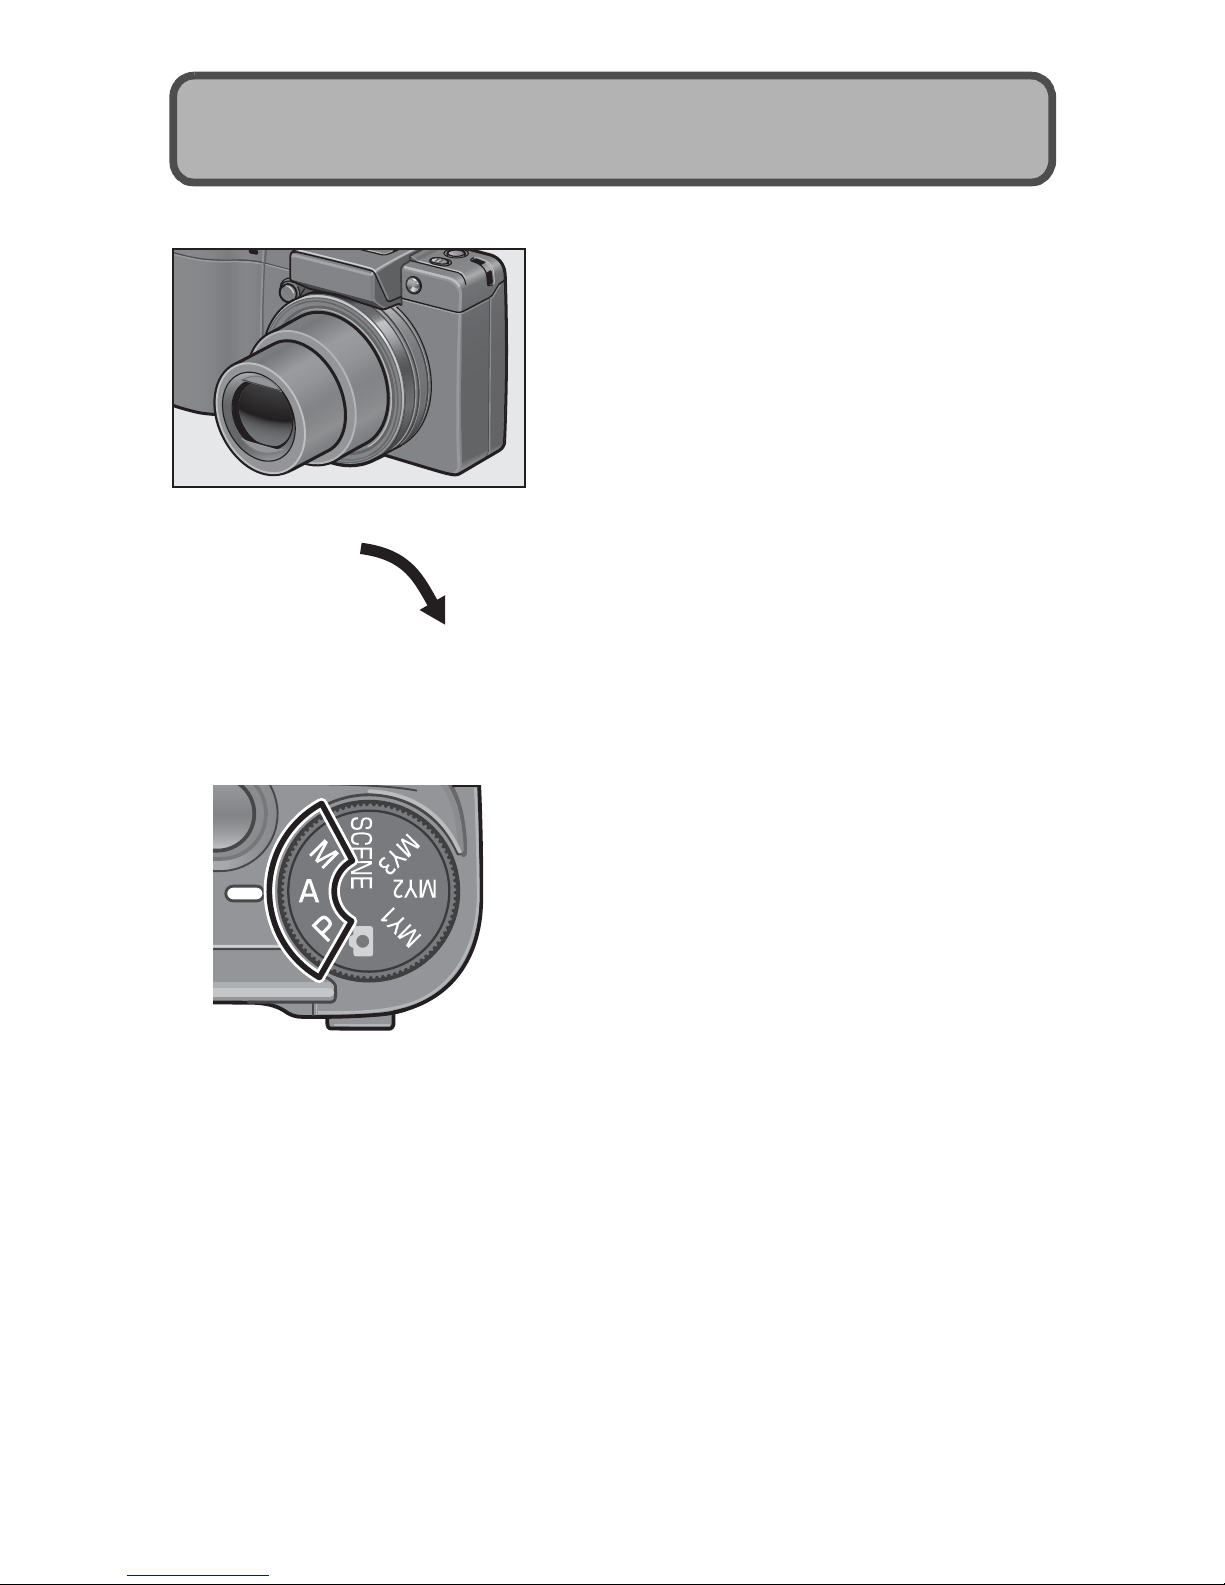
Easily customize your favorite shooting
settings with my settings mode (P.93)
Youcan customizethreegroupsofsettings,
and then turn the mode dial to MY1/MY2/
MY3 to shoot with those registered settings.
4
Fn (Function) buttons enables easy
modeswitchingwithasinglepushofthe
button (P.189)
When a function is assigned to either of the
two Fn (Function) buttons, you can perform
the assigned function, such as switching to
JPEG mode or RAW mode, switching to auto
focus ormanual focus, or switching to color or
black-and-white mode,simply by pressingthe
Fn1/Fn2 button. You can also assign various
other shooting settings to the Fn1/Fn2 button.
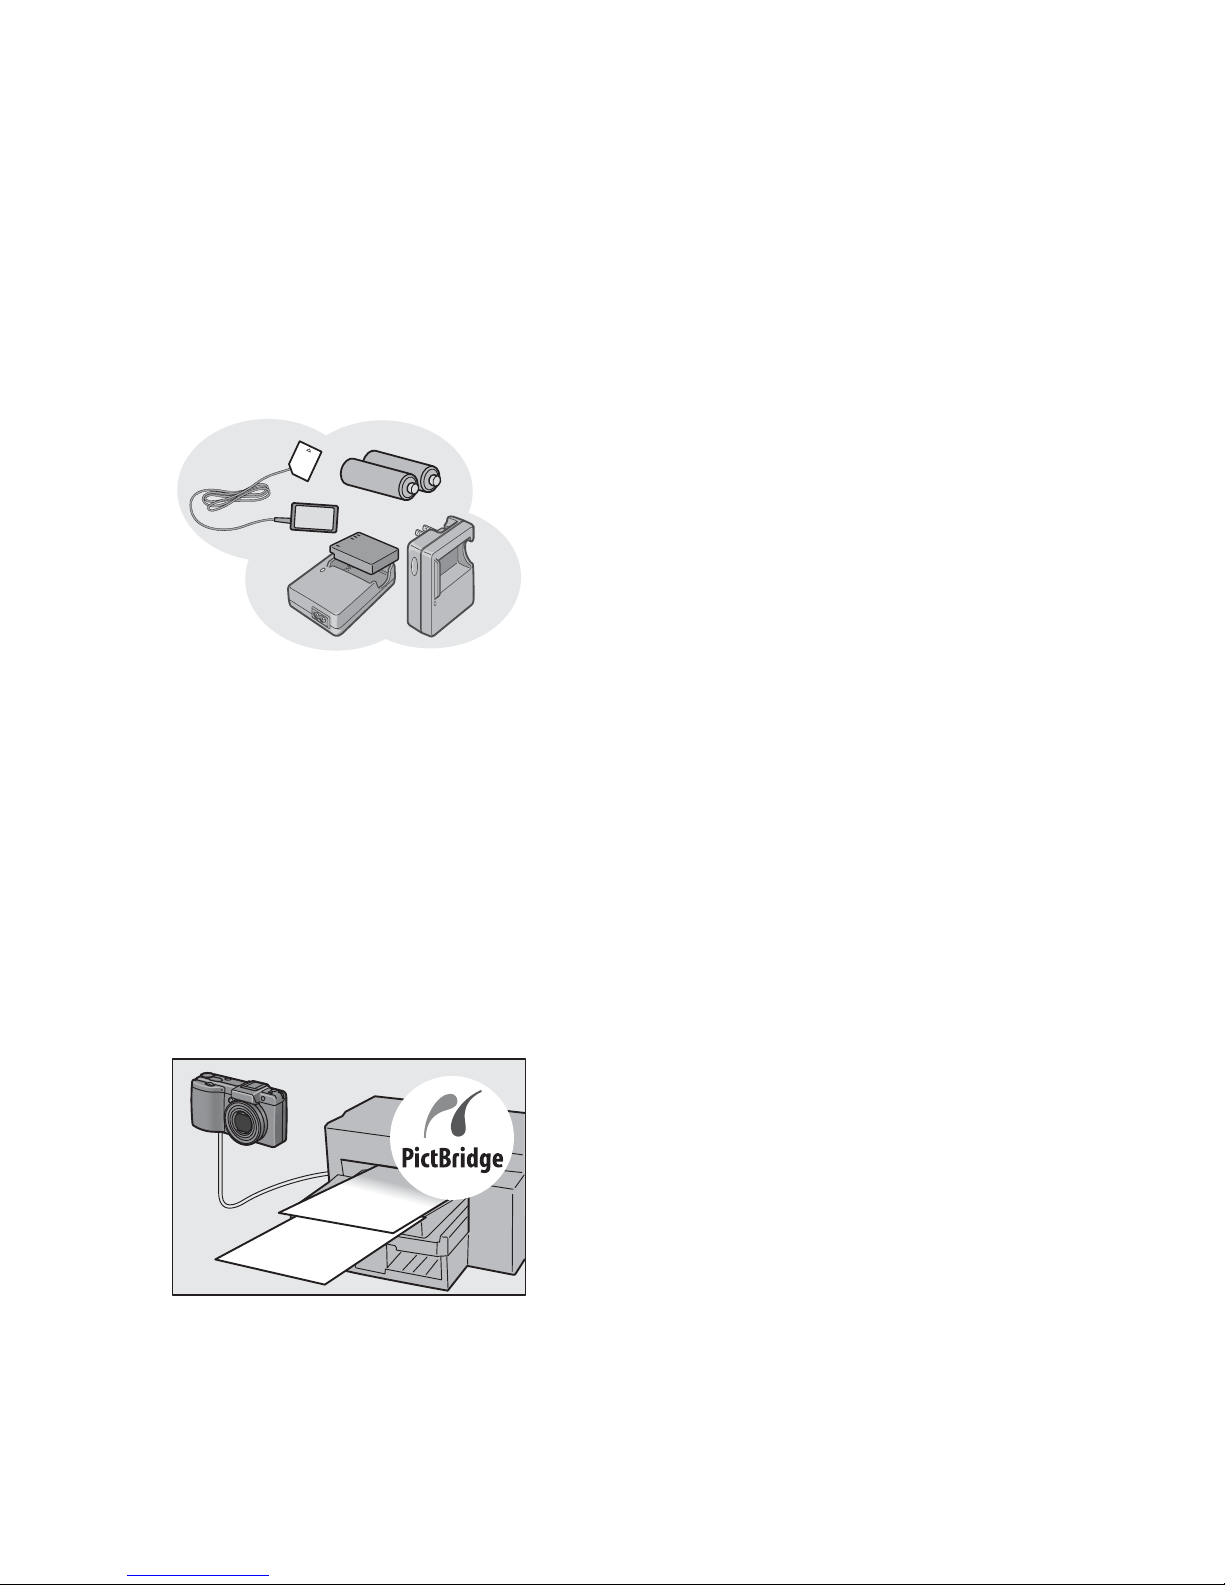
Compatibility with AAA batteries
eliminates concerns about the batteries
running out while you’re traveling (P.26)
In addition to the specified large-capacity
rechargeable lithium-ion battery (sold
separately)forlongperiodsofshootingand
playback, the camera is also compatible
with AAA alkaline batteries, AAA Oxyride
batteries, and AAA nickel-metal hydride
batteries. This eliminates concerns about
the batteries running out while you’re
traveling.
Irodio Photo & Video Studio software for
browsing, viewing, and editing still
images and movies (P.215)
This software enables you to view, organize,
and perform simple editing (supporting DNG
file format) of shot images. You can also use
thevideoeditorfunctiontocreatemoviesusing
still images, video clips, audio, and music files.
Direct printing without the use of a
computer (P.171)
A direct print-compatible printer can be
connected to the camera with the USB
cable to directly transfer images to the
printer. This allows for easy printing without
using a computer.
You can also print reports.

5
Contents
Using These Manuals.................................................................... 1
Key Features................................................................................. 2
Contents........................................................................................ 5
Packing List................................................................................. 12
Optional Accessories..............................................................................14
Recommended Ricoh Accessories.........................................................15
Names of Parts............................................................................ 17
How to Use the Mode Dial........................................................... 19
How to Use the Up-down Dial and ADJ. Lever............................ 20
Picture Display ............................................................................ 22
Getting Ready ............................................................................. 26
About the Battery ....................................................................................26
SD Memory Card (available in stores)....................................................28
Loading the Battery and SD Memory Card.............................................30
Turning the Power On/Off.......................................................................32
Setting the Language..............................................................................34
Setting the Date and Time......................................................................35
Basic Shooting ............................................................................ 36
Holding the Camera................................................................................36
Shooting..................................................................................................38
Using the Zoom Function........................................................................41
Shooting Close-Ups (Macro Shooting)....................................................42
Using the Flash.......................................................................................44
tUsing the Self-Timer...........................................................................47
Playing Back Images................................................................... 48
Viewing Your Images..............................................................................48
Grid View (Thumbnail Display)................................................................50
Enlarging Images....................................................................................51
Deleting Files............................................................................... 53
Deleting a File.........................................................................................53
Deleting All Files.....................................................................................54
Deleting Multiple Files at One Time........................................................54
Changing the Display with the DISP. Button............................... 57
About the Electronic Level......................................................................60
Histogram................................................................................................63
Basic Operations 11
If you are using the camera for the first time, read this section.

6
1 Various Shooting Functions 66
Using the ADJ. Lever .................................................................. 66
Changing the Text Density (Scene Mode)..............................................68
Shifting the AE and AF Targets ..............................................................69
Using the Fn (Function) Buttons.................................................. 71
Switching Between Auto Focus and Manual Focus (AF/MF)..................73
Switching Between Auto Focus and Snap Mode (AF/Snap)...................75
Locking the Exposure (AE Lock).............................................................76
Switching from JPEG to RAW Mode (JPEG>RAW) ...............................77
Switching from Color to Black-and-White or
Black-and-White (TE) Mode (Color>B&W, Color>TE)........................78
Shifting the AE and AF Targets ..............................................................79
Setting Other Functions..........................................................................80
Shooting with a Set Aperture Value
(A: Aperture Priority Mode)...................................................... 81
Shooting with a Set Aperture Value and Shutter Speed
(M: Manual Exposure Mode)................................................... 83
Shooting with an Combined Aperture Value and Shutter Speed
(P: Program Shift Mode).......................................................... 86
Shooting with Optimal Settings According to Shooting
Conditions (SCENE: Scene mode).......................................... 88
Using the Skew Correction Mode ...........................................................91
Shooting in Zoom Macro Mode...............................................................92
Shooting with Custom Settings
(MY1/MY2/MY3: My Settings Mode)....................................... 93
Shooting Menu ............................................................................ 94
Using the Menu.......................................................................................97
Choosing Picture Quality Mode/Image Size (Pic Quality/Size) ... 99
Changing the Focusing Mode (Focus)...................................... 102
Manual Focus Shooting (MF)................................................................103
Changing the Exposure Metering Modes
(Exposure Metering).............................................................. 105
Shooting with Multi-Shot (Continuous/S-Cont/M-Cont)............. 106
Viewing an S-Cont or M-Cont Still Image in Enlarged Display Mode....110
Advanced Operations 65
Read this section when you want to learn more about the different camera
functions.

7
Setting the Picture Quality and Color (Image Settings)............. 111
Setting the Black-and-White Picture Quality (B&W)..............................113
Setting the Toning Effect for Black-and White Images (B&W (TE))......114
Customizing the Picture Quality (Setting1, Setting2)............................116
Correcting Distorted Images While Shooting
(Distortion Corr.).................................................................... 117
Adjusting the Light Intensity of the Flash
(Flash Expo. Comp.).............................................................. 118
Setting the Flash Amount in Manual Flash Mode
(Man. Flash Amount)............................................................. 119
Setting the Flash Timing (Synchro Settings)............................. 120
Shooting Consecutively with Different Exposures
(Auto Bracket)........................................................................ 121
Shooting Consecutively with Different White Balance (WB-BKT).........122
Shooting Consecutively with Different Color
(CL-BKT: Color Bracket)...................................................................124
Reducing Image Noise (Noise Reduction) ................................ 126
Shooting Pictures Automatically at Set Intervals (Interval)........ 128
Inserting the Date into a Still Image (Date Imprint).................... 130
Using the Camera Shake Correction Function to Prevent
Camera Shake (Camera Shake Cor) .................................... 131
Changing the Exposure (Exposure Comp.)............................... 132
Using Natural and Artificial Lighting (White Balance)................ 134
Setting the White Balance Manually (Manual Settings)........................136
Setting the White Balance Details (Detail)............................................137
Correcting the White Balance Mode Color Tone
(White Bal. Comp.)................................................................ 138
Changing the Sensitivity (ISO Setting)...................................... 140
Returning the Shooting Menu Settings to their Defaults
(Restore Defaults) ................................................................. 142
Automatically Changing the Aperture Value in Aperture Priority
Mode (Auto Aper. Shift)......................................................... 143
Changing the Shooting Mode When in My Settings Mode
(Switch Shooting Mode) ........................................................ 144
2 Shooting/Playing Back Movies 145
3Shooting Movies..............................................................................145
Setting the Frame Rate (Frame Rate)...................................................146
Playing Back Movies.............................................................................148

8
3 Other Playback Functions 149
Playback Menu.......................................................................... 149
Using the Menu.....................................................................................150
Displaying Photos in Order Automatically (Slide Show)............ 151
Preventing the Deletion of Files (Protect).................................. 152
Protecting a File....................................................................................152
Protecting All Files................................................................................153
Protecting Multiple Files at Once ..........................................................154
Using a Printing Service (DPOF)............................................... 155
Setting DPOF for the Displayed Still Image..........................................155
Setting DPOF for All Still Images..........................................................156
Setting DPOF for Multiple Still Images..................................................157
Changing the Image Size (Resize)............................................ 158
Copying the Contents of the Internal Memory to an
SD Memory Card (Copy To Card)......................................... 160
Straightening Skewed Images (Skew Correction)..................... 161
Correcting the Image Brightness and Contrast
(Level Compensation) ........................................................... 163
Correcting Images Automatically (Auto)................................................164
Correcting Images Manually (Manual)..................................................165
Correcting the Image Color Tone
(White Balance Compensation)............................................. 167
Viewing on a Television............................................................. 169
4 Direct Printing 171
Direct Print Function.................................................................. 171
Connecting the Camera to a Printer.......................................... 172
Printing Still Images................................................................... 173
Printing One or All Still Images.............................................................173
Printing Several Still Images.................................................................175
5 Changing Camera Settings 177
Setup Menu............................................................................... 177
Using the Setup Menu ..........................................................................178
Preparing the SD Memory Card (Format [Card])....................... 180
Formatting the Internal Memory (Format [Internal])................... 181
Adjusting the brightness of the picture display
(LCD Brightness)................................................................... 182
Setting the Type of Conversion Lens (Conversion Lens).......... 183
Registering Custom Settings (Reg. My Settings)...................... 185
Setting the Zoom to a Fixed Focal Length (Step Zoom)............ 187

9
Changing the ISO Auto-High Setting (ISO Auto-High).............. 188
Assigning a Function to the Function Button
(Set Fn1/2 Button)................................................................. 189
Setting Whether to Save the Fn (Function) Button Function to
My Settings (Fn Set. My Set.)................................................ 191
Changing the Operation Sound Setting (Operation Sounds) .... 192
Changing the Operation Sound Volume (Vol. Settings)............ 193
Assigning a Function to the ADJ. Lever (ADJ Lever Set.)......... 194
Using the Shutter Release Button to Set a Setting in
ADJ. Mode (ADJ Shutter)...................................................... 195
Changing the Level Confirmation Setting (Level Setting).......... 196
Changing the AF Auxiliary Light Setting (AF Aux. Light)........... 197
Using the Auto Resize Zoom (Digital Zoom Img)...................... 198
Changing the Auto Power Off Setting (Auto Power Off)............ 200
Setting the Playback Screen Output Display
(Playback Screen)................................................................. 201
Changing Image Confirmation Time (LCD Confirm.)................. 202
Automatically Rotating the Playback Image (Auto Rotate)........ 203
Setting the Recorded Image During Color Bracket Shooting
(CL-BKT B&W (TE)).............................................................. 205
Changing the RAW Mode JPEG Image Setting
(RAW/JPEG Setting)............................................................. 206
Changing the File Name Setting (Sequential No.)..................... 207
Setting the Date and Time (Date Settings)................................ 209
Changing the Display Language (Language/N)................... 210
Changing the Playback Method for Viewing on TV
(Video Out Mode).................................................................. 211
6 Downloading Images to Your Computer 212
For Windows ............................................................................. 212
System Requirements for Using the supplied CD-ROM.......................213
CD-ROM Setup.....................................................................................214
When [Installing the software] is Clicked...............................................215
When [Browse User’s Manual (Software Version)] is Clicked...............218
When [Browse CD-ROM Content] is Clicked........................................218
Uninstalling the Software......................................................................219
Downloading Images Using the Software.............................................221
Downloading Images Without Using the Software................................222
Disconnecting the Camera from Your Computer..................................224
For Macintosh............................................................................ 225
Downloading Images to Your Computer...............................................225
Disconnecting the Camera from Your Computer..................................226

10
7 Appendices 227
Troubleshooting......................................................................... 227
Error Messages.....................................................................................227
Camera Troubleshooting ......................................................................228
Software and Computer Troubleshooting.............................................235
Specifications ............................................................................ 237
Number of Images That Can be Stored in Internal Memory/
SD Memory Card..............................................................................240
Optional Accessories................................................................. 241
Using the AC Adapter (sold separately)................................................241
Recommended Ricoh Accessories............................................ 243
Using the External Flash........................................................... 244
Defaults Settings/Functions Whose Defaults are Restored
When Camera is Turned Off.................................................. 245
Cautions on Use........................................................................ 247
Care and Storage...................................................................... 248
Index......................................................................................... 249

Basic
Operations
If you are using the
camera for the first time,
read this section.
Packing List......................................12
Names of Parts.................................17
How to Use the Mode Dial...............19
How to Use the Up-down Dial and
ADJ. Lever....................................20
Picture Display.................................22
Getting Ready ..................................26
Basic Shooting.................................36
Playing Back Images.......................48
Deleting Files ...................................53
Changing the Display with the
DISP. Button.................................57
12
If you are using the camera for the first time, read this section.
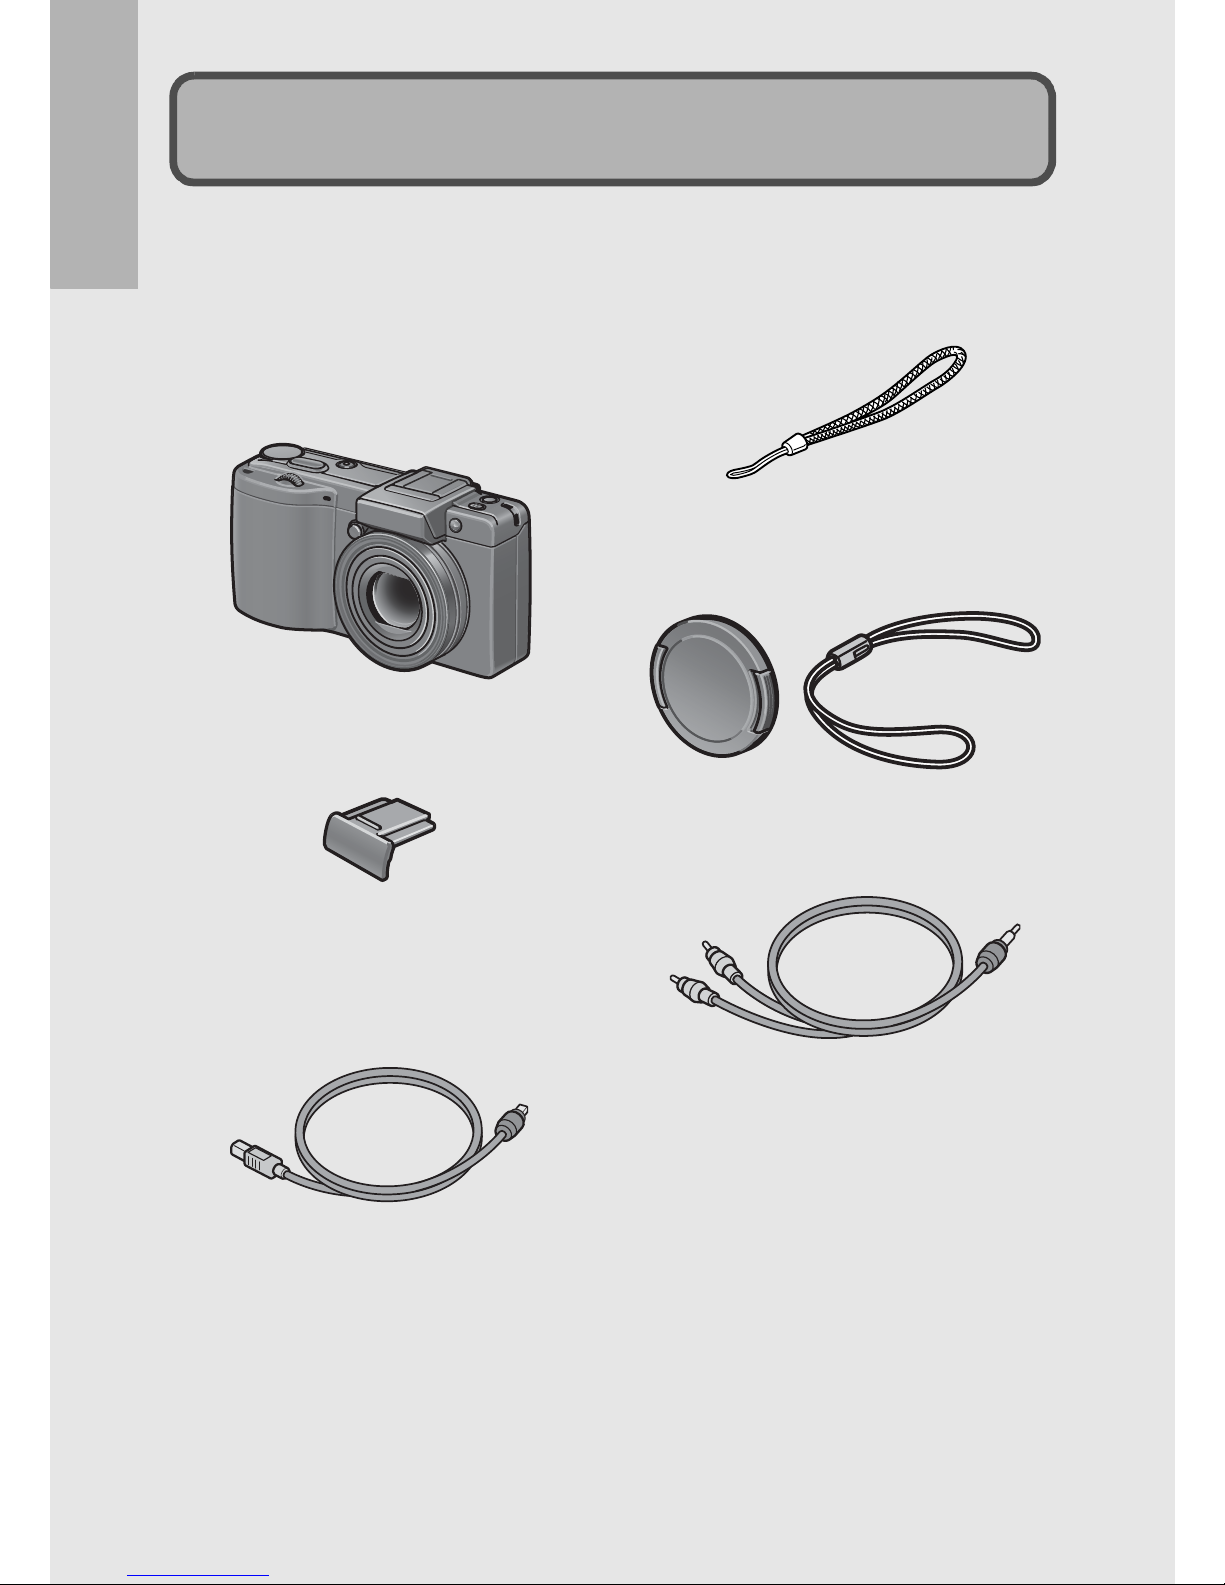
Open the package and make sure all the items are included.
* The actual appearance of items included may differ.
Digital Camera
The serial number of the camera is
provided on the bottom face of the
camera.
Hot Shoe Cover
Included with the camera.
USB Cable (mini-B type)
Used to connect the camera to a
computer or direct print-
compatible printer.
Handstrap
Lens Cap
Lens Cap Strap
AV Cable
Used to view your images on a TV.
Packing List
If you are using the camera for the first time, read this section.
13
Caution-----------------------------------------------------------------------------------------------
The CD-ROM supports the following languages. Operations are not guaranteed on
operating systems with languages other than those listed below.
English,French,German,Spanish, Italian,Chinese(Traditional,Simplified),Korean
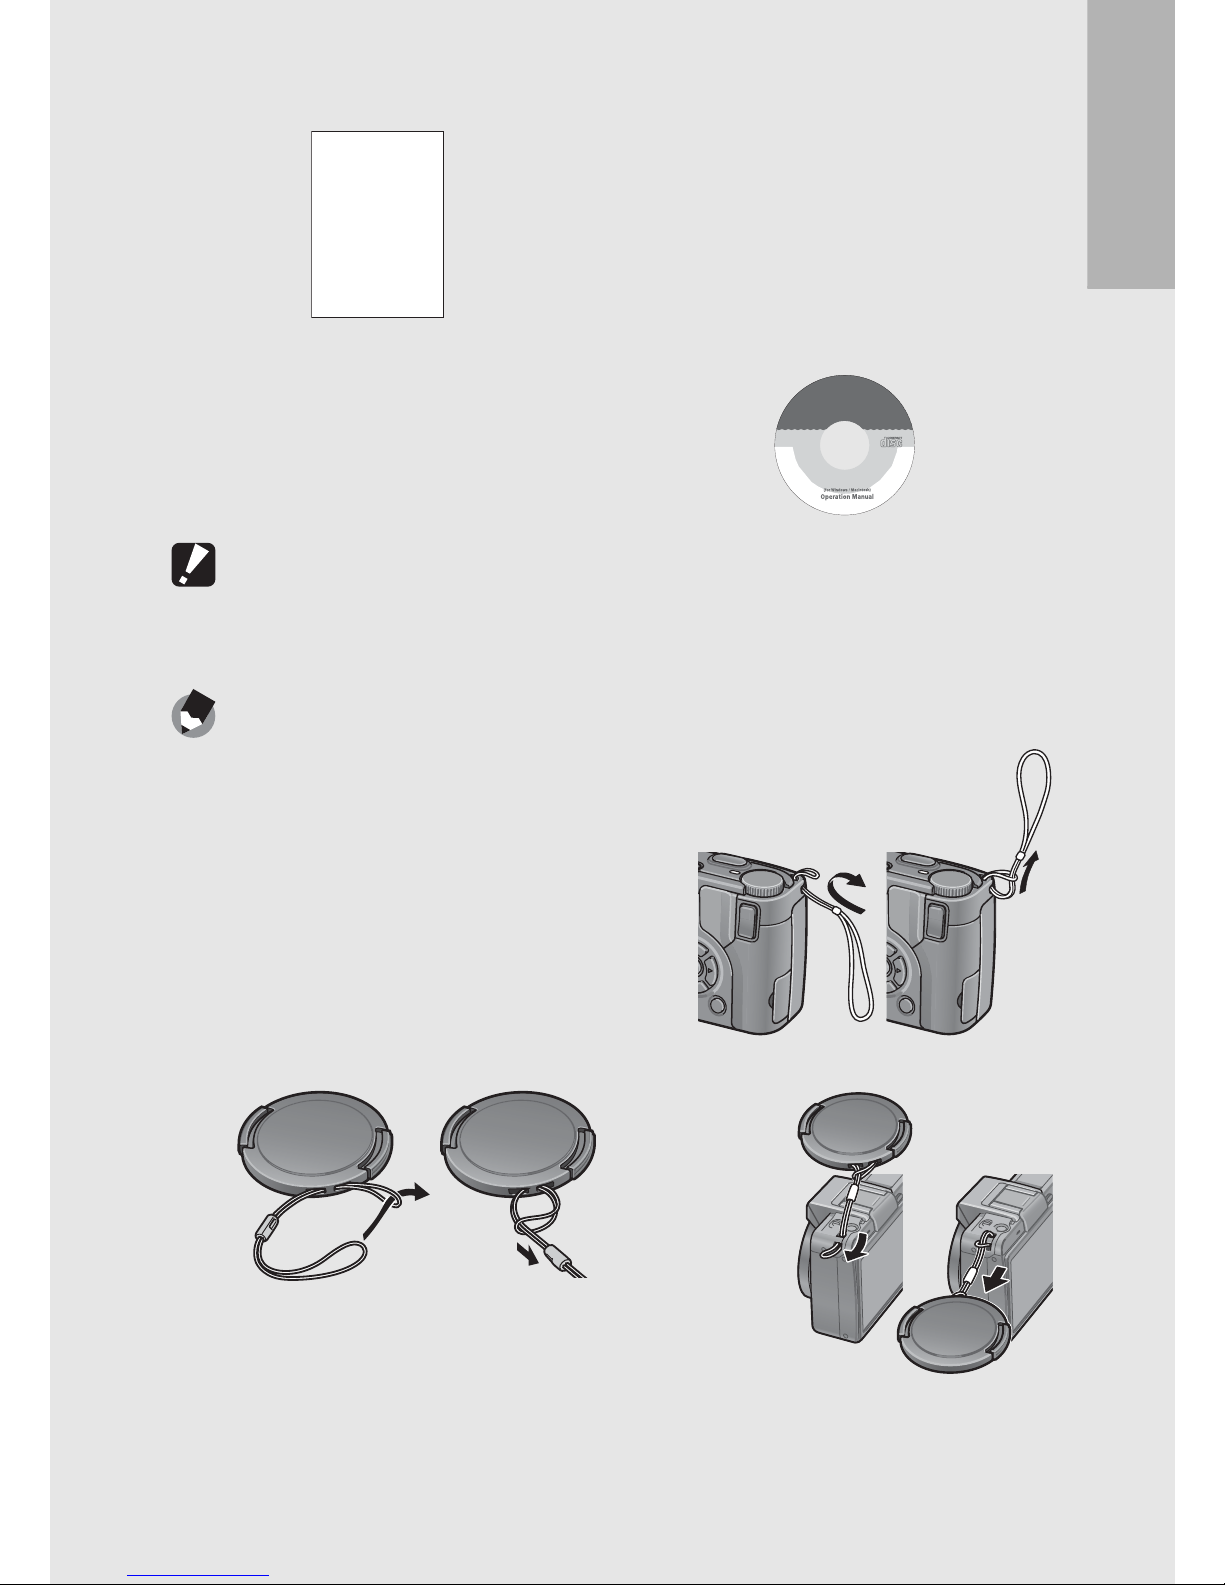
Note ---------------------------------------------------------------------------------------------------
Attaching the handstrap to the camera
Threadthesmallendofthestrapthrough the
strap eyelet on the camera andloop the ends
as shown.
Attaching the lens cap strap to the camera
Camera User Guide CD-ROM (GP.212)
The provided software and the
“Software User Guide” are
included on this CD-ROM.
Although the software included in
the CD-ROM cannot be used with
Macintosh, it is possible to display
the Software User Guide. (Only on
computers with Acrobat installed.)
(This booklet)

14
If you are using the camera for the first time, read this section.
Optional Accessories
Rechargeable Lithium-ion
Battery
Battery Charger
AC Adapter
Used for power supply from a
household outlet to the camera.
Usethisadapterforlongperiodsof
playback or when transferring
images to a computer.
If you are using the camera for the first time, read this section.
15
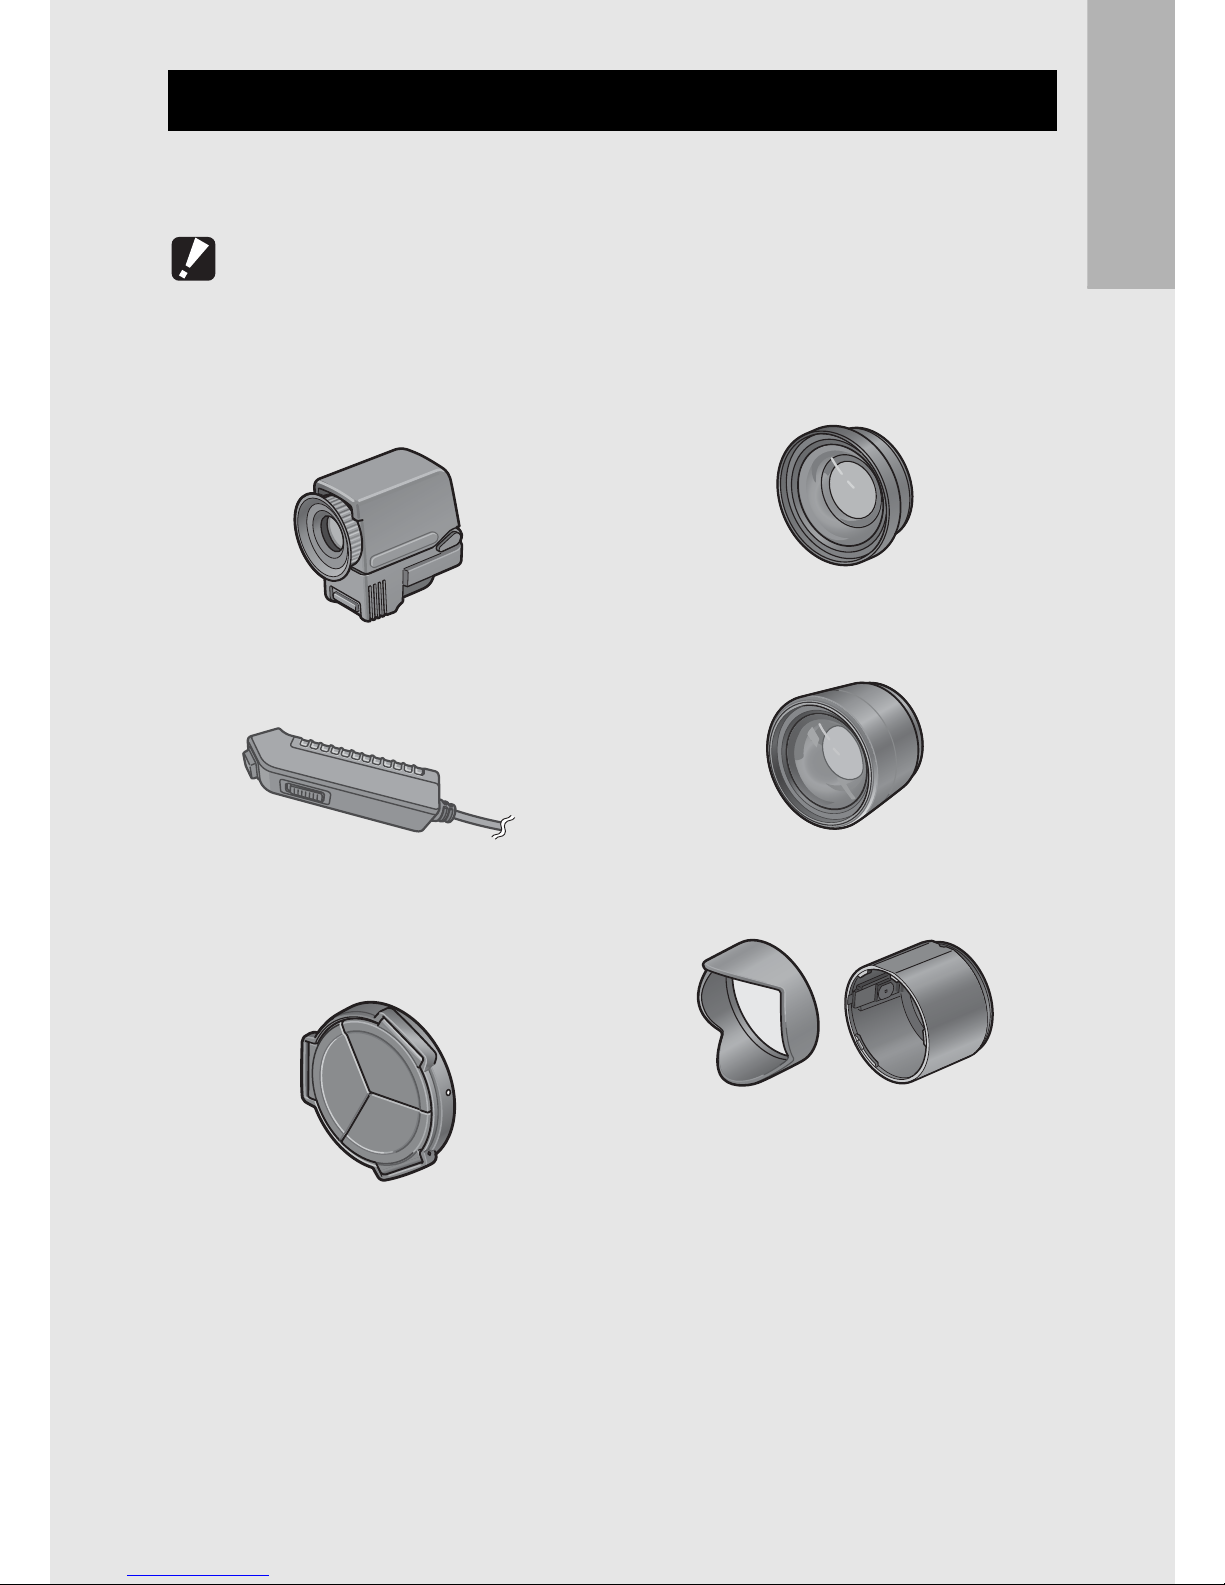
The camera can be used with the following recommended
accessories when it is used alone.
Caution-----------------------------------------------------------------------------------------------
These recommended accessories cannot be used with DX-2G.
Recommended Ricoh Accessories
LCD Viewfinder (VF-1)
LCD viewfinder attaches to the hot
shoe.
Cable Switch (CA-1)
Self Retaining Lens Cap (LC-1)
Opens and closes automatically
according to the lens movement.
Wide Conversion Lens
(DW-6)
Tele Conversion Lens (TC-1)
Hood & Adapter (HA-2)

16
If you are using the camera for the first time, read this section.
Removing/attaching the ring cap -----------------------------------------------------------
Removetheringcapwhenusingthewideconversionlens(DW-6),teleconversionlens
(TC-1), self retaining lens cap or hood & adapter (HA-2).
Removing the ring cap
With the ring cap removal button pressed,
turn the ring cap counterclockwise while the
camera is turned off and remove from the
camera body.
Attaching the ring cap
Withthecameraturnedoff,align themarking
on the ring cap(2) with the marking on the
camera body (1) and turn the ring cap
clockwise until it clicks.
Ring cap
removal button
If you are using the camera for the first time, read this section.
17
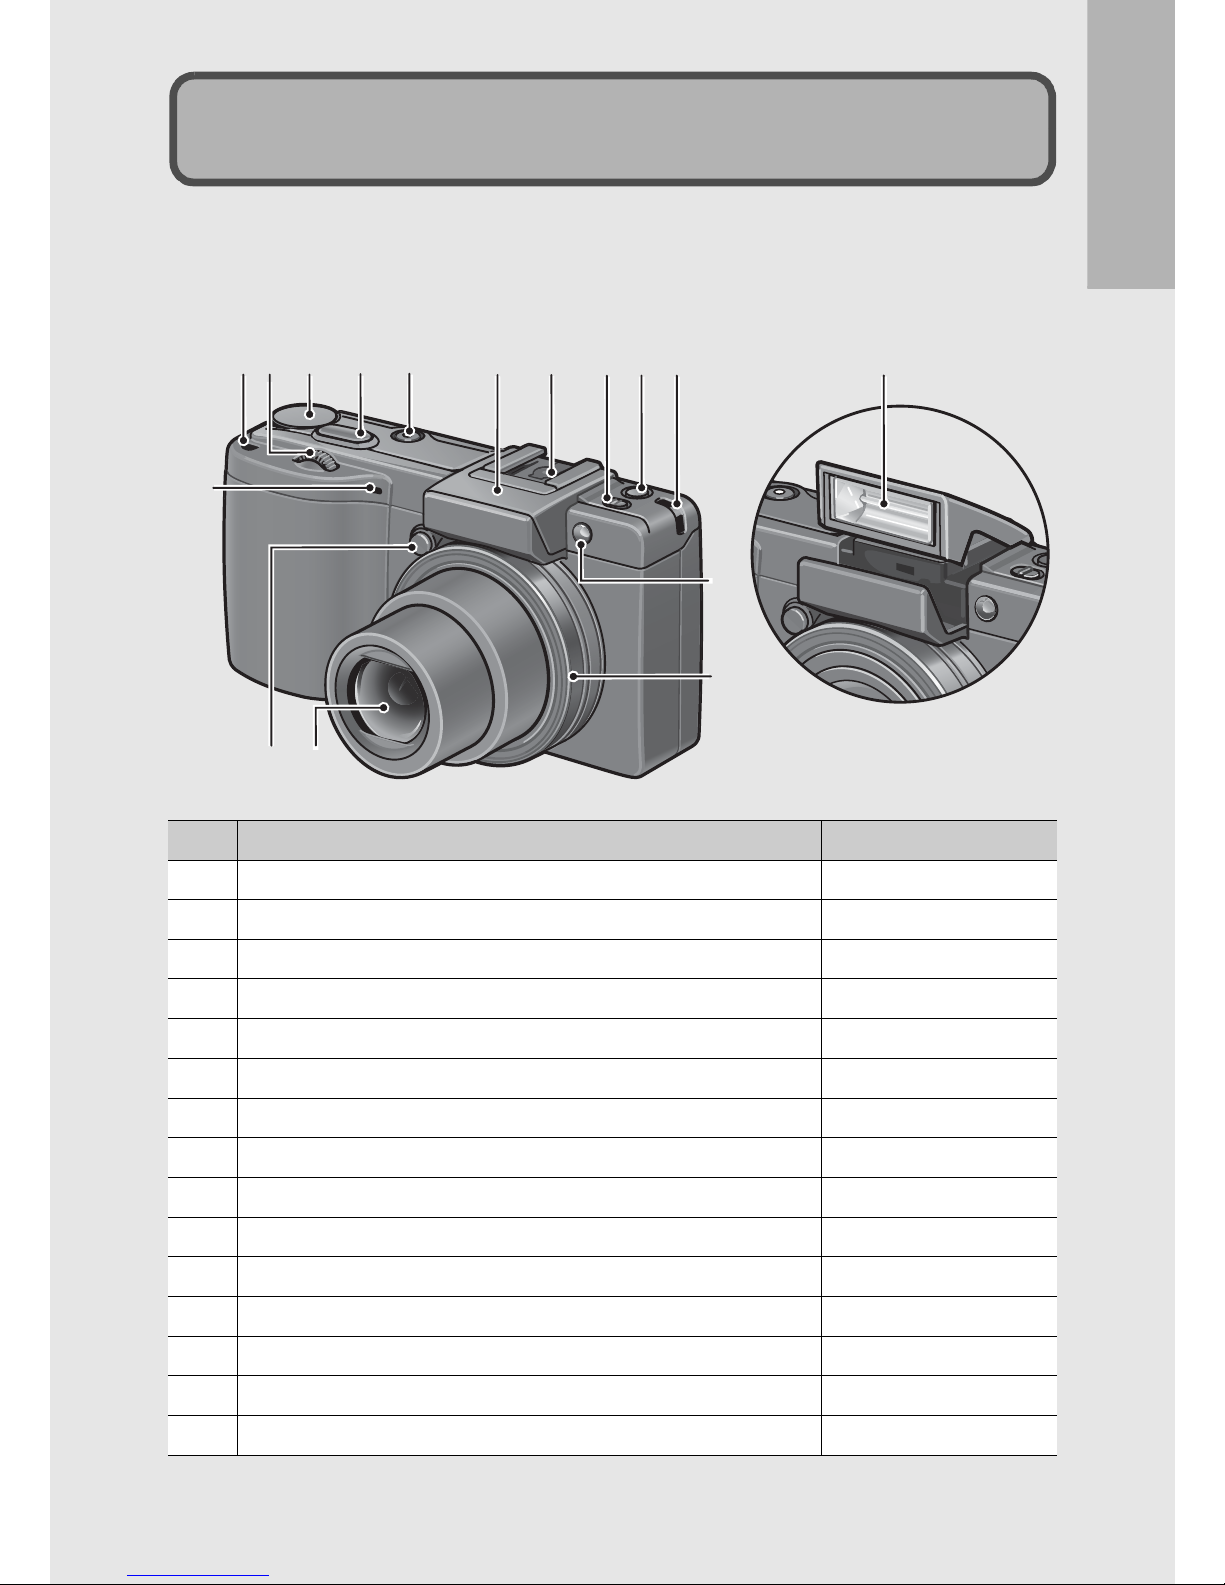
Camera
Front View
Item Name Refer to
1Up-down Dial P.20
2Mode Dial P.19
3Shutter Release Button P.36
4POWER Button P.32
5Flash Cover P.44
6Hot Shoe P.244
7F(Flash) OPEN Switch P.44
8Fn1 (Function 1) Button P.71
9Strap Eyelet P.13
10 Microphone -
11 Ring CapRemovable Button P.16
12 Lens P.36
13 AF Auxiliary Light P.47,197
14 Ring Cap P.16
15 Flash P.44
Names of Parts
1
10
1211
13
14
2934 65879 15

18
If you are using the camera for the first time, read this section.
Rear View
Item Name Refer to
1Picture Display P.22
2Auto Focus/Flash Lamp P.32, 39, 44
3AV Output Terminal P.169
4USB Terminal P.172,221, 222, 225
5VF/LCD button P.57
6ADJ. Lever P.66
7z(Telephoto)/8(Englarged View) Button P.41, 51
8Z(Wide-angle)/9(Thumbnail Display) Button P.41, 50
9$/F(Flash) Button P.44
10 MENU/OK Button P.97, 150, 178
11 O(DISP.) Button P.57
12 "/N(Macro) Button P.42
13 #/Fn2 (Function 2) Button P.71
14 6(Playback) Button P.48
15 D(Delete)/t(Self-timer) Button P.53, 47
16 Terminal Cover P.169,172, 221, 222,225
17 Speaker P.148
18 Power (DC input) Cable Cover P.241
19 Release Lever P.30, 241
20 Battery/Card Cover P.30, 241
21 Tripod Screw Hole P.237
ADJ.
VF/LCD
Fn2
1
2
18 4
3
1716 19 2120
9
8
7
11
10
1315
6
514
12
Table of contents
Other Sea & Sea Digital Camera manuals

Sea & Sea
Sea & Sea MX-10 User manual

Sea & Sea
Sea & Sea DX-860G Manual

Sea & Sea
Sea & Sea MM III User manual

Sea & Sea
Sea & Sea DX-1G User manual

Sea & Sea
Sea & Sea DX-8000G User manual

Sea & Sea
Sea & Sea DX-750G User manual

Sea & Sea
Sea & Sea MM II-EX User manual

Sea & Sea
Sea & Sea DX-1G Manual

Sea & Sea
Sea & Sea DX-860G Specification sheet

Sea & Sea
Sea & Sea SX-1000TTL User manual


Popular Digital Camera manuals by other brands


Wiseup
Wiseup W8600 user guide

Panasonic
Panasonic DMC-TZ3A - Lumix Digital Camera Instrucciones de funcionamiento

Olympus
Olympus Camedia X-450 Basic Manual

Omron
Omron FQ2-S/CH Series user manual

Panasonic
Panasonic LUMIX DMC-FZ18 operating instructions

Dahua Technology
Dahua Technology DHI-ITC237-PW6M-LZF1050 user manual


