manuals.online logo
Brands
  1. Home
  2. •
  3. Brands
  4. •
  5. Sealey
  6. •
  7. Grinder
  8. •
  9. Sealey POWER TOOL SA653 User manual

Sealey POWER TOOL SA653 User manual

Thank you for purchasing a Sealey Product. Manufactured to a high standard this product will, if used according to these instructions
and properly maintained, give you years of trouble free performance.
IMPORTANT:PLEASE READ THESE INSTRUCTIONS CAREFULLY. NOTE THE SAFE OPERATIONAL REQUIREMENTS,
WARNINGS AND CAUTIONS. USE THIS PRODUCT CORRECTLY AND WITH CARE FOR THE PURPOSE FOR WHICH
IT IS INTENDED. FAILURE TO DO SO MAY CAUSE DAMAGE OR PERSONAL INJURY AND WILL INVALIDATE THE
WARRANTY. PLEASE KEEP INSTRUCTIONS SAFE FOR FUTURE USE.
1. SAFETY INSTRUCTIONS
3Follow all workshop health & safety rules, regulations, and conditions when using tool.
pWARNING! Disconnect from air supply before changing grinding bit or servicing.
3Maintain die grinder in good condition and replace any damaged or worn parts. Use
genuine parts only. Non-authorised parts may be dangerous and will invalidate the warranty.
pWARNING! Check correct air pressure is maintained and not exceeded. We recommended 90psi.
3Keep air hose away from heat, oil and sharp edges. Check air hose for wear before each
use and ensure that all connections are secure.
pWARNING! Before each use check grinding bit is secure, and the bit is not worn or damaged,
if damaged, replace immediately.
3Ensure replacement grinding bits are not damaged (cracks, deformations or splinters etc).
3Always use the correct grinding bit suitable for the material being ground. Ensure the maximum
speed specification of the bit is higher than that indicated on the machine data plate.
pWARNING! Always wear approved eye or face protection when operating the die grinder.
3Use breathing protection in accordance with COSHH regulations if fumes or dust pose a hazard.
3Wear ear defenders and gloves if necessary.
3Keep hands and body clear of the workpiece when operating the die grinder.
3Maintain correct balance and footing. Ensure the floor is not slippery and wear non-slip shoes.
3Secure non stable work piece with a clamp, vice or other adequate holding device.
3Keep children and non essential persons away from the working area.
3Avoid subjecting grinding bit to excessive strain, always ease grinding bit against workpiece
(a harsh impact may break the bit). Maintain a controlled adequate progression.
8DO NOT get the die grinder wet or use in damp or wet locations.
8DO NOT hold the workpiece by hand. Use clamps or a vice to secure the workpiece.
7DO NOT use the die grinder for a task it is not designed to perform.
pWARNING! DO NOT use die grinder if damaged or faulty. Contact your local service agent.
7DO NOT use die grinder unless you have been instructed in its use by a qualified person.
7DO NOT carry the die grinder by the air hose, or yank the hose from the air supply.
7DO NOT direct air from the air hose at yourself or others.
pWARNING! DO NOT grind any materials containing asbestos.
7DO NOT turn the die grinder on whilst the grinding bit is in contact with the work piece.
7DO NOT use die grinder where there are flammable liquids, solids or gases such as paint
solvents, including waste wiping or cleaning rags etc as generated sparks may be dangerous.
7DO NOT touch the workpiece close to the ground surface as it will be very hot. Allow to cool.
The workpiece may also be very sharp.
7DO NOT operate die grinder if you are tired, under the influence of alcohol, drugs or intoxicating medication.
3When not in use disconnect from air supply and store in a safe, dry, childproof location.
SA653 - 0016 - (1) -010700
INSTRUCTIONS FOR
90ODIE GRINDER
Model: SA653
01284 757500 E-mail: sales@sealey.co.uk
01284 703534
NOTE: It is our policy to continually improve products and as such we reserve the right to alter data, specifications and component
parts without prior notice. IMPORTANT: No liability is accepted for incorrect use of this equipment. WARRANTY: Guarantee is 12
months from purchase date. proof of which will be required for any claim. INFORMATION: Call us for a copy of our latest catalogue
and promotions on 01284 757525 and leave your full name and address including your postcode.
Sole UK Distributor, Sealey Group, Bury St. Edmunds, Suffolk.
Original Date: 010700
Issue Date: 010700
Version No: 0
Date Modified: N/A
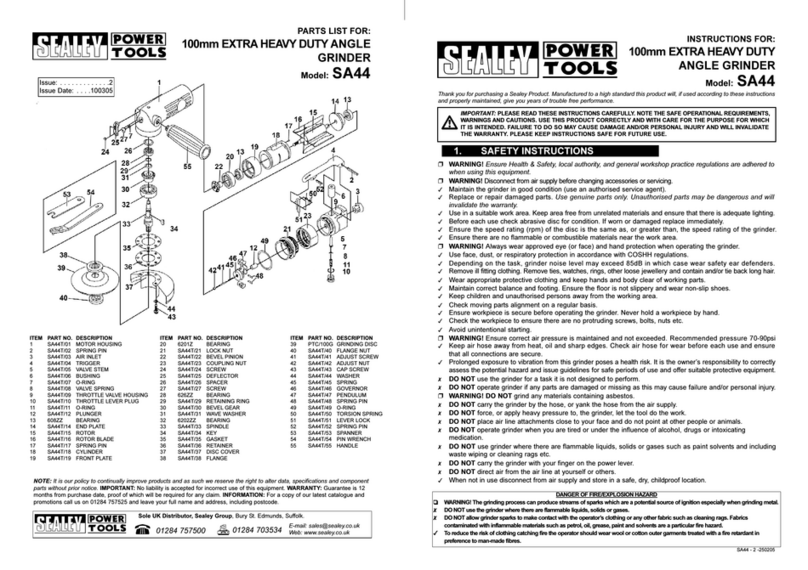
23 SA653/23 REAR END PLATE
24 SA653/24 CYLINDER PIN
25 SA653/25 CYLINDER
26 SA653/26 ROTOR
27 SA653/27 ROTOR BLADE
28 SA653/28 FRONT END PLATE
29 SA653/29 BALL BEARING
30 SA653/30 ROTOR SPACER
31 SA653/31 COLLET
32 SA653/32 COLLET NUT
33 SA653/33 SPANNER WRENCH (11mm)
34 SA653/34 SPANNER WRENCH (17mm)
35 SA653/35 PIN
36 SA653/36 FILTER
37 SA653/37 SPINDLE
38 SA653/38 CLAMP NUT
39 SA653/39 BEVEL GEAR
40 SA653/40 KEY
41 SA653/41 ANGLE HEAD HOUSING
42 SA653/42 PINION
43 SA653/43 GREASE FITTING
44 SA653/44 COLLAR
1SA653/01 MOTOR HOUSING
2SA653/02 SILENCER
3SA653/03 WASHER
4SA653/04 O-RING
5SA653/05 DEFLECTOR
6SA653/06 AIR INLET
7SA653/07 HOUSING LOCK RING
8SA653/08 LEVER PIN
9SA653/09 THROTTLE LEVER
10 SA653/10 SPRING PIN
11 SA653/11SPRING
12 SA653/12 STOP ROD
13 SA653/13 VALVE BUSHING
14 SA653/14 VALVE STEM
15 SA653/15 O-RING
16 SA653/16 O-RING
17 SA653/17 SPRING
18 SA653/18 REGULATOR
19 SA653/19 O-RING
20 SA653/20 O-RING
21 SA653/21 VALVE SCREW
22 SA653/22 BALL BEARING
Item Part No Description Item Part No Description
3.1. Air Supply
3.1.1. Ensure die grinder air valve (or trigger) is in "off" position before connecting to the air supply.
3.1.2. You will require an air pressure of 90psi, and an air flow according to specification.
3.1.3. pWARNING! Ensure the air supply is clean and does not exceed 90 psi while operating the
die grinder. Too high an air pressure and unclean air will shorten the product life due to
excessive wear, and may be dangerous causing damage and/or personal injury.
3.1.4. Drain the air tank daily. Water in the air line will damage the die grinder.
3.1.5. Clean air inlet filter weekly. Recommended hook-up procedure is shown in fig 1.
3.1.6. Line pressure should be increased to compensate for unusually long air hoses (over 8
metres). The minimum hose diameter should be 1/4 I.D. and fittings must have the same
inside dimensions.
3.1.7. Keep hose away from heat, oil and sharp edges. Check hose for wear, and make certain
that all connections are secure.
3.2. Couplings.
Vibration may cause failure if a quick change coupling is connected directly to the die grinder.
To overcome this, connect a leader hose to the grinder. A quick change coupling may
then be used to connect the leader hose to the air line recoil hose. See fig 1 & 2.
pWARNING! Disconnect die grinder from air supply before changing accessories, servicing or
performing maintenance. Replace or repair damaged parts. Use genuine parts only. Non-
authorised parts may be dangerous and will invalidate the warranty.
5.1. Lubricate the air die grinder daily with a few drops of Sealey air die grinder oil dripped into
the air inlet to prolong its life.
5.2. Clean the die grinder after use.
5.3. Loss of power or erratic action may be due to the following:
a) Excessive drain on the air line. Moisture or restriction in the air pipe. Incorrect size or
type of hose connectors. To remedy check the air supply and follow instructions in
chapter 3.
b) Grit or gum deposits in the die grinder may also reduce performance. If your model has
an air strainer (located in the area of the air inlet), remove the strainer and clean it. Flush
the die grinder out with gum solvent oil or an equal mixture of SAE No 10 oil and
paraffin. Allow to dry before use.
5.4. For a full service contact your local Sealey service agent.
5.5. When not in use, disconnect from air supply, clean die grinder and store in a safe, dry,
childproof location.
5.6. Periodically lubricate crown and pinion gear with general purpose grease through the grease
nipple on head.
3. PREPARING TOOL FOR USE
5. MAINTENANCE
4.2. OPERATING
pWARNING! Ensure you have read, understood and apply safety instructions.
4.2.1. Connect the die grinder to the air supply.
4.2.2. To start, hold firmly and push the trigger locking lever forward whilst depressing trigger.
4.2.3. The bit must be running at its maximum speed before attempting to grind the workpiece.
4.2.4. Slowly and smoothly bring the grinding bit toward the workpiece (avoid jerky movements).
Exert adequate pressure on the die grinder to grind according to the type and size of the
material you are working with. Avoid subjecting bit to excessive strain or harsh impacts.
Always hold die grinder firmly and ease grinding bit against workpiece. Maintain a
controlled adequate progression.
DO NOT allow die grinder to free run for an extended period of time as this will shorten its life.
4. OPERATING INSTRUCTIONS
fig 1
SA653 - 0016 - (1) -010700
fig 2
2. INTRODUCTION & SPECIFICATIONS
Motor power . . . . . . . . . . . . . . . .0.3Hp
Collet size . . . . . . . . . . . . . . . . . .6mm
Free speed . . . . . . . . . . . . 20,000rpm
Air consumption . . . . . . . . . . . . . 4cfm
Operating pressure . . . . . . . . . . .90psi
Air inlet size . . . . . . . . . . . . . 1/4 BSP
Weight . . . . . . . . . . . . . . . . . . . . 0.6kg
Shaped composite cover moulded around lightweight alluminium alloy housing reduces effects of
chill on operators' hands and provides added control. Quality air motor with Japanese/Swedish
bearings for smooth and powerful operation. Available in both 0.3Hp and 0.6Hp versions. Integral
sintered brass baffle with rear exhaust gives quiet operation. Fitted with safety trigger to prevent
inadvertent operation. Supplied with spanner. Suitable for professional users.
Declaration of Conformity We, the sole importer into the UK, declare that the product listed here is in conformity
with the following EEC standards and directives. The construction file for this product is held by the Manufacturer and may be
inspected by a national authority upon request to contacting Jack Sealey Ltd
For Jack Sealey Ltd. Sole importer into the UK
of Sealey
Power Tools.
Air Die Grinder Model: SA653
98/37/EC Machinery Directive
93/68/EEC Marking Directive
1st July 2000
Signed by Mark Sweetman
4.1 FITTING grinding bit
pWARNING! Disconnect from the air supply before changing grinding bit.
4.1.1. Check that grinding bits are not damaged in any way such as cracks, deformations
or splinters etc. Damaged bits must not be used.
4.1.2. Use wrenches enclosed to loosen collet locking collar. Insert grinding bit and re-lock collar.

Other Sealey Grinder manuals

Sealey bg200/99.V3 User manual

Sealey

Sealey bg200/99.V3 User manual

Sealey CP5418V User manual

Sealey

Sealey CP5418V User manual

Sealey BG200XL User manual

Sealey

Sealey BG200XL User manual

Sealey SA14 User manual

Sealey

Sealey SA14 User manual

Sealey Siegen tools S0530.V2 User manual

Sealey

Sealey Siegen tools S0530.V2 User manual

Sealey SA44.V3 User manual

Sealey

Sealey SA44.V3 User manual

Sealey SG101.V2 User manual

Sealey

Sealey SG101.V2 User manual

Sealey POWER TOOLS SA673 User manual

Sealey

Sealey POWER TOOLS SA673 User manual

Sealey SA151.V2 User manual

Sealey

Sealey SA151.V2 User manual

Sealey SG180D User manual

Sealey

Sealey SG180D User manual

Sealey SG100 User manual

Sealey

Sealey SG100 User manual

Sealey BG150XL/96 User manual

Sealey

Sealey BG150XL/96 User manual

Sealey SA654.V3 User manual

Sealey

Sealey SA654.V3 User manual

Sealey SA151.V2 User manual

Sealey

Sealey SA151.V2 User manual

Sealey SA671.V4 User manual

Sealey

Sealey SA671.V4 User manual

Sealey SA673 User manual

Sealey

Sealey SA673 User manual

Sealey SM53 User manual

Sealey

Sealey SM53 User manual

Sealey BG150XL/96.V2 User manual

Sealey

Sealey BG150XL/96.V2 User manual

Sealey SA655 User manual

Sealey

Sealey SA655 User manual

Sealey GENERATION Series User manual

Sealey

Sealey GENERATION Series User manual

Sealey POWER TOOLS SA652.V3 User manual

Sealey

Sealey POWER TOOLS SA652.V3 User manual

Sealey SG115E User manual

Sealey

Sealey SG115E User manual

Sealey GSA67.V2 User manual

Sealey

Sealey GSA67.V2 User manual

Sealey SG101.V2 User manual

Sealey

Sealey SG101.V2 User manual

Popular Grinder manuals by other brands

Cuisinart ECH-4 Series user manual

Cuisinart

Cuisinart ECH-4 Series user manual

Hilti AG 5D-22 Original Operating Instruction

Hilti

Hilti AG 5D-22 Original Operating Instruction

Hitachi G 13SQ Handling instructions

Hitachi

Hitachi G 13SQ Handling instructions

Elu WS22 instruction manual

Elu

Elu WS22 instruction manual

Lux Tools WS-125 Original instructions

Lux Tools

Lux Tools WS-125 Original instructions

Drill Master 60625 Owner's manual & safety instructions

Drill Master

Drill Master 60625 Owner's manual & safety instructions

Sthor 78127 instruction manual

Sthor

Sthor 78127 instruction manual

HIKOKI G 13SN2 Handling instructions

HIKOKI

HIKOKI G 13SN2 Handling instructions

Matrix AG 900-125-1 Translation of the original instructions

Matrix

Matrix AG 900-125-1 Translation of the original instructions

Clarke CAT133 Operating & maintenance instructions

Clarke

Clarke CAT133 Operating & maintenance instructions

Bosch GSS 140 A Professional Original instructions

Bosch

Bosch GSS 140 A Professional Original instructions

Makita GB602 instruction manual

Makita

Makita GB602 instruction manual

Zoofari KS-8949 operating instructions

Zoofari

Zoofari KS-8949 operating instructions

stayer AGR L20 Original instruction manual

stayer

stayer AGR L20 Original instruction manual

Maktec MT951 instruction manual

Maktec

Maktec MT951 instruction manual

Stomer SAG-2000 user manual

Stomer

Stomer SAG-2000 user manual

Weston 33-1301-W manual

Weston

Weston 33-1301-W manual

Terratek TBG150 user manual

Terratek

Terratek TBG150 user manual

manuals.online logo
manuals.online logoBrands
  • About & Mission
  • Contact us
  • Privacy Policy
  • Terms and Conditions

Copyright 2025 Manuals.Online. All Rights Reserved.