1.3.8. DO NOT pull the plug from the socket by the cable.
1.3.9. DO NOT use worn or damage cables, plugs or connectors. Immediately have any faulty item
repaired or replaced by a qualified electrician. When an ASTA/BS approved UK 3 pin plug is
damaged, cut the cable just above the plug and dispose of the plug safely.
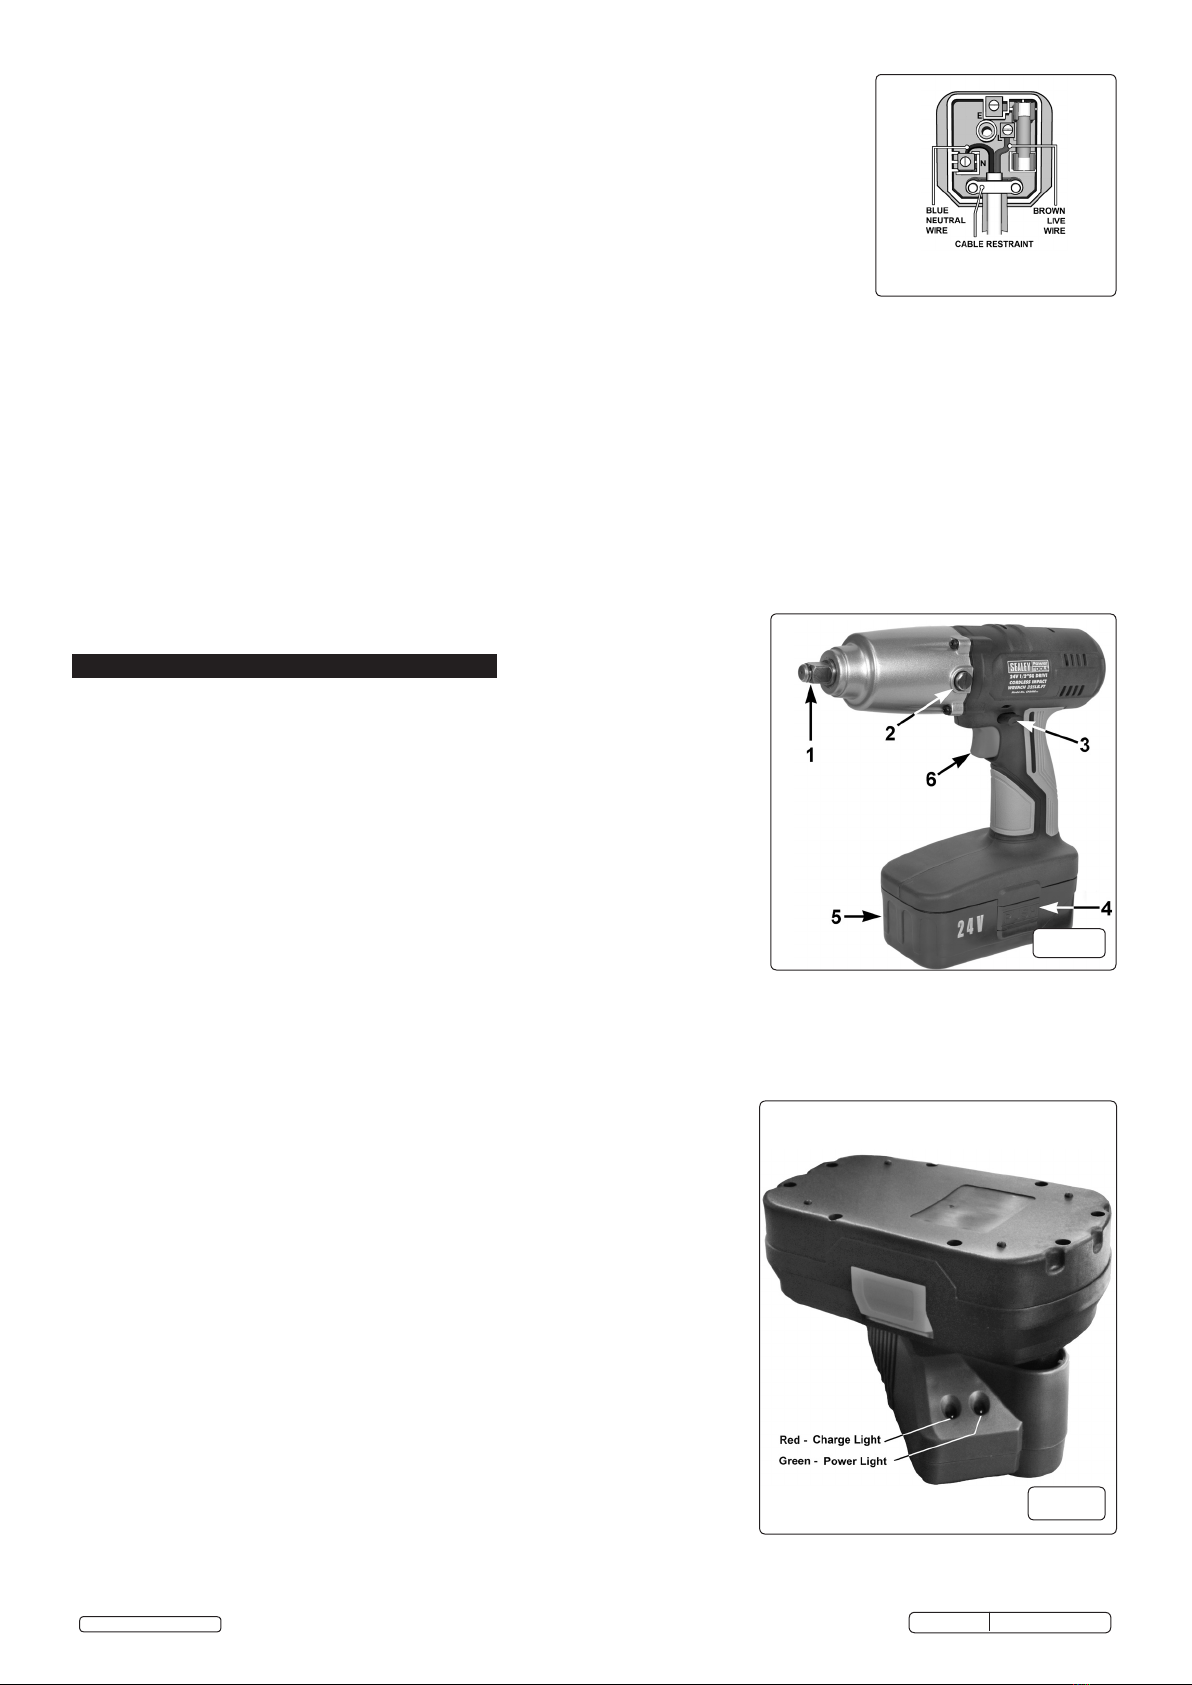
Ensure that the double insulated charger is correctly connected via a three-pin plug, as follows:
a) Connect the Brown live wire to live terminal ‘L’.
b) Connect the Blue neutral wire to the neutral terminal ‘N’.
c) After wiring, check that there are no bare wires, that all wires have been correctly connected,
that the cable outer insulation extends past the cable clamp and that the clamp is tight. Note that
the earth pin ‘E’ remains unconnected.
1.3.10.If an extension reel is used it should be fully unwound before connection. A reel with an RCD fitted is
preferred since any appliance plugged into it will be protected. The cable core section is important and
should be at least 1.5mm², but to be absolutely sure that the capacity of the reel is suitable for this
product and for others which may be used in the other output sockets, we recommend the use of 2.5mm² section cable. If extension reel is
to be used outdoors, ensure it is marked for outdoor use.
1.4. BATTERY CHARGER SAFETY INSTRUCTIONS
WARNING! DO NOT attempt to charge any battery other than that supplied for the wrench. Other types of batteries may explode!
All mains electrical supply safety features must be followed as described in 1.3 above.
Disconnect the charger from the mains supply when not in use.
DO NOT charge battery if room temperature is below 10°C (50°F) or above 40°C (104°F).
DO NOT expose the charger to damp or wet conditions.
DO NOT pull or carry the charger by the power lead.
DO NOT operate the charger if it has been dropped, or has received a sharp knock, or is damaged. Take the charger to an authorised
agent for repair or obtain a replacement.
DO NOT dismantle the charger as this may cause damage and/or personal injury and will invalidate the warranty.
DO NOT insert foreign objects or material into the hole reserved for the battery pack.
DO NOT recharge a second battery pack immediately after charging the first. Consecutive charging will overheat the charger. Allow the
unit to cool for 15 minutes before charging the next pack.
DO NOT attempt to connect two chargers together.
Store the charger in the same manner as the battery pack in 1.2.
RECOMMENDED
FUSE RATING: 5AMP
fig.1
2. INTRODUCTION & SPECIFICATION
Powerful, compact, cordless impact wrench removes wheel nuts on the roadside with no com-
pressor or mains source required. Produces torque in excess of 441Nm (325lb.ft). Featuring a
variable speed switch for added control. Forward and reverse control integrated into housing for
ease of use. Superbly balanced tool with side handle and vibration reducing grip. Suitable for
workshop, bodyshop and tyre shop applications with no trailing cables causing hazards. Includes
24V 2Ah Ni-MH battery pack and 80 minute mains charger.
Model No: ................................ CP2400MH
Battery: ................................24V 2Ah Ni-MH
Drive: ..........................1/2"SqNo Load Speed:
No load speed: ..............................0-2000rpm
Impact Rate: ............................... 0-2600bpm
Maximum Torque: ........................441Nm(325lb.ft)
Replacement Battery:......................CP2400MHBP
Weight: ........................................3.6kg
IMPORTANT WARRANTY INFORMATION:
The battery pack fitted to this cordless tool is considered to be a consumable item and its ability to accept charge will reduce over
time. We will guarantee it against mechanical and electrical defect for a period of one year - this does not cover fair wear and tear. If the
battery is not properly charged before first use, or regularly conditioned, its capacity will diminish. Under these circumstances we will
not replace the battery pack even if it is less than one year old. Remove battery pack from case and charge as below:
fig.2
3.1. CHARGING THE BATTERY PACK.
3.1.1.
Remove the battery pack (fig.1.5) from the wrench, by depressing the two side
release clips (fig.1.4).
WARNING! DO NOT touch metal terminals.
3.1.2. Place wrench in carry case and remove the battery charger.
3.1.3. Connect the charger to the mains electricity supply. The green LED will light.
3.1.4. The battery pack and charger have the positive (+) and negative (-) terminals
marked. Align the correct terminals and insert the battery into slot (fig.2).
NOTE: The battery pack is designed so that it will only enter the charger unit the correct
way. When placed in the charger, a very slight downward pressure will seat the
pack firmly into the power terminals.
3.1.5. When inserted correctly, the red charge light will flash whilst the battery is charging.
3.1.6. When the charge is complete the red LED will show a steady aspect along with the
green LED. The battery pack is now ready for use.
NOTE: When new, the battery pack will have been shipped in a low charge state. It will
take longer to charge initially, and several subsequent charges may also take a
little longer than when the battery pack reaches its optimum performance.
Afterwards, normal charging time is approximately 80minutes
3.1.7. After removing the battery, disconnect the charger from the mains supply and store
in the carry case.
© Jack Sealey Limited Original Language Version CP2400MH Issue1 - 01/08/16


