CAUTION: ENSURE ADEQUATE VENTILATION. DO NOT SPRAY NEAR
NAKED FLAMES.
KEEP AIR BRUSH
PARALLEL TO SURFACE
Fig. 2
Fig. 3
SURFACE
START
MOTION
HERE
PRESS
TRIGGER
HERE
RELEASE
TRIGGER
HERE
FOLLOW
THROUGH
MOTION
KEEP MOTION
STEADY AND SPRAY
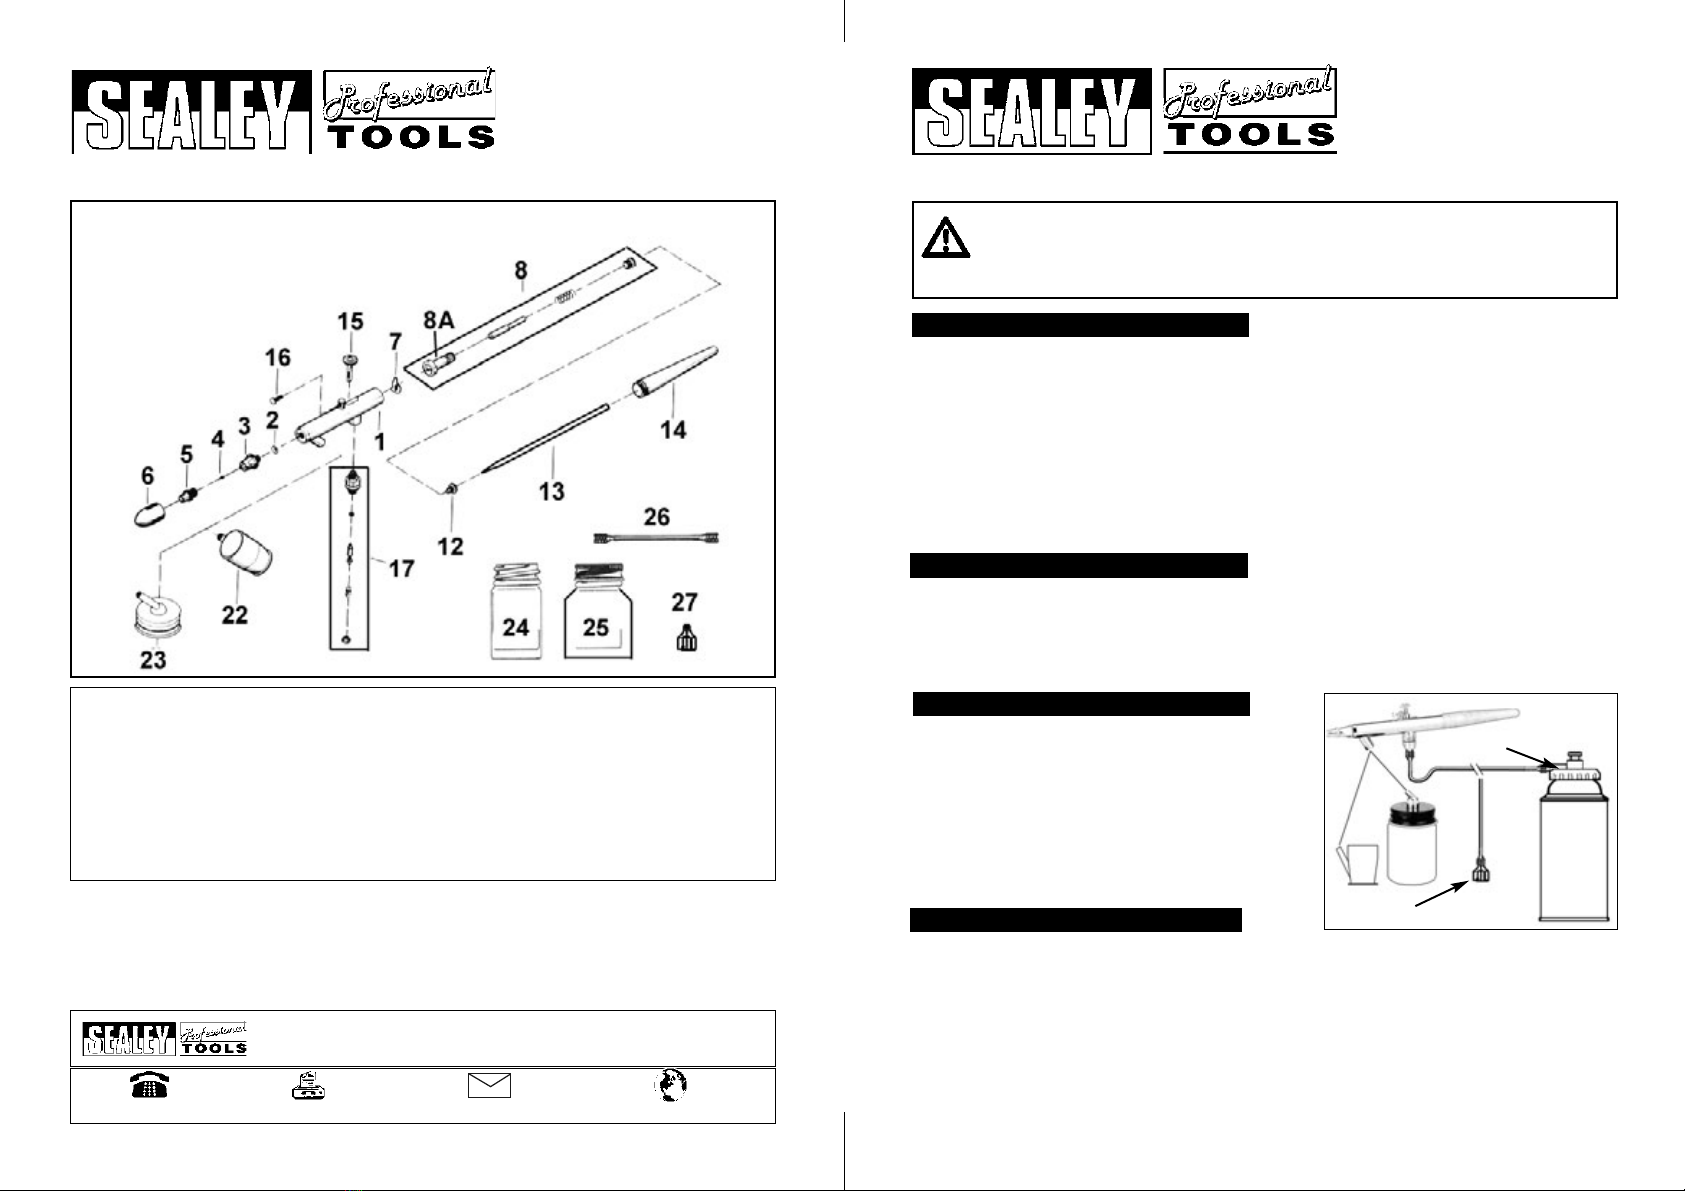
Note: Numbers in brackets refer to item numbers on the parts diagram.
Note: To achieve the best results when spraying it is always best to start with the air brush clean and totally free
from old paint deposits, dirt etc. Therefore the air brush should be thoroughly cleaned immediately
after each operation.
5.1. Remove the empty paint container, wipe the inside thoroughly, including the lid.
5.2. Fill the container half full of a compatible solvent and re-attach to the air brush.
5.3. Spray onto newspaper, this will clean the needle, nozzle assembly and fixing nut. Hold a soft cloth over
the fixing nut and spray again, this will force air and the compatible solvent back through the air brush and
clean the internal moving parts. Should the air brush become clogged with paint, dismantle the airbrush and
clean the component parts as follows:
5.3.1. Turn off the air and disconnect the air hose from the airbrush.
pWARNING! The fluid needle has a long sharp point and great care should be exercised when handling it.
5.3.2. Unscrew the tail cover (14), unscrew the needle securing nut (8A) and carefully withdraw the needle and
needle guide assembly (8).
5.3.3. Unscrew the needle fixing nut (5) and the nozzle assembly (3). Note: Should the nozzle assembly require
soaking in a compatible solvent, remove the O-ring (2) to prevent damage.
5.3.4. Clean and dry the component parts taking great care with the needle to ensure it does not get bent.
5.3.5. Should the needle need to be replaced, unscrew the needle securing screw (12), withdraw the needle and
replace with a new one (Sealey Part No: AB932/13).
5. CLEANING & MAINTENANCE
THE PROBLEM
Paint Runs.
Grainy Spray.
Paint Splattering.
Curved Stroke.
Paint Spitting.
Restricted Spray.
Bubbles in Paint Jar
Erratic Spray
6. TROUBLESHOOTING
THE CAUSE
Too much paint applied.
Moving air brush too slowly along workpiece.
Not releasing trigger at the end of stroke.
Paint too thick.
Dried paint deposits on tip, needle or regulator.
Needle snapping back into tip.
Air brush arcing too close to object.
Needle snapping back into tip.
Regulator screwed in too tight.
Paint tube in pot clogged.
Regulator open too loose.
Paint tube in pot clogged.
Fluid needle bent or paint deposits on needle.
THE SOLUTION
Hold brush further away from object.
Press trigger lightly.
Move at a constant speed.
Release trigger at end of stroke.
Thin paint.
Clean air brush thoroughly,
(as described above).
Release needle gently.
Keep air brush parallel to the object,
unless curved stroke is desired.
Release needle gently.
Loosen regulator.
Clean as described above.
Tighten regulator.
Clean as described above.
Replace needle or clean as
required.
01284 757500 sales@sealey.co.uk
01284 703534
NOTE: It is our policy to continually improve products and as such we reserve the right to alter data, specifications and component
parts without prior notice.
IMPORTANT: No liability is accepted for incorrect use of this equipment.
WARRANTY: Guarantee is 12 months from purchase date. proof of which will be required for any claim.
INFORMATION: For a copy of our latest catalogue and promotions, call us on 01284 757525 and leave your full name and address
including your postcode.
Sole UK Distributor, Sealey Group, Bury St. Edmunds, Suffolk.
email Web
www.sealey.co.uk
4.5. Make any necessary spray adjustments. The paint spray pattern can be adjusted by turning the fixing nut
(5). The nut is fully closed when it has been turned clockwise to the stop point. The volume of paint
dispensed can be adjusted by varying the backward movement of the trigger (15). This can be pre-set
using the micro adjust screw (16).
4.6. Holding the air brush about 6 inches from the surface press the trigger (15) down. Using short strokes, move
the air brush at a steady rate, parallel to the surface, fig.2.
4.7. Apply a light coat of paint, let it dry, then apply another coat. Continue with this method until the desired
coverage is reached. DO NOT spray too heavily.
4.8. Once you are satisfied with the results of your test pieces and have made any necessary adjustments
to the air brush, continue with the task to be performed. Best results are achieved with a good
constant motion. Start the motion before pressing the trigger, and follow a through motion after
releasing the trigger, fig.3.
AB932/K - 1 - 29/04/04 AB932/K - 1 - 29/04/04
5.5. Re-assemble the air brush as follows:
5.5.1. Refit the O-ring removed in paragraph 4.3.3 and screw the nozzle assembly (3) onto the frame (1).
5.5.2. Refit the needle securing nut (8A).
5.5.3. Position the trigger (15) inside the slot in the frame (1) such that the base sits on top of the air valve.
5.5.4. Insert the spacer (7) such that the convex face of the upper section rests against the trigger (15).
5.5.5. Insert the needle (13) into the needle guide assembly (8) and secure by tightening the needle fixing screw (12).
5.5.6. Carefully insert the needle centrally into the frame (1) and secure by tightening the needle securing nut (8A).
5.5.7. Refit the tail cover (14).