Sealey FGE01 User manual

2.5 X 4.5 X 2.5M FOLDABLE STEEL GARAGE
EXTENSION
MODEL NO: FGE01
Thank you for purchasing a Sealey product. Manufactured to a high standard, this product will, if used according to these
instructions, and properly maintained, give you years of trouble free performance.
IMPORTANT: PLEASE READ THESE INSTRUCTIONS CAREFULLY. NOTE THE SAFE OPERATIONAL REQUIREMENTS, WARNINGS & CAUTIONS. USE
THE PRODUCT CORRECTLY AND WITH CARE FOR THE PURPOSE FOR WHICH IT IS INTENDED. FAILURE TO DO SO MAY CAUSE DAMAGE AND/OR
PERSONAL INJURY AND WILL INVALIDATE THE WARRANTY. KEEP THESE INSTRUCTIONS SAFE FOR FUTURE USE.
1. SAFETY
9Read all safety instructions to reduce the risk of injury or death.
9This is a temporary structure and is not recommended as a permanent structure.
9Choose your shelter’s location carefully. Check for overhead utility lines, branches, etc. DO NOT install near roofs or other structures
thatmayshedsnow,iceorexcessiverun-oontoyourshelter.Keepawayfromelectricalwires!
9Install your shelter on a level surface.
9Check municipal by-laws prior to setting up the product.
9Have an overview of all parts before attempting installation. Make sure all components are available.
8DO NOT use this product in environments for which it is not intended (i.e. extreme cold, high winds, extreme heat, heavy rainfall,
etc).
9Always wear safety glasses when assembling this product. Wear gloves when working with tubing to prevent cuts or abrasions.
9Anchors must be used with all shelters. Covers should NOT be installed on any product until it has been properly anchored to the
ground.
9Proper anchoring and keeping cover tight and free of snow and debris, is the responsibility of the consumer.
9Damages caused by improper anchoring are not covered under warranty.
9 Keepallameandheatsourcesawayfromtheshelterfabric.Thefabricwillburnifleftincontinuouscontactwithaamesource.
8DO NOTuseopenamesorcookingorheatingdevicesinsideorincloseproximitytotheproduct,includingalltypesofstoves,gas
heaters, gas lanterns, citronella torches, mosquito coils, etc.
8DO NOTcook,smoke,refueloruseanyopenamedevicesinoraroundtheshelter.
8DO NOTstoreammableliquids(gasoline,kerosene,propane,etc.)intheshelter.
8DO NOT operate gas powered vehicles/equipment in or around the shelter.
9 Keepopenamesasafedistanceawayfromtheshelter.
8DO NOT use hard-edged tools or instruments, such as rakes or shovels, to remove snow. These can cause punctures to the cover.
8DO NOT start the engine of any vehicle or machine inside a closed shelter. Ensure that there is adequate ventilation for starting
engines and for any work with paints, cleaners, etc.
9This shelter is NOT designed to support heavy snow or ice loads. Snow or ice accumulation may cause your shelter to collapse. To
avoidoverload,brushsnowandiceotherooftopwithabroomormop.
9To prevent collapse, damage to property, personal injury and/or death, NEVER clear the roof of snow or debris from inside the
shelter.
9 Keepchildrenawayduringassembly.Thisproductcontainssmallpartswhichcanbeswallowedbychildren.
8DO NOT attempt to assemble the product if any parts are missing.
9At least 4 people are needed to complete the assembly as some of the steps require heavy lifting.
WARNING! DO NOT leave the shed unattended during assembly. Otherwise, personal injury or damage to the shed may occur
2. INTRODUCTION
Foldable garage extension, perfect for allowing temporary use of a driveway as a garage. Supplied with a powder coated steel frame. 195g/m2
PE Tarp with UV protection and completely waterproof.
3. SPECIFICATION
Model No:...................................................................FGE01
Door Size: .................................. 2500mm (W) x 2000mm (H)
Material: ......................................195g/m2 PE Tarp and Steel
Overall Size (W x D x H): ..............................2.5 x 4.5 x 2.5m
FGE01 Issue 1 25/11/2020
Original Language Version
© Jack Sealey Limited
Refer to
instructions
Wear eye
protection
Wear protective
gloves
Wear safety
footwear

4. CONTENTS
5. ASSEMBLY
5.1. Place all parts from the packaging box in a cleared area and arrange them on the ground.
5.2. Remove all packaging materials and place them back in the box.
8DO NOT dispose of the packaging materials until assembly is complete.
5.3. Check for completeness and transport damages.
WARNING! DO NOT place the product under trees from which hard fruit such as apples, walnuts or heavy pine cones, etc., may
fall. The shed’s cover only protects against normal leaves and light debris, whereas large branches or other falling items may
puncture or tear the cover material.
FGE01 Issue 1 25/11/2020
Original Language Version
© Jack Sealey Limited

5.4. STEP 1 (FIG 2)
5.4.1. Take the riser sections out of the box as shown below.
5.4.2. Screwallthecasters(g.2.18)tothebottomsofthelegsasperthebelowdiagram.
g.1
g.2
FGE01 Issue 1 25/11/2020
Original Language Version
© Jack Sealey Limited
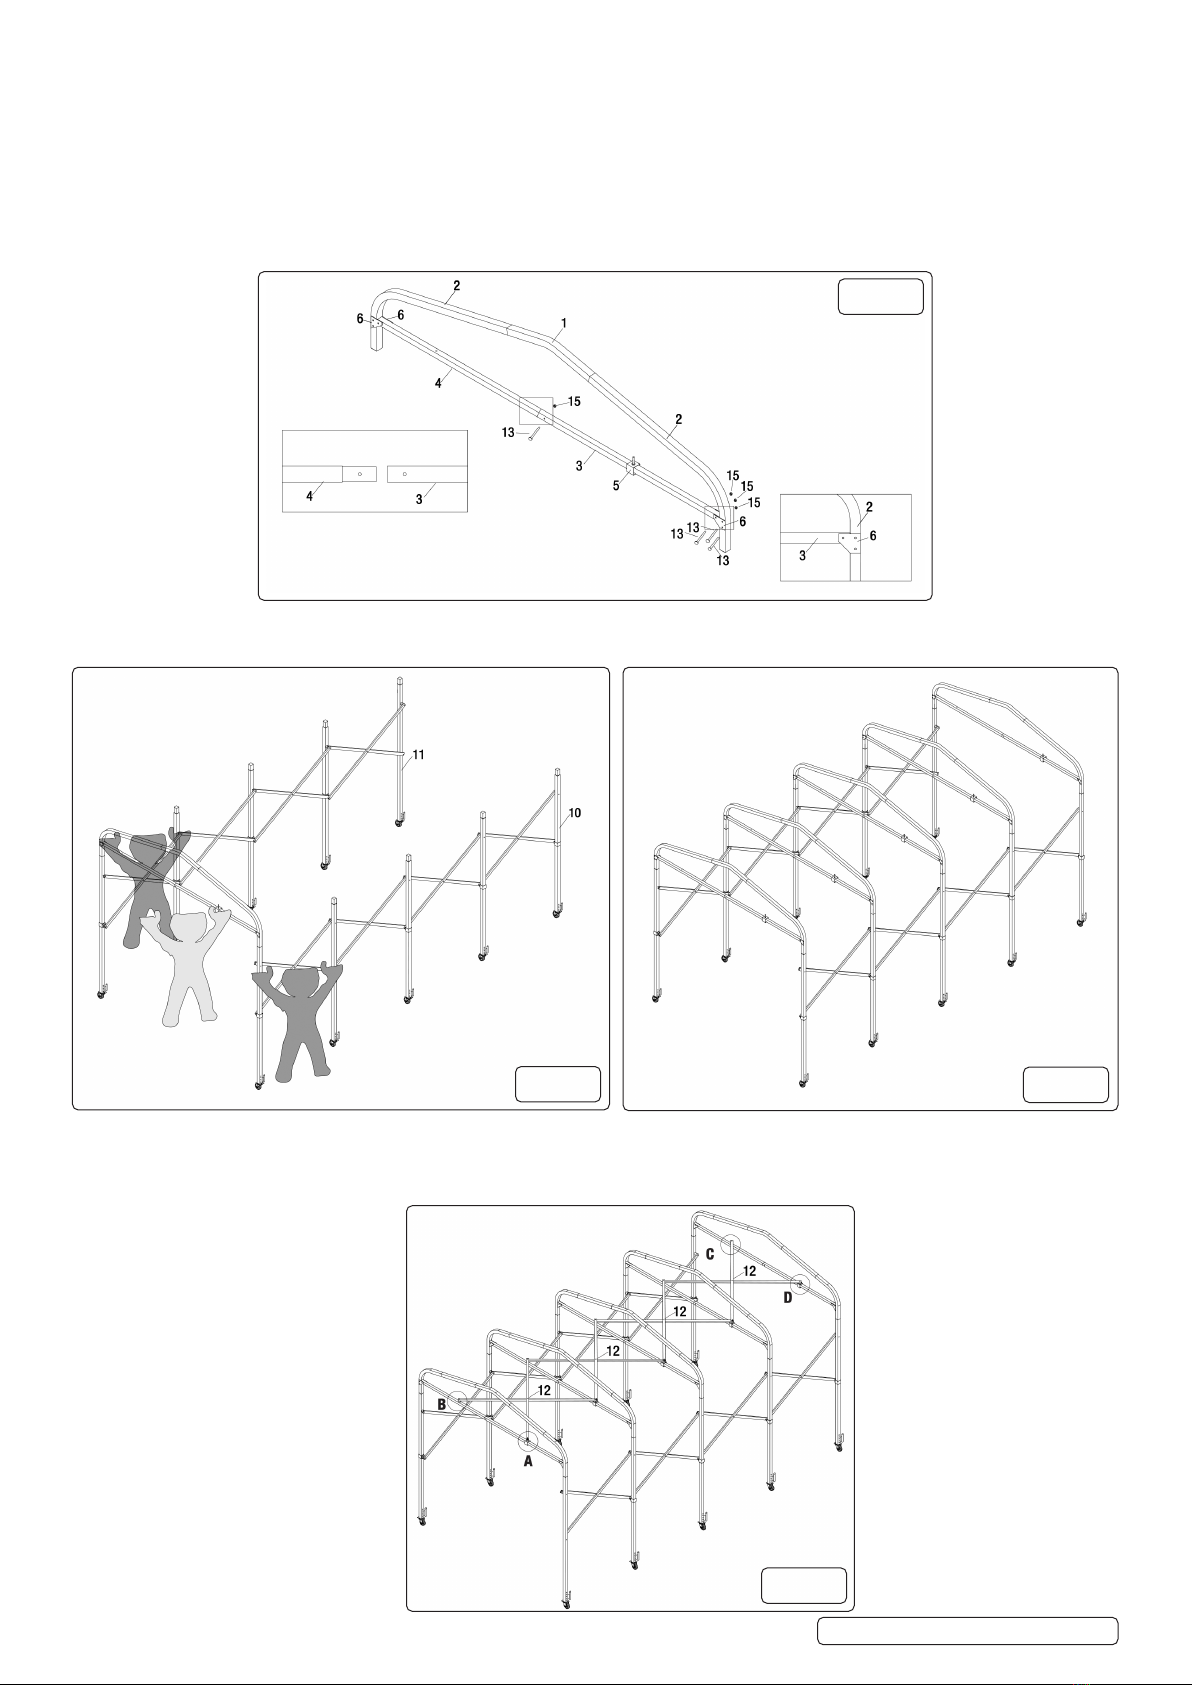
5.5. STEP 2 (FIG 3)
5.5.1. Inserttube(g.3.4)intotube(g.3.3)andsecureitwithBoltM6x55(g.3.13)andM6Nut(g.3.15),thenslidePart(g.3.5)ontotube
(g.3.3).
5.5.2. Connect1pcofPeakCentreTube(g.3.1)and2pcsofRoofTube(g.3.2)asperthebelowdiagram.
5.5.3. ThenuseConnectingPlate(g.3.6)connectendoftube(g.3.3)andonesideoftube(g.3.2)togetherusingBoltM6x55(g.3.13)and
M6Nut(g.3.15).
5.5.4. Inthesamewayconnecttheendoftube(g.3.4)andtheothersideoftube(g.3.2)togetherusingBoltM6x55(g.3.13)andM6Nut
(g.3.15).
5.5.5. Repeatabove3stepstonishtheother4sections.
5.6. STEP 3 (FIG.4 & .5)
5.6.1. Followthebelowdiagrams(g.4&.5),assemblethe5groupsofroofstructureontothetwosetsofRiserComponents(g.4.10&11).
5.7. STEP 4 (FIG.6 & 7)
5.7.1. NowassemblepipeJackingComponent(g.6.12)ontopofparts3&4BracebyM8x70(g.6.14)andM8Nut(g.6.16).
5.7.2. Pleaserefertoattacheddiagramofg.7,A,B,C,D.MakesureAxleTube(g.6.9)isintherightplace,eitherbelowpart12,orabove
part 12 to make sure the components are spaced evenly.
g.3
g.4 g.5
g.6
FGE01 Issue 1 25/11/2020
Original Language Version
© Jack Sealey Limited

5.8. STEP 5 (FIG.8)
5.8.1. Movethewheelsclosetothecentretotakethetensionoutofthewholestructure,thenputthecover(g.8.19)ontothewholeframe,
and then pull the whole structure tight.
5.8.2. Walk around the whole structure, pull the cover tight, and then hook the cover into the suitable hole on the tube legs.
5.8.3. Pullthecovertightontotheframe.Usethe‘hookandlooptape’strapssewnonthecovertosecureit(g.9).
g.7
g.8
g.9
FGE01 Issue 1 25/11/2020
Original Language Version
© Jack Sealey Limited

5.9. STEP 6 (FIG.10)
5.9.1. Carefullymovetheassembleproducttothewallwhereyouwantittostay,thenuseAnchorageClip(g.9.8)andExpansionBolt
(g.10.17)xittothewall.
5.9.2. Thenyoucanlatchittothegroundusingthestakes(g.10.7).
6. MAINTENANCE
8DO NOT use bleach, alkaline or harsh detergents for cleaning. Doing so will damage the polyethylene material. Soap and warm
water are recommended.
g.10
Sealey Group, Kempson Way, Suffolk Business Park, Bury St Edmunds, Suffolk. IP32 7AR
01284 757500 01284 703534 sales@sealey.co.uk www.sealey.co.uk
ENVIRONMENT PROTECTION
Recycle unwanted materials instead of disposing of them as waste. All tools, accessories and packaging should be sorted, taken to
a recycling centre and disposed of in a manner which is compatible with the environment. When the product becomes completely
unserviceable and requires disposal, drain any fluids (if applicable) into approved containers and dispose of the product and fluids
according to local regulations.
Note: It is our policy to continually improve products and as such we reserve the right to alter data, specifications and component parts without prior
notice.
Important: No Liability is accepted for incorrect use of this product.
Warranty: Guarantee is 12 months from purchase date, proof of which is required for any claim.
FGE01 Issue 1 25/11/2020
Original Language Version
© Jack Sealey Limited
This manual suits for next models
1
Table of contents
Other Sealey Tent manuals


