Sealife Sea Dragon 1500 User manual

Sea Dragon 2000
Photo/Video/Dive Light
Item SL984
Sea Dragon 2100 S/F
Photo/Video/Dive Light
Item SL670
Sea Dragon 2500
Photo/Video/Dive Light
Item SL671
Sea Dragon 1500
Photo/Video/Dive Light
Item SL672

2
Contents:
I. Safety Warnings........................................................ 3-4
II. Check What You Got ................................................ 5-6
III. Product view with call-outs ..........................................7
IV. Charging and Loading the Battery.................................8
V. Operating the light .......................................................9
VI. Battery Status Indicator.................................................9
VII. Maintaining a waterproof seal (Before your dive).......10
VIII. Care and maintenance (After your dive)................. 11
IX. Replacing the O-rings.................................................12
X. Attaching light to underwater camera .........................13
XI. Expanding your Flex-Connect™ Lighting System .. 14-17
XII. Recommended Camera Settings .................................18
XIII. Great pictures made easy ..................................... 19-22
XIV. Advanced Settings ................................................ 23-25
XV. Troubleshooting Guide ...............................................26
XVI. Specifications ....................................................... 27-28
XVII. Parts and Service.........................................................29
www.sealife-cameras.com/manuals
Español - Deutsch - Français - Italiano - Nederlands

3
I. Safety Warnings
Make sure you follow these important safety warnings to avoid the risk
of fire or injury.
Avoid using the light above water for prolonged periods of time. The
light is designed for underwater use and water is needed to displace
heat. The metal light head at full power will reach temperature of about
140F (60C) degrees within a few minutes, which may cause burning if
touched. A thermal sensor will automatically dim the light if internal
temperatures reaches 150F (65C) degrees. Immediately turn off light if
any parts of the light become hot to the touch.
If water has entered the light, immediately turn off power and follow
these instructions: Remove and dry the battery. DO NOT use the battery
once it has become wet. Wet batteries must be replaced. Allow battery to
dry and dispose it in accordance with local battery recycling regulations.
The battery chamber is waterproof. If no water has entered the LED light
head, the chamber may be cleaned without causing permanent damage
to the electronics. Rinse the waterproof battery compartment with fresh
water and allow the inside to dry. Replace the o-rings and apply lube.
Install new, fully-charged battery and test light. If light does not operate
properly, please contact your local SeaLife dealer or the SeaLife service
center in your country.
Do not use battery if the outer casing is cracked, separated, damaged
or has become wet. Dispose battery in accordance with local battery
recycling regulations.

4
I. Safety Warnings
Never expose battery to fire or intense heat. Do not expose light to
direct sunlight for prolonged periods of time.
Remove batteries from light before transporting, traveling or long periods
of storage. Remember to use the protective battery cover included when
the battery is not inside the light or charging tray to prevent accidental
short-circuiting the battery contacts.
Airlines impose strict safety regulations for handling and shipping
lithium ion batteries. Spare lithium batteries may not be packed in your
checked baggage but may be packed in your carry-on baggage. It is
important to pack spare batteries in such a way as to prevent metal
objects from touching the contacts and potentially short-circuiting the
battery. Always use protective battery cover included when the battery is
not inside the light or charging tray to prevent accidental short-circuiting
the battery contacts.
Only use the specified battery and battery charger approved by SeaLife.
Using any other battery or charger may cause fire, injury and permanently
damage the light.
Observe all SCUBA dive safety rules and control your buoyancy at all
times. Consult your dive instructor for dive safety questions.
Visit www.sealife-cameras.com for updates to this manual and
underwater photography tips.

5
II.Check What You Got
One of the following lights
Sea Dragon 1500F Light (SL672)
with Flex-Connect Grip (SL9905) and
Micro Tray (SL9902)
Sea Dragon 2000F Light (SL984)
with Flex-Connect Grip (SL9905) and
Single Tray (SL9903)
Sea Dragon 2100SF Light (SL670)
with Flex-Connect Grip (SL9905) and
Single Tray (SL9903)
Sea Dragon 2500F Light (SL671)
with Flex-Connect Grip (SL9905) and
Single Tray (SL9903)

(GoPro adapter NOT included when light is part
of a SeaLife Camera Set)

7
III. Product view with call-outs
Major parts
1 - Light head
2 - Metal cooling bezel
3 - Release buttons
4 - Flex-Connect grip
5 - Tray
6 - 1/4-20 Mounting screw
7 - Rubber friction pad
8 - Power button / Brightness adjust
9 - Battery status indicator
10 - Battery cap
11 - Pressure safety valve
12 - Flex-Connect swivel connector

8
IV. Charging and Loading the Battery
1) Charge battery (green light = fully charged)
2) Unscrew the battery cap
3) Insert fully charged battery.
Important: Make sure O-ring and sealing surfaces are perfectly
clean and undamaged.
4) Screw on battery cap. (Do not overtighten or use tools.)
Battery charged
when green

Power
Button
Battery
status
indicators
9
V. Operating the light
1) Push and hold the power
button for 1 second to
power ON the light.
2) Push the power button
to change between the
following light modes:
1500F, 2000F and 2500F
lights: 100% 50%
25% 100% etc.
2100SF light: 100% Flood
50% Flood 25%
Flood 100% Spot
100% Flood - etc.
3) Push and hold the mode button for 2 seconds to power OFF
the light.
VI. Battery Status Indicator
3 status lights indicate remaining battery power:
Status lights Battery power
3 solid 100%
2 solid 75%
1 solid 50%
1 blinking 25%
10
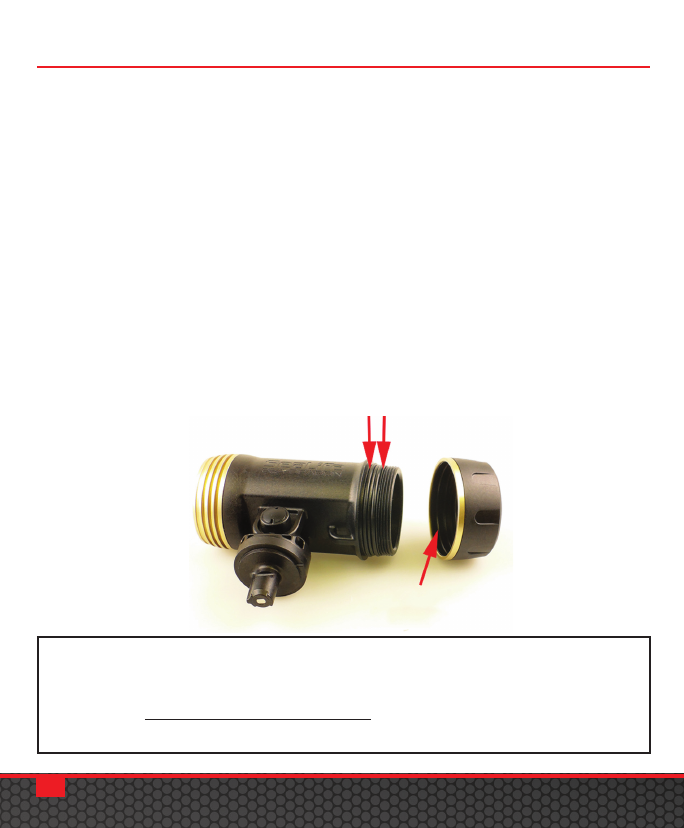
VII. Maintaining a waterproof seal (Before your dive)
1) The light uses two O-rings to maintain a waterproof seal.
2) Every time you open the battery cap make sure the O-rings and
sealing surfaces are clean, undamaged and lubricated.
3) Dampen a clean cotton cloth and wipe it around the o-ring and
o-ring contact surfaces to remove any hair, sand or debris.
4) Carefully inspect the o-ring for cuts, tears or other damage.
Replace o-rings if damaged.
5) Lube O-rings regularly. Apply a small amount of silicone lube
on your finger tip and wipe it around the O-rings. Wipe off
excess lubricant. The o-ring surface should have shiny, wet
appearance.
Important:
Replace O-rings every year if damaged or not. Visit your local SeaLife
dealer or www.sealife-cameras.com for information on ordering
spare o-rings.
O-rings
O-rings contact
surface
This manual suits for next models
7
Table of contents
Other Sealife Flashlight manuals


Popular Flashlight manuals by other brands


ADC
ADC Adlite Pro Use, Care and Maintenance

Fervi
Fervi 0338 Operation and maintenance manual

Milwaukee
Milwaukee M18 IL Original instructions
Spectronics
Spectronics Spectroline LeakTracker SPI-LT instruction manual

Larson Electronics
Larson Electronics SLEDB-110V-M instruction manual

vulta
vulta hurricane 262 lumen fg-e15 user manual