Sealife Sea Dragon SL673 User manual

1

1
Contents:
I. Introduction..................................................................2-3
II. Safety Warnings.............................................................4-5
III. Check What You Got.....................................................6-7
IV. Product View with Call-Outs.............................................8
V. Charging and Loading the Battery.....................................9
VI. Operating the Light.........................................................10
VII. Battery Status Indicator....................................................10
VIII. Maintaining a Waterproof Seal (Before Dive)..................11
IX. Care and Maintenance (After Dive).................................12
X. Replacing the O-rings.....................................................13
XI. Attaching Light to Underwater Camera...........................14
XII. Attaching Filter Straps...............................................15-17
XIII. Expanding your Flex-Connect™Lighting System........18-21
XIV. Recommended Camera Settings.....................................22
XV. Fluoro Diving Tips.....................................................23-24
XVI. Advanced Settings..........................................................25
XVII. Troubleshooting Guide...................................................26
XVIII. Specifications.................................................................27
XIX. Parts and Service............................................................28
www.sealife-cameras.com/manuals
Español - Deutsch - Français - Italiano - Nederlands

2
I. Introduction
Thank you for purchasing the Sea Dragon Fluoro-Dual Beam light.
Get ready to experience something truly amazing and different from
any diving you have every done before.
This light represents a two-year development collaboration with
FireDiveGear.com the leading authority in underwater fluorescence
diving. It features a unique combination of blue LED’s and integrat-
ed dichroic filter creating the optimal light wavelength for viewing
and photographing bio-fluorescence.
Simply put, bio-fluorescence is light created by and emitted by un-
derwater organisms when exposed to a certain wavelength of blue
light. The purpose of the blue light is only to “excite” the organism,
which results in the organism emitting its own light at a different
wavelength from the Fluoro-Dual Beam light. The organism is not
harmed in any way.
Bio-fluorescence is a natural phenomenon that occurs during day-
light, but the light emitted by the organism is overpowered by the
sun, so you don’t see it.

3
I. Introduction
The Fluoro-Dual Beam includes two yellow barrier filters essential
for viewing and photographing the fluorescence effect. You want to
see the light being emitted by the organism and not the blue light.
One filter fits over your dive mask to block blue light from reflecting
back into your eyes. The other filter attaches to any UW camera
with lens diameter <47mm. These are universal filters designed to fit
most masks and cameras. If you prefer, FireDiveGear.com can make
custom filters to fit your specific camera model or mask.
This manual includes information on operating and maintaining the
light. There is so much to learn about fluoro diving that we could
not cover it in this manual. To learn more about fluoro diving, we
recommend taking a specialty fluoro diving or fluoro photography
course written by Lynn Miner of FireDiveGear.Com, now offered by
the major dive certification agencies.
Happy Diving!
SeaLife Team

4
II. Safety Warnings
Observe all SCUBA dive safety rules and control your buoyancy at all
times. Because fluoro diving takes place at night, your ability to see your
surroundings will be greatly diminished when using a blue light in com-
bination with the mask filter. It is critically important that good buoyancy
practices are used and situational awareness is observed at all times.
Consult your dive instructor for dive safety questions.
Make sure you follow these important safety warnings to avoid the risk
of fire or injury.
Avoid using the light above water for prolonged periods of time. The
light is designed for underwater use and water is needed to displace heat.
The metal light head at full power will reach temperature of about 140F
(60C) degrees within a few minutes, which may cause burning if touched.
A thermal sensor will automatically dim the light if internal temperatures
reaches 150F (65C) degrees. Immediately turn off light if any parts of the
light become hot to the touch.
If water has entered the light, immediately turn off power and follow
these instructions: Remove and dry the battery. DO NOT use the battery
once it has become wet. Wet batteries must be replaced. Allow battery to
dry and dispose it in accordance with local battery recycling regulations.
The battery chamber is waterproof. If no water has entered the LED light
head, the chamber may be cleaned without causing permanent damage
to the electronics. Rinse the waterproof battery compartment with fresh
water and allow the inside to dry. Replace the o-rings and apply lube.
Install new, fully-charged battery and test light. If light does not operate
properly, please contact your local SeaLife dealer or the SeaLife service
center in your country.

5
II. Safety Warnings
Do not use battery if the outer casing is cracked, separated, damaged or
has become wet. Dispose battery in accordance with local battery recy-
cling regulations.
Never expose battery to fire or intense heat. Do not expose light to direct
sunlight for prolonged periods of time.
Remove batteries from light before transporting, traveling or long periods
of storage. Remember to use the protective battery cover included when
the battery is not inside the light or charging tray to prevent accidental
short-circuiting the battery contacts.
Airlines impose strict safety regulations for handling and shipping lithium
ion batteries. Spare lithium batteries may not be packed in your checked
baggage but may be packed in your carry-on baggage. It is important to
pack spare batteries in such a way as to prevent metal objects from touch-
ing the contacts and potentially short-circuiting the battery. Always use
protective battery cover included when the battery is not inside the light
or charging tray to prevent accidental short-circuiting the battery contacts.
Only use the specified battery and battery charger approved by SeaLife.
Using any other battery or charger may cause fire, injury and permanently
damage the light.
Visit www.sealife-cameras.com for updates to this manual and underwa-
ter photography tips.

6
Sea Dragon Fluoro-Dual Beam Light (SL673)
with Flex-Connect Grip (SL9905) and Single Tray (SL9903P)
1) Protective Cover for barrier filters (SL67304)
Used to store filters and to secure mask filter
to your dive mask strap.
2) Universal yellow barrier mask filter (SL67303)
with elastic strap and adjustment buckles
3) Universal yellow barrier camera filter 47mm (SL67302)
with elastic attachment cord
III. Check What You Got

7
Charging Tray (SL98311)
AC Power Adapter (SL98312)
Int’l Plug Inserts (SL98306)
Flex-Connect Ball Joint Adapter
(SL995) For connecting light to
standard 1” ball joint arm mounting
system. Not needed if using
Flex-Connect mounting system.
O-ring Remover (SL9808)
Li-ion Battery (SL9831)
w/ protective cover
Sea Dragon Case (SL942)
Spare O-rings (SL98303)
O-ring Lube (SL9807)
III. Check What You Got

8
IV. Product Views with Call-Outs
Major parts
1 - Light head
2 - Dichroic Filter
3 - Release buttons
4 - Flex-Connect grip
5 - Single Tray
6 - 1/4-20 Mounting screw
7 - Rubber friction pad
8 - Power button / Brightness adjust
9 - Battery status indicator
10 - Battery cap
11 - Pressure safety valve
12 - Flex-Connect swivel connector
Battery charged
when green
9
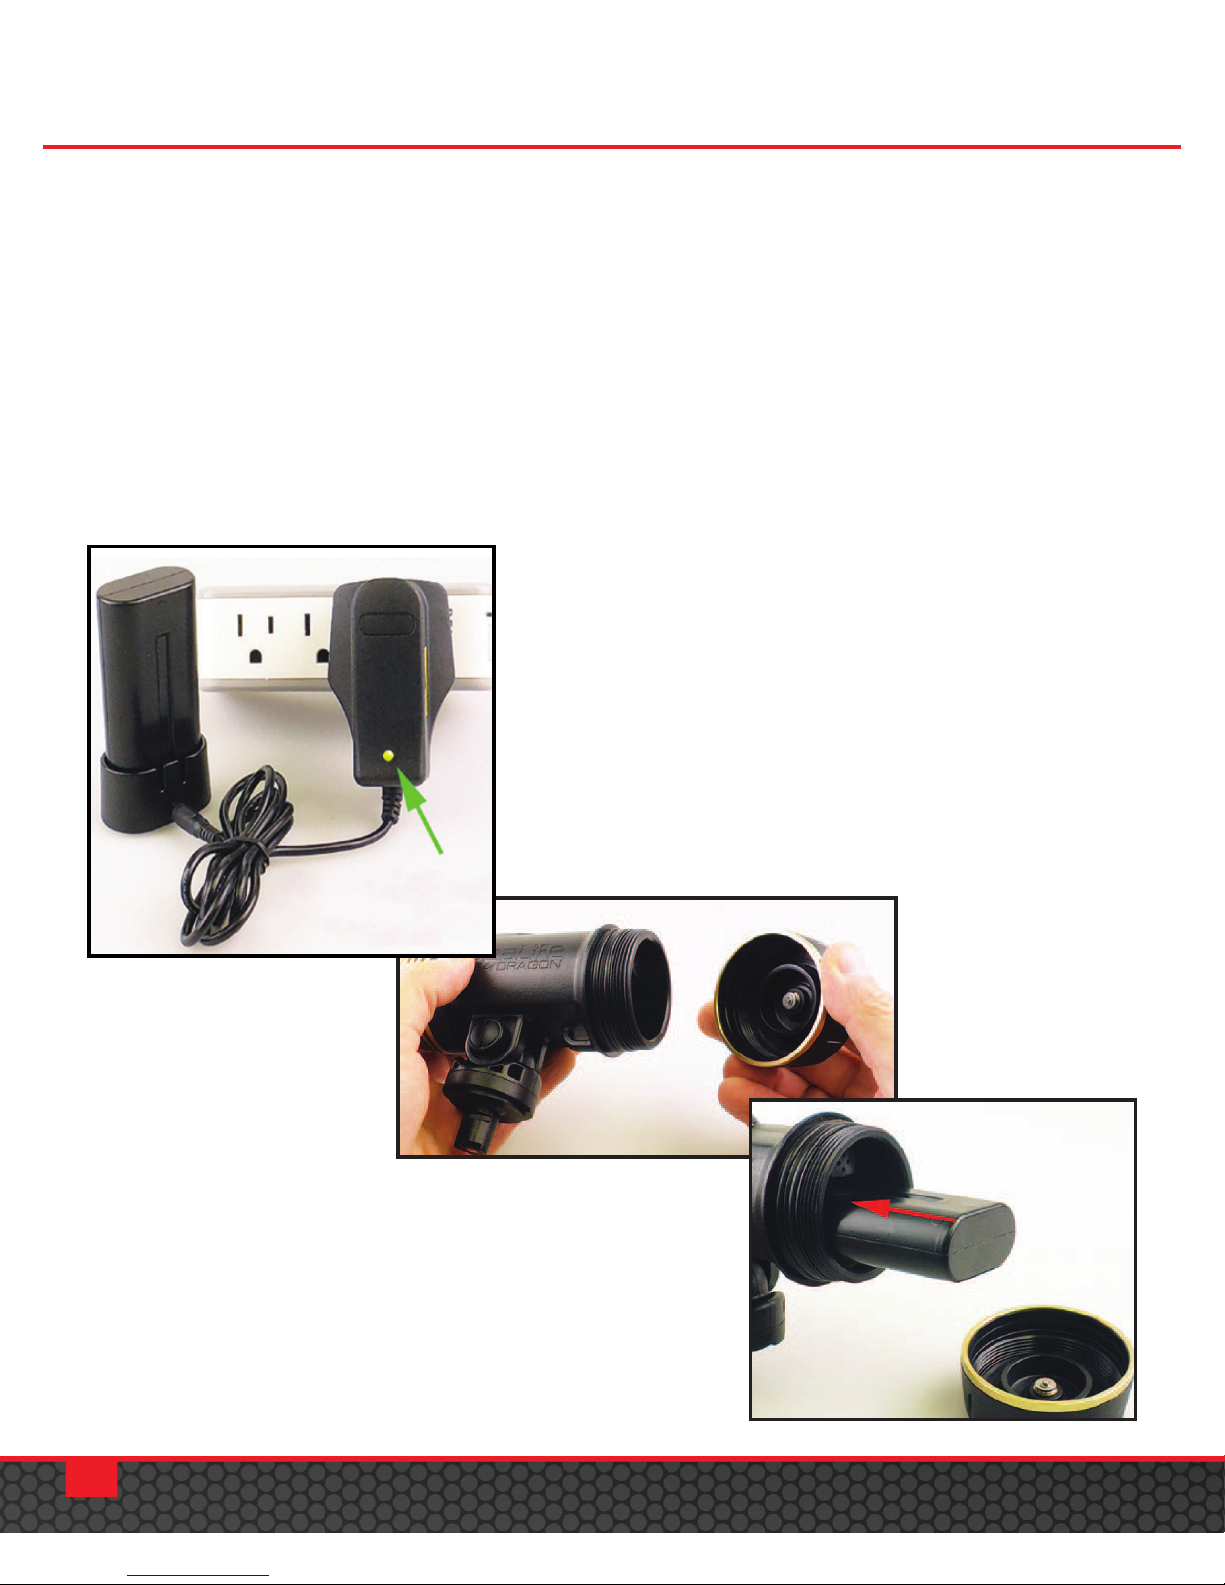
V. Charging and Loading the Battery
1) Charge battery (green light = fully charged)
2) Unscrew the battery cap
3) Insert fully charged battery.
Important: Make sure O-ring and sealing surfaces are perfectly
clean and undamaged.
4) Screw on battery cap. (Do not overtighten or use tools.)
Table of contents
Other Sealife Underwater Lighting manuals


Popular Underwater Lighting manuals by other brands

Keldan
Keldan VIDEO 18X 25000lm CRI82 operating instructions

Oase
Oase ProfiLux Garden LED RGB operating instructions

Oceanled
Oceanled DISCOVER D3 Installation & operation manual

NORBIT
NORBIT AQUA FCL600 quick guide

Keldan
Keldan VIDEO 8XR Ambient 18000lm operating instructions

Ikelite
Ikelite PCm - LED Light manual


