Seaside Casual 101 User manual

Page 1
REV A
Seaside Casual
WARRANTY QUESTIONS OR COMMENTS PLEASE CALL TOLL FREE AT 1-800-809-3114
WICKFORD PLANTER
& EXTENSION KIT
(100 & 101)
WICKFORD ESTATE
PLANTER & EXT. KIT
(110 & 111)
Seaside Casual Furniture | 11 Industrial Drive Coventry, RI 02816 | 800-809-3114 | sales@seasidecasual.com
1PLEASE READ INSTRUCTIONS COMPLETELY BEFORE BEGINNING.
Carefully remove contents from box. Make sure that all parts and hardware
are included using the Parts List below.
ASSEMBLY INSTRUCTIONS
#2 Phillips Head Screwdriver
Tools Required:
Side/End Panels
x 4
Planter
x 2
Extension
Floor
x 1 x 1
Planter Extension
Corner Legs
x 4 x 0
Planter Extension
Middle Legs
x 0 x 2
Stretcher
x 0 x 1
Part Code: 316-8X1-3/4PFDS
1-3/4 Phillips Head Screw
Actual Size
x 24 x 16
Planter Extension Planter Extension
Planter Extension
Page 2
REV A
8TIGHTEN ALL CONNECTIONS. AVOID OVER TIGHTENING; DOING SO
CAN CAUSE DAMAGE TO THE PRODUCT.
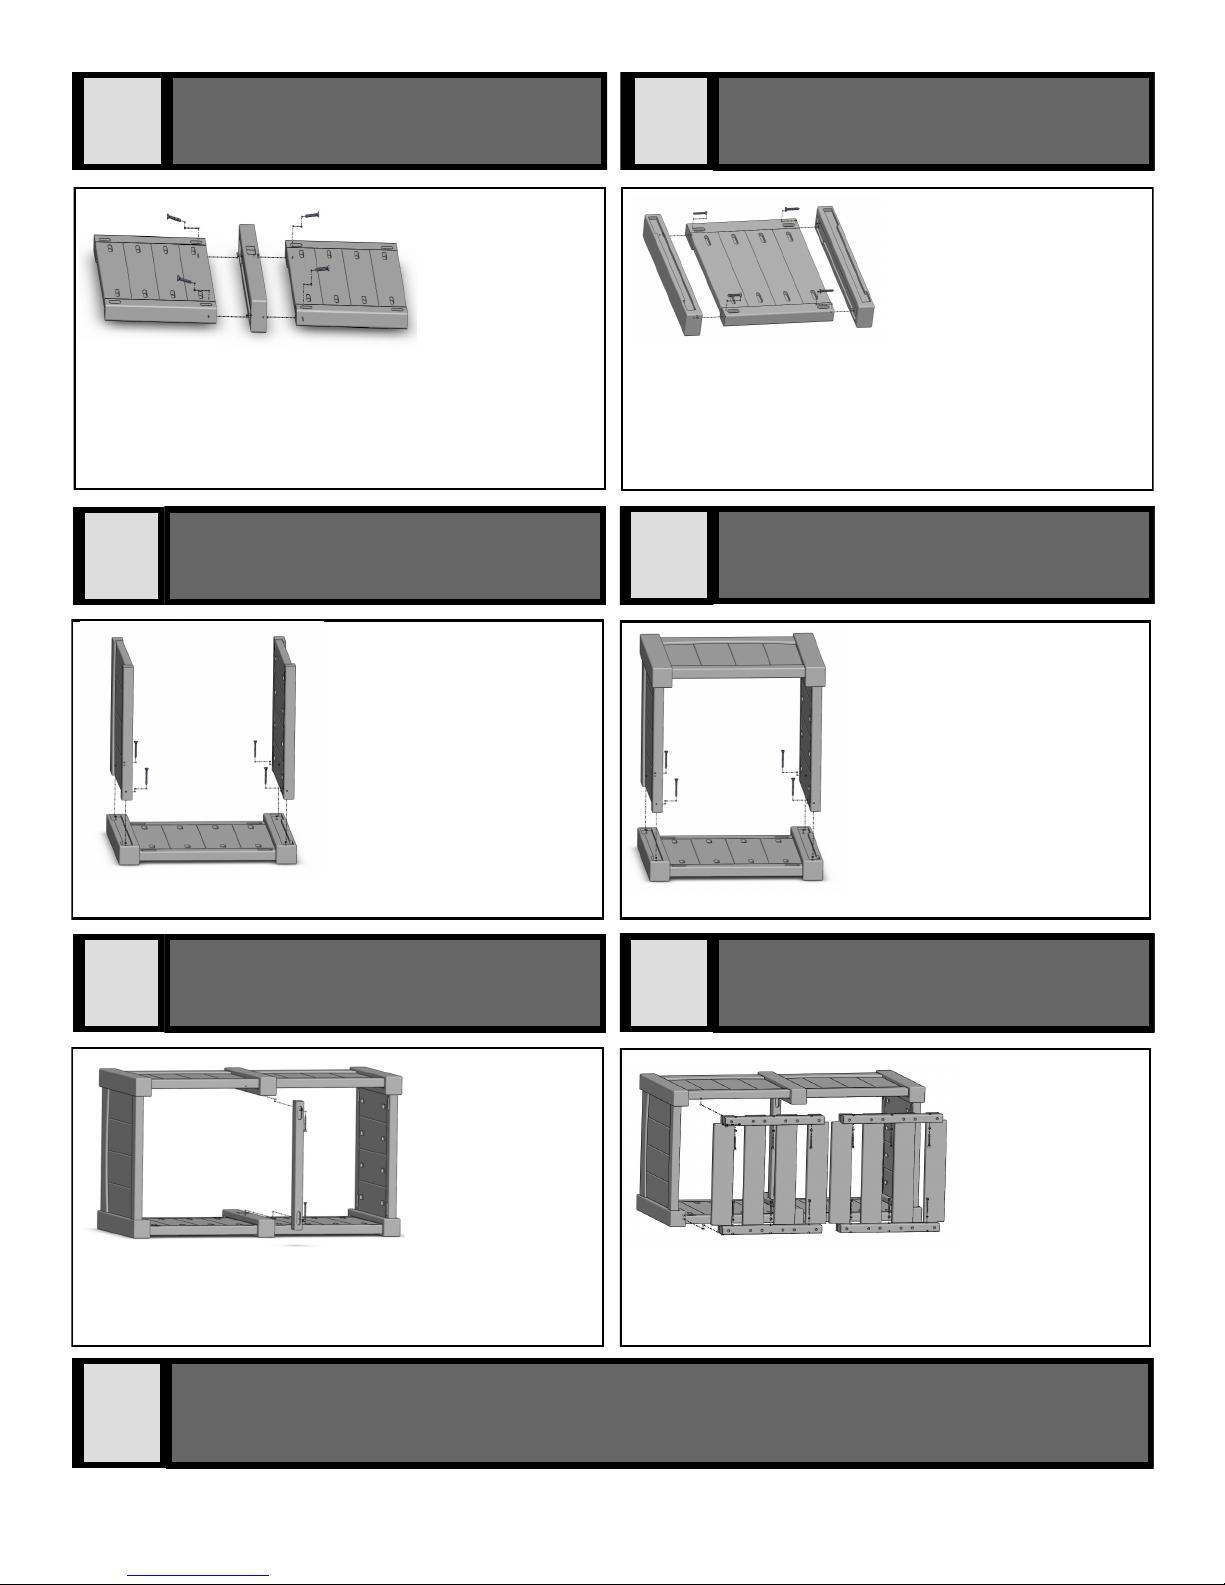
3ATTACH CORNER LEGS TO SIDE
PANELS
If you have purchased an
Extension Kit for your
Wickford Planter, use the
Extended Side Panels for
this step. Line-up pockets
in (2) Corner Legs with
Side Panel. Attach using (4) 1 3/4” Phillips Head
Screws thru pockets in upper and lower aprons. Repeat
process for other (2) Corner Legs.
4ATTACH REMAINING (2) END PAN-
ELS TO CORNER LEGS
2CREATE EXTENDED SIDE PANELS
(FOR EXTENSION KIT ONLY)
If you have pur-
chased an exten-
sion kit for your
Wickford Planter,
line up pockets in
Middle Legs with
Side Panels as shown. Attach using (4) 1 3/4” Phillips
Head Screw thru pockets in upper and lower aprons.
Repeat process for other Side Panel Assembly.
FINAL SIDE ASSEMBLY
5
Turn 3-panel assembly over
and align End Panels with
pockets on Legs of remaining
Side Assembly from step 3.
Secure using (4) 1 3/4” Phillips
Head Screws.
6ATTACH STRETCHER (FOR EXTEN-
SION KIT ONLY)
Place Stretcher into
pockets in Middle
Legs from the bot-
tom of the assem-
bly. Secure using
(2) 1 3/4” Phillips
Head Screws.
ATTACH FLOOR(S)
7
Slide Floor Assem-
bly into the bottom
of unit, aligning
floor cleats with
lower aprons.
Flush slats to one
side to ensure that
the planter is square. Secure using (6) 1 3/4” Phillips
Head Screws (or (8) for Estate size) per Floor Assembly.
Line up (2) remaining End
Panels with pockets on Legs
from one of the assemblies
from Step 3. Secure using (4)
1 3/4” Phillips Head Screws.
This manual suits for next models
3
Table of contents
Popular Lawn And Garden Equipment manuals by other brands

Remington Solar
Remington Solar Green House manual

Yardistry
Yardistry 12 WOOD PRIVACY WALL Installation and operating instructions

NewTechWood
NewTechWood Planter Box installation guide

Forever Redwood
Forever Redwood THE VERSAILLES ARBOR Assembly instructions

vita
vita VA42034 Assembly guide

Gloria
Gloria Gardenboy PLUS 400 W user manual


